Che tu sia un giocatore che cerca di catturare una partita con un punteggio elevato, un professionista che crea un tutorial o uno studente che registra una lezione a distanza, sapere come registrare lo schermo su Windows Non è più un lusso, è una necessità. Sono finiti i tempi in cui servivano costosi software di terze parti solo per registrare il desktop; Windows 10 e Windows 11 ora sono dotati di potenti funzionalità di registrazione native.
Dalla semplificata Xbox Game Bar allo Strumento di cattura aggiornato, fino a opzioni di livello professionale come OBS Studio, esistono diversi modi per registrare lo schermo del PC, ottenendo video e audio di alta qualità. In questa guida, ti illustreremo i metodi migliori per registrare lo schermo, regolare le impostazioni audio e salvare le clip nel formato corretto per una facile condivisione.
- Parte 1: Metodi integrati per la registrazione dello schermo in Windows
- Parte 2: Come visualizzare le registrazioni dello schermo su Windows
- Parte 3: Limitazioni dei programmi di registrazione schermo predefiniti di Windows
- Parte 4: Un metodo leggero ed efficace per registrare lo schermo su Windows
- Parte 5: Domande frequenti su come registrare lo schermo su Windows
Parte 1: Metodi integrati per la registrazione dello schermo in Windows
Su Windows, dalla versione 7 alla 11, esistono due metodi predefiniti per registrare lo schermo: lo Strumento di cattura e la Xbox Game Bar. Forse non ne avete mai notato l'esistenza, ma ora potete imparare come utilizzarli per avviare una registrazione dello schermo.
1. Strumento di cattura
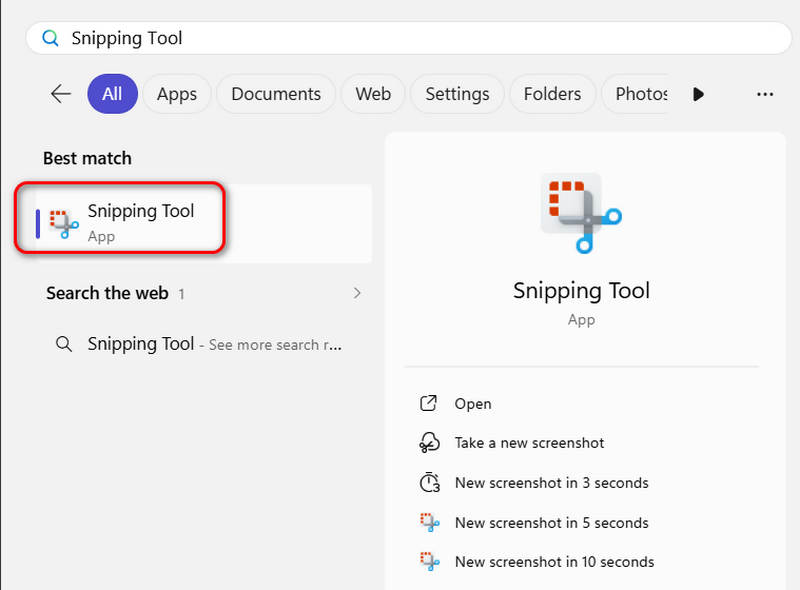
Passo 1Apri il Ricerca casella in basso a sinistra del desktop e cerca Strumento di catturaQuindi, trova e apri questo programma.
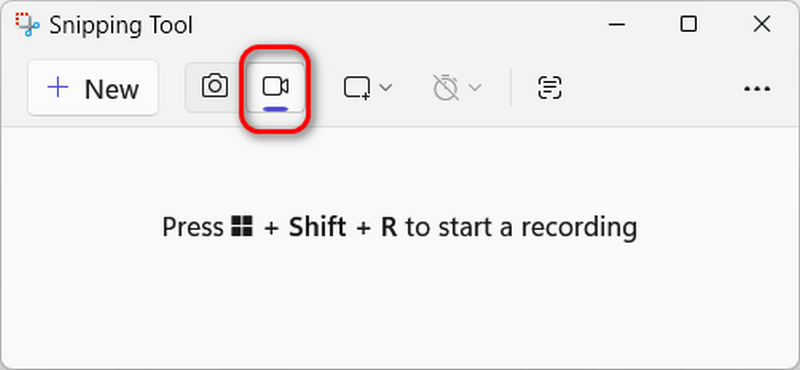
Passo 2Nell'interfaccia del programma, selezionare il Disco funzione con un'icona della fotocamera. Quindi, segui le istruzioni sullo schermo per premere finestre + Spostare + R. Quindi, devi trascinare una porzione sullo schermo e fare clic su Inizio pulsante per avviare la registrazione dello schermo sul computer Windows.
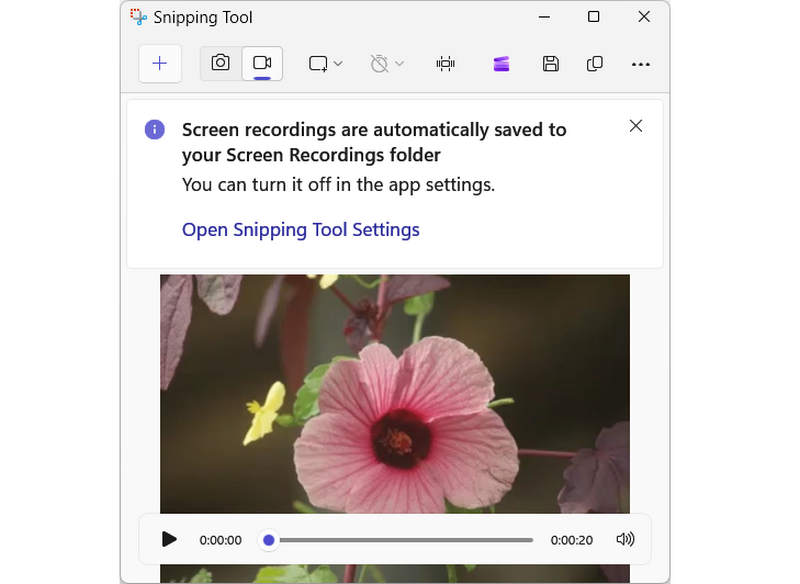
Passaggio 3La registrazione viene salvata automaticamente nella cartella predefinita Registrazioni schermo in Video. Puoi anche aprire le impostazioni dello Strumento di cattura per modificarne la posizione.
2. Xbox Game Bar
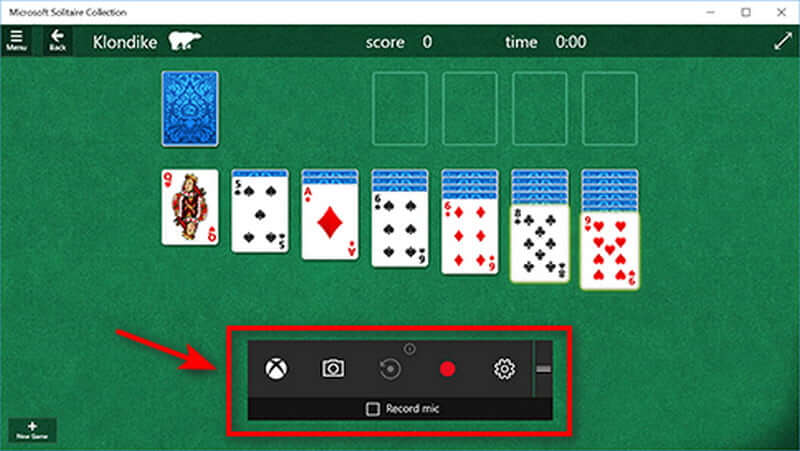
Xbox Game Bar è una potente sovrapposizione per il gaming integrata direttamente in Windows 10 e 11, progettata per consentirti di accedere agli strumenti essenziali senza interrompere le tue sessioni di gioco. Premendo semplicemente Win + G, puoi attivare/disattivare diversi widget per acquisire clip di gioco di alta qualità, scattare screenshot e monitorare le prestazioni del sistema in tempo reale. Non si tratta di un registratore di gioco dedicato, ma puoi utilizzare Xbox Game Bar anche per registrare lo schermo di Windows. Che tu stia coordinandoti con gli amici o gestendo le risorse del tuo PC, questa applicazione integrata ti garantisce di non dover mai interrompere l'azione con Alt+Tab. Guarda il video qui sotto per una dimostrazione dettagliata delle sue principali funzionalità di registrazione.
Passo 1Apri il software integrato
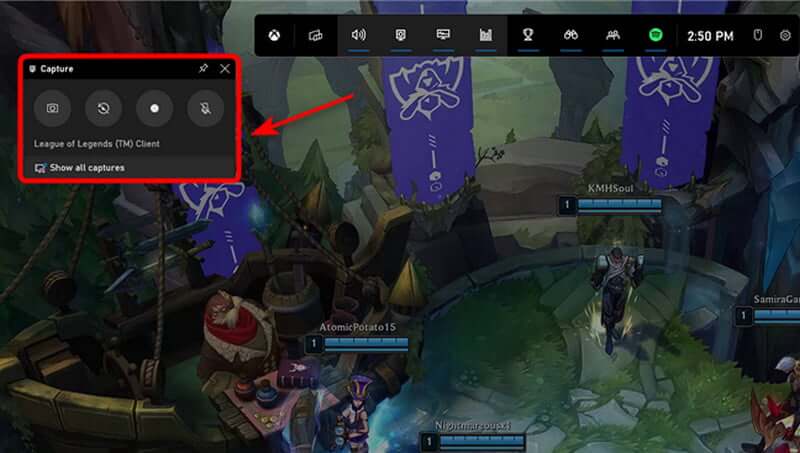
Innanzitutto, apri il file Barra di gioco Xbox e abilita il widget di acquisizione. Puoi salvare tutto il tuo gameplay per i posteri o salvare i momenti salienti, come le battaglie con i boss più recenti o le uccisioni di Penta.
Passo 2Inizia a registrare
Puoi iniziare subito la registrazione della cattura dello schermo su Windows selezionando Disco da adesso. Se vuoi fare uno screenshot, puoi farlo facendo clic sull'icona della fotocamera e scattando una foto di ciò che sta accadendo nel gioco.
Passaggio 3Regola il volume del suono
L'avvio dello strumento mostra tutti i canali audio che riproducono l'audio sul tuo dispositivo Windows. Se vuoi ascoltare la musica mentre giochi, puoi regolare il volume di ogni traccia audio.

- È inoltre possibile utilizzare il widget audio per regolare il volume del microfono se si desidera registrare lo schermo con l'audio su Windows. In tal caso, può essere utile perché permette di controllare quanto forte o debole sia la propria voce.
Passaggio 4Interrompi registrazione
premi il finestre tasto logo + Alt + G o fai clic sull'icona quadrata per interrompere la registrazione nei giochi per PC a schermo intero. Apri l'app Xbox premendo il pulsante Xbox e selezionando Cattura per modificare una clip.
Come modificare la registrazione dello schermo dalla Game Bar su Windows
La maggior parte degli utenti Windows ritiene che l'installazione di un software di registrazione dello schermo sul proprio computer o laptop sia l'unico modo per acquisire uno screenshot del video, ma questo non è vero. Con l'app Xbox Game Bar integrata, puoi anche iniziare a modificare le registrazioni dello schermo. Inoltre, questo strumento è un componente dell'app Xbox, installata per impostazione predefinita in Windows 10. Include tutte le funzioni necessarie per modificare rapidamente la registrazione dello schermo.
Passo 1Passare a Impostazioni
Passo 2Regola la registrazione in background
Se le impostazioni vengono modificate, viene creato un buffer di 30 secondi o più di contenuto registrato automaticamente. Quindi, se stai giocando e hai appena avuto un'uccisione epica, puoi utilizzare la barra di gioco per salvare gli ultimi 30 secondi, anche se non lo stavi registrando attivamente. Sebbene il nome di questa impostazione differisca tra Windows 11 e 10, la funzionalità rimane la stessa.
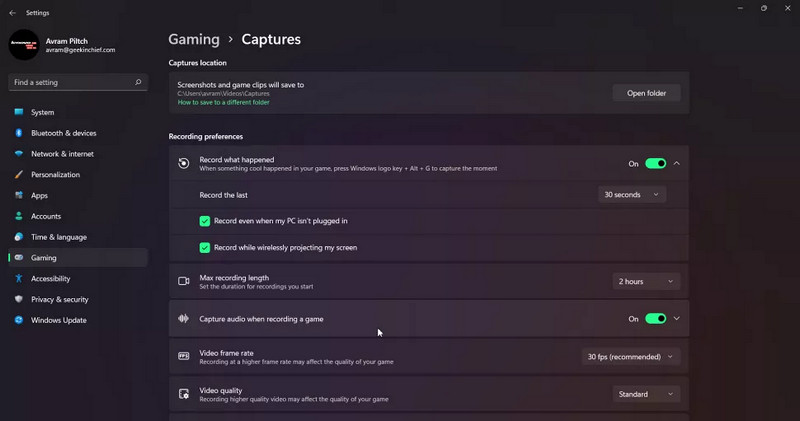
Passaggio 3Cattura l'audio
Per impostazione predefinita, questi registrano solo l'audio dal tuo microfono e dal gioco, non da Windows o altre app. Puoi disabilitare completamente la registrazione audio, abilitarla per registrare i suoni di sistema o regolare il bilanciamento.

- È possibile modificare la frequenza dei fotogrammi del video: per impostazione predefinita è 30 fotogrammi al secondo, ma è possibile modificarla a 60 fotogrammi al secondo. Inoltre, scegli tra qualità video standard e alta. Infine, ti consigliamo di lasciare abilitato Cattura il cursore del mouse durante la registrazione di un gioco, soprattutto se registri un'app non di gioco.
Parte 2: Come visualizzare le registrazioni dello schermo su Windows
Una volta terminata la registrazione dello schermo su Windows 10/11 con lo Strumento di cattura o la Game Bar, probabilmente vorrai modificare, rinominare o condividere il file. A seconda dello strumento utilizzato, il video verrà salvato in una delle seguenti directory.
1. Individuazione delle registrazioni dello Strumento di cattura
Per impostazione predefinita, la registrazione dello schermo effettuata con lo Strumento di cattura di Windows viene salvata in una cartella specifica all'interno del profilo utente.
Percorso della cartella: C:\Utenti\[NomeUtente]\Video\Registrazioni schermo
Come arrivarci velocemente:
- 1.Apri Esplora file (Windows + E).
- 2.Clicca su Video nella barra laterale sinistra.
- 3.Apri il Registrazioni dello schermo cartella.
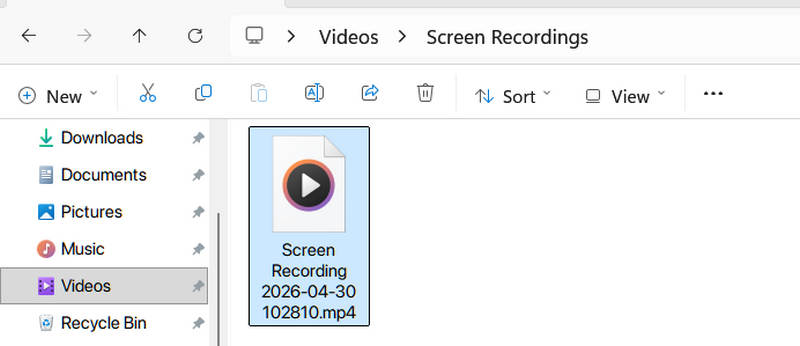
Consiglio utile: Se hai appena terminato una registrazione dello schermo su Windows, di solito compare una notifica nell'angolo in basso a destra. Facendo clic su tale notifica si aprirà l'anteprima del video, dove potrai fare clic su Di più pulsante e selezionare Apri cartella.
2. Trovare le registrazioni (catture) della Xbox Game Bar
La Xbox Game Bar salva le registrazioni in una cartella denominata "Catture", che si trova anch'essa all'interno della libreria Video, ma in una sottocartella separata.
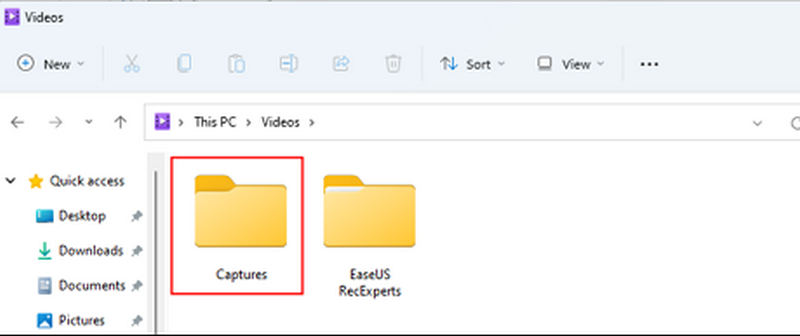
Percorso della cartella: C:\Users\[NomeUtente]\Videos\Captures
Come arrivarci tramite l'interfaccia:
- 1.Premere finestre + G per aprire la sovrapposizione della Game Bar.
- 2.Fai clic sul widget Galleria (ha l'aspetto di una piccola icona a forma di cartella/immagine).
- 3.Nella finestra Galleria, fai clic Apri la posizione del fileIn questo modo si aprirà immediatamente una finestra di Esplora file nel percorso specificato.
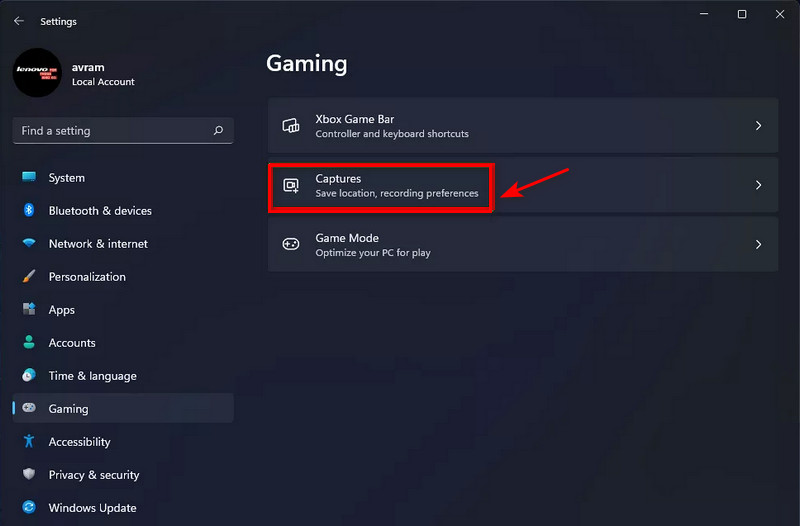
La scorciatoia: Puoi anche andare a Impostazioni > Gioco d'azzardo > Cattura Nel menu principale delle impostazioni di Windows è possibile visualizzare il percorso esatto e persino modificare la posizione in cui questi file vengono salvati in futuro.
Parte 3: Limitazioni dei programmi di registrazione schermo predefiniti di Windows
Sebbene gli strumenti di registrazione video integrati rendano incredibilmente comodo registrare lo schermo su Windows senza dover scaricare software aggiuntivo, presentano alcune limitazioni. A seconda della complessità del progetto, che si tratti di un webinar professionale o di un tutorial creativo di alto livello, potresti incontrare i seguenti ostacoli:
1. Mancanza di suite di editing avanzate: Sia lo Strumento di cattura che la Xbox Game Bar sono progettati per registrare e utilizzare immediatamente. Mancano di timeline integrate, editing audio multitraccia o la possibilità di aggiungere annotazioni (come frecce e testo) al termine della registrazione. Se è necessario perfezionare la registrazione dello schermo su Windows, probabilmente sarà necessario importare il file originale in un editor video separato.
2. Frequenza dei fotogrammi e bitrate fissi: Per gli utenti esperti e i giocatori, il controllo sulla qualità dell'output è fondamentale. I registratori schermo predefiniti di Windows spesso utilizzano frame rate variabili (VFR), che possono causare problemi di sincronizzazione audio in software di editing professionali come Premiere Pro. A differenza degli strumenti di registrazione schermo dedicati, si ha un controllo limitato sul bitrate esatto o sui preset di codifica utilizzati durante il processo.
3. Restrizioni relative al desktop e all'interfaccia utente:
- Xbox Game Bar: Progettato principalmente per giochi e singole applicazioni. Spesso ha difficoltà a registrare il desktop di Windows o Esplora file, interrompendo talvolta la registrazione se si passa da un'applicazione all'altra.
- Strumento di cattura: Sebbene sia più flessibile per la registrazione su desktop, manca di funzionalità come l'evidenziazione del mouse o gli effetti di clic, essenziali per registrare video didattici facili da seguire.
4. Vincoli relativi all'ingresso audio: Sebbene sia possibile registrare lo schermo su Windows utilizzando i suoni di sistema e il microfono, gestire più sorgenti audio (come una chiamata Discord, un gioco e una traccia musicale separata) risulta complesso. Questi strumenti non dispongono di un mixer audio nativo per bilanciare i livelli in tempo reale durante la registrazione video dello schermo su Windows.
Parte 4: Un metodo leggero ed efficace per registrare lo schermo su Windows
AVAide Screen Recorder è uno degli strumenti di registrazione dello schermo più consigliati per Windows grazie alle sue funzionalità avanzate come la personalizzazione dell'area di registrazione, l'acquisizione dell'audio e del microfono del sistema e persino la regolazione del formato video di output. Registra attività sullo schermo, videochiamate, spettacoli televisivi, o gameplay su più piattaforme senza perdita di qualità e audio chiaro.
Il registratore dello schermo può anche essere controllato utilizzando i tasti di scelta rapida. Registra anche video di alta qualità, ideale per l'output. Il video può essere registrato sia dalla scheda di sistema che da dispositivi esterni.
- Registra la schermata originale di Windows e, se necessario, convertila in 4K.
- Consente di regolare le impostazioni di uscita video e audio, inclusi codec (HEVC, AV1, H.264), bitrate, risoluzione, frame rate e altro ancora.
- Supporta l'upscaling tramite intelligenza artificiale per aumentare e migliorare la qualità delle registrazioni.
- Consente registrazioni di lunga durata senza ritardi o interruzioni.
- Registra schermo, finestra, gioco e porzione di video con audio di sistema, sovrapposizione webcam e microfono, tutto in modo fluido.
- Gestisci facilmente le tue registrazioni e condividile sui social media come YouTube e Instagram.

 Download sicuro
Passo 1Scarica il software di registrazione
Per iniziare, scarica e installa lo strumento facendo clic sul pulsante di download in alto. L'installazione del software richiederà alcuni minuti. Clicca il Videoregistratore icona per avviare la registrazione.

Passo 2Regola la cornice
Regola l'area che desideri registrare attorno alla finestra. Selezionare Costume dalla freccia a discesa sul primo ritaglio e inserisci una posizione di registrazione. Selezionare A schermo intero per catturare l'intera scena.

Passaggio 3Aggiungi audio e registrazione audio
È possibile registrare un video con audio utilizzando l'audio e il microfono integrati nel sistema o un microfono esterno collegato ad esso per registrare una schermata del desktop con narrazioni vocali. Clicca il Microfono pulsante per disattivare la narrazione vocale durante la registrazione.

Passaggio 4Inizia a registrare
Per avviare la registrazione, premere il REC pulsante.

Passaggio 5Ferma ed esporta
Al termine della registrazione, premere il tasto Fermare pulsante per fermarlo, e poi il Clip pulsante per ritagliare le clip di registrazione prima di salvarle. Quindi, per salvare il video, fai clic su Esportare pulsante.

Passaggio 6Visualizza la registrazione video
Dopo aver salvato la registrazione, ora puoi visualizzare la registrazione video nella cronologia delle registrazioni. Sono ordinati cronologicamente, a partire dalla registrazione più recente fino alla più vecchia.

Parte 5: Domande frequenti su come registrare lo schermo su Windows
È possibile rintracciare gli screenshot?
Un sito Web può dire se fai uno screenshot o usi il browser per farlo. Un sito Web può anche sapere se fai uno screenshot premendo il pulsante Stampa schermo sulla tastiera. Tuttavia, se utilizzi un programma come Snipping Tool, il sito Web non saprà che hai acquisito uno screenshot.
Quanto durerà la cattura dello schermo?
Puoi schermare Registra a tempo indeterminato con il giusto software di registrazione dello schermo. Puoi continuare a catturare l'azione finché è visibile sullo schermo. Ciò non implica sempre che sarai in grado di catturare ore e ore di riprese.
Perché la combinazione di tasti Alt+R di Windows non funziona?
La scorciatoia Windows + Alt + R potrebbe non funzionare per diversi motivi, più comunemente perché la Xbox Game Bar è disabilitata nelle impostazioni di sistema o Registrazione in background Questa funzione è disattivata. Inoltre, questo collegamento è progettato specificamente per la registrazione di applicazioni e giochi; non funzionerà se il cursore è posizionato sul desktop di Windows o in Esplora file.
Che effetto ha la registrazione dello schermo?
La cattura dello schermo è corretta quando devi mostrare a qualcuno qualcosa che vedi sul monitor del tuo computer. A volte, l'acquisizione di schermate di immagini fisse è l'ideale, nota anche come screenshot. D'altra parte, uno screencast può essere un'opzione migliore se la cattura dello schermo richiede molte spiegazioni.
In definitiva, padroneggiare come registrazione dello schermo su Windows Dipende dalle tue esigenze. Strumenti integrati come lo Strumento di cattura e la Xbox Game Bar sono perfetti per acquisizioni rapide senza installazione e per sessioni di gioco occasionali. Tuttavia, spesso mancano delle funzionalità di editing avanzate, della formattazione flessibile e della stabilità su tutto il desktop necessarie per progetti di livello professionale.
Per una soluzione più potente, AVAide Screen Recorder È la nostra raccomandazione principale. Supera le limitazioni native offrendo una sovrapposizione fluida della webcam, annotazioni in tempo reale e un output ad alta frequenza di fotogrammi senza rallentare il sistema. Se hai bisogno di un risultato professionale impeccabile, pronto all'uso, per tutorial o presentazioni, AVAide è la scelta migliore per qualsiasi registrazione video dello schermo su Windows.
INFORMAZIONI SULL'AUTORE

Cattura le attività sullo schermo con audio, riunioni online, video di gioco, musica, webcam, ecc.
Registra schermo e video
- Registrazione schermo su Mac
- Registrazione schermo su Windows
- Registrazione schermo su iPhone
- Registra audio su iPhone
- Registra programmi TV senza DVR
- Screen Record Snapchat su iPhone e Android
- Registra una chiamata FaceTime
- Come utilizzare il VLC per registrare lo schermo
- Correggi il codice di errore Amazon 1060
- Risolto il problema con OBS Window Capture Black
- Come trasformare un PowerPoint in un video [Tutorial completo]
- Come realizzare video tutorial: preparativi e linee guida
- Come registrare lo schermo con audio su iOS 15 e versioni successive
- Come registrare lo schermo su TikTok: soluzioni desktop e mobili
- Come registrare lo schermo su Samsung in 2 modi comprovati [Risolto]
- Come registrare il gameplay su PS4 senza una scheda di acquisizione
- Come registrare il gioco su Xbox One [Tutorial completo]