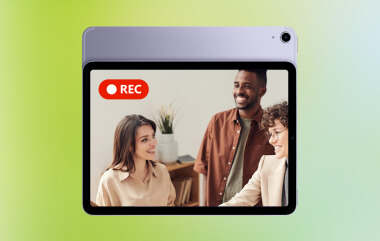
כיצד להקליט מסך במחשב נייד של לנובו תלוי בכלי שתבחר, החל מתכונות מובנות של Windows ועד תוכנות מתקדמות. מדריך זה מציג שיטות פשוטות, ברורות ויעילות ללכידת המסך שלך במכשירי Lenovo, בין אם עבור הדרכות, פגישות, משחקיות או הקלטה יומיומית.
שיטה 1. שימוש בסרגל המשחקים של Xbox
תכונת ההקלטה המובנית של Xbox Game Bar היא של מיקרוסופט, משתלבת בצורה חלקה עם Windows, והיא פתרון ההקלטה הנוח ביותר עבור משתמשי Lenovo. היא נוצרה למשחקים, ובמקביל משמשת כמקליט יישומים סטנדרטי, יוצרת הדרכות ומקליטת דפדפן. היתרון הגדול הוא שהיא אינה דורשת התקנה; היא מוכנה לשימוש באופן מיידי.
אבל יש חסרונות ברורים. לא מקליט את שולחן העבודה או את סייר הקבצים, וההתאמה האישית מוגבלת לכלים מקצועיים. עם זאת, זוהי עדיין אחת האפשרויות המובנות הנוחות ביותר עבור מפגשים מזדמנים שבהם איכות ומאמץ אינם חשובים באותה מידה.
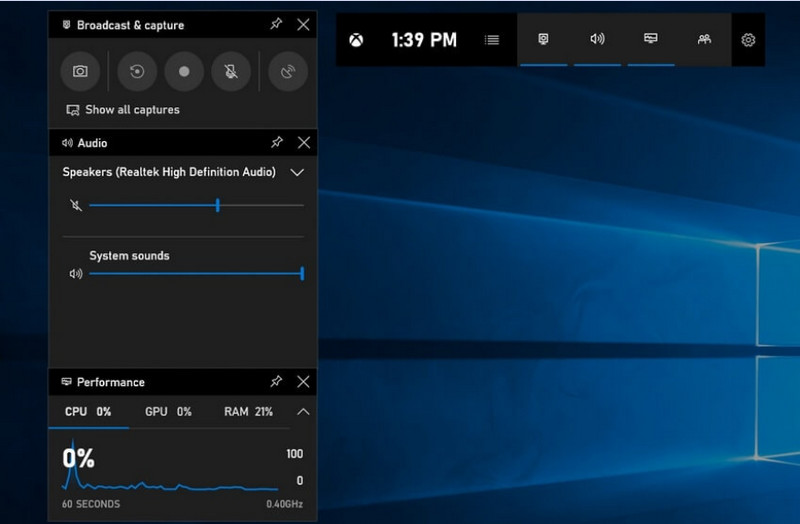
שלב 1כדי לפתוח את סרגל המשחקים של Xbox, לחצו חלונות + G במקלדת שלך.
שלב 2למצוא את ה לִלְכּוֹד לוח או לחץ עליו מתוך ווידג'טים תַפרִיט.
שלב 3לחץ על רשומה (●) כפתור או לחץ Windows + Alt + R.
שלב 4אם ברצונך להקליט קול, הפעל את מִיקרוֹפוֹן.
שלב 5ללחוץ Windows + Alt + R שוב או לחץ עצור (■) להשלים.
שלב 6תמצא את ההקלטה שלך ב סרטונים > לוכדים.
שיטה 2. שימוש ב-Lenovo Vantage
Lenovo Vantage אינו מקליט מסך; זוהי חבילת ניהול ואופטימיזציה של המערכת. יש לו תפקיד עקיף יותר בהקלטה, עם מעט מאוד תכונות המסייעות לתהליך ההקלטה בצורה כלשהי, בהתאם לדגם מכשיר ההקלטה, או אפילו עם מכשירים מסוימים המציעים קיצורי דרך או כלי מצלמה/תצוגה שיכולים לסייע בתהליך ההקלטה.
זהו וריאציה רחבה בביצועים ובזמינות. פונקציות הקלטה בסיסיות עשויות להיות נתמכות בחלק ממכשירי Lenovo, אך ייתכן שאחרים לא יתמכו בכך כלל. זה מוגבל וקצת לא עקבי מבחינת מה שהוא יכול לעשות עבור מקליטי מסך מלא, אך זה עשוי להיות בעל ערך למשתמשים שרוצים להישאר בתוך המערכת האקולוגית של Lenovo או להקליט פודקאסט תוכן עם כלים בסיסיים.
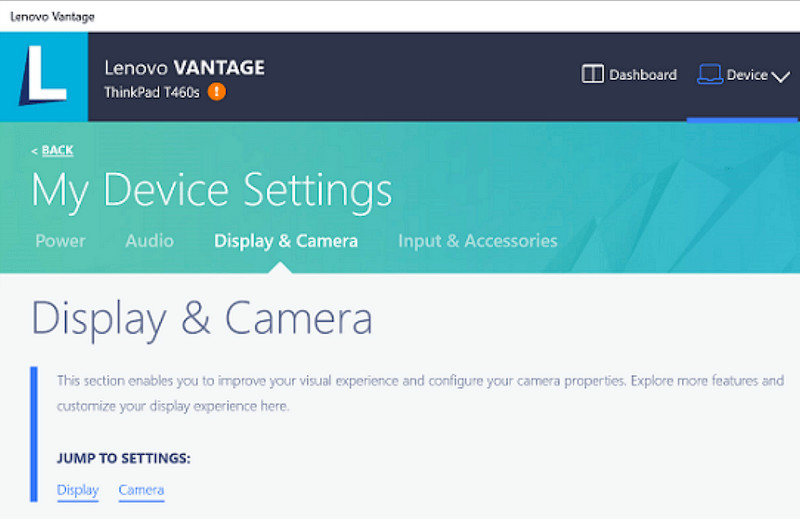
שלב 1לך אל הַתחָלָה תפריט ולחצו על לנובו ואנטג'.
שלב 2בֶּרֶז הגדרות המכשיר שלי > תצוגה ומצלמה.
שלב 3בדוק אם יש הקלטות או פונקציות זמינות אחרות.
שלב 4הפוך את כל האפשרויות או קיצורי הדרך הנחוצים לזמינים.
שלב 5הקלט את המוזיקה באמצעות הפונקציה המסופקת (אם אפשר).
שלב 6מצא הקלטות ששמרת בתיקיית הסרטונים שלך.
שיטה 3. שימוש ב-Legion Zone / Lenovo Nerve Center
Lenovo Nerve Center (או Legion Nerve Center - כלים חדשים יותר של Legion החליפו את Nerve Sense) מותאם במיוחד למכשירי Lenovo, ובמיוחד למחשבים ניידים של Lenovo Legion, המיועדים לגיימרים. הוא גם משולב היטב עם כלי ביצועי משחקים, כך שמשתמשים יכולים לצלם צילומי מסך של המשחקים שלהם תוך ניטור ואופטימיזציה של משאבי המערכת.
עם זאת, זהו מקליט בסיסי למדי. הוא מתמקד יותר בנוחות מאשר בהתאמה אישית, ומציע רק אפשרויות הקלטה בסיסיות עם שליטה מוגבלת על רזולוציה, קצב סיביות והגדרות מתקדמות. בנוסף, הוא זמין רק בכמה מערכות חדשות יותר, ואחרות החליפו אותו או הסירו אותו מהמערכות שלהן, כך שהוא אינו אמין כפי שהיה פעם.
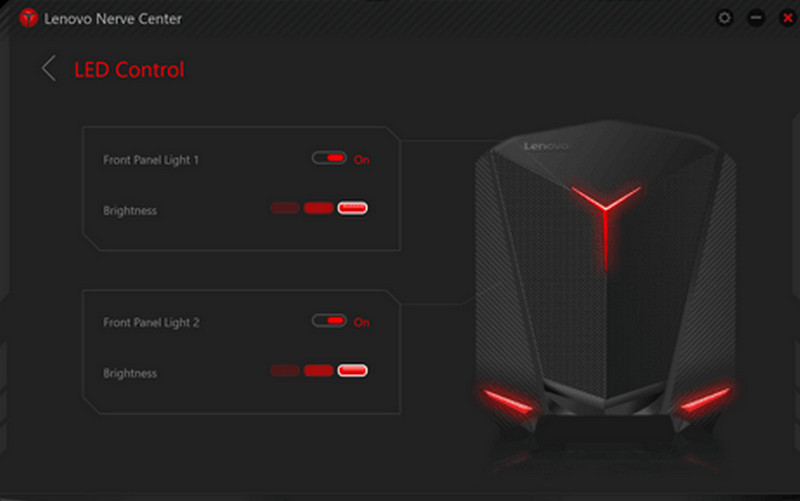
שלב 1גישה אל מרכז העצבים של לנובו אוֹ אזור הלגיון מהמכשיר.
שלב 2נווט אל כלי ההקלטה ו/או המשחק.
שלב 3אם יש אפשרות בחירה, שנה את הגדרות ההקלטה, כגון רזולוציה או איכות שמע.
שלב 4הפעל את המשחק או האפליקציה.
שלב 5הקלטה באמצעות קיצור הדרך או הכפתור המוגדרים כברירת מחדל.
שלב 6תפסיק את ההקלטה ותסתכל בפנים שלך סרטונים תיקייה כדי לראות אם הקובץ הוקלט.
שיטה 4. שימוש במקליט המסך AVAide
מקליט מסך AVAide הוא מקליט מסך מתוחכם ורב-תכליתי יותר עבור לנובו מאשר מקליט המסך המובנה. הוא בנוי עבור אלו המעוניינים באיכות וידאו, פעולה חלקה יותר ושליטה רבה יותר בהקלטה. זהו הכלי המושלם ליצירת הדרכות, הקלטת פגישות או לכידת משחקיות, ללא צורך בהתקנה מסובכת, והכל ברמה מקצועית.
למרות שהוא יכול ללכוד צלילי מערכת, קלט מיקרופון, מצלמת רשת ואזורי מסך, הוא תומך גם בהקלטה באיכות Full HD ואפילו 4K עם השהיה מינימלית בהשוואה למקליטי מסך בסיסיים. זה הופך אותו לאפליקציית לכידת מסך הכל-באחד לעבודה ולפנאי.
- צלם סרטונים באיכות 1080p או 4K עם ביצועים חלקים וללא השהיות.
- הקלט במצב מסך מלא או מותאם אישית בהתאם לצרכים שלך.
- הקלט בו זמנית גם צליל פנימי וגם קול עם פלט ברור.
- הוסף הקלטת Facecam עבור הדרכות, מצגות או סרטוני משחק.
- חיתוך, דחיסה ושיפור הקלטות לאחר הצילום.

 הורדה מאובטחת
שלב 1הורד והתקן את התוכנה
בקרו באתר הרשמי של AVAide Screen Recorder. הורידו את Windows Installer, התקינו אותו במחשב הנייד של Lenovo שלכם והפעילו אותו.
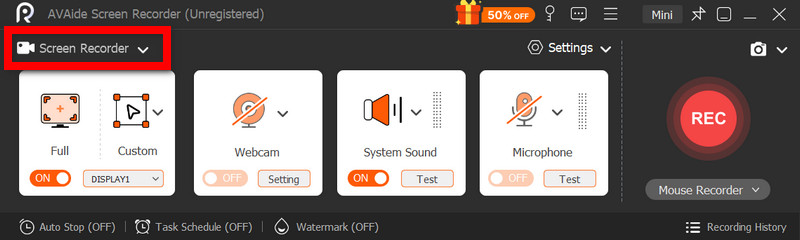
שלב 2בחירת מצב הקלטה
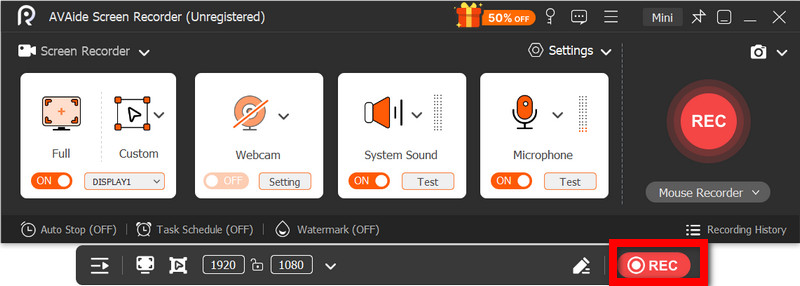
פתחו את התוכנה, לאחר מכן לחצו על מקליט מסךהקלט את כל המסך עם מלא או חלק מהמסך עם המותאם אישית.
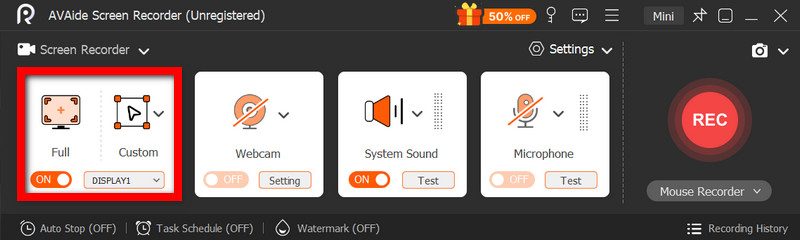
שלב 3הגדרת הגדרות שמע
כדי להקליט צלילים המופקים על ידי המחשב, הפעל סאונד מערכתכדי לכלול את הקול שלך, הפעל את מִיקרוֹפוֹןניתן גם להפעיל את מצלמת הרשת לפי הצורך.
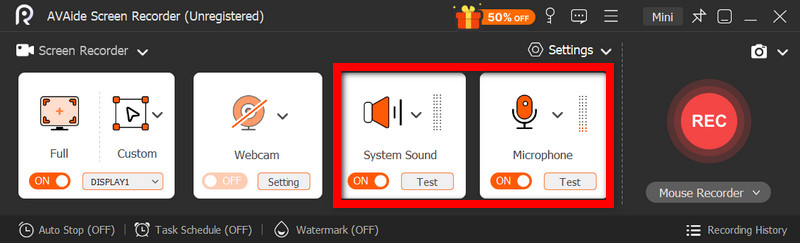
שלב 4התאמת הגדרות הקלטה
להשתמש ב הגדרות כפתור כדי להגדיר את איכות הווידאו, הרזולוציה, קצב הפריימים ופורמט הפלט כדי להשיג ביצועי הקלטה אופטימליים.
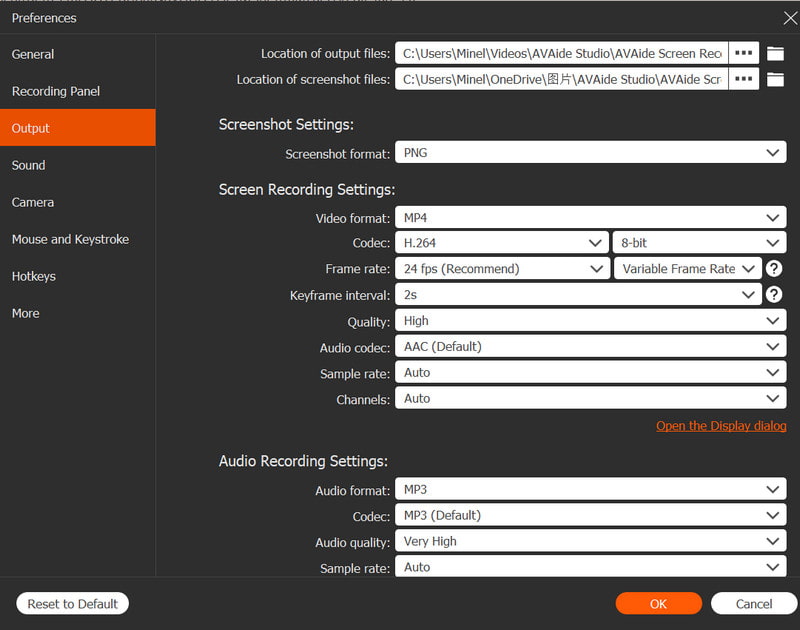
שלב 5התחל להקליט
הקש על REC כדי להתחיל להקליט. ניתן להקליט בצורה חלקה הקלטות, הדרכות, משחקיות או כל פעילות על המסך ב-Google Meet.
שלב 6עצירה ושמירה של ההקלטה
לאחר שתסיים, לחץ על ה- תפסיק כפתור. הצג תצוגה מקדימה של ההקלטה שלך, ערוך אותה במהירות במידת הצורך ושמור אותה במחשב שלך באופן מיידי.
שיטה 5. שימוש בהגדרות מהירות
בטאבלטים של Lenovo עם אנדרואיד, ישנה אפשרות הקלטת מסך מובנית בהגדרות המהירות. הדרך הטובה ביותר להקליט הדרכות, משחקיות או פעילות אפליקציות בטאבלט היא מבלי להוריד אפליקציות של צד שלישי. קל, מהיר ומותאם לשימוש נייד, אידיאלי להקלטות מהירות תוך כדי תנועה.
חסרות לו תכונות העריכה וההתאמה האישית המתקדמות הנמצאות בכלי לכידת מסך אחרים, אך הוא מספיק ללכידות מסך פשוטות עם קול.
שלב 1החלק למעלה מתחתית המסך כדי לפתוח את הגדרות מהירות.
שלב 2חפש את ה הקלטת מסך אוֹ מקליט מסך כפתור. אם הוא לא שם, לחץ על לַעֲרוֹך כפתור והוסף אותו לפאנל שלך.
שלב 3נְקִישָׁה מקליט מסך, לאחר מכן בחר את ההגדרות הרצויות.
שלב 4בֶּרֶז הַתחָלָה כדי להתחיל להקליט. תהיה ספירה לאחור לפני תחילת ההקלטה.
שלב 5הקש על סרגל הכלים הצף או על סרגל ההתראות, לאחר מכן לחץ תפסיק כדי לסיים את ההקלטה.
פתרון בעיות נפוצות בהקלטת מסך ב-Lenovo
באפשרותך לקרוא טיפים לפתרון בעיות נפוצות בעת הקלטת המסך במכשיר Lenovo.
למרות שבדרך כלל אין סיבוכים משמעותיים בהקלטת מסך במכשירי Lenovo, תמיד קיימת אפשרות לבעיות בהתאם לכלי או למכשיר הקלטת המסך בו נעשה שימוש. להלן הבעיות הנפוצות ביותר וכיצד לתקן אותן.
- מקליט המסך לא עובד: הפעל מחדש את המכשיר ונסה שוב. עבור כלים מובנים כמו Xbox Game Bar, ודא שהוא מופעל בהגדרות Windows תחת משחקים.
- אין אודיו בהקלטה: בדוק אם צליל המערכת או המיקרופון מופעלים לפני ההקלטה. כמו כן, ודא שעוצמת הקול של המערכת אינה מושתקת.
- וידאו באיכות נמוכה או לאגי: הפחת את איכות הווידאו או סגור יישומים ברקע. שדרוג מנהלי ההתקן של הגרפיקה יכול גם לשפר את הביצועים.
- לא ניתן להקליט את שולחן העבודה או סייר הקבצים: זוהי אחת המגבלות הנפוצות של Xbox Game Bar. אם ברצונך להקליט את המסך שלך וללכוד הכל, השתמש בתוכנה מתקדמת כמו AVAide Screen Recorder, אחת מה... מקליטי המסך הטובים ביותר עבור מק ו-Windows.
- הקלטה לא נשמרת: ודא שהאחסון שלך אינו מלא, וודא את מיקום השמירה המוגדר כברירת מחדל. בהגדרות, שנה את תיקיית הפלט ונסה זאת.
כפתור הקלטת המסך של לנובו האפשרויות משתנות בהתאם למכשיר שלך ולכלי שבו אתה משתמש. בסך הכל, תכונות מובנות ואפליקציות של צד שלישי הופכות את ההקלטה לפשוטה, ומספקות לך דרכים גמישות ללכוד, לשמור ולנהל פעילות מסך ביעילות במכשירי Lenovo.
אודות המחבר

צלם פעילויות מסך עם אודיו, פגישות מקוונות, סרטוני משחק, מוזיקה, מצלמת אינטרנט וכו'.