מנסה להבין איך להקליט אודיו במחשב מק קורה לעתים קרובות כשצריך להקליט הרצאה בכיתה, לשמור שיחת וידאו, להקליט פודקאסט או ליצור תוכן קולי במהירות. למרבה המזל, macOS כולל כלי הקלטה מובנים, וכמה אפשרויות של צד שלישי יכולות לעזור לך להקליט מיקרופון ואודיו פנימי באיכות גבוהה בקלות.
שיטה 1: שימוש בנגן QuickTime
נראה שלכולם יש QuickTime במערכת ההפעלה macOS שלהם. QuickTime מספק ממשק אינטואיטיבי, הקלטת מיקרופון אמינה וייצוא מהיר שאינו דורש יישום אחר. טכניקה זו שימושית לקריינות, הרצאות, פגישות מקוונות ואפילו להקלטות פודקאסטים בסיסיות.
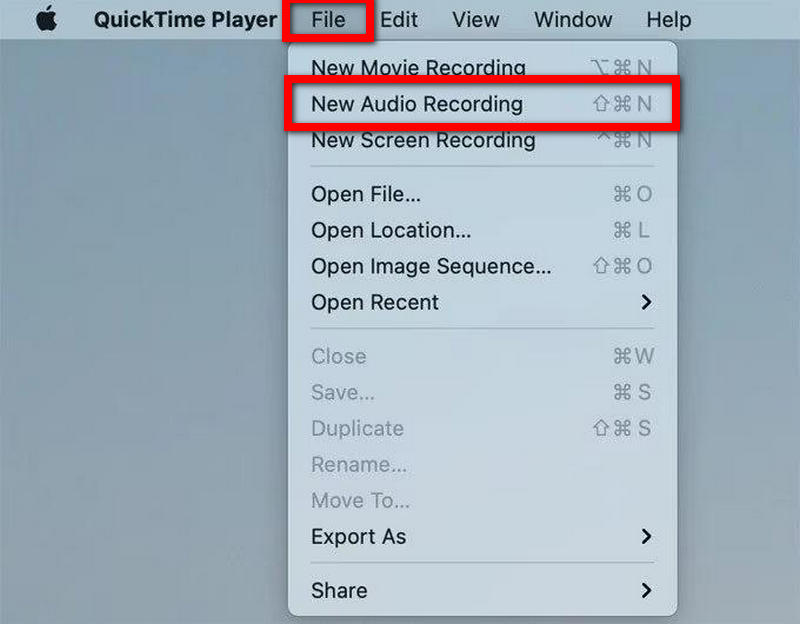
שלב 1הפעל את QuickTime Player מתיקיית היישומים או באמצעות חיפוש Spotlight.
שלב 2לך אל קוֹבֶץ תפריט משורת התפריטים העליונה.
שלב 3נְקִישָׁה הקלטת אודיו חדשה.
שלב 4לחץ על החץ הקטן שליד תקליט כדי לציין את המיקרופון שברצונך להשתמש בו.
שלב 5במידת הצורך, כוונן את עוצמת הקלט.
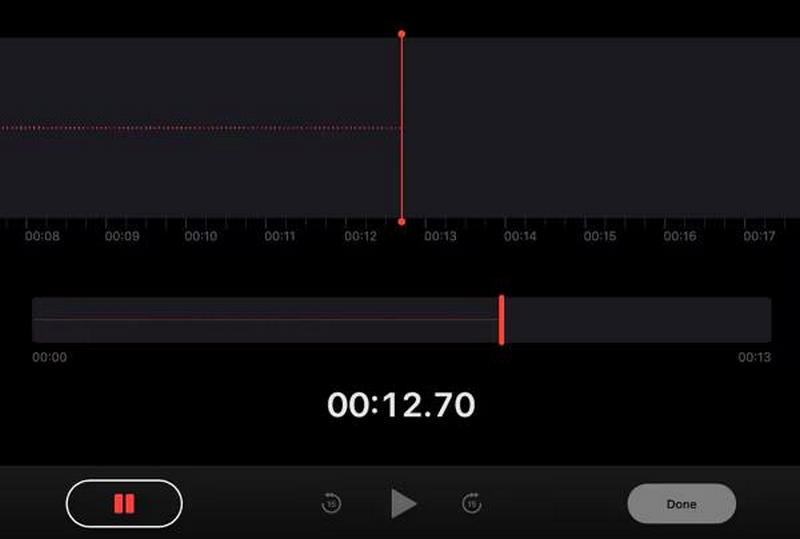
שלב 6כדי להתחיל בהקלטה, לחץ על תקליט לַחְצָן.
שלב 7 דבר לתוך המיקרופון.
שלב 8הקש על תפסיק כפתור כדי לסיים את ההקלטה.
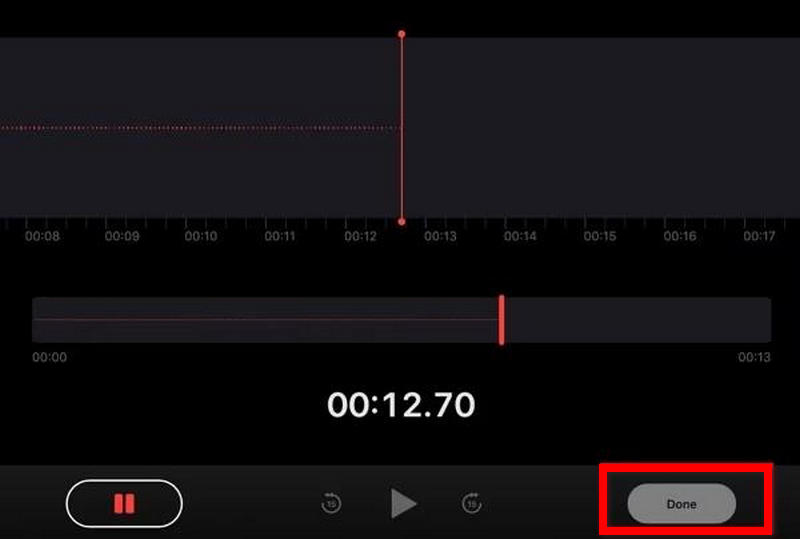
שלב 9כדי לשמור את ההקלטה במחשב ה-Mac שלך, עבור אל קוֹבֶץ ובחר להציל.
שיטה 2: שימוש בתזכירי קול
Voice Memos מיועד להקלטת קול מהירה. אפליקציה זו טובה ליצירת תזכורות אישיות, סיעור מוחות, הרצאות קצרות והקלטות שמע קצרות. תזכירי קול מוקלטים מסונכרנים אוטומטית דרך iCloud, כך שההקלטות זמינות בכל מכשירי Apple.
שלב 1הפעל את תזכורות קוליות במחשב ה-Mac שלך.
שלב 2הקש על תקליט לַחְצָן.
שלב 3דבר דרך המיקרופון.
שלב 4אם עליך להפסיק את ההקלטה לרגע, בחר הַפסָקָה.
שלב 5ללחוץ בוצע כדי לסיים את ההקלטה.
שלב 6כדי להקל על מציאת ההקלטה, בחר את שנה שם אוֹפְּצִיָה.
שלב 7כדי לשתף, לשכפל או לייצא את ההקלטה, לחצו לחיצה ימנית על הקובץ.
מדוע macOS אינו תומך באופן טבעי בהקלטת שמע פנימית
כבר מהקופסה, macOS מאפשר שימוש במיקרופון. עם זאת, אין דרך להקליט שמע פנימי של המערכת בעזרת הפונקציונליות המובנית. זה כולל השמעת מדיה באפליקציות, מוזיקה וצלילי דפדפן. פרטיות, הגנת זכויות יוצרים ואבטחת מערכת הן הסיבות לכך ש-macOS מציבה את ההגבלות הללו.
שלא כמו שמע מהמיקרופון, שמע פנימי עשוי להכיל מדיה מוגנת או תקשורת פרטית מאפליקציות. מסיבה זו, אפל מגבילה את הגישה לערוצי שמע פנימיים אלא אם כן משתמשים מתקינים תוכנה נוספת.
בגלל בעיות אלה, כלים כמו QuickTime אינם יכולים להקליט אודיו פנימי, אך אודיו חיצוני דרך מיקרופון כן.
דוגמאות לבעיות אלו:
- הקלטת משחק וידאו עם אודיו.
- הקלט שיעור מקוון.
- הקלטת אודיו ווידאו באינטרנט.
- הקלטת אודיו מסרטון מקוון ברשת.
- הקלט סרטוני הדרכה עם אודיו פנימי של המחשב.
שיטה 3: שימוש ב-BlackHole + QuickTime Player
BlackHole הוא מנהל התקן אודיו וירטואלי חינמי המאפשר ניתוב פנימי של אודיו מהמערכת לתוכנת הקלטה. אם משתמשים במנהל התקן זה יחד עם QuickTime, משתמשי מקינטוש יכולים להקליט אודיו פנימי ואודיו של מיקרופון חיצוני. כונן זה מאפשר למשתמשים להקליט פגישות מקוונות, הדרכות, משחקי וידאו, סמינרים מקוונים, פודקאסטים ואודיו מדפדפן, והכל עם אודיו באיכות גבוהה וצלול.
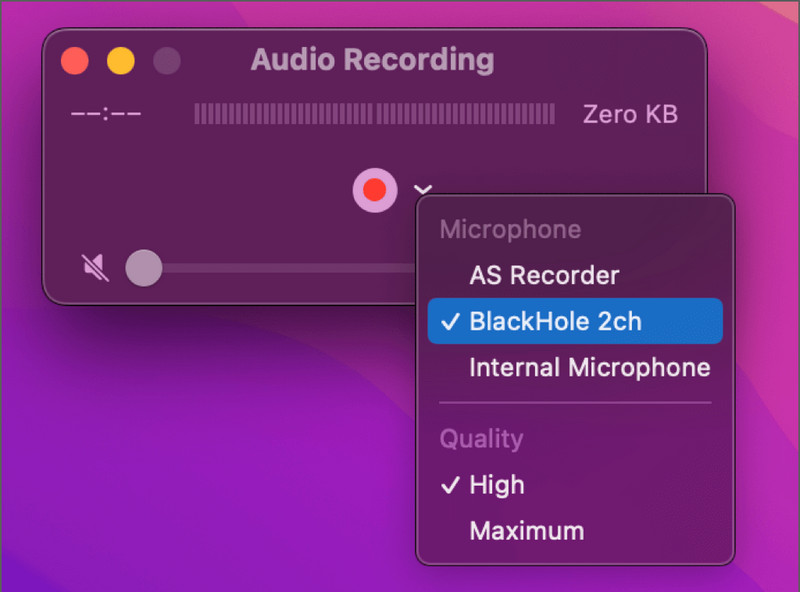
שלב 1הורד והתקן את BlackHole במחשב ה-Mac שלך מהאתר הרשמי, לאחר מכן פתח את הגדרת שמע MIDI.
שלב 2צור התקן רב-פלט והפעל גם את הרמקולים או האוזניות של ה-Mac וגם את BlackHole.
שלב 3 הגדר את התקן הרב-פלט כפלט השמע המוגדר כברירת מחדל בהגדרות הצליל.
שלב 4פתח את נגן QuickTime, בחר קוֹבֶץ > הקלטת אודיו חדשה, אז תבחר חור שחור כמיקרופון או כמקור שמע.
שלב 5לחץ על תקליט כפתור, הפעל את השמע שברצונך ללכוד, לאחר מכן עצור ושמור את ההקלטה לאחר שתסיים.
שיטה 4: שימוש בתוכנה ייעודית של צד שלישי
1. מקליט מסך AVAide
מקליט מסך AVAide מושלם למשתמשי מק שרוצים כלי פשוט אך עוצמתי להקלטת קול ואודיו. בנוסף להקלטת מסך, AVAide יכול ללכוד אודיו מהמיקרופון, רמקולי המערכת ומצלמת הרשת, כמו גם מסך הטלפון. אחת התכונות הטובות ביותר של AVAide היא שהוא מיועד למשתמשים מתחילים ומתקדמים, מה שהופך אותו לאופציה נהדרת לכל מי שצריך להקליט קול במק.
- מקליט בו זמנית את שמע המיקרופון ואודיו של המערכת.
- תומך בהקלטת שמע באיכות גבוהה עם השהייה מינימלית.
- מאפשר הקלטה במסך מלא, בחלון או באזור מותאם אישית.
- כולל הקלטת מצלמת רשת עבור הדרכות ופודקאסטים.
- תומך בפורמטי ייצוא מרובים כגון MP3, AAC, FLAC, M4A ועוד.

 הורדה מאובטחת
שלב 1הורד והתקן את התוכנה
נווט לאתר האינטרנט של AVAide כדי להוריד את התוכנה. פעל לפי הוראות ההתקנה שעל המסך כדי להתקין את התוכנה בהצלחה.
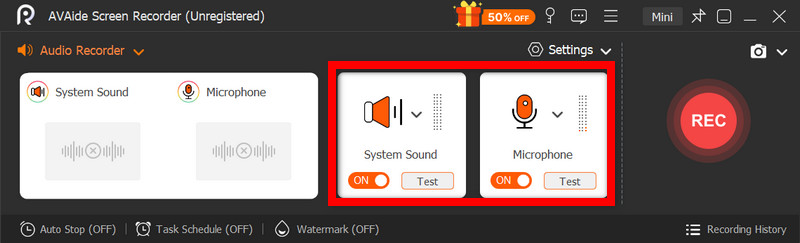
שלב 2בחר מקליט אודיו
פתחו את התוכנה ובדף הראשי, בחרו מקליט אודיו להקלטת קול בלבד.
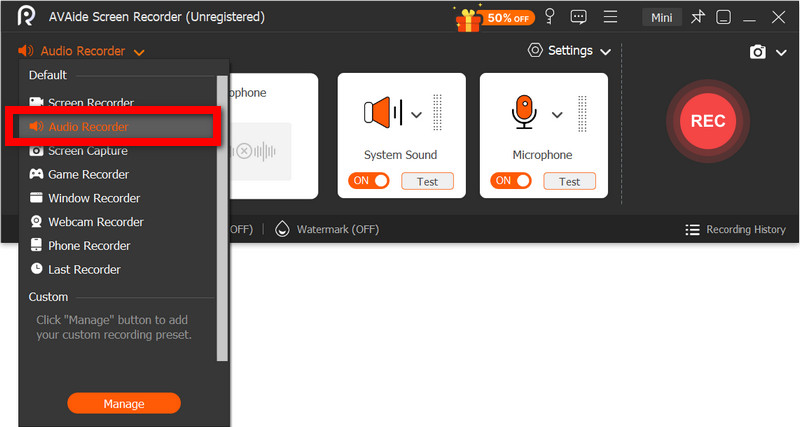
שלב 3הפעלת מיקרופון וצליל מערכת
הפעל את מִיקרוֹפוֹן אפשרות להקליט קול בצורה ברורה. הפעל את סאונד מערכת כדי ללכוד את האודיו הפנימי מה-Mac שלך.
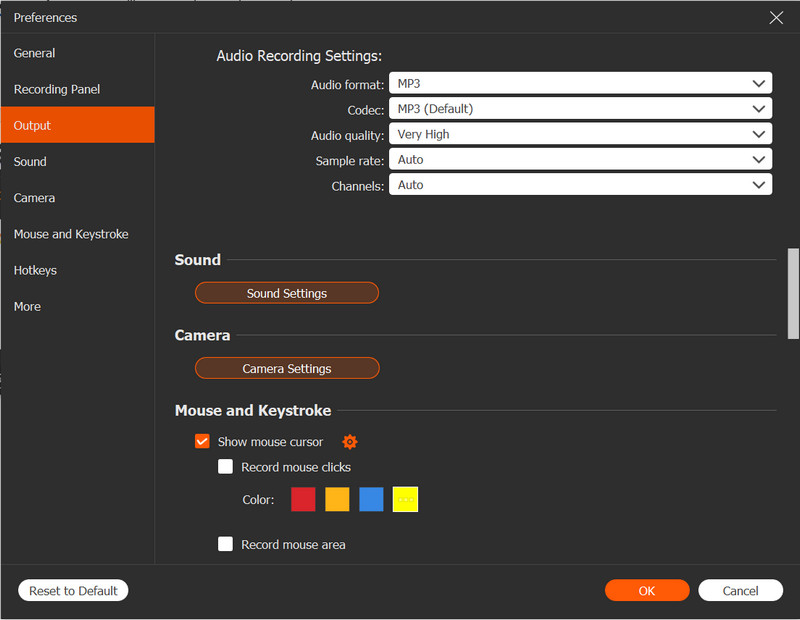
שלב 4התאמת הגדרות הקלטה
מ ה הגדרות בתפריט, בחר את פורמט השמע ואת איכות הפלט המועדפים עליך. קבע את מיקום השמירה והתאם את עוצמת הקול עבור המיקרופון ושמע המערכת.
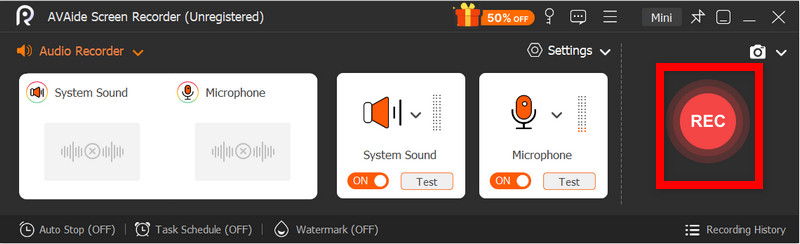
שלב 5התחל להקליט
בחר את REC אפשרות להתחיל להקליט את קולך. במהלך סשן ההקלטה, תוכל להשהות, לחדש או להוסיף הערות.
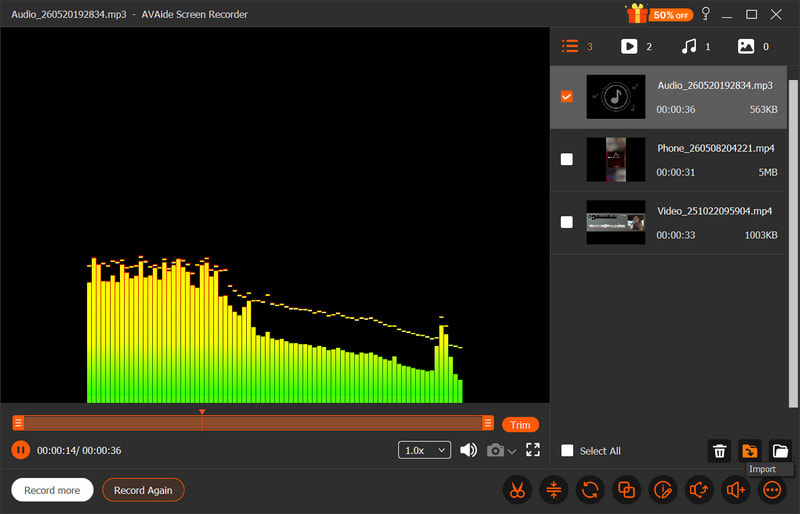
שלב 6שמירה ותצוגה מקדימה
בחר את תפסיק אפשרות לסיום הקלטת האודיו. לאחר מכן תוכלו לקצץ את האודיו ולשמור את האודיו המוקלט במחשב ה-Mac שלכם.
2. שימוש ב-Audacity
Audacity הוא מקליט ועורך אודיו חינמי, עוצמתי וקל לשימוש עבור מק. הוא מועדף לעתים קרובות על פני אפשרויות אחרות עבור פודקאסטים ופרויקטים מוזיקליים בגלל זרימות העבודה הפשוטות שלו ותכונות מקצועיות כמו הפחתת רעשים, חיתוך ושיפור אודיו. אפילו עם כל התכונות הללו, ל-Audacity יש ממשק משתמש פשוט, מה שהופך אותו לבחירה מצוינת למתחילים.
שלב 1הורידו את Audacity והתקינו אותה על ה-Mac שלכם. פתחו את האפליקציה לאחר שתסיימו את ההתקנה.
שלב 2בחר את קלט השמע שלך. הגדר את הקלט למכשיר השמע שלך והתאם את עוצמת הלכידה.
שלב 3כאשר אתם מוכנים להקליט, לחצו על הלחצן תקליט כפתור והתחל לדבר לתוך המיקרופון שלך.
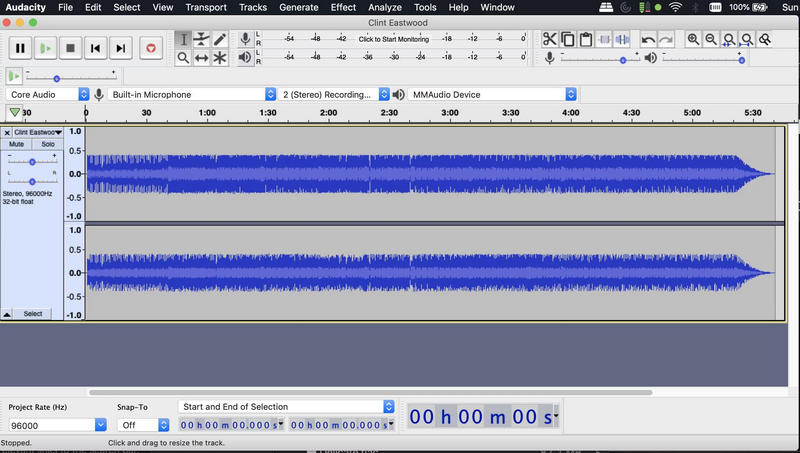
שלב 4לאחר סיום ההקלטה, לחצו על הלחצן תפסיק לַחְצָן.
שלב 5כאשר אתם מרוצים מההקלטה, בחרו את הפרויקט שברצונכם לייצא על ידי מעבר אל קוֹבֶץ > יְצוּא. בחר MP3, WAV, או אפשרות ייצוא אודיו אחרת.
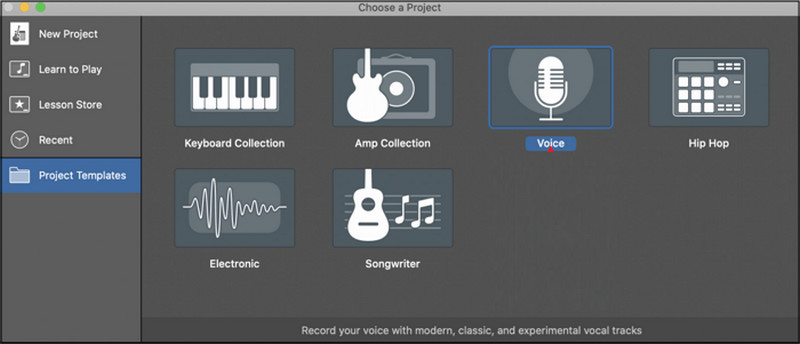
3. שימוש ב-GarageBand
אלטרנטיבה מצוינת ל-Audacity היא GarageBand, שהיא אפליקציה קניינית של אפל המותקנת מראש בכל מחשבי המק. ל-GarageBand יש את כל אותן תכונות כמו של Audacity ועוד, כמו כלי מוזיקה ואפקטים של אודיו. GarageBand טובה אף יותר להפקות מוזיקה ונמצאת בשימוש נרחב ל... להקליט פודקאסט סשנים, קריינות ופרויקטים של אודיו באיכות גבוהה עם בקרת סאונד מקצועית.
שלב 1הפעל את GarageBand ובחר פרויקט חדש, תוך בחירת האפשרות קוֹל.
שלב 2בחר את הקלט שברצונך להקליט איתו. אם תרצה, הפעל ניטור שמע כדי לשמוע את קולך בעת ההקלטה.
שלב 3מכה תקליט ותתחילו את הפגישה שלכם.
שלב 4לאחר שתסיים את ההקלטה, לחץ על תפסיק כפתור. השתמש בתכונות העריכה והתאמת הצליל ב-GarageBand כדי לשפר את ההקלטה שלך.
שלב 5ייצא את פרויקט האודיו המוגמר באיכות ובפורמט הרצויים ל-Mac שלך.
טיפים לבונוס
1. כיצד להקליט אודיו מיוטיוב במק
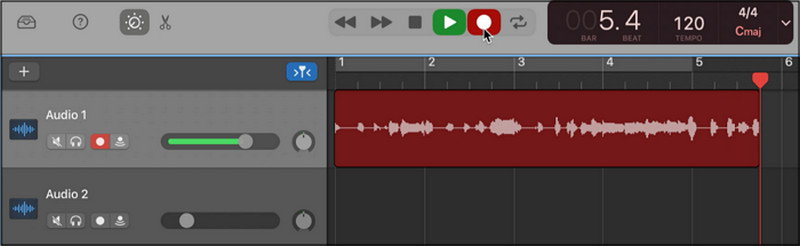
כדי ללכוד אודיו מיוטיוב, קורסים מקוונים, וובינרים והשמעת פודקאסטים ומוזיקה במחשב ה-Mac שלכם, תוכלו להשתמש ב-OBS Studio, תוכנת הקלטה חינמית לצילום וידאו מסך ושידור חי. מכיוון ש-OBS Studio מציעה הקלטות באיכות גבוהה של צלילי מערכת, זוהי אופציה נהדרת.
שלב 1הורד והתקן את OBS Studio במחשב ה-Mac שלך ופתח את התוכנה לאחר התקנתה.
שלב 2צור מקור חדש ב- שֶׁמַע ובחר את התקן השמע של המערכת או את מנהל התקן השמע הווירטואלי שלך.
שלב 3פתחו את יוטיוב בדפדפן וטעןו את הסרטון/אודיו שברצונכם להקליט.
שלב 4לחץ על התחל להקליט כפתור, לאחר מכן הפעל את סרטון/אודיו של YouTube כרגיל.
שלב 5המתן עד לסיום הקלטת האודיו שברצונך להקליט, לאחר מכן לחץ על הלחצן תפסיק ואתר את קובץ השמע, שנשמר כעת במחשב ה-Mac שלך.
2. כיצד להקליט אודיו ב-Mac עם מיקרופון חיצוני
אודיו ממיקרופונים חיצוניים, ברוב המקרים, הוא בעל איכות שמע גבוהה יותר בהשוואה למיקרופון פנימי במחשבי מק. מיקרופונים מסוג USB מחוברים ישירות למחשב מק. עם זאת, מיקרופונים מסוג XLR עשויים להזדקק לממשק שמע לאיכות צליל טובה יותר ולהפחתת רעש. שימוש ב- מקליט המסך הטוב ביותר עבור מק יכול גם לעזור ללכוד הקלטות ברורות יותר בעת שילוב משימות אודיו ווידאו.
שלב 1חבר את המיקרופון שבחרת למק שלך, פתח הגדרות מערכת, לך אל נשמע, והגדר את המיקרופון שחיברת זה עתה כהתקן הקלט.
שלב 2כוונן את עוצמת קלט המיקרופון ובדוק את הצליל כדי לוודא שקולך מזוהה בבירור.
שלב 3פתחו את תוכנת ההקלטה המועדפת עליכם, כגון AVAide Screen Recorder.
שלב 4בחרו את המיקרופון החיצוני בתוך הגדרות התוכנה והתחלו להקליט את הקול או השמע שלכם.
שלב 5עצרו את ההקלטה, בדקו את איכות הצליל ושמרו או ייצואו את קובץ השמע הסופי ל-Mac שלכם.
הקלטת קול של מק בקלות באמצעות כלים מובנים כמו QuickTime ותזכירי קול או תוכנות מתקדמות להקלטות באיכות מקצועית. בין אם אתם זקוקים לשמע פנימי, קריינות פודקאסט או הקלטות הרצאות מקוונות, שיטות אלו מספקות דרכים אמינות ללכידת צליל צלול ביעילות במחשב ה-Mac שלכם.
אודות המחבר

צלם פעילויות מסך עם אודיו, פגישות מקוונות, סרטוני משחק, מוזיקה, מצלמת אינטרנט וכו'.