Have you ever wondered about those tiny tapes capturing your special moments? That is MiniDV - a format once a star in personal videos. Let us discuss why you might want to convert MiniDV to DVD. MiniDV has limitations in storage and where you can play them. On the other hand, DVDs are playable almost everywhere.
Converting MiniDV to DVD is not just about upgrading; it is about keeping your memories safe and accessible. This write-up guides you in turning those little tapes into something you can easily share and enjoy. Stick around, and we will walk you through the simple steps!
Part 1. Use DVD Recorder for MiniDV Video Recording
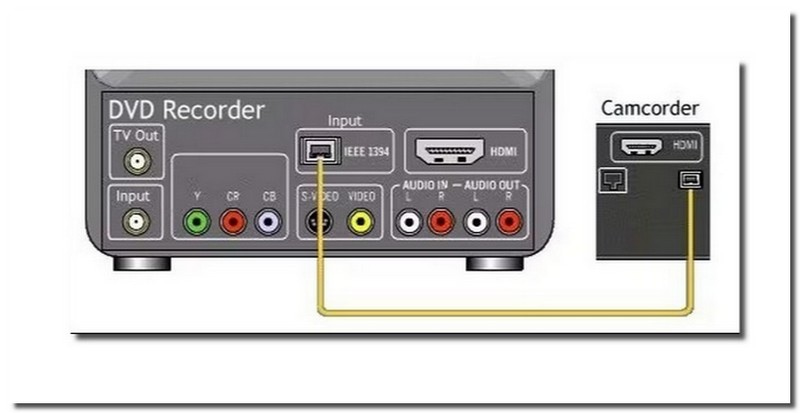
A DVD recorder is a handy device to duplicate homemade videos captured with your camcorder. Recording MiniDVD video onto a DVD using a DVD recorder can be a convenient way to preserve and share memories. However, it is necessary to note that these recorders have limitations when copying commercial videos. This restriction arises from copy-protection mechanisms embedded in commercial content, preventing unauthorized duplication.
Step 1Connect your camcorder to the DVD recorder using FireWire, HDMI, S-Video, or RCA Audio-Video.
Step 2vOn the DVD recorder, select the input that corresponds to your camcorder connection.
Step 3Place the MiniDV tape you want to copy into the camcorder. Also, insert a blank DVD into the DVD recorder.
Step 4Hit Play on the camcorder, then press the record button on the DVD recorder. It will begin copying the MiniDV tape to the DVD.
Step 5Once the copying is complete, press Stop on the camcorder and the DVD recorder.
Part 2. Transfer & Convert MiniDV to DVD
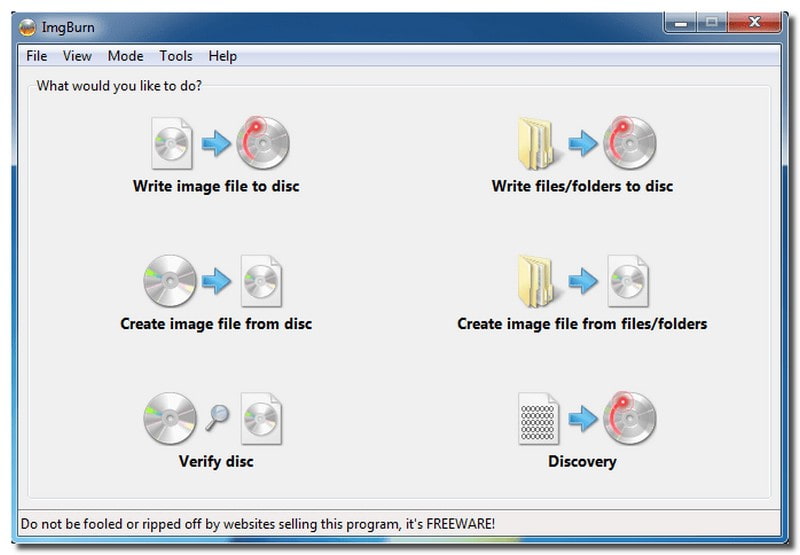
1. ImgBurn
ImgBurn is a versatile and accessible program designed for burning CDs, DVDs, HD DVDs, and Blu-rays on Windows.
This multifunctional platform writes images to DVDs, creates ISO images, and handles batch video file burning. This MiniDV to DVD converter can verify and assess the disc's condition and burning quality. It offers five key features: reading, building, writing, verifying, and discovery. However, the ImgBurn lacks customization options. Meaning you have limited control over specific settings or adjustments.
Below are the steps on how to convert MiniDV to DVD using ImgBurn:
Step 1First, download and install ImgBurn on your computer.
Step 2Once ImgBurn is open, click Write files/folders to disc.
Step 3If your MiniDV files are in AVI or MPEG-2 format, convert them to ImgBurn DVD format.
Step 4Click Browser for a folder to locate and open the converted MiniDV video files.
Step 5Set the maximum Write Speed low under Device and ensure the File System is set to ISO9660 + UDF.
Step 6Place a blank DVD into your computer's DVD drive. Lastly, click the Burn button to start the conversion of MiniDV to DVD.
2. Tipard DVD Creator
Preserving your MiniDV memories has never been easier! Tipard DVD Creator is a novice-friendly platform designed to convert your cherished MiniDV tapes into DVDs efficiently. This MiniDV to DVD converter supports DVD-5, DVD-9, DVD-R, DVD+R, DVD-RW, DVD+RW, DVD+R DL, and DVD-R DL formats.
It offers functionalities for adding and editing audio, video, subtitles, etc. It provides numerous menu templates you can choose from to make your output more appealing. Besides that, you can incorporate background, background music, and opening film if you want to. It works seamlessly on Windows and Mac operating systems. It makes it accessible to a range of users. There is no need for advanced technical knowledge - this platform is designed for everyone.
Step 1Download and Install Tipard DVD Creator on your computer. Once done, follow the installation instructions provided.

FREE DOWNLOAD For Windows 7 or later
 Secure Download
FREE DOWNLOAD For Mac OS X 10.13 or later
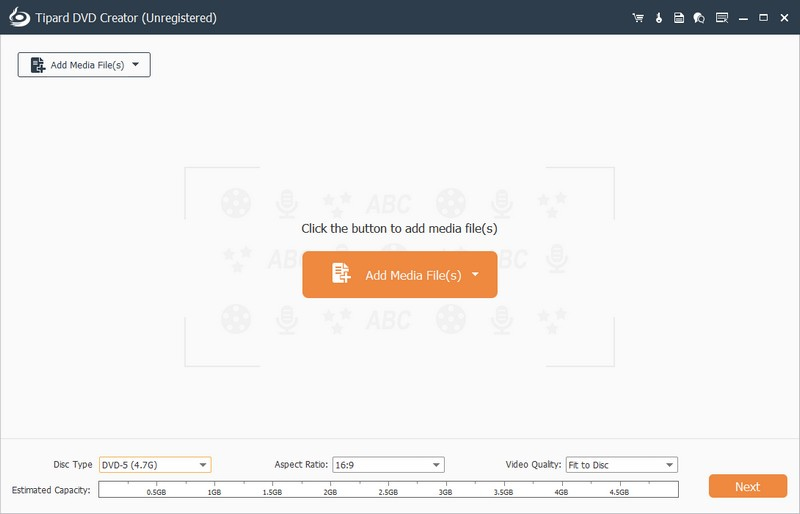
Secure DownloadStep 2Insert a blank DVD into your computer's DVD drive. Open the program and start by selecting your disc type, which is the DVD Disc. Next, click the Add Media Files button to upload your MiniDV files to the program.
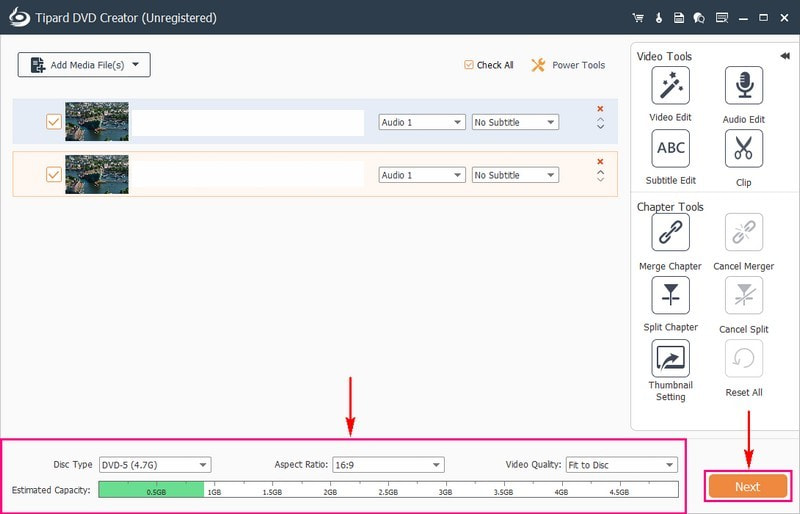
Step 3Once your files are uploaded, put a checkmark beside the Check All option to enable Power Tools. You can use the Power Tools feature to improve your output before converting if you desire.
There are two options under Power Tools: Video Tools and Chapter Tools. The Video Tools offers functionalities to edit video, audio, subtitle, etc. The Chapter Tools offers functionalities to merge and split chapters, cancel mergers and split, etc.
Tip: Remember to click the Apply button after using the tools to save the changes you made successfully.

Step 4Head to the Disc Type to choose DVD-5, DVD-9, BD-25 or BD-50. Move to Aspect Ratio to select 16:9 or 4:3, depending on your liking. Next, choose your preferred Video Quality, which might be Fit to Disc, Low, Medium, or High. Once configured with each option, press the Next button to continue.
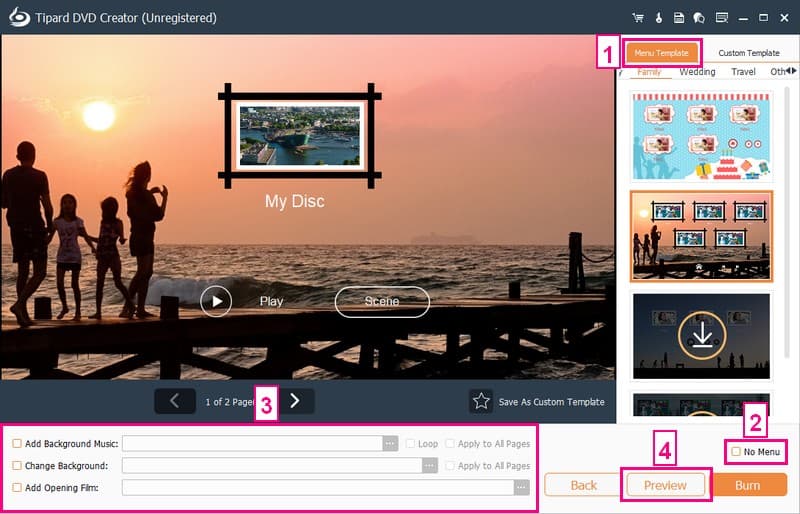
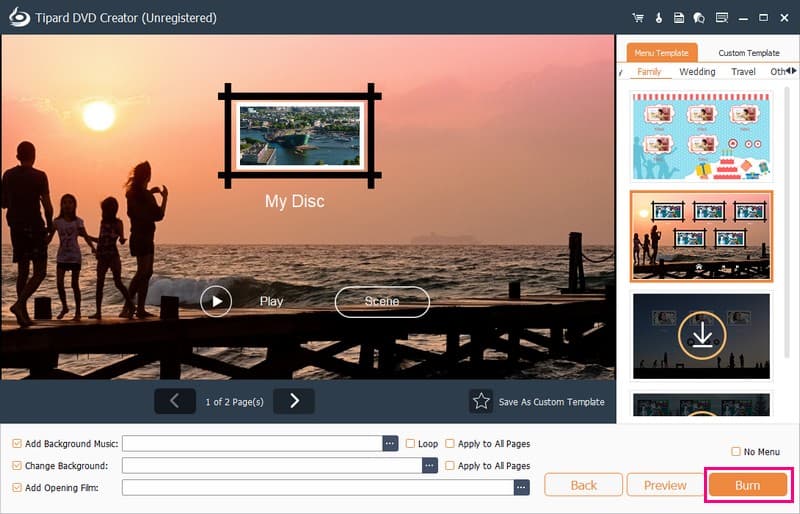
Step 5Select the one from Menu Templates you desire to apply to your output. You can choose from the holiday, family, wedding, travel, and other themes. If you do not want to apply one, put a checkmark beside the No Menu option.
Besides the Menu Template, you can enable the Add Background Music, Change Background, and Add Opening Film options. To do that, put a checkmark beside their respective boxes. To see how your output looks before diving into conversion, click the Preview button.
Step 6Once satisfied, proceed to press the Burn button. It will start the MiniDV to DVD conversion process. The procedure will be completed within just minutes!
Part 3. FAQs about Converting MiniDV to DVD
How long do MiniDV tapes last?
A MiniDV tape can last more than ten years and even up to twenty years if properly stored. However, the lifespan of MiniDV tapes can be significantly influenced by environmental factors. Taking good care of them is essential to ensure they endure longer.
How do I transfer MiniDV to my computer?
First, connect your MiniDV camcorder to your computer using a USB or AV cable. Then, set up a desktop screen recorder. Insert the MiniDV tape into the camcorder. Ensure it is in VCR mode, and load the tape completely.
Open the recording software on your computer. When the MiniDV tape starts playing, hit record to capture the audio. Once the recording is done, save the MiniDV video on your desktop immediately.
What is the best format for backing up MiniDV Tapes?
For the best quality, consider using formats like MPEG-4 or DV-AVI. MPEG-2 is another suitable option, as it aligns with the digital video standard used for DVDs.
Can I customize the DVD menu and quality?
Absolutely! Tipard DVD Creator allows customization of DVD menus, frames, buttons, and background music. It ensures excellent video quality during the conversion process, maintaining the clarity of your MiniDV footage.
Does anyone still use MiniDV?
Despite being in cassette form, MiniDV tapes offered quality comparable to digital images and sound. Some professionals still utilize this format today.
Preserving your MiniDV to DVD is a wise choice. It ensures long-term accessibility and protection against the aging of physical tapes.
Tipard DVD Creator allows you to customize menus, enhance video quality, and share your cherished moments effortlessly. Embrace the convenience of DVDs, which are compatible with standard players. Do not let your MiniDV tapes fade away; convert them to DVDs and enjoy the lasting benefits of this timeless format.
ABOUT THE AUTHOR

Best tool for ripping and converting DVD Disc/Folder/ISO image file into over various formats.