Bad sound can be a big problem even if a video is on point. Knowing how to record good audio with OBS can minimize background noise, level your microphone, and produce clear audio for games, tutorials, or live streaming. These small settings can have a great impact and are frequently overlooked when setting up. This guide covers the key and crucial options for your recording, the audio quality settings, the idea of separate audio recordings, Mac alternatives, and troubleshooting tips to resolve common recording issues to make recording with confidence.
Part 1. Setting Up OBS for Basic Audio Recording
Take some time to configure and tune your audio before recording in OBS. The right selection of input/output devices enables you to prevent issues with sound being lost or not playing at full volume or being distorted. If you do want to learn how to make only OBS record game audio distantly later in this guide, it's also a good starting point here.
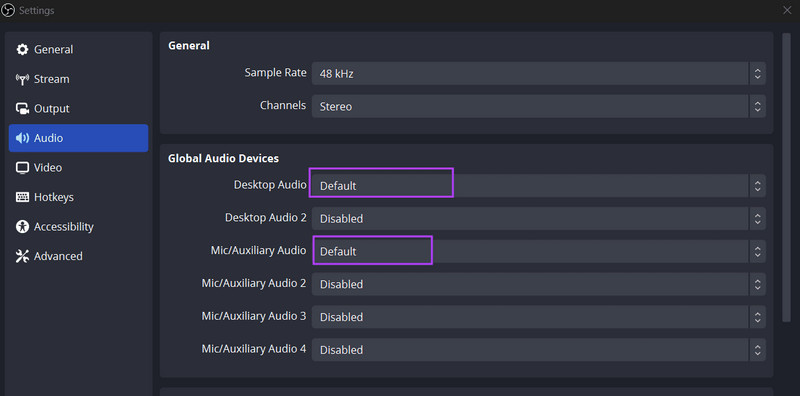
Step 1Open OBS, then click Settings > Audio to access the audio settings.
Step 2Under Global Audio Devices, select the microphone and desktop audio device you want OBS to use. Make sure they match the devices connected to your computer.
Step 3Return to the primary OBS window to examine the Audio Mixer. Speak into the microphone or play music to check that the meters are moving. When the levels hit the red, reducing the volume is a way to keep them from clipping.
Step 4Record a short test clip and play it back. If everything sounds clear, you are ready to start recording.
Part 2. How to Record Only Game Audio
1. Disable Global Desktop Audio & Use Application Audio Capture (Recommended)
If you want OBS to record audio only from your game, disable the global desktop audio source and use Application Audio Capture instead. This will also mean that OBS will not capture the notifications, music, and other device noises, except for the application that you are recording.
Step 1Open Settings > Audio and set Desktop Audio to Disabled under Global Audio Devices.
Step 2Now go back into the main OBS window and click on the + button in the Sources panel. Click on Application Audio Capture (BETA) and add a new source.
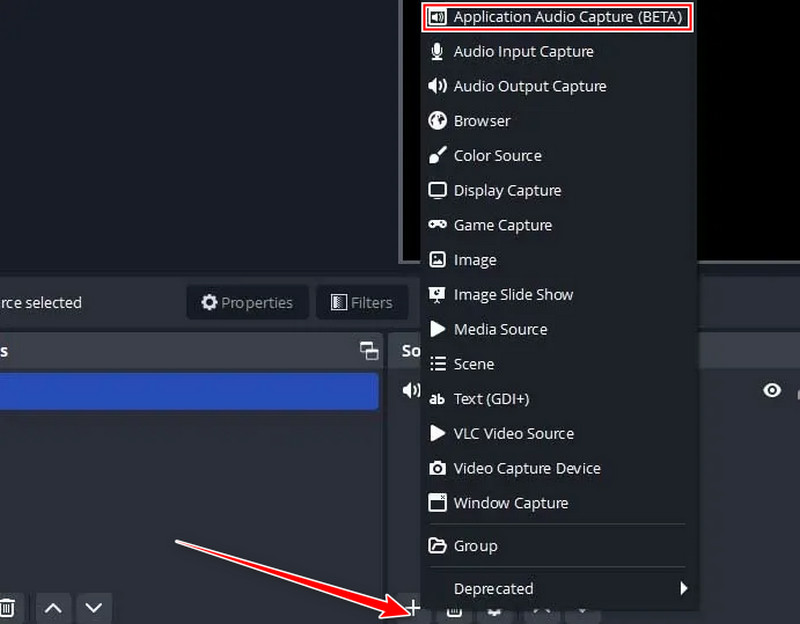
Step 3Choose your game from the application list, then create a short test recording to confirm only the game audio is captured.
2. Use Audio Tracks to Separate Game from Mic
Using separate audio tracks gives you more control during editing because your game audio and microphone are saved independently. This setup is also helpful if you want to record lossless audio on OBS while preserving the highest possible audio quality for each source.
Step 1Open Settings > Output and go to the Recording tab.
Step 2Enable multiple audio tracks for your recording.
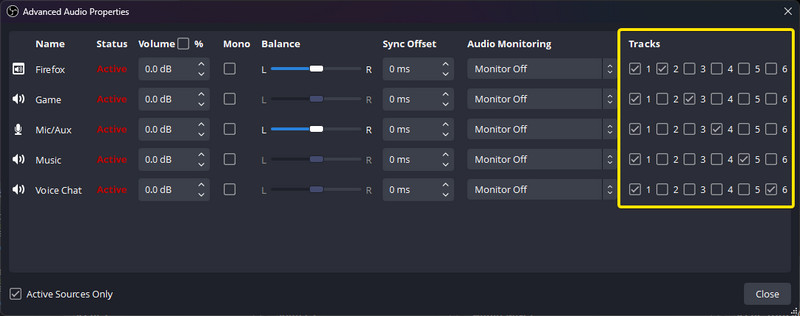
Step 3In the Audio Mixer, click the gear button beside an audio source and select Advanced Audio Properties.
Step 4Assign your game audio and microphone to different recording tracks, then create a short test recording to verify that both tracks were recorded correctly.
3. Use Windows Audio Routing (Advanced)
Windows audio routing lets you send applications to different output devices before OBS Screen Recorder captures them. This method can also help if OBS is not recording audio from a specific game because you can verify that Windows is sending the game's audio to the correct device before recording.
Step 1Open Windows Settings > System > Sound.
Step 2Click on Volume Mixer or App Volume and Device Preferences, depending on your version of Windows.
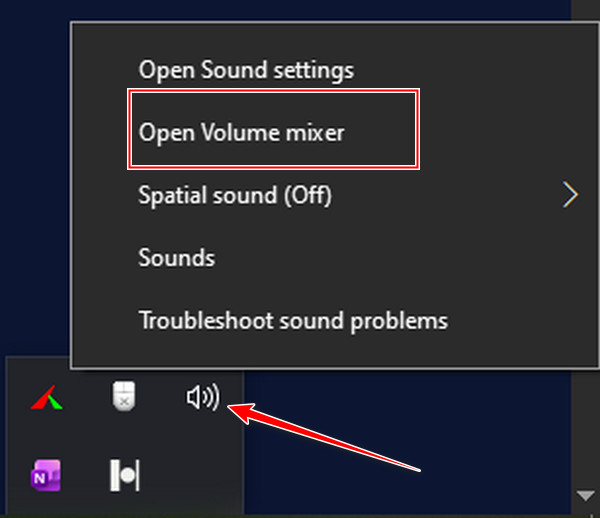
Step 3Set your game to be captured by the output device you wish to have OBS capture. Use OBS or its respective audio output device to add an Application Audio Capture source or select the appropriate audio output device; record a small sample to ensure that the correct audio source is being captured.
Part 3. Recording Lossless Audio in OBS
Lossless vs. Lossy Audio
It's helpful to know the distinction between lossless and lossy audio before gearing up for making recordings with changed settings. When you need OBS to capture audio only in as high a quality as possible, opt for a lossless format, which will capture every nuance of the original recording. Lossy formats compress an audio file to make it smaller and are better suited in cases where storage is a concern.
| Features | Lossless | Lossy |
| Audio Quality | Preserves all original audio data | Removes some audio data to reduce the file size |
| File Size | Larger | Smaller |
| Editable | Better choice for editing because it is usually in raw, and the quality is maintained | When edited multiple times, the quality will be reduced |
| Compression | No data is discarded | Uses compression to reduce the file size |
Lossless Quality Preset (Simple Mode)
The Lossless Quality preset offers the easiest way to record high-quality audio and video without changing advanced settings. It is a good option for beginners who want better recording quality with minimal setup.
Step 1Open Settings > Output. Set Output Mode to Simple.
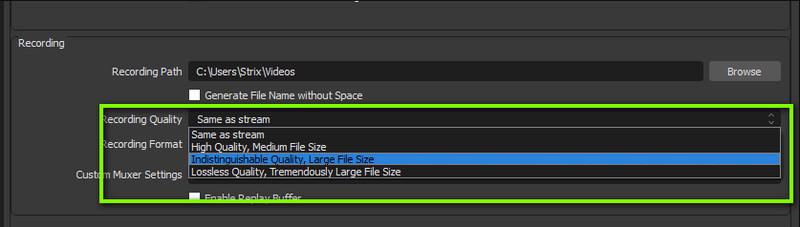
Step 2For Recording Quality, go to Lossless Quality, Tremendously Large File Size. Click Apply, then OK; make a brief test recording.
PCM Uncompressed Audio (Advanced Mode - Higher Quality)
PCM stores audio without compression, making it a preferred choice for professional editing. It is also useful if you are learning how to record audio separately from video OBS, since uncompressed audio preserves the original sound quality for post-production.
Step 1Navigate to Settings > Output and set Output Mode to Advanced.
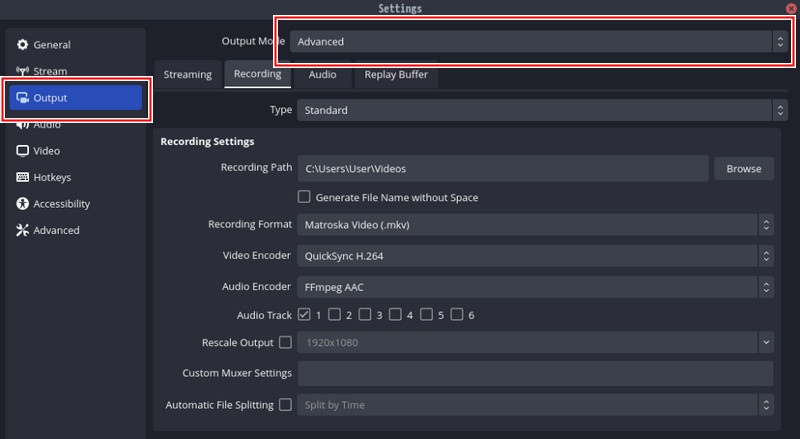
Step 2Select the Recording tab. Pick a recording format that supports PCM audio that is available here.
Step 3Set the PCM as the audio encoder, save the settings, and record a short test recording.
Part 4. How to Record Audio Separately from Video in OBS (Multi-Track Recording)
Recording audio on separate tracks simplifies editing because you can manipulate your microphone, game audio, or other audio sources separately without affecting the others. If OBS is not recording audio on one of your tracks, you can review your multi-track recording settings to make sure each track is getting the proper audio source.
Step 1Open Settings > Output and change Output Mode to Advanced.
Step 2Under the Recording tab, select the audio tracks you want OBS to include in your recording.
Step 3In the Audio Mixer, click the gear button next to an audio source and choose Advanced Audio Properties.
Step 4Assign each audio source, such as your microphone and game audio, to different recording tracks by checking the appropriate track boxes.
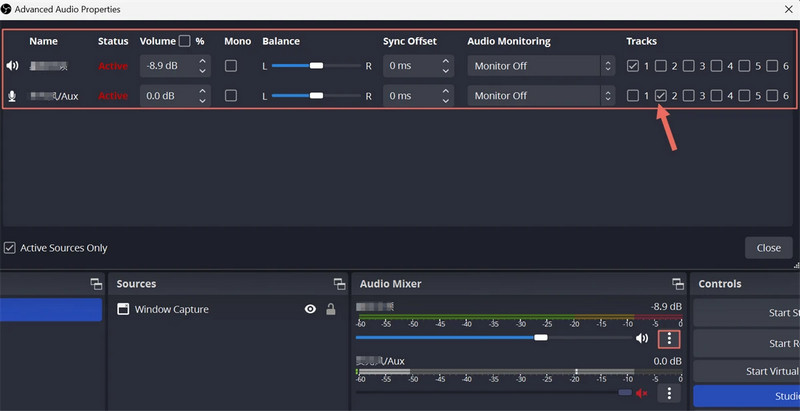
Step 5Record a short test clip and open it in a video editor to verify that each audio track was recorded separately.
Part 5. OBS Record Audio on Mac
Unlike Windows, macOS does not allow OBS to capture system audio directly because of Apple's security restrictions. This makes it more difficult if you are trying to learn how to make OBS only capture game audio, as OBS requires a virtual audio driver to record system sound on a Mac. If you prefer a simpler solution without additional setup, you can use AVAide Screen Recorder. It can capture both system audio and microphone input on macOS, making it a convenient alternative for recording gameplay, tutorials, and other on-screen activities.

FREE DOWNLOAD For Windows 7 or later
 Secure Download
FREE DOWNLOAD For Mac OS X 10.13 or later
Secure Download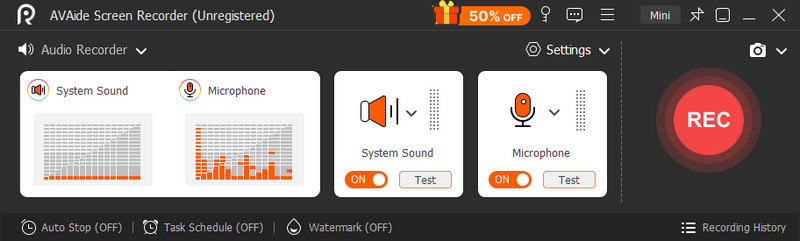
Part 6. Troubleshooting: OBS Not Recording Audio
If OBS is not recording audio, check these common causes before trying more advanced fixes.
1. Incorrect Audio Device
OBS may be using the wrong microphone or speaker. Go to Settings > Audio and make sure the correct input and output devices are selected.
2. Muted Audio Source
A microphone or desktop audio source may be muted in the Audio Mixer. Check that the volume meters are moving and that the source is not muted.
3. Desktop Audio Is Disabled
If Desktop Audio is disabled, OBS will not capture system sounds. Enable it or use Application Audio Capture if you only want to record a specific game or app. If that did not work, try using another audio recording software as an alternative to it.
4. Wrong Audio Track Settings
Your recording may be saved to an audio track that is not enabled or being played back. Review your recording track settings under Settings > Output > Recording.
5. Missing Microphone Permission
Windows and macOS require apps to have permission to access the microphone. Check your system privacy settings and make sure OBS is allowed to use your microphone.
Recordings that have good audio will sound more professional and easier to edit. Many common recording problems can be eliminated by selecting the correct recording settings, separating tracks, and selecting the right recording tools for your operating system. Whether you are creating gameplay videos, tutorials, or podcasts, knowing how to record audio separately from video in OBS gives you greater control during editing. It boosts your content quality and cleanliness.
ABOUT THE AUTHOR

Capture screen activities with audio, online meetings, gameplay videos, music, webcam, etc.