Are you curious about the possibility of recording just an audio with OBS? Although OBS Studio is popular for streaming consistency, recording audio only presents some difficulties. If clear audio is needed without requiring video, solutions are simple. In this article, we will take you through the processes of recording audio on OBS, saving it as an audio-only file, and the most efficient tools for recording audio on Windows and Mac computers.
Part 1. Can OBS Record Audio Only
No, OBS Studio allows audio to be captured only as a secondary channel but not as the main channel. Since OBS was developed primarily with screencasting and commensurate streaming in mind, users must have at least an audio and video source for the software to work. However, users could also turn off all video sources and only record desktop or mic audio sources that are video-less.
Still, some form of video recording is a requirement due to video tracks being included. If the intention is to capture sound only, OBS can perform the recording function while allowing users to subtract the file from the video using third-party applications. Furthermore, Mac users are required to use more programs to record internal sound for other reasons packeted with the system. Recording just sound waves uses volumetric measures, is tedious and needs to be better integrated with OBS.
Part 2. Record Audio with OBS into Video and Convert It to Audio File
As mentioned in the previous section, although you can use OBS to record high-quality videos, OBS can't record audio only. So, what's the solution when the video has been recorded? you can use AVAide Video Converter to convert the recorded video to audio easily.
This program can easily convert any video to audio formats like MP3, FLAC, OGG, ALAC, and other popular and rare audio formats. The high-quality audio track in your OSB recording can be fully kept after conversion.
- Convert OBS recording to an audio file in the best audio quality.
- Support all OSB recording formats and export them to MP3, FLAC, ALAC, and more audio formats.
- Allow you to trim the audio file before conversion.
- Increase the audio bitrate and channels to increase the audio quality.

 Secure Download
1. Recording with OBS
Step 1Use your device to open the application OBS Studio.
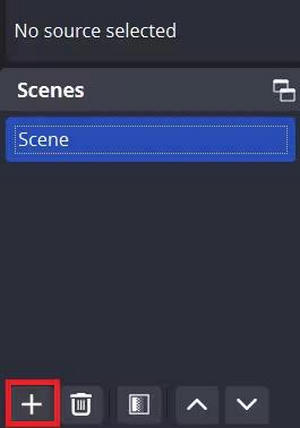
Step 2Under the box titled Scenes, choose the button with the Myoblus sign and enter the name of the new scene.
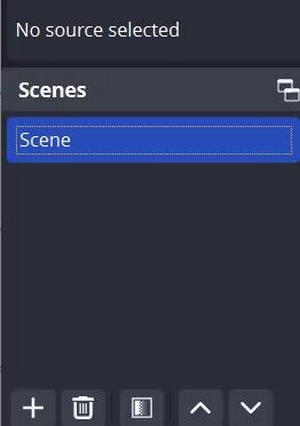
Step 3In the Sources box, locate the + button and decide on the Audio Input Capture option. From the list, choose and click Yes, which is your microphone.
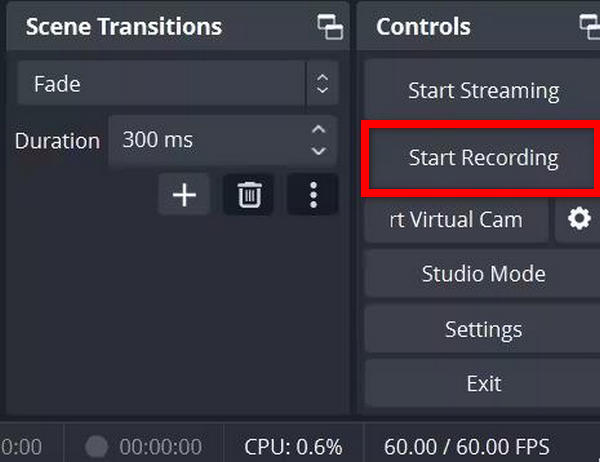
Step 4The Start Recording button located at the right-bottom of the program face also needs to be clicked.
2. Using AVAide Video Converter Convert the Recording to Audio
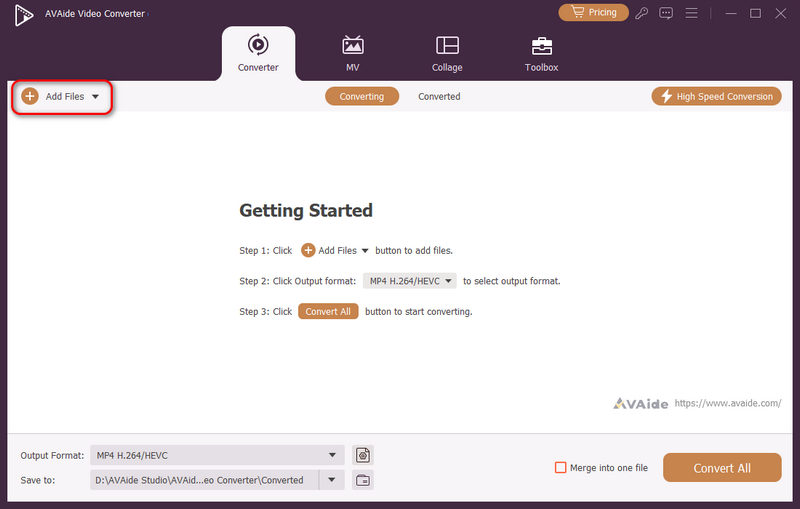
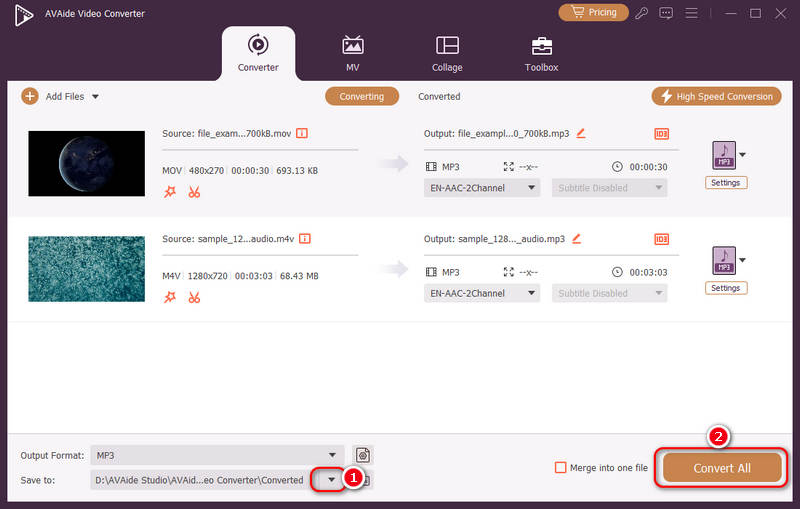
Step 1Download and install AVAide Video Converter on your computer and launch it. Click the Add Files button on the top left side to add your OBS recordings to this program. You can add multiple recordings.
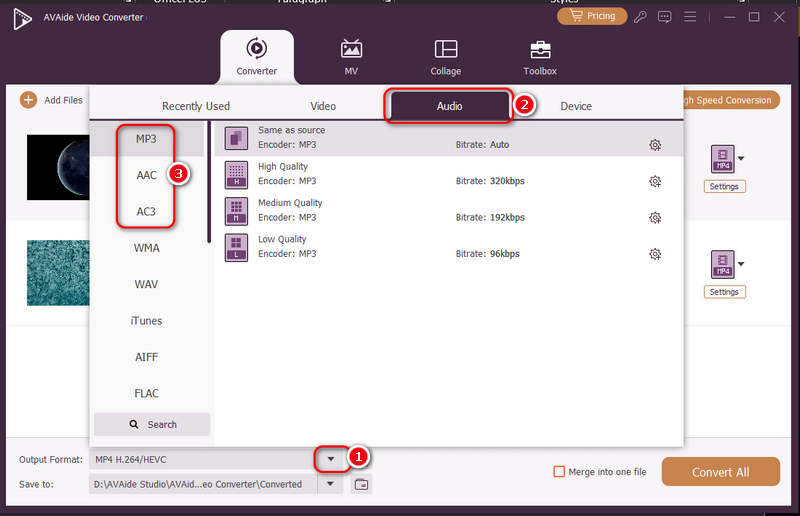
Step 2Click the Output Format dropdown button, and then select the Audio category. Now, you can select a desired audio format, such as MP3, AAC, or AC3. Double-click a format to select it.
Step 3Finally, click the Save to dropdown button to choose an output folder for the upcoming audio file. Click the Convert All button to convert the OBS recordings to audio files easily.
Part 3. Top 3 Alternatives to OBS to Record Audio Only on Windows and Mac
There are a few simple options for Windows and Mac users who are wondering whether there are any solutions for recording audio other than OBS. Whether system audio, voice or both, these tools ensure you do not get too much hassle. Here are three of the best alternatives to the software, with AVAide Screen Recorder taking the first place in this alternative list due to its great capabilities and features combined with a simple interface.
1. AVAide Screen Recorder
AVAide Screen Recorder is one of the best in the market for recording sounds, whether from the computer or the microphone. One of the goals for which AVAide Screen Recorder was designed is a simple and intuitive user experience coupled with strong features that enable professionals to complete their audio recording work effortlessly and efficiently.
- Display and record system audio and microphone at the same time.
- Record the full screen or a portion of it.
- Keep the output in several formats, such as MP3, WAV, etc.
- Cut and make changes to recordings in quite a few easy steps.
How to Record:
Step 1Download the latest version of AVAide Screen Recorder and install it, open the program and click Audio Recorder on the left panel.

Step 2Click the Speaker to tape system sounds or the Microphone for voice.
Step 3Then, hit the REC button to record the audio.

Step 4Click on the red square-shaped button with the word Stop written to complete your voice message and save the audio file.
2. HitPaw Screen Recorder
HitPaw Screen Recorder is the perfect tool for those looking to capture audio efficiently. It comes in handy for live recordings and features quick export options, making it suitable for users who want to get in and out of the application while exporting audio. Additionally, it includes an MP3 metadata editor, allowing users to organize and manage their audio files effortlessly.
Key Features:
• Record Zoom meetings, gameplay, or lectures.
• Cam embeds to improve recordings.
• Recordings in MP3 format can be done in minutes.
How to Record:
Step 1Download and install HitPaw Screen Recorder.
Step 2The program launches. Select Record, then the Game option to capture audio.
Step 3Choose the game or audio you would like to capture.
Step 4Record, then when done, select scissors to output the recording in MP3 format.
3. EaseUS RecExperts
Another good option is EaseUS RecExperts, which already has a knowledgeable base for recording audio from multiple sources and allows users to edit music. With its intuitive design and support for basic and advanced options, EaseUS RecExperts is compatible with various operating systems, catering to diverse user needs.
Key Features:
• Output files can be recorded in over ten different file types.
• Audio can be recorded in video or just audio.
• The app itself provides extensive editing tools for the recordings.
How to Record:
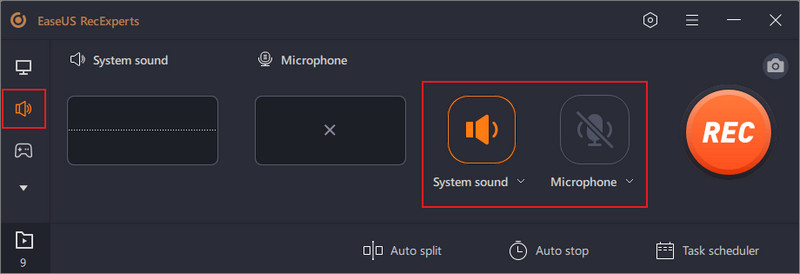
Step 1After starting the app, the standard recording option Audio is chosen.
Step 2System sound, microphone or both can be selected.
Step 3Recording starts when you push the button labeled REC on your device.
Step 4In the record audio section, hit the red square to conclude the recording process and store the audio in the system.
Learning ways of making OBS record game audio only may enhance your recording capabilities. Thank you for mastering the usage of OBS's configuration for selective audio sources. Knowing how to work with audio sources allows you to deliver high-quality audio recordings without background noise, which is perfect for a variety of applications, whether for gaming or professional use.
Record screen, audio, webcam, gameplay, online meetings, as well as iPhone/Android screen on your computer.