A webinar creates lasting value because its recorded version serves as an ongoing resource. Knowing how to record a webinar ensures that important insights, training sessions, or product demos remain accessible long after the live event ends. The process of recording webinars enables both internal reuse of content and audience engagement because it enhances both reach and impact.
Part 1: 2 Ways to Record Webinar on Windows
1. AVAide Screen Recorder
AVAide Screen Recorder is a user-friendly tool that makes learning how to record a webinar simple and efficient. This tool enables users to obtain high-quality recordings of both video plus audio when they want to document either the complete screen or specific portions. Automation scheduling is included in the software, so you can have it start recording without manual intervention. Users who seek simple video webinar-saving solutions should consider AVAide because it provides real-time annotation capabilities with various format options.
Step 1To use this screen recorder, you will need to click the download button that we have here to install it on your Windows, but you can also have it on your Mac. Install the screen recorder properly by following the setup and launching it afterward.

FREE DOWNLOAD For Windows 7 or later
 Secure Download
FREE DOWNLOAD For Mac OS X 10.13 or later
Secure DownloadStep 2After that, adjust the recording frame by dragging the points, or you can click the Full Screen. Then, activate the web if you want to include your face in the recording and use the system sound to record all the emulated sounds during the webinar. When that is done, click the REC button to start.

Step 3After recording, click the stop button. In the recording history, you can trim the recorded webinar video if it is needed and play it afterward to check it.

2. OBS Studio
If you are wondering how I can record a webinar, OBS Studio is a free and powerful option. OBS Studio provides top-notch screen capture features and a primary function, although people most often use it to stream live content. The program lets users modify audio together with video parameters to fit different webinar recording needs. Users can experience professional-grade recording through this tool after learning its advanced specifications but still receive unlimited recording capability with no watermark distraction.
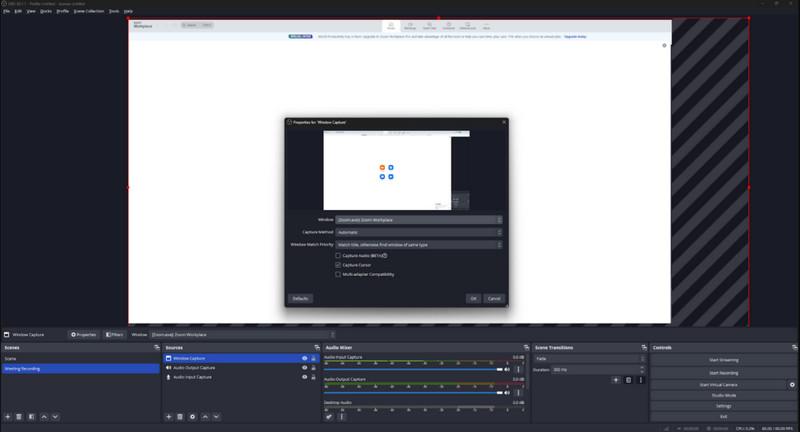
Step 1Launch the OBS Studio, click the + button, and choose the Scene under the bottom corner.
Step 2Right next to it, click Sources > + > and choose the Display Capture that allows you to enter the name of your display and click OK.
Step 3Then, a new window will appear where you can choose the screen to record. Use the drop-down to select the correct display, and you can also include the mouse curser by ticking the box check or not and clicking OK to save.
Step 4Choose the Settings > Output to choose the format you want. Under the Recording, look for the Recording Path and click Browse to determine where the recorded file will be saved.
Step 5Once done, click the Start Recording to begin the OBS recording and click the Stop Recording to end it.
Part 2: 2 Ways to Record a Webinar on Mac
1. QuickTime Player
Ever wondered how to record a webinar on my computer? QuickTime Player functions as an integrated, simple recording solution. The application enables simple recording from full screen or specified regions under optional audio settings. The application requires no setup or downloads and operates efficiently. This application allows for webinar recording without advanced capabilities but effectively captures presentations without sound and saves them for future use. Basic recording tasks work effectively with QuickTime.
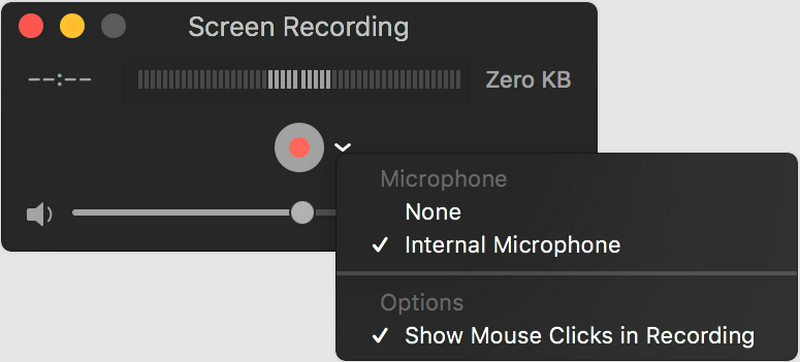
Step 1Open the QuickTime Player and click the File, then New Screen Recording, or you can use a shortcut with Control + Command + N
Step 2Launch the webinar meeting, and in the recording window, click the small arrow next to the Record button to activate the microphone and show mouse clicks when needed.
Step 3Adjust the recording area by dragging it to the selected location, or you can simply click the entire screen. Then, tick Start Recording.
Step 4Tick the Stop button at the menu bar, and the recorded webinar will be automatically saved on your device.
2. Movavi Screen Recorder
Movavi Screen Recorder for Mac is a user-friendly tool that works well for webinar recording. The software enables users to produce recordings through either extended or subset screen view while granting the option to capture both system-generated sounds and microphones during playback. The recording scheduling is available in Movavi Screen Recorder for Mac, as well as the features for showing mouse clicks and the option to add webcam overlays. Following recordings, the Movavi Screen Recorder provides simple functions to cut your video.
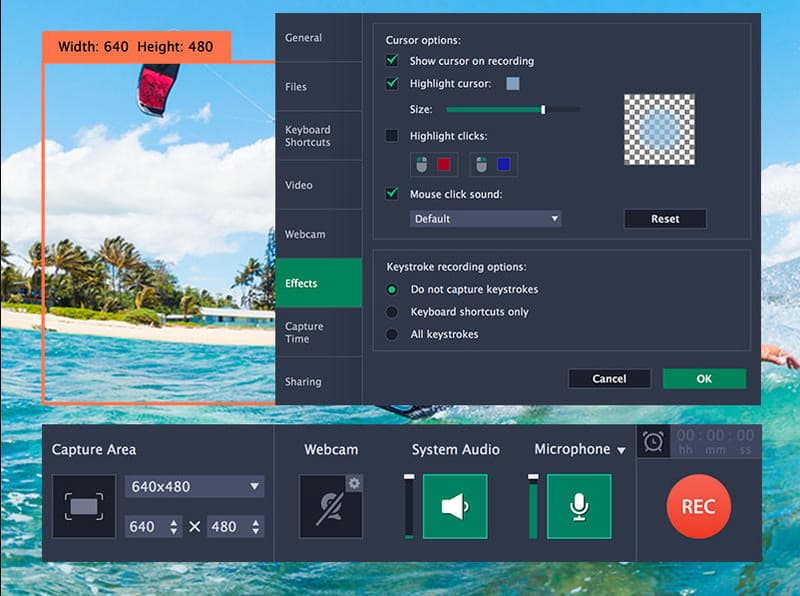
Step 1Download the latest version of the Movavi Screen Recorder from its official website and launch. Click the Video Camera button on the sidebar and use your cursor to drag and adjust the recording.
Step 2Tick the REC button to start and control its processing while you are recording the webinar.
Step 3Click the Export button to save your webinar recording.
Part 3: How Can I Record a Webinar Online for Free
The Screen-Recorder.com online screen recording tool is absolutely free for users who need to record their screen with webcam and audio through their browser without requiring any downloads or account setup. Anyone using Chrome Edge or Firefox browsers can access this screen recorder tool, which allows video recordings without watermark addition. All recordings are saved directly to your device as a privacy measure, and the tool does not have any limits for video creation. People who need basic screen recording capabilities will find this best online screen recorder to be their perfect solution.
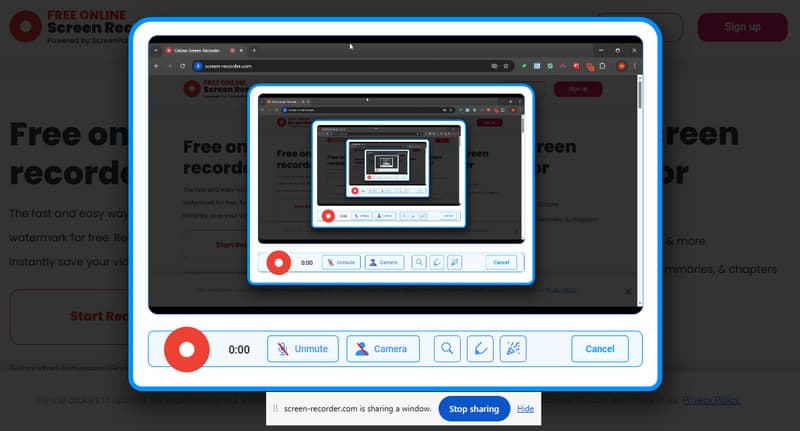
Step 1Visit the official screen recorder page and click the Start Recorder button. It will allow you to choose the recording area you want to use, such as the Chrome tab, Window, or the Entire Screen.
Step 2Next, tick the record button to start the recording, and when you are finished, click the Done Recording button.
Step 3If you want to edit the video, you can download the ScreenPal, or you can tick the download button to have it on your device.
Since you need a webinar recording, it can now be done with the use of reliable Windows, Mac, and online screen recording applications. It can be either built-in or downloadable. Choosing the perfect one for your needs can be confusing, especially if this is your first time. To safely have a smooth sailing recording, we suggest that you download and use the AVAide tool. It is the perfect solution for your recording needs. As long as you have internal storage on your PC, you can record high-quality videos of your webinar meetings at a very low cost. No additional setting is needed, for it is already built for recording anytime and anywhere you need it.
Record screen, audio, webcam, gameplay, online meetings, as well as iPhone/Android screen on your computer.