There are many reasons to record audio on an iPhone. You might want to capture a lecture, save a quick idea, record a podcast, or keep a personal note. No matter the reason, having a clear recording helps you remember and share it later.
Here, we will teach you how to record audio on an iPhone using both a built-in app and a third-party app for higher-quality sound. By the end, you will also learn useful tips to get high-clarity audio recordings.
Part 1: How to Record Audio on iPhone Using the Built-in App
The iPhone has a built-in app called Voice Memos that helps you capture clear audio with little effort. It gives you a simple screen with easy buttons, so you know what to press right away. It also shows a sound line that helps you check if your voice is too loud or too soft. It works well for class notes, ideas, music, and personal messages. Each file saves on its own, so you do not lose your work, and you can rename your recordings to keep them neat.
Refer to the steps below to learn how to record only audio on an iPhone using Voice Memos:
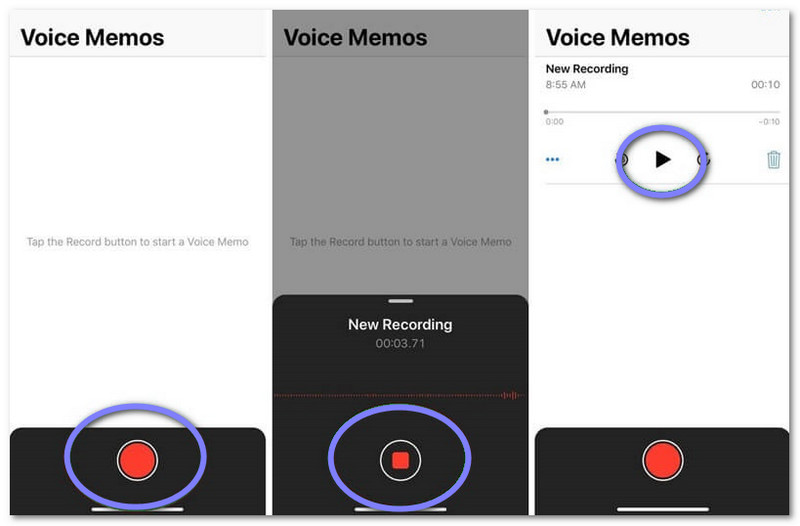
Step 1Look for the Voice Memos app on your iPhone. You can swipe down on the Home Screen and type "Voice Memos" in the search bar. You can also swipe left until you reach the App Library. The app is inside the Utilities folder. Tap it to open.
Step 2You will see a big red circle at the bottom of the screen. It is the Record button. Tap it to start recording right away.
Step 3While the app records, you will see an Orange dot at the top of your screen. It means the microphone is working. You will also see a moving waveform. It shows how loud your sound is. If the lines fill up too much, your audio may be too loud. You can fix this by moving your iPhone a little farther from the sound.
Step 4If you want to take a short break, swipe up from the waveform to see more tools. Tap Pause to stop for a moment. Once you are ready, tap Resume to continue. If you want to finish the whole recording, tap Pause and then tap the red Stop button at the bottom.
Step 5Voice Memos saves your audio right away with a default name. It may use the date, the location, or it may say New Recording. To rename it, tap the name, type the new title on your keyboard, and press Return. Your recording is now saved and ready to use.
- If you are wondering where audio recordings are saved on iPhone, here is the answer. Recordings made with the Voice Memos app stay inside the app itself. If you turn on iCloud sync for Voice Memos, your recordings will also appear on other Apple devices signed in with the same Apple ID.
Part 2: Best Way to Record High-Quality Audio on iPhone
The best way to record high-quality audio on an iPhone is by using AVAide Screen Recorder. This program has a built-in phone recorder that works with both iOS and Android, so that you can capture clean sound straight from your phone speaker. It gives you clear audio for podcasts, music, interviews, and more.
Another impressive thing about it is that it has no time limits and no watermark, which makes your work feel more professional. Moreover, you can record and edit your audio in one go, so you save time and keep everything simple. AVAide Screen Recorder turns your phone and computer into a small studio that is easy to use for beginners and professionals.
- Allows instant preview of recordings.
- Lets you edit videos right after recording.
- Captures high-quality audio for clear sound.
- Records screen in 4K or 1080p for sharp visuals.
- Supports multiple audio formats like MP3, M4A, WMA, and FLAC.

 Secure Download
Refer to the guide below to discover how to record audio on iPhone using AVAide Screen Recorder:
Step 1You must have AVAide Screen Recorder on your computer before you start. Refer to the Download buttons that match your device. Pick the right one for Windows or Mac. It helps the program run well and avoid errors.
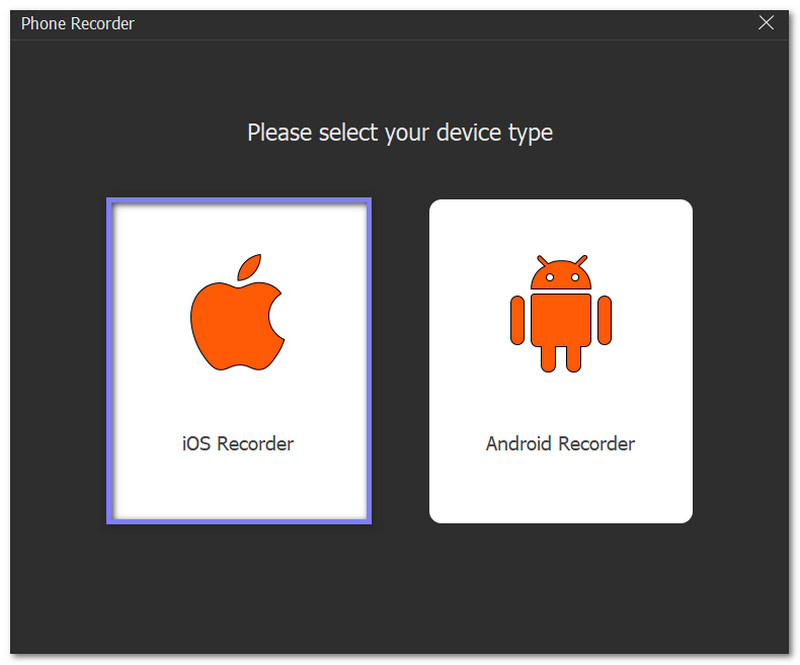
Step 2Launch the program and select Phone Recorder in the drop-down. A new display will show up. You must choose the iOS Recorder option so the recorder can connect to your iPhone.
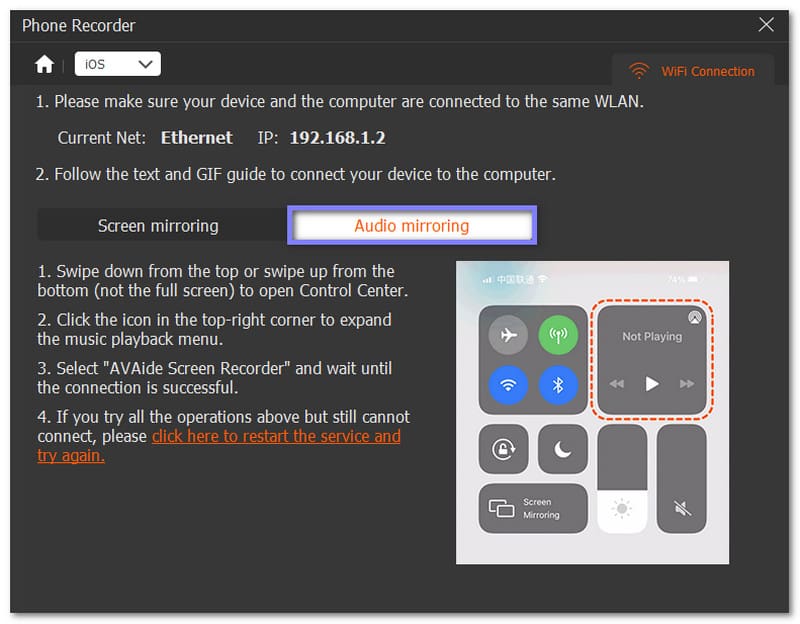
Step 3Make sure your iPhone and your computer use the same Wi-Fi network. On the program, select Audio Mirroring. Then, on your iPhone, open the Control Center. Tap your Music Playback box to expand it and choose AVAide Screen Recorder from the list. It links your phone audio to your computer.
Step 4Once the connection is set, you will see the recording display. Go to Settings and turn on Phone Speaker under Recording Content. It makes the audio clear. Play the sound or music you want to capture on your iPhone. Then, click the Record button to start. You can pause or stop anytime.

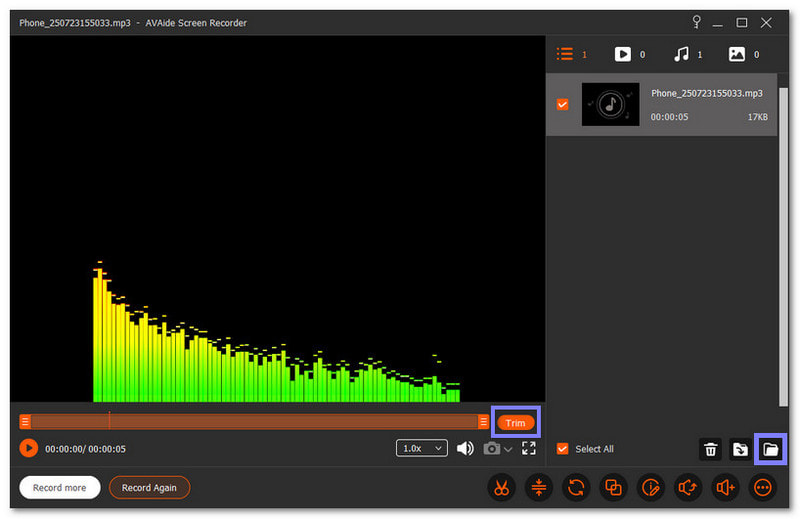
Step 5After you stop the recording, the exporting will begin. A new display appears. You may trim the audio if you want a cleaner result. Once done, click Export. You can also label your file to keep it organized. Hit Complete to finish everything.
Extra Details: AVAide Screen Recorder is more than just an audio recorder. It can also record your iPhone screen, as well as your Android screen. It makes it useful for tutorials, gaming, and presentations. You can capture both screen and sound at the same time in high quality.
Part 3: Tips to Record High-Quality Audio on iPhone
We are done with how to make an audio recording on an iPhone. Now, we want you to get the best and clearest sound possible. We will list tips to help you get cleaner results, no matter what app you use.
These tips will help you reduce noise, place your device in the right way, and give your microphone the best chance to capture every sound. The goal is to make your audio crisp and professional, whether it is for music, podcasts, or interviews.
1. Position Your iPhone the Right Way
Good audio starts with the right phone position. The main mic sits at the bottom of the iPhone, but newer models have extra mics. Make sure nothing blocks them. Hold your phone gently, and do not cover the holes. Keep the sound source close, but not too close. It avoids harsh breaths and crackling noise. Clear space around your device helps it pick up full sound.
2. Silence Alerts or Switch to Airplane Mode
Any notification can ruin a great take. Turn on mute to stop alert sounds. It keeps message tones out of the recording. The best choice is airplane mode. It blocks calls, alerts, and vibrations. It gives you a quiet phone that focuses only on your audio.
3. Change Your Audio Settings for Better Quality
Your iPhone has options that improve audio clarity. Go to Settings > Voice Memos > Audio Quality > choose Lossless for the best sound. Lossless keeps more detail because it avoids heavy compression. Make sure your phone has the latest iOS update so your features work well.
4. Use a Separate Microphone for Clearer Sound
Your built-in mic is good, but an external mic is better for tough jobs. It picks up a richer sound and reduces noise from holding your phone. It also lowers vibration and movement sounds. Many small mics plug straight into your iPhone. They help a lot with music, interviews, and outdoor recording.
5. Improve the Audio Through Simple Editing
Editing helps you fix small mistakes. Use your recording tool or another audio editor. Trim silence, reduce noise, and raise the parts that sound weak. Simple edits make your final track brighter and cleaner. Editing is the last step that turns a normal clip into a high-quality audio file.
Make sure you follow these tips to record high-quality audio on iPhone, and your recordings will sound clear and professional.
For simple and quick recordings, Voice Memos is perfect. It is easy to use, saves files automatically, and keeps your recordings organized. For higher-quality audio, AVAide Screen Recorder works like a personal studio. It captures clear sound from your phone speaker, lets you edit recordings right away, and has no time limits or watermarks.
So many reasons to record just audio on iPhone, but whatever your reason is, we have guided you on what you need to do. With the right method, you can always have clean, professional audio ready whenever you need it.
ABOUT THE AUTHOR

Record screen, audio, webcam, gameplay, online meetings, as well as iPhone/Android screen on your computer.