Imaginează-ți că încerci să salvezi un tutorial, un moment de joc sau o întâlnire online, dar nu ești sigur cum să îl capturezi pe dispozitiv. Știind... cum să înregistrezi ecranul pe iPad poate facilita salvarea și partajarea acestor momente. Acest ghid vă prezintă cum să activați înregistrarea, să utilizați sunetul, să rezolvați problemele și să îmbunătățiți calitatea pentru înregistrări ale ecranului mai fluide și mai bune de fiecare dată.
Partea 1. Cum să activați înregistrarea ecranului pe iPad
Nu vă faceți griji, butonul de înregistrare a ecranului nu este încă instalat în Centrul de Control, cu excepția cazului în care nu îl aveți pe iPad. Apple a inclus această funcționalitate nativ în iPadOS și trebuie activată înainte de a putea fi utilizată. Odată adăugată, puteți înregistra ecranul oricând cu o simplă glisare și atingere.
Pasul 1Apasă pe Setări aplicație pe iPad-ul tău.
Pasul 2Click pe Centrul de Control în meniu pe măsură ce derulați în jos.
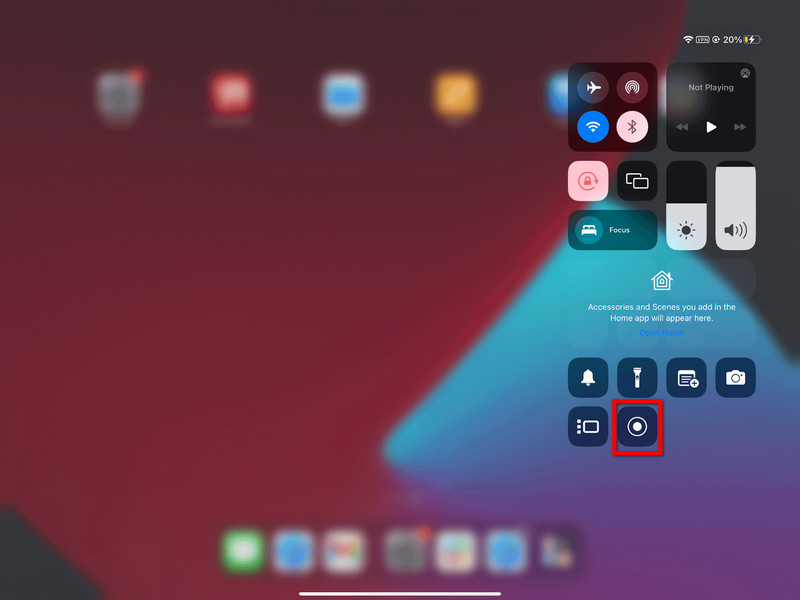
Pasul 3Apasă pe + (Adăugați) butonul din Înregistrare ecran secțiune din lista de controale disponibile.
Pasul 4Pentru a accesa Centrul de Control, glisează în jos din colțul din dreapta sus al ecranului. Acum ar trebui să vezi înregistrarea.
Partea 2. Cum să înregistrezi ecranul pe iPad
După ce îl activezi, înregistrarea ecranului iPad-ului este ușoară și rapidă. Înregistratorul încorporat în iPadOS este o funcție perfectă care îți permite să capturezi jocuri, tutoriale sau chiar apeluri video fără a instala aplicații terțe.
Pasul 1Atingeți și mențineți apăsat colțul din dreapta sus al ecranului iPad-ului, apoi trageți-l în jos.
Pasul 2Atingeți pe Înregistrare ecran Va exista o numărătoare inversă de 3 secunde înainte de începerea înregistrării.
(Opțional) Țineți apăsat Înregistrare ecran butonul și atingeți Microfon pentru a o activa atunci când doriți să vă înregistrați vocea.
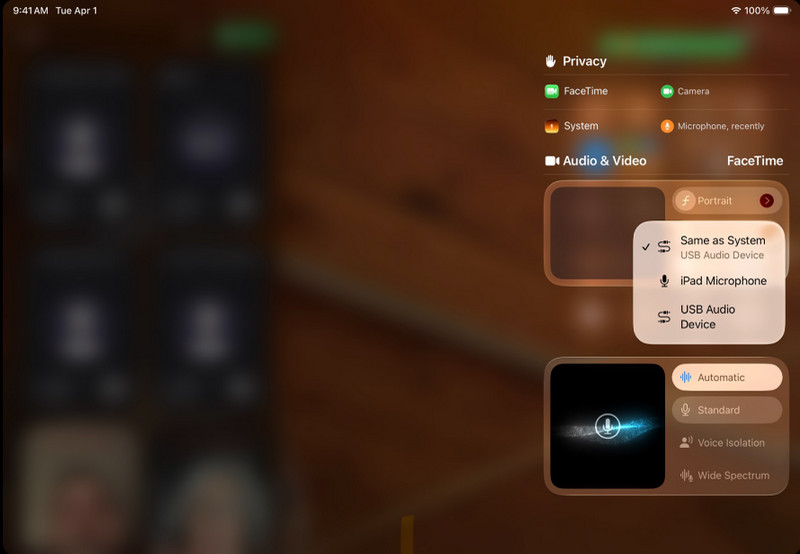
Pasul 3Selectați aplicațiile sau activitățile pe care doriți să le înregistrați.
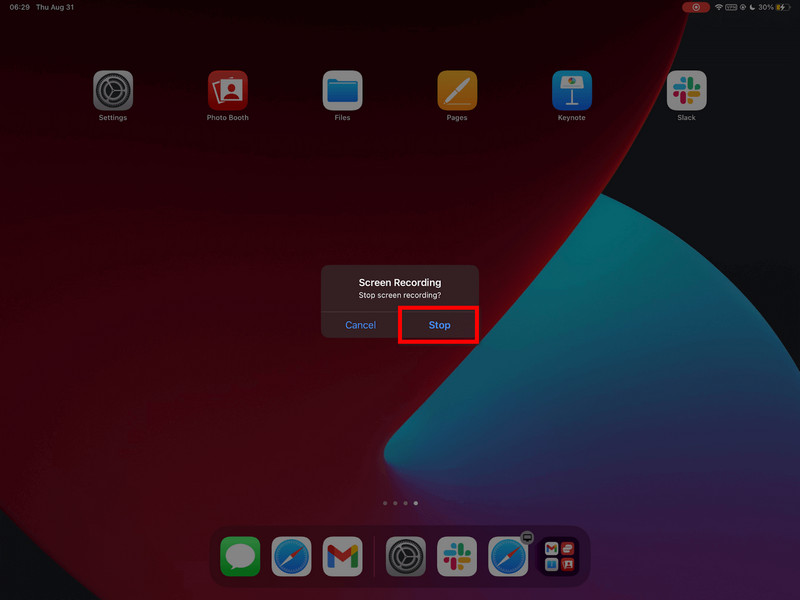
Pasul 4Atingeți bara de stare roșie, apoi atingeți Stop, sau întoarceți-vă la Centrul de Control și atingeți Record butonul din nou.
Pasul 5Videoclipul dvs. va fi salvat automat în Fotografii aplicație, unde o puteți edita sau partaja.
Partea 3. Cum să înregistrezi ecranul pe iPad cu sunet
Capturarea ecranului și a sunetului cu iPad-ul este utilă pentru tutoriale, jocuri, cursuri online și demonstrații. Înregistrarea pe iPadOS funcționează doar într-o măsură limitată și este important să înțelegeți relația dintre microfon și sunetul sistemului înainte de înregistrare.
Distincție importantă: Microfon vs. Sistem audio
| Tip audio | Ce înregistrează | Disponibilitate pe iPadOS | Cele mai bune cazuri de utilizare |
| Microfon audio | Vocea ta și sunetele externe sunt captate de microfonul iPad-ului. | Disponibil | Comentarii, tutoriale, narațiune. |
| Sistem audio | Sunete interne din aplicații, jocuri, videoclipuri și redare media. | Nu este susținut direct | Necesită instrumente externe sau o soluție alternativă. |
Pași pentru înregistrarea audio cu un microfon
Pasul 1Glisați în sus din dreapta sus a ecranului iPad-ului pentru a deschide Centrul de Control.
Pasul 2Țineți apăsat Înregistrare ecran buton pentru a vedea mai multe opțiuni.
Pasul 3Apăsați microfonul pentru a-l porni. Ar trebui să se aprindă în roșu pentru a indica faptul că înregistrarea vocală este activată.
Pasul 4Clic Începe să înregistrezi...iar când numărătoarea inversă de 3 secunde se termină, începe înregistrarea.
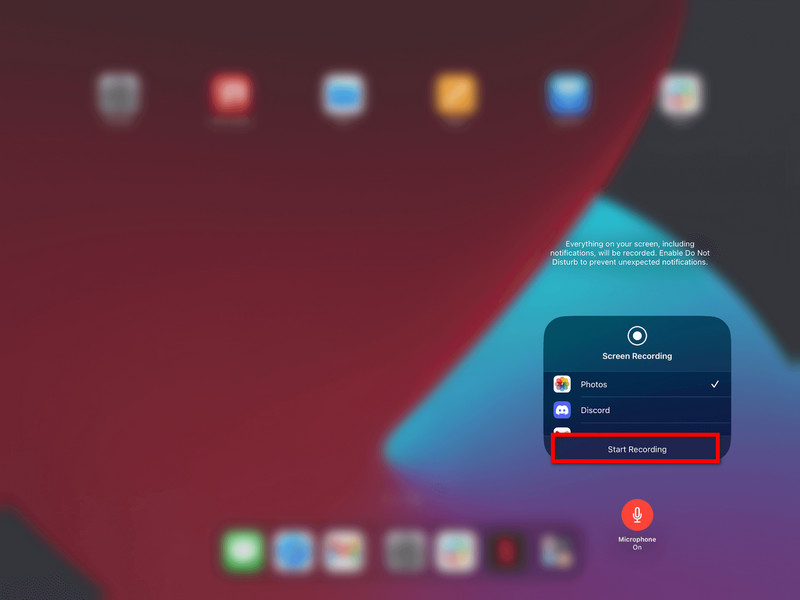
Pasul 5Repetați mișcările pe care doriți să le înregistrați. Dacă microfonul este pornit, vocea dumneavoastră va fi înregistrată.
Pasul 6Atingeți bara de stare roșie din partea de sus a ecranului sau reveniți la Centrul de Control și atingeți Record butonul din nou.
Pasul 7Videoclipul va fi salvat automat în Fotografii aplicație, unde o puteți vizualiza sau edita.
Alternativă pentru înregistrarea audio a sistemului
Din păcate, din cauza limitărilor sistemului, nu puteți înregistra audio intern direct pe iPad, așa că este necesară o soluție bazată pe computer. Un instrument excelent este AVaide Screen Recorder, care vă permite să oglindiți un iPad și să înregistrați simultan sunetul ecranului și al sistemului.
AVAide Screen Recorder este un software de înregistrare a ecranului de înaltă calitate care capturează activitatea ecranului cu claritate. Poate înregistra fără latence sau întârziere până la 4 K/1080p. De asemenea, permite înregistrarea simultană a sunetului sistemului și al microfonului, perfect pentru tutoriale, jocuri și prezentări.
- Înregistrarea de înaltă calitate vă permite să capturați videoclipuri în 4K sau 1080p cu rezultate clare și de înaltă calitate.
- Sunet dual
- Suportă înregistrarea simultană a sunetului sistemului și a sunetului microfonului.
- Funcția iOS Screen Mirroring afișează și înregistrează ecranul iPad-ului pe un PC sau Mac.
- Modurile de ecran flexibile acceptă înregistrarea pe tot ecranul sau pe o zonă personalizată.
- Instrumentele de editare încorporate vă ajută să decupați, să îmbunătățiți și să editați rapid înregistrările.

 Descărcare sigură
Pasul 1Descarca si instaleaza
Vizitați site-ul oficial și descărcați AVAide Screen Recorder. Descărcați AVAide Screen Recorder de pe site-ul oficial. După instalare, acesta poate fi rulat de pe computerul Windows sau Mac.
Pasul 2Selectați opțiunea iOS
În interfața principală, faceți clic pe Recorder de telefon, apoi selectați Recorder iOS din lista de opțiuni (iOS și Android).
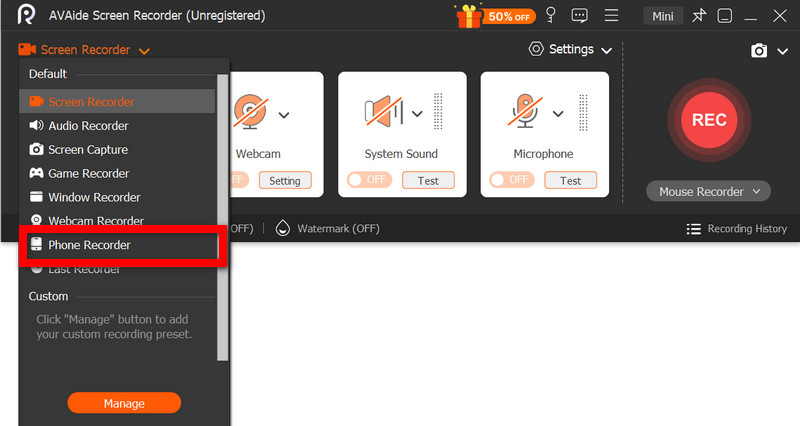
Pasul 3Conectați iPad-ul la PC
Oglindirea wireless a iPad-ului pe computer este posibilă prin aceeași rețea sau printr-un cablu USB, dacă este disponibil unul. În aplicația Screen Mirroring de pe iPad, alegeți dispozitivul AVAide. Veți vedea ecranul iPad-ului afișat pe computer odată ce v-ați conectat.
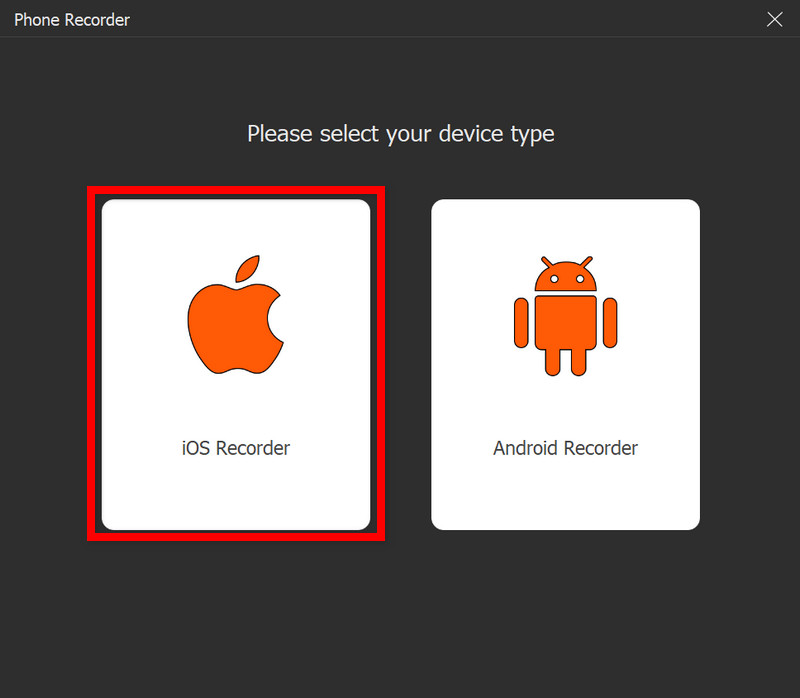
Pasul 4Începe să înregistrezi
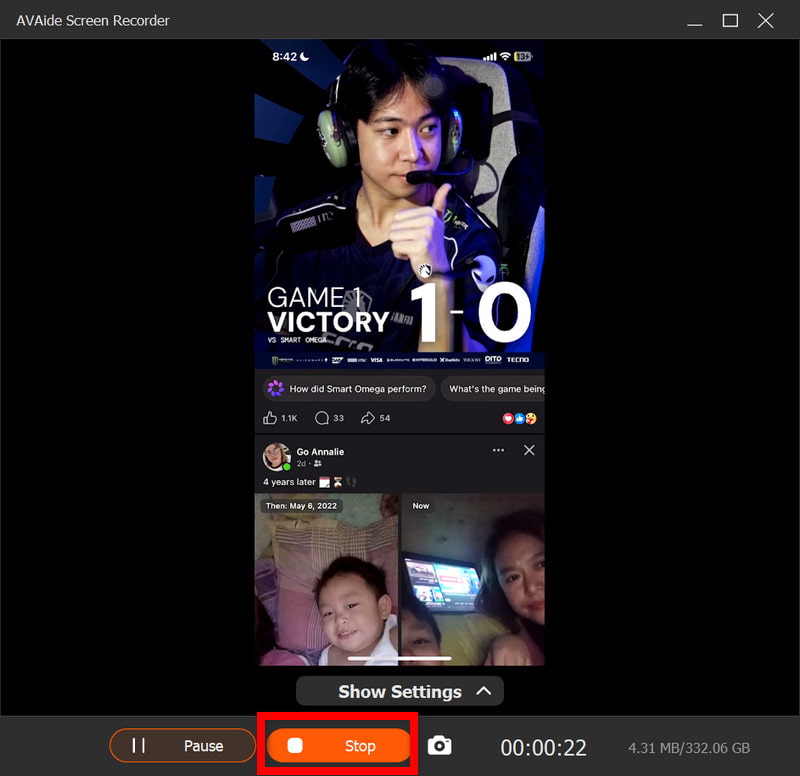
Cu oglindirea reușită, apăsați Record pentru a începe înregistrarea ecranului iPad-ului, a sunetului sistemului și a intrării microfonului (dacă există).
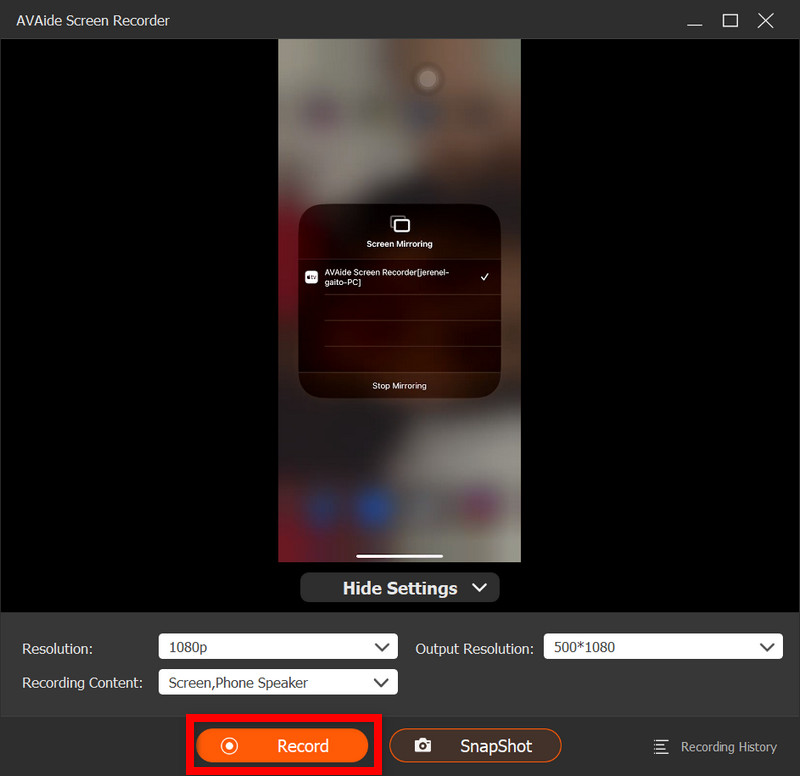
Pasul 5Opriți înregistrarea
apasă pe Stop apăsați butonul când ați terminat. Înregistrarea va fi salvată automat pe computer.
Pasul 6Editați videoclipul
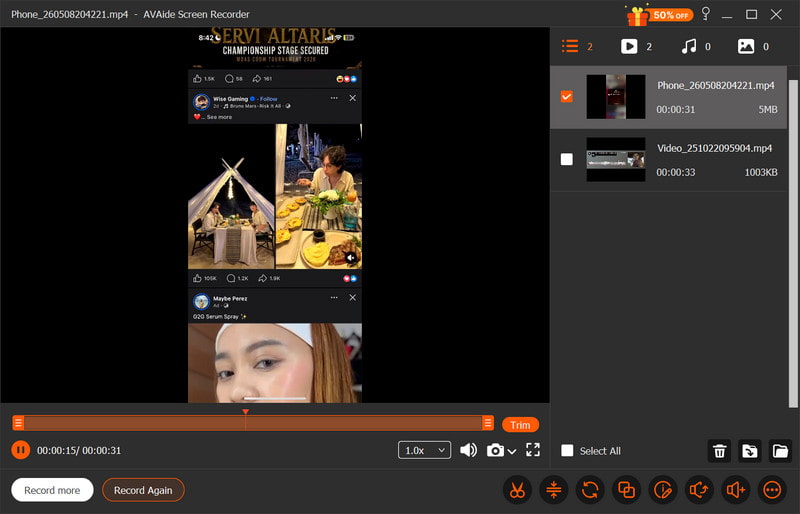
După ce ați înregistrat, se va deschide o fereastră de previzualizare. Părțile nedorite pot fi eliminate, sunetul poate fi ajustat sau editat simplu înainte de a exporta videoclipul final.
Partea 4. De ce nu pot înregistra ecranul pe iPad-ul meu?
O problemă la înregistrarea video pe iPad apare de obicei din cauza setărilor, restricțiilor sau problemelor de performanță. Cele mai frecvente probleme și cauze sunt afișate mai jos.
1. Butonul lipsește complet
Acest lucru se întâmplă dacă Înregistrarea ecranului nu este instalată în Centrul de control. Trebuie să adăugați manual Înregistrarea ecranului în Setări > Centru de control pentru ca aceasta să apară acolo.
2. Butonul este gri sau nu răspunde
De obicei, acest lucru se datorează unei restricții privind înregistrarea ecranului din setările de sistem sau din comenzile dispozitivului.
- Pot fi setate limite de timp pe ecran.
- Înregistrarea poate fi interzisă de setările profilului dispozitivului de la școală sau de la serviciu.
- Este posibil ca unele aplicații să nu vă permită să faceți o captură de ecran în timp ce le utilizați.
3. Înregistrarea se oprește imediat după începere
Problema este de obicei legată de probleme de sistem sau de stocare, cum ar fi spațiul insuficient disponibil sau alte aplicații care interferează cu procesul de înregistrare.
4. Înregistrarea nu are sunet
Acest lucru se întâmplă atunci când sunetul nu este conectat corect sau când utilizatorul așteaptă sunet intern; nu este posibilă înregistrarea ecranului intern pe iPadOS, așa că utilizarea funcției cel mai bun înregistrator de ecran pentru Mac poate ajuta la captarea corectă a sunetului sistemului.
5. Înregistrarea este sacadată sau de calitate scăzută
De obicei, acest lucru este cauzat de unul dintre acești factori: spațiu de stocare limitat pe dispozitiv, rularea a prea multor aplicații sau un model de iPad mai vechi care nu poate înregistra la o rezoluție atât de mare.
Partea 5. Sfaturi profesionale pentru înregistrări mai bune ale ecranului
Când înregistrați pe iPadOS, asigurați-vă că iPad-ul este configurat corect pentru o înregistrare fluidă, clară și de înaltă calitate. Iată câteva sfaturi utile pentru optimizarea calității video și audio.
1. Eliberați spațiu de stocare
Înainte de a începe înregistrarea, asigură-te că există suficient spațiu liber pe iPad, astfel încât să nu apară întârzieri sau erori, ceea ce poate cauza probleme de înregistrare în timp ce filmezi.
2. Închideți aplicațiile neutilizate
Închideți toate aplicațiile inutile în fundal pentru a îmbunătăți performanța sistemului și a preveni întreruperile sau încetinirile în timpul înregistrării.
3. Activați funcția Nu deranjați
Activează Nu deranja pentru a împiedica apariția pe ecran a tuturor apelurilor, mesajelor și notificărilor primite și a te distrage în timpul înregistrării.
4. Mențineți o configurație stabilă a ecranului
Nu ajustați luminozitatea, orientarea sau setările de sistem în timpul înregistrării, deoarece modificările bruște pot afecta consistența videoclipului și calitatea înregistrării.
5. Testați mai întâi sunetul
Înainte de a începe filmarea videoclipului, faceți o scurtă înregistrare de probă pentru a verifica dacă nivelurile microfonului sunt setate corect și dacă vocea dvs. sună clar și este înregistrată corect.
6. Folosește un ecran de pornire curat
Curățați ecranul de pornire sau mutați aplicațiile sensibile într-un alt folder, astfel încât înregistrarea să pară concentrată, profesională și ordonată.
7. Înregistrați într-un mediu liniștit
Dacă poți înregistra într-o cameră liniștită cu puțin zgomot de fundal, microfonul va capta mai bine sunetul vocal și va reduce la minimum sunetele nedorite atunci când înregistrarea vocii pe un Mac sau iPad.
Înregistrarea ecranului iPad-ului este o modalitate simplă, dar puternică de a captura tutoriale, momente din joc și momente importante direct de pe dispozitiv. Cu setările și sfaturile potrivite, puteți îmbunătăți atât calitatea video, cât și cea audio pentru rezultate mai bune. Indiferent dacă utilizați instrumente încorporate sau software extern, înregistrarea devine mai ușoară și mai fiabilă.
DESPRE AUTOR

Capturați activități pe ecran cu sunet, întâlniri online, videoclipuri de joc, muzică, cameră web etc.
Înregistrare ecran
- Înregistrare ecran pe Windows
- Înregistrați live pe Instagram
- Extrage videoclipuri din Tubi
- Convertește videoclipuri YouTube în MP3
- Descarcă videoclipuri de la Fansly
- Descărcarea videoclipurilor JW Player
- Descărcați videoclipuri Bilibili
- Descarcă videoclipuri Patreon
- Descarcă videoclipuri SpankBang
- Descarcă videoclipuri Discord
- Descărcați videoclipul DoodSream