Whether you are a gamer looking to capture a high-score run, a professional creating a tutorial, or a student recording a remote lecture, knowing how to screen record on Windows is no longer a luxury, it's a necessity. Gone are the days when you needed expensive third-party software just to capture your desktop; Windows 10 and Windows 11 now come equipped with powerful, native recording features.
From the streamlined Xbox Game Bar to the updated Snipping Tool and even professional-grade options like OBS Studio, there are several ways to screen capture recording high-quality video and audio on your PC. In this guide, we'll walk you through the best methods to record your screen, adjust your audio settings, and save your clips in the right format for easy sharing.
Part 1: Built-in Ways to Screen Record on Windows
There are two default ways to screen record on Windows from Windows 7 to 11: Snipping Tool and Xbox Game Bar. Maybe you haven't noticed their existence, but right now, you can learn how to use them to start screen capture recording.
1. Snipping Tool
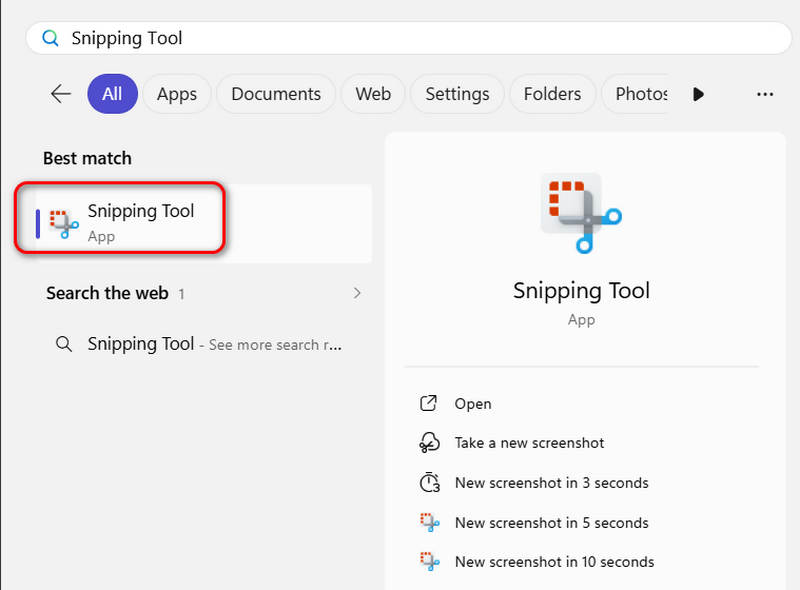
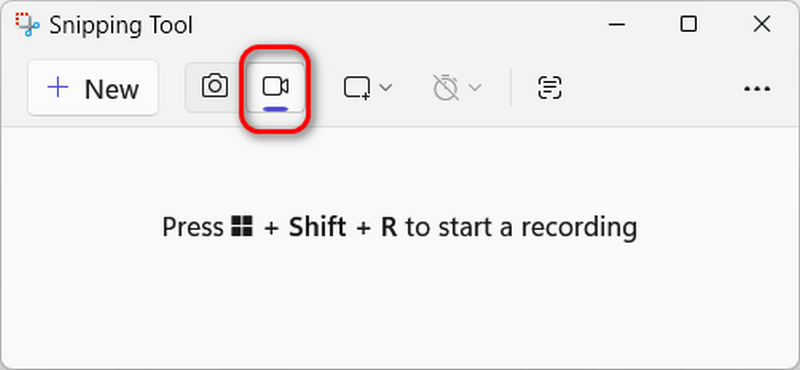
Passo 1Abra o Procurar box on the bottom left side of your desktop and search for Ferramenta de recorte. Then, find and open this program.
Passo 2On the program interface, select the Registro feature with a camera icon. Then, follow the on-screen prompt to press janelas + Mudança + R. Then, you need to drag a portion on your screen and click the Começar button to start screen recording on your Windows computer.
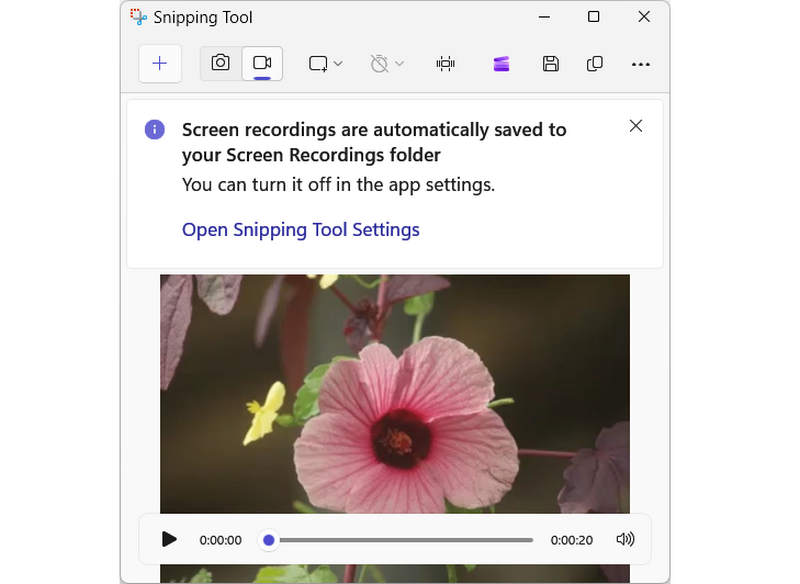
etapa 3Your recording is automatically saved to the default Screen Recordings folder in Videos. You can also open Snipping Tool settings to change the location.
2. Xbox Game Bar
Xbox Game Bar is a powerful gaming overlay integrated directly into Windows 10 and 11, designed to let you access essential tools without interrupting your gameplay. By simply pressing Win + G, you can toggle various widgets to capture high-quality game clips, snap screenshots, and monitor system performance in real-time. But it is not a dedicated game recorder, you can also use Xbox Game Bar to record from screen on Windows. Whether you're coordinating with friends or managing your PC's resources, this built-in application ensures you never have to Alt-Tab away from the action. Check out the video below for a step-by-step walkthrough of its core recording features.
Passo 1Abra o software integrado
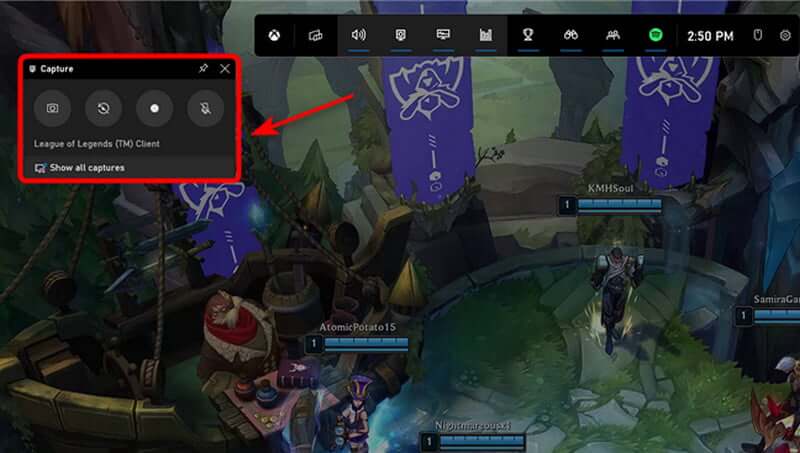
Em primeiro lugar, abra o Barra de jogos do Xbox e ative o widget de captura. Você pode salvar toda a sua jogabilidade para a posteridade ou salvar destaques, como suas batalhas de chefes mais recentes ou mortes de Penta.
Passo 2Comece a gravar
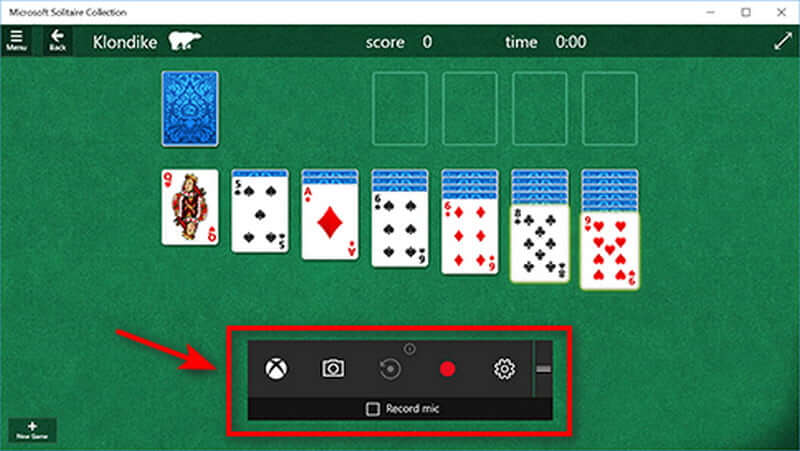
You can begin screen capture recording on Windows right away by selecting Registro a partir de agora. Se você quiser fazer uma captura de tela, clique no ícone da câmera e tire uma foto do que está acontecendo no jogo.
etapa 3Ajuste o volume do som
Iniciar a ferramenta exibe todos os canais de áudio que renderizam som em seu dispositivo Windows. Se você quiser ouvir música enquanto joga, pode ajustar o volume de cada faixa de áudio.

- You can also use the audio widget to adjust the volume of your microphone if you want to screen record with audio on Windows. In that case, this can be useful because you can control how loudly or silently your voice is captured.
Passo 4Pare de gravar
aperte o janelas tecla do logotipo + Alt + G ou clique no ícone quadrado para interromper a gravação em jogos de PC em tela cheia. Abra o aplicativo Xbox pressionando o botão Xbox e selecionando Capturas para editar um clipe.
How to Edit Screen Recording from Game Bar on Windows
A maioria dos usuários do Windows acredita que instalar um software de gravação de tela em seu computador ou laptop é a única maneira de fazer uma captura de tela de vídeo, mas isso não é verdade. Com o aplicativo Xbox Game Bar integrado, você também pode começar a editar suas gravações de tela. Além disso, esta ferramenta é um componente do aplicativo Xbox, instalado por padrão no Windows 10. Inclui todas as funções necessárias para editar rapidamente sua gravação de tela.
Passo 1Navegue até Configurações
Passo 2Ajustar Gravação de Fundo
Se as configurações forem alteradas, isso cria um buffer de 30 segundos ou mais de conteúdo gravado automaticamente. Então, se você está jogando e acabou de ter uma morte épica, você pode usar a barra de jogo para salvar os últimos 30 segundos, mesmo se você não estiver gravando a tela ativamente. Embora o nome dessa configuração seja diferente entre o Windows 11 e o 10, a funcionalidade permanece a mesma.
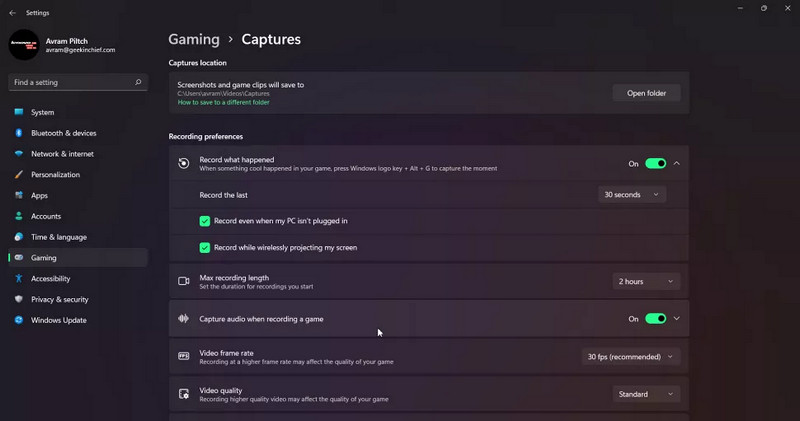
etapa 3Capturar áudio
Por padrão, eles gravam apenas o som do seu microfone e do jogo, não do Windows ou de outros aplicativos. Você pode desabilitar totalmente a gravação de áudio, habilitá-la para gravar sons do sistema ou ajustar o equilíbrio.

- Você pode modificar a taxa de quadros do vídeo: o padrão é 30 quadros por segundo, mas você pode alterá-lo para 60 quadros por segundo. Além disso, escolha entre qualidade de vídeo padrão e alta. Por fim, recomendamos deixar Capturar o cursor do mouse ao gravar um jogo ativado, especialmente se estiver gravando um aplicativo que não seja do jogo.
Part 2: How to View Your Screen Recordings on Windows
Once you’ve finished recording your screen on Windows 10/11 with Snipping Tool or Game Bar, you'll likely want to edit, rename, or share the file. Depending on which tool you used, your video will be stored in one of the following directories.
1. Finding Snipping Tool Recordings
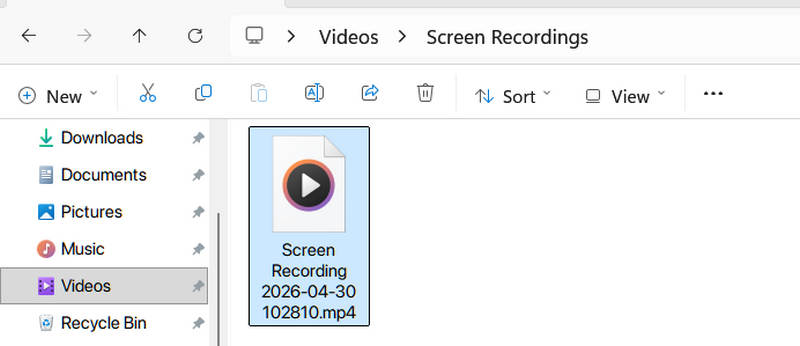
By default, Snipping Tool screen record in Windows goes to a specific folder within your user profile.
The Folder Path: C:\Users\[YourUsername]\Videos\Screen Recordings
How to get there quickly:
- 1.Open File Explorer (Windows + E).
- 2.Clique em Vídeos in the left-hand sidebar.
- 3.Abra o Screen Recordings pasta.
Dica profissional: If you just finished a screen recording on Windows, a notification usually pops up in the bottom-right corner. Clicking that notification will open the video preview, where you can click the Mais botão e selecione Abrir pasta.
2. Finding Xbox Game Bar Recordings (Captures)
The Xbox Game Bar saves its recordings to a Captures folder, which is also located inside your Videos library but in a separate subfolder.
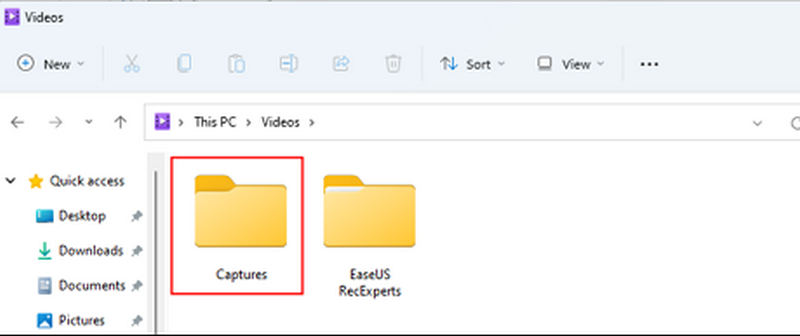
The Folder Path: C:\Users\[YourUsername]\Videos\Captures
How to get there via the interface:
- 1.Imprensa janelas + G to open the Game Bar overlay.
- 2.Click on the Gallery widget (it looks like a small folder/picture icon).
- 3.In the Gallery window, click Open file location. This will instantly launch a File Explorer window at the exact path.
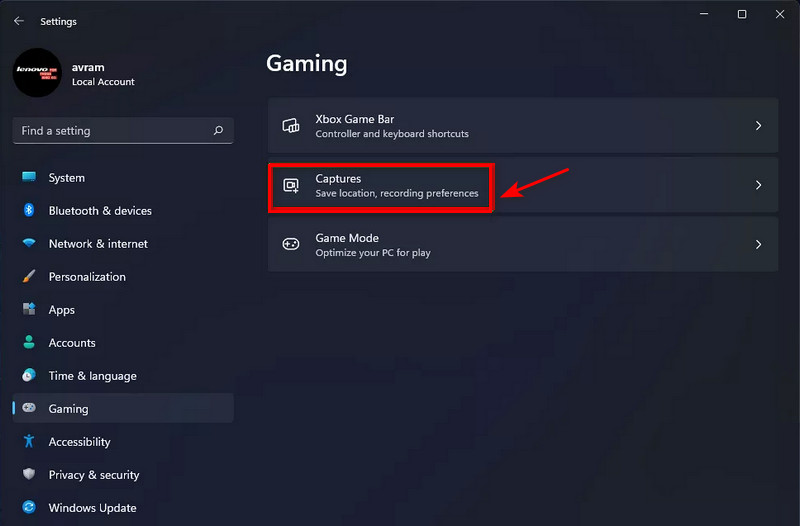
The Shortcut: You can also go to Configurações > Jogos > Capturas in the Windows main settings menu to see the exact path and even change where these files are saved in the future.
Part 3: Limitations of Default Windows Screen Recorders
While the built-in video recording tools make it incredibly convenient to screen record video on Windows without downloading extra software, they do come with specific constraints. Depending on your project's complexity, whether it’s a professional webinar or a high-end creative tutorial, you might encounter the following roadblocks:
1. Lack of Advanced Editing Suites: Both the Snipping Tool and Xbox Game Bar are designed for capture and go. They lack built-in timelines, multi-track audio editing, or the ability to add callouts (like arrows and text) after the recording is finished. If you need to polish your screen record video on Windows, you will likely need to import the raw file into a separate video editor.
2. Fixed Frame Rates and Bitrates: For power users and gamers, control over output quality is vital. The default Windows screen recorders often use variable frame rates (VFR), which can lead to audio-sync issues in professional editing software like Premiere Pro. Unlike dedicated screen recording tools, you have limited control over the exact bitrate or encoding presets used during the process.
3. Desktop and UI Restrictions:
- Xbox Game Bar: Primarily designed for games and individual apps. It often struggles to record the Windows desktop or File Explorer, sometimes cutting off the recording if you switch between different applications.
- Snipping Tool: While more flexible for desktop recording, it lacks features like Mouse Highlight or Click Effects, which are essential for recording instructional videos easy to follow.
4. Audio Input Constraints: While you can screen record on Windows with system sounds and your microphone, managing multiple audio sources (like a Discord call, a game, and a separate music track) is difficult. There is no native audio mixer within these tools to balance levels in real-time while you screen record video on Windows.
Part 4: Lightweight and Effective Way to Screen Record on Windows
Gravador de tela AVAide é uma das ferramentas de gravação de tela mais recomendadas para Windows por causa de seus recursos avançados, como personalizar a área de gravação, capturar áudio e microfone do sistema e até ajustar o formato de vídeo de saída. Ele grava atividades de tela, chamadas de vídeo, programas de televisão, ou jogabilidade em várias plataformas sem perda de qualidade e áudio claro.
O gravador de tela também pode ser controlado usando teclas de atalho. Também grava vídeo de alta qualidade, o que é ideal para saída. O vídeo pode ser gravado pela placa de sistema e dispositivos externos.
- Record the original Windows screen and upscale it to 4K if needed.
- Let you adjust the video and audio output settings, including codec (HEVC, AV1, H.264), bitrate, resolution, frame rate, and more.
- Support AI upscaling to increase and enhance the output recordings.
- Support long-duration recording without lag or stutter.
- Record screen, window, game, and portion with system audio, webcam overlay, and microphone seamlessly.
- Easily manage your recordings and share them on social media like YouTube and Instagram.

 Download seguro
Passo 1Baixe o software de gravação
Para começar, baixe e instale a ferramenta clicando no botão de download acima. A instalação do software levará alguns minutos. Clique no Gravador de video ícone para iniciar a gravação.

Passo 2Ajuste o quadro
Ajuste a área que deseja gravar ao redor da janela. Selecionar Personalizado da seta suspensa no primeiro cortador e insira um local de gravação. Selecionar Tela cheia para capturar toda a cena.

etapa 3Adicionar áudio e gravação de som
Você pode gravar um vídeo com áudio usando o som e o microfone integrados do sistema ou um microfone externo conectado a ele para gravar uma tela da área de trabalho com narrações de voz. Clique no Microfone botão para desligar a narração de voz durante a gravação.

Passo 4Comece a gravar
Para iniciar a gravação, pressione o botão GRAVANDO botão.

Etapa 5Parar e exportar
Depois de terminar a gravação, pressione o botão Pare botão para pará-lo e, em seguida, o Grampo botão para cortar seus clipes de gravação antes de salvá-los. Em seguida, para salvar seu vídeo, clique no botão Exportar botão.

Etapa 6Veja a gravação de vídeo
Depois de salvar a gravação, agora você pode visualizar a gravação de vídeo no histórico de gravação. Eles são organizados cronologicamente, começando com a gravação mais recente e progredindo para a mais antiga.

Par 5: FAQs of How to Screen Record on Windows
É possível rastrear capturas de tela?
Um site pode dizer se você faz uma captura de tela ou usa o navegador para fazer isso. Um site também pode saber se você fez uma captura de tela pressionando o botão imprimir tela no teclado. No entanto, se você usar um programa como a Ferramenta de Recorte, o site não saberá que você tirou uma captura de tela.
Quanto tempo durará a captura de tela?
Você pode gravar a tela indefinidamente com o software de gravação de tela certo. Você pode continuar a capturar a ação enquanto estiver visível na tela. Isso nem sempre significa que você poderá capturar horas e horas de filmagem.
Why is Windows Alt+R not working?
The Windows + Alt + R shortcut may fail to work for several reasons, most commonly because the Xbox Game Bar is disabled in your system settings or the Record in the background feature is turned off. Additionally, this shortcut is specifically designed for recording applications and games; it will not function if your focus is on the Windows Desktop or File Explorer.
Que efeito tem a gravação de tela?
A captura de tela é adequada quando você precisa mostrar a alguém algo que vê no monitor do computador. Às vezes, a captura de tela de imagem estática é ideal, também conhecida como captura de tela. Por outro lado, um screencast pode ser uma opção melhor se sua captura de tela exigir muitas explicações.
Ultimately, mastering how to registro de tela no Windows depends on your needs. Built-in tools like the Snipping Tool and Xbox Game Bar are perfect for quick, no-install captures and casual gameplay. However, they often lack the advanced editing, flexible formatting, and desktop-wide stability required for professional-grade projects.
For a more powerful solution, Gravador de tela AVAide is our top recommendation. It overcomes native limitations by offering smooth webcam overlay, real-time annotations, and high-frame-rate output without lagging your system. If you need a polished, "one-click" professional result for tutorials or presentations, AVAide is the superior choice for any screen record video on Windows.
SOBRE O AUTOR

Capture atividades na tela com áudio, reuniões online, vídeos de jogos, música, webcam, etc.
Gravar tela e vídeo
- Gravação de tela no Mac
- Gravação de tela no Windows
- Gravação de tela no iPhone
- Gravar áudio no iPhone
- Grave programas de TV sem DVR
- Snapchat de gravação de tela no iPhone e Android
- Gravar uma chamada do FaceTime
- Como usar o VLC para gravar a tela
- Corrigir o código de erro 1060 da Amazon
- Corrigir captura de janela OBS preta
- Como transformar um PowerPoint em um vídeo [tutorial completo]
- Como fazer vídeos tutoriais: preparativos e orientações
- Como gravar a tela com som no iOS 15 e posterior
- Como fazer o registro de tela no TikTok: soluções para desktop e dispositivos móveis
- Como gravar a tela na Samsung de 2 maneiras comprovadas [Resolvido]
- Como gravar a jogabilidade no PS4 sem uma placa de captura
- Como gravar a jogabilidade no Xbox One [Tutorial completo]