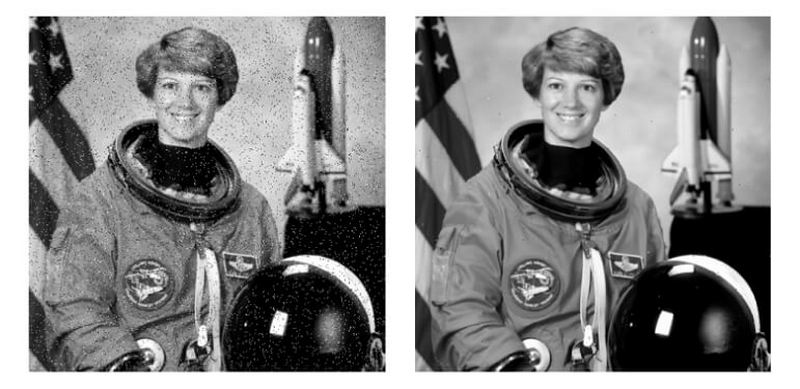
Imagine capturing a beautiful sunset or a precious family moment, only to notice unwanted grain or color distortions in your photo. Picture noise removal becomes essential in these situations, helping you restore clarity and vibrancy. Whether it’s a blurry snapshot from your phone or a detailed computer-generated graphic, removing noise can transform your images from distracting and unclear to sharp and professional. With the right tools and techniques, anyone can enhance their photos and achieve stunning, clean results.
Part 1. What Is Image Denoising?
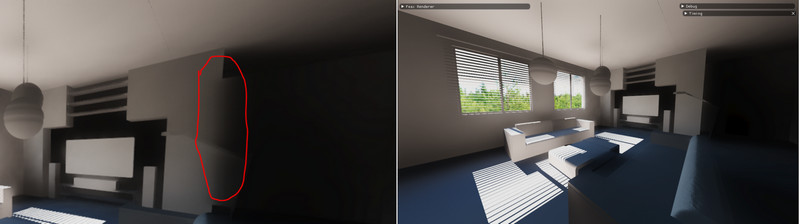
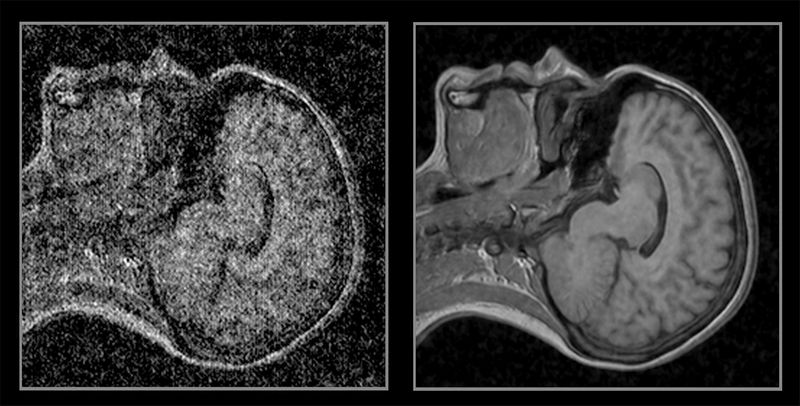
Image denoising entails eliminating unwanted visual noise, which consists of unpredictable, random changes in brightness and color that scar an image. Noise is the reason why photos or computer-generated graphics turn grainy, are of different colors, or are unclear more often. It is the reason why adequate lighting and proper camera settings of a photographer are of no use. Noise is even more heavily present in computer graphics, especially in ray-traced scenes.
In computer graphics, every image is composed of useful information and noise. Denoising aims at retaining the informative visual features, edges, textures, corners, reflections, and shadows. Noise is the main detractor of image clarity. To achieve that, denoising has to address three key signals.
- 1. Diffuse lighting: light that is scattered and reflected in all directions.
- 2. Specular or reflective lighting: light that is reflected in a certain direction.
- 3. Infinite light-source shadows: shadows and lighting that are a result of sunlight or another direct light source.
Producing clean images ought to take thousands of rays per pixel, but real-time ray tracing is limited to a smaller number of rays, which is why the outputs are noisier. However, denoising is really important as noise is removed while images remain interactive.
Part 2. How Does Image Denoising Work?
Three major techniques drive the latest digital imaging denoising: spatial filtering, temporal accumulation, and denoising via machine learning reconstruction. All methods aim to remove noise in different ways, and often work in conjunction to achieve the best outcomes.
1. Spatial Filtering
Spatial Filtering Improvements in imaging techniques are achieved by filtering spatially in the neighborhood of a pixel, comparing with similar pixels, and smoothing noise to create a uniform structure. This helps remove random distracting areas from the image and preserves the structure to reduce noise.
- Pros
- There are no temporal lags associated with this method.
- The method increases the clarity of a frame, which causes the image to appear sharper.
- Cons
- The sharpness of the image may decrease, and the image may become muddy.
- There may be visual side effects of instability, like flickering or detail inconsistency.
2. Temporal Accumulation
Temporal Accumulation. The comparison of the current and previous frames results in improved image stability. The technique is focused on using past frames to remove visual anomalies and provide flicker-free temporal consistency to the accumulation of visual data. Real-time optical flow gives improved smoothness.
- Pros
- Has an improved smoothness in playing images due to fewer flickers and page artifacts.
- Has great spatio-temporal stability across several frames.
- Cons
- Has great smoothness in playing images due to fewer flickers and page artifacts.
- Has great spatio-temporal stability across several frames.
3. Machine Learning and Deep Learning Reconstruction
Using a specially designed neural network that removes noise from high and low-quality image pairs is how this strategy operates to streamline and improve images without losing any attributes.
- Pros
- Producing images that are of great high definition due to increased clarity.
- Effectively working on images that are of great heavy noise, allowing users to sharpen images online while restoring clarity and details.
- Cons
- Can result in greater instability throughout the sequence of multiple frames.
- Using specially designed temporal stabilizers to reduce flicker and achieve smooth motion.
Part 3. How to Denoise an Image Free Online
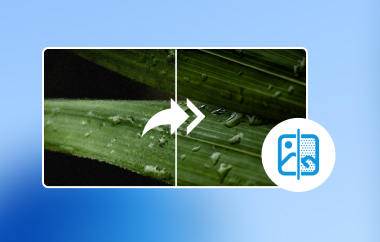
Taking into consideration all the variables, if you are a novice and are looking to improve the clarity of your images without overly complex programs, AVAide Image Upscaler is the ideal tool for you. It is a free, lightweight online editor that requires no installation and is easy to use for all users. Powered by AI, it removes noise with one click, sharpens details for better focus, and helps upscale images by 2×, 4×, 6×, or even 8×. It also supports batch processing, allowing you to enhance multiple images at once. Suitable for facial photos, product shots, animal images, and more, the tool can quickly deliver professional-grade results with minimal effort.
Step 1Access the Tool
To access the tool, open your internet browser and visit the AVAide Image Upscaler website. There is no need to install anything, as the tool operates completely online.
Step 2Upload Your Image
Hit the Choose a Photo button and select the image file that is blurry and/or consists of noise. This tool works with almost all image file formats, such as JPG, JPEG, and BMP.

Step 3Enhance and Denoise Automatically
The AI will begin processing the image automatically once you have completed the upload. It will reduce noise, improve overall clarity, and sharpen the blurry sections. If you wish, you can also increase the size of the image to 2×, 4×, 6×, or 8× the original size to help show more features of the image.
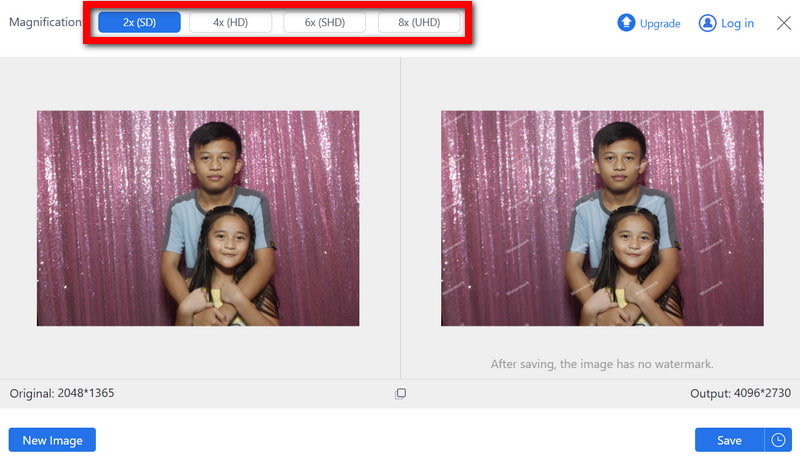
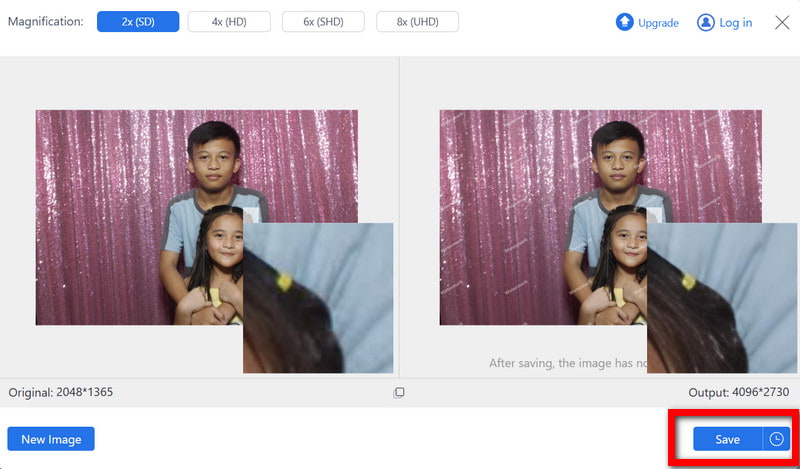
Step 4Preview the Result
The tool allows you to see the image, which has been enhanced almost instantly, so you can evaluate the effectiveness of the tool in reducing noise and improving the overall quality of the image.
Step 5Download Your Clean Image
The tool generates a clean and high-resolution image with no watermarks, and to obtain such an image, you only need to press the Save button.
Part 4. How to Denoise an Image with Photoshop
Adobe Photoshop has pioneered technology focused on noise reduction & grain/artifact removal while still leaving details & textures intact. Photoshop provides technology unparalleled in contemporary imaging, allowing users to add pixels to a photo and create images worthy of print in catalogs and professionally designed digital mediums.
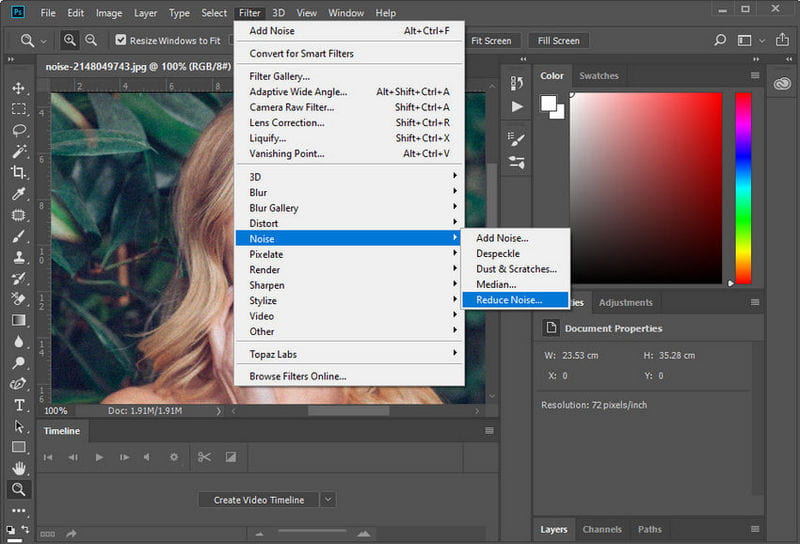
Step 1Launch Photoshop, open the photo you want to denoise, and duplicate the layer to keep the original intact for comparison.
Step 2Go to Filter > Noise > Reduce Noise and adjust the sliders to remove unwanted noise while maintaining details in your image.
Step 3For RAW images, open Filter > Camera Raw Filter and use the Detail panel to fine-tune luminance and color noise for smoother results.

Step 4Apply layer masks to denoise specific areas of the image, keeping important details sharp while smoothing less critical parts like backgrounds.
Step 5Compare the edited layer with the original, make any final adjustments, and save the clean, high-quality image in your preferred format.
If you wish to denoise an image, the right process and application have to be taken. Online tools that incorporate AI work well, and professional applications like Photoshop can make noise reduction a detail-oriented process and work best in photos. With this process and method, any picture that is visually poor, laden with grain and detail, can be enhanced to high-quality and visually captivating images.

Our AI technology will automatically enhance the quality of your images, remove noise and fix blurry images online.
PROCESS NOW