How to add pixels to a photo? Well, inserting additional pixels into your images is an effective method to increase the resolution of your images to make them sharper and more detailed. This technique is commonly used to improve low-quality photos, adjusting them for larger displays or preparing them for printing purposes. So, if you want to learn how to add pixels to your photos, check this tutorial, as we offer the best methods you can use online and offline.
Part 1. Understanding Pixels, Resolution, and Resizing
Introduction to Pixels
Pixels are known as the smallest units of a digital photo, mini squares of color that combine to form full pictures. You must know that the more pixels a photo has, the higher the resolution, which means better clarity and detail. For example, a 1920×1080 image has over two million pixels, each contributing to the overall sharpness.
Resizing vs. Upscaling
When discussing resizing, it is about changing the dimension of a photo or shrinking existing pixels, which can lead to distortion and blurriness. On the other hand, upscaling adds new pixels intelligently using an AI image upscaler to preserve detail and improve quality. While resizing is a quick process, upscaling is more ideal if you want to enlarge images without affecting the quality.
Why Do You Need to Add Pixels?
Inserting and adding pixels is helpful when preparing photos for large prints, high-resolution displays, and presentations, making them look more professional and visually appealing. Upscaling images ensures that you can get a better and crisper output, leading to a better viewing experience.
Part 2. How to Add Pixels to a Photo Online
Want to learn how to change the pixel size of an image online? In that case, you can check the process below.
Method 1. Add Pixel to Photo Using ResizePixel
If you want to change the pixel of your image, you can rely on ResizePixel. This online tool is ideal if you want a simple method to resize and add pixels to your images. The best art here is that it has a fast resizing process.
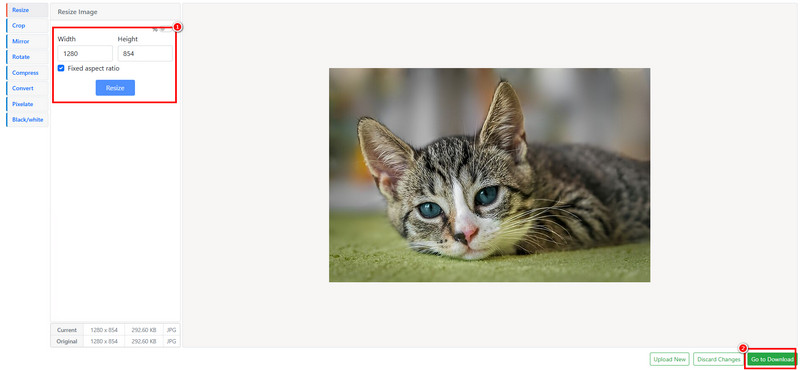
Step 1Go to the website of ResizePixel and start uploading the image.
Step 2You can start changing the dimensions, such as width and height. Once done, click the Resize button.
Step 3Finally, click Download to start saving the image.
Method 2. Add Pixel to Photo Using Photo Size
Photo Size is another tool you can use to change the size of your images. Its layout is also simple and can give you the result you need with the best quality. The only problem here is that there are times when the tool is not working well. You can follow/check the steps below to resize image pixels.
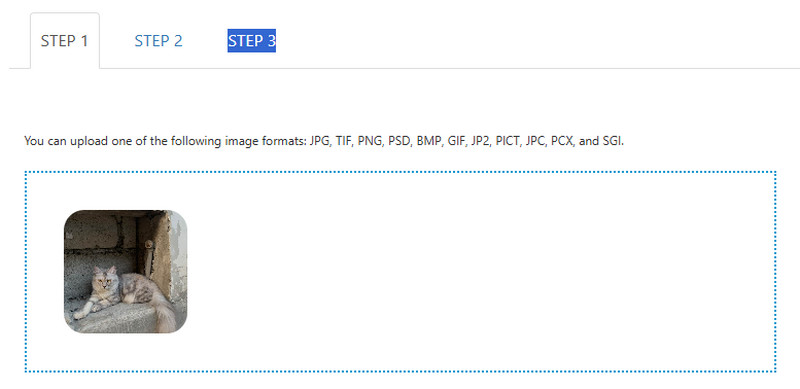
Step 1Access the Photo Size tool and start uploading the image you want to deal with.
Step 2Start resizing the image by adjusting the pixel dimensions.
Step 3Click Resize to start the resizing process. After that, download the image to start saving the photo on your device.
Method 3. Add Pixel to Photo Using Pixlr
If you prefer a smoother resizing process, you can access Pixlr. This tool is perfect since it ensures that you get the result you want. You can even retain the quality for a better viewing experience. You can also improve the image by inserting filters and effects, adding text, elements, and more, making the tool helpful for users.
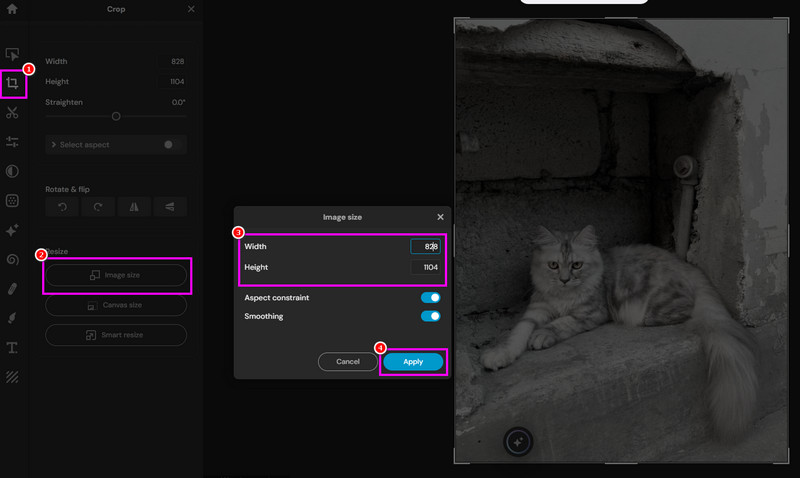
Step 1Go to the Pixlr tool and proceed to its main layout. After that, upload the photo from your device.
Step 2Proceed to the Crop section and click the Image Size option. Then, start resizing your image based on your preferences, and click Apply.
Step 3After resizing the image, click Save to keep the resized photo on your computer.
Part 3. Use AI-Powered Upscaler
Do you want to use an AI-powered upscaler to add pixels to your images? Then, you can use all the methods from this section.
Method 1. Add Pixel to Photo Using Pixlr
One of the most powerful and reliable AI-powered tools you can use to improve and upscale your images is AVAide Image Upscaler. This tool is perfect if you want to upscale your pictures up to 2×, 4×, 6×, and even 8×. It also has a smooth and simple upscaling process since it has an easy-to-follow user interface. It also supports a batch processing feature, so you can upscale multiple files without consuming much time. So, to start adding pixels to your photos, see the steps below using this image pixel enhancer.
Step 1Access AVAide Image Upscaler on your browser. After that, click the Upload Your Image button to start uploading the image you want to upscale.

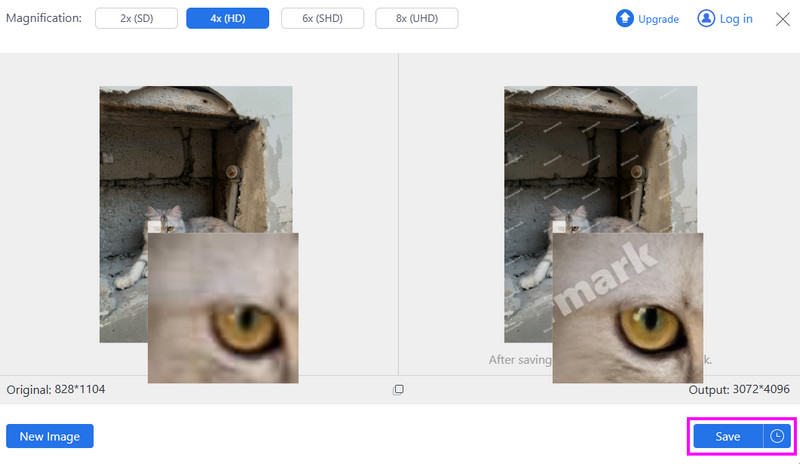
Step 2Go to the Magnification section and choose your preferred resolution option. You can upscale the image up to 2×, 4×, 6×, and 8×.
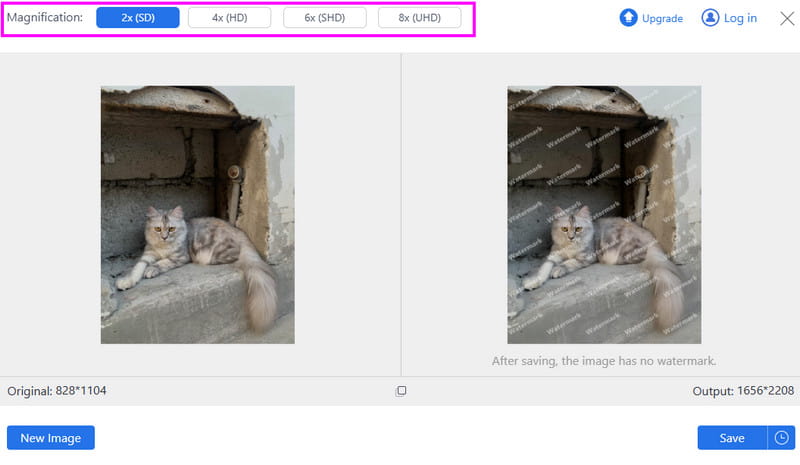
Step 3After the upscaling process, hit the Save button below.
Method 2. Upscale Image Using LetsEnhance
Another AI-powered tool you can use to upscale your images is Let's Enhance. This tool is ideal if you want to upscale your images using various AI enhancement models. You can even upscale your image up to 8× better. The only drawback here is that it is not 100% free. You have to buy credits to enjoy upscaling numerous images.
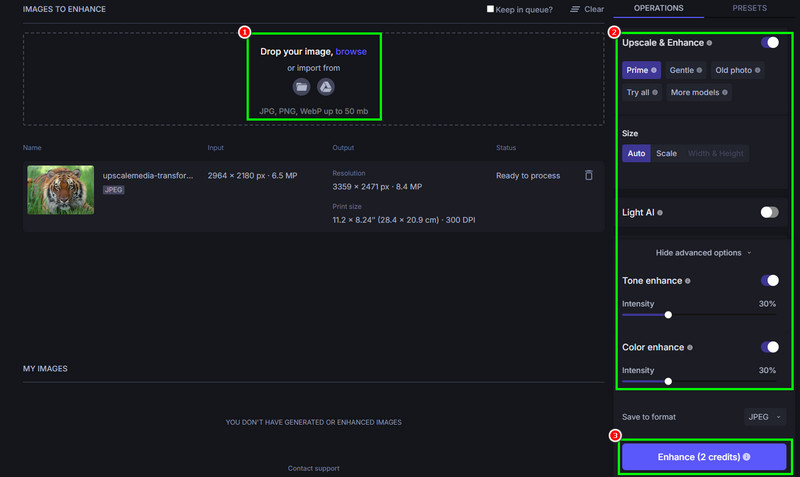
Step 1Access Let's Enhance and upload the image you want to upscale.
Step 2Then, you can select your enhancement model. You can also adjust the Tone Enhance and Color Enhance levels.
Step 3Finally, hit the Enhance button from the bottom interface.
Method 3. Upscale Image Using Krea AI
Krea AI also stands out as an excellent AI-driven image upscaler. Like other tools, it can upscale images up to 8× better. This resolution upscaler can also let you manually adjust the AI strength, sharpness, clarity, and resemblance. The only drawback here is that the tool has a slow upscaling process. See the steps below and learn how to increase the pixel size of an image.
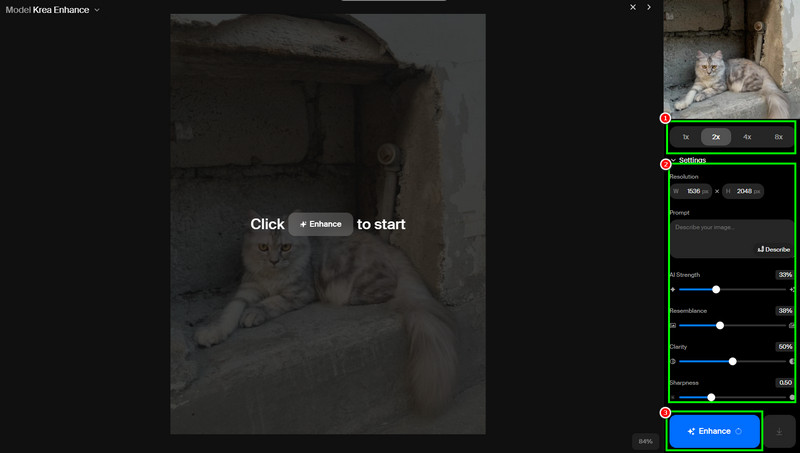
Step 1After accessing Krea AI on your browser, start the uploading process.
Step 2Then, you can now upscale your images up to 8×. You can also go to the Settings section to manually change the resolution, sharpness, AI strength, and more.
Step 3Lastly, click the Enhance button below to begin the image upscaling/resizing.
Part 4. Add Pixels to a Photo Using Professional Software
Are you looking for professional-grade software that can help you add pixels to your images? If so, proceed to this section as we offer all the information you need.
Method 1. Add Pixels to Images Using Photoshop
Adobe Photoshop is an excellent and professional software you can use to add pixels to your photos. This program is ideal since it lets you manually resize your images based on your preferred resolution. Plus, you can use its Preserve Details 2.0 feature to add pixels to the photos intelligently. The only disadvantage here is that it is not free to use. You must get the plan to access its overall features.
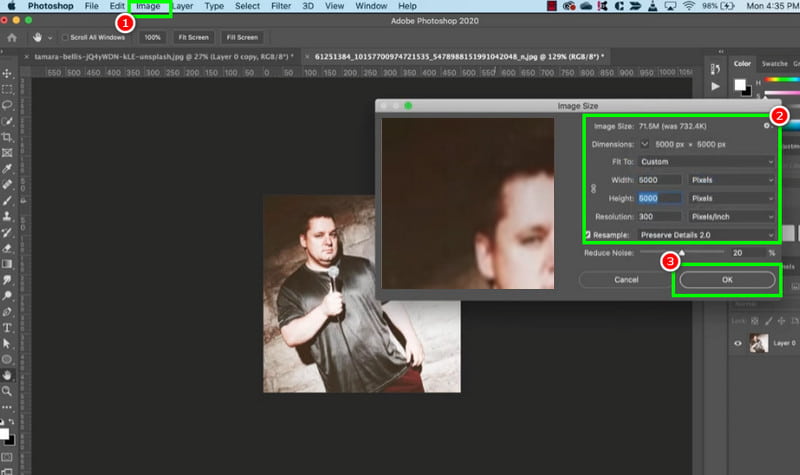
Step 1Download and install Adobe Photoshop on your computer. Then, go to the File > Open to add the image you want to improve.
Step 2Then, proceed to the Image section and select the Image Size option. A mini window will appear on your monitor.
Step 3You can start adding pixels to the image by adjusting the width, height, and resolution. You can also select the Preserve Details 2.0 option under the Resample section. Then, hit OK.
Step 4After that, you can start saving the image on your desktop.
Method 2. Add Pixels to Images Using GIMP
If you want a free image pixel resizer to add pixels to your images, you can access GIMP. This software can offer all the features you need to achieve the result you need. You can resize the image, adjust the resolution, add a background, and more. To check its capability, see the instructions below.
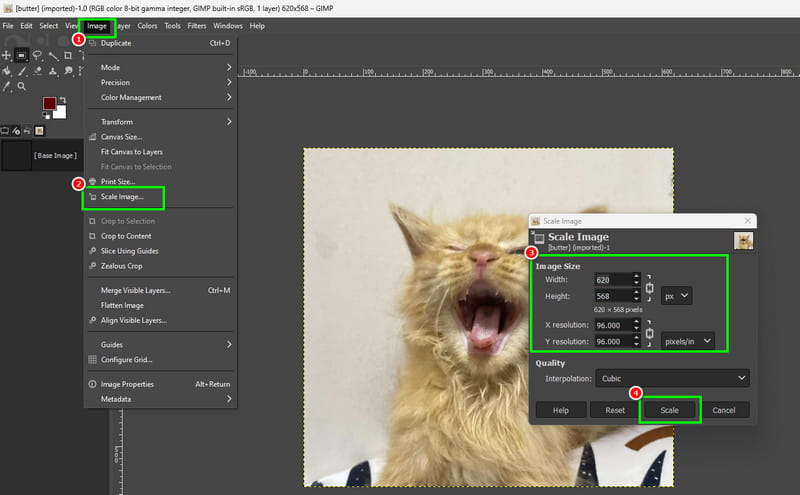
Step 1Download and run GIMP on your desktop. After that, click the File > Open options to add the photo.
Step 2Then, navigate to the Image > Scale Image options. Then, a mini interface will pop up on your screen.
Step 3To add pixels to the images, manually adjust the X and Y resolutions. Once done, hit the Scale button. After that, start saving the photo.
Part 5. Comparison and Decision Guide
To get more insights about the tools, see the table in this section.
| Tools | Ease of Use | Features | Best Use Case |
| ResizePixel | Easy | Basic resizing, cropping, and compression | Quick resizing without advanced editing |
| Photo Size | Easy | Custom dimensions | Preparing images for social media or printing |
| Pixlr | Easy | AI upscaling, filters, and advanced editing | Combining upscaling with creative edits |
| AVAide Image Upscaler | Very Easy | AI-powered upscaling | Enhancing resolution with minimal effort |
| Let’s Enhance | Easy | AI upscaling, color/tone correction | Professional-quality upscaling for prints/web |
| Krea AI | Easy | AI upscaling | Artistic or stylized high-res images |
| Photoshop | Advanced | AI resampling, full editing suite | Maximum control for professional projects |
| GIMP | Easy | Interpolation methods, free editing tools | Budget-friendly upscaling with decent quality |
Quick Decision Guide:
- If you want a fast, free tool to add pixels to photos, you can always rely on AVAide Image Upscaler. This is also powered by AI, giving you the best result.
- If you need a professional-grade tool that can resize, upscale, and edit your images, you can try using Adobe Photoshop.
To change the size and pixel of a photo, you can use all the methods we have provided in this tutorial. With that, you can get the result you need for a better viewing experience. Plus, if you want to upscale your images up to 8× better, we recommend using AVAide Image Upscaler. It can even offer a fast and smooth upscaling process, making it the top choice for users.
ABOUT THE AUTHOR


Our AI technology will automatically enhance the quality of your images, remove noise and fix blurry images online.
PROCESS NOW