Have you ever wondered why a photo that appears sharp on your phone becomes blurry on a big canvas? A low number of pixels and poor scaling are often the beginning of the problem. Wall art requires controlling resolution, DPI, and viewing distance to enlarge photos. Being a worker with print files in your day-to-day life, you may have come across the fact that even minor errors lead to low clarity in a short time. In this guide, you will learn why enlargement is not easy, which resolution is best, and how to resize images for wall art without compromising quality.
Part 1. Why It Is Challenging to Enlarge Photos for Wall Art
To upsize photos to wall art, you are overloading a small digital file with more visual information than it was meant to support. The picture that appeared sharp on your computer or phone screen may very well become blurred when blown up to poster size. The distinction lies in the number of pixels, the resolution, and how the digital files stretch. Being aware of these difficulties will help you avoid disappointment and produce professional-quality prints. The following are key factors that make it challenging to expand images for use as wall art.
1. Limited Pixel Count
Any digital picture consists of minute pixels. Enhancing a picture is equivalent to distributing the same pixels over a larger area when you increase the image's size. When the source file is of low quality, details soften, edges blur, and any slight imperfections become visible. Enlarging it does not generate any new information, just increases the existing one.
2. Low DPI for Print
Images are portrayed in screens and prints very differently. Most monitors display 72 to 96 DPI, and large wall images may need 240 to 300 DPI to be clearly visible. What appears to be a sharp file in a screen may not make the print standard. Low-DPI prints are jagged or smooth, and this is why professional printing always takes into account both the image resolution and the size at which the image is to be printed.
3. Compression Artifacts
Most photos are saved as JPEG files, which compress data to reduce file size. Compression removes subtle details, and this loss becomes obvious when the image is enlarged. Enlarged JPEGs can exhibit blocky areas, banding, and other unwanted artifacts that compromise print smoothness.
4. Noise and Grain
Digital noise is present in photos, especially those taken in low light or with smaller sensors. It can be barely noticeable on small screens; however, when the picture is enlarged, the grain, color dots, and minor flaws become more evident. This may cause the end product to appear gritty or rough in areas that are supposed to be smooth.
5. Interpolation Limits
Interpolation is used by editing software to approximate missing pixels during resizing. More sophisticated algorithms, such as bicubic or AI-based methods, can enhance results, yet the predicted pixels cannot completely reproduce the details of real images. Exceeding the size of the image may produce unnatural edges or low-density zones that are prominent in the massive wall print.
6. Viewing Distance Misjudgment
The distance from which a print is viewed affects perceived sharpness. Large prints are often designed to be seen from several feet away. If a wall print is displayed in a small room or too close to viewers, any softness or pixelation becomes more noticeable. Planning for viewing distance is a key part of successful wall art printing.
7. File Format and Bit Depth
Photos with low bit depth or over-processed images can be desaturated. The enlargement of these files can show banding in skies, gradients, or plain backgrounds. Greater bit-depth files preserve light tones and transitions, resulting in a cleaner, more natural print.
By being aware of these shortcomings, you can make wiser decisions when creating wall images. Once an appropriate source file is selected, the planning of print size and resolution influences the final quality. In the following discussion, we will examine optimal print resolution standards for wall art and show how to make your enlarged pictures look clean, sharp, and beautiful.
Part 2. Best Resolution for Wall Art Prints
When enlarging photos for wall art, resolution is the most critical factor for achieving sharp, professional-looking prints. Every print size and viewing distance has a required pixel density to maintain detail and color fidelity. The appropriate resolution will avoid blurring, pixelation, and visible artifacts. The following is a handy table of the popular sizes of wall art:
1. 300 DPI - Optimal for Close-Up Viewing
It is the gold standard of professional printing. Best with miniature to medium-sized prints, 16x20 inches, or detailed portraits. Each pixel matters when the audience views the picture up close.
2. 240 DPI - High-Quality Large Prints
Best on prints 20x30, 24x36. This lower density ensures clarity but allows slight expansion, making it a favorite in home decor and galleries.
3. 200 DPI - Suitable for Medium Viewing Distance
Works with prints viewed from several feet away. The detail is also good, though fine details can appear slightly blurred at higher magnification.
4. 150 DPI - Large Format Wall Displays
Optimal for large prints 30x40 inches or larger. Performs well in cases where the art is meant to be viewed from more than a few feet away, like over a couch or in a hallway.
5. 100 DPI - Very Large Murals or Canvas Walls
Designed for prints viewed from a distance of 6 feet or more. This allows massive enlargements without overwhelming file size, though fine details will be less noticeable up close. That is why many users are looking to unpixelate images at this dots per inch.
6. Check Native Resolution Before Scaling
Always check whether your initial image meets the required print dimensions and DPI. To illustrate, a 6000 x 4000 pixel image was printed at 20x13 inches at 300 DPI, and it was clear. This knowledge can help avoid unwanted deterioration when scaling photos for wall use.
Selecting the correct resolution balances print size, viewing distance, and image quality. In the next section, we will explore step-by-step methods to enlarge your photos safely, increasing the DPI while maintaining crisp detail and color accuracy.
Part 3. How to Enlarge Photos for Wall Art Without Losing Quality
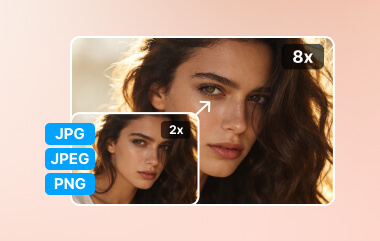
The process of enlarging photos to be used as wall art does not need to be complicated. The standard method of stretching an image usually produces a soft, blurry, or noisy image. Here is where AVAide Image Upscaler comes in. This intelligent AI application enhances your photographs 2X, 4X, or even 8X, inferring and recreating missing information, keeping edges sharp and textures vivid. It is comparable to having a professional makeover your photo without using fancy editing software.

Better still, AVAide is free and provides 4K quality results. Whether you are making a statement piece in your living room or a massive canvas on a gallery wall, it is easy to have all the details clear and vivid using this tool. Combine it with an appropriate solution and DPI, and your digital snapshots can finally shine as wall art that looks beautiful from any angle.
Learn to enlarge photos safely for wall art by understanding resolution, DPI, and how to properly upscale images. By selecting the right size of the print, adhering to the standards, and using AI, such as AVAide Image Upscaler, you can keep your pictures sharp, detailed, and vivid. These steps can make even tiny digital files beautiful wall art that leaves an impact and beautifies any space.
ABOUT THE AUTHOR


Our AI technology will automatically enhance the quality of your images, remove noise and fix blurry images online.
PROCESS NOW