Want to adjust a logo or a line on your PowerPoint slide but can't select it? The object is likely not part of the slide itself, but stored in the Slide Master, which is why you can't edit it in Normal view. It's different from a slide's background fill. This guide shows you how to find the right place to edit the PowerPoint background graphics you are dealing with.
- How to Choose the Right PowerPoint Background Editing Method
- Part 1. How to Edit Background Graphics in Slide Master
- Part 2. How to Edit Background Graphics in Format Background
- Part 3. How to Find Hidden Graphics with Selection Pane
- Part 4. How to Remove Background from an Image in PowerPoint
- FAQs About Editing Background Graphics in PowerPoint
How to Choose the Right PowerPoint Background Editing Method
| What you see | Likely location | Use this method |
| A logo, watermark, or decorative graphic appears on many slides and cannot be selected. | Slide Master | Part 1: Edit the Slide Master |
| A graphic appears only on certain slide types, such as Title Slide or Section Header. | A specific slide layout | Part 1: Edit the layout |
| You want to hide inherited master graphics. | Slide Master or layout graphics | Part 1: Hide Background Graphics |
| The slide has a color, gradient, texture, or full-slide picture with no selection handles. | Slide background fill | Part 2: Format Background |
| The graphic is on the current slide but is behind other objects and hard to click. | A slide object | Part 3: Selection Pane |
| You want to remove the unwanted area around the subject of a selected photo. | A picture object | Part 4: Remove Background |
Part 1. How to Edit Background Graphics in Slide Master
How to Edit Graphics in a Specific Layout
When you can't select a graphic in Normal view, try editing the layout in the Slide Master mode instead.
Step 1Open Slide Master View
Go to View > Slide Master. The large thumbnail at the top is the Slide Master, while the smaller thumbnails below it are the associated layouts.

Step 2Select the matching layout
In the left pane, choose the layout used by the slides where the graphic appears, such as Title Slide or Section Header.
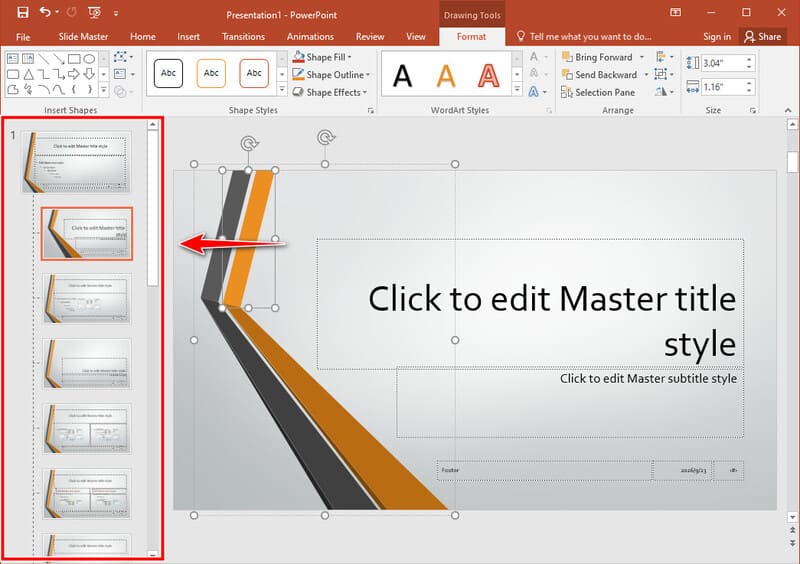
Step 3Select and edit the graphic
Click the logo, shape, line, or picture, then move, resize, replace, recolor, or delete it as needed.
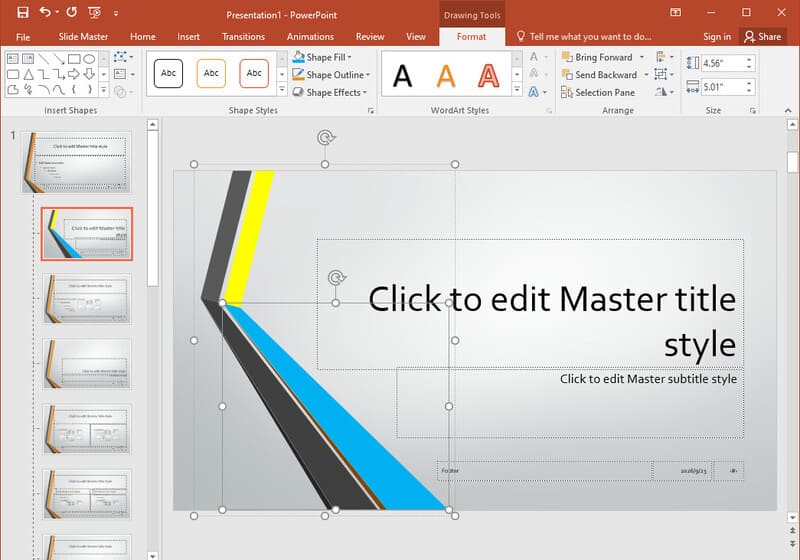
Step 4Close Slide Master
In the Slide Master tab, click Close Master View before checking the slides that use that layout to make sure the change is correct.

How to Edit Graphics in All Slides
Sometimes a graphic exists on several slides, but editing it in a single layout won't update to all of them. You don't want to adjust the whole lot of layouts one by one. That's when you might need to edit in the Slide Master, which is the top slide thumbnail above the other layouts. Adjustments on that one automatically apply to the others.
Step 1Open Slide Master View
Go to View > Slide Master.
Step 2Select the top Slide Master
In the left pane, select the large master thumbnail at the top of the master group.
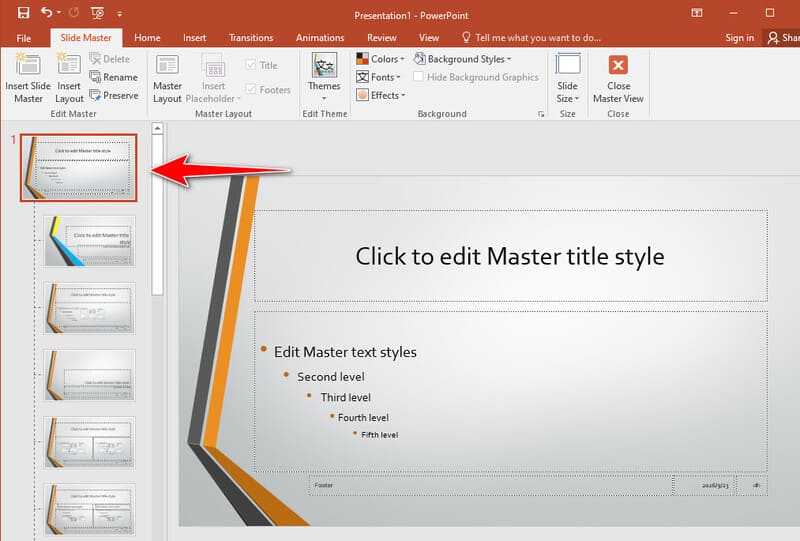
Step 3Edit the recurring graphic
Select the logo, watermark, decorative shape, or picture that you want to edit, then change its size, position, color, or other formatting. Whatever changes you do will appear on other slides which have the same element.
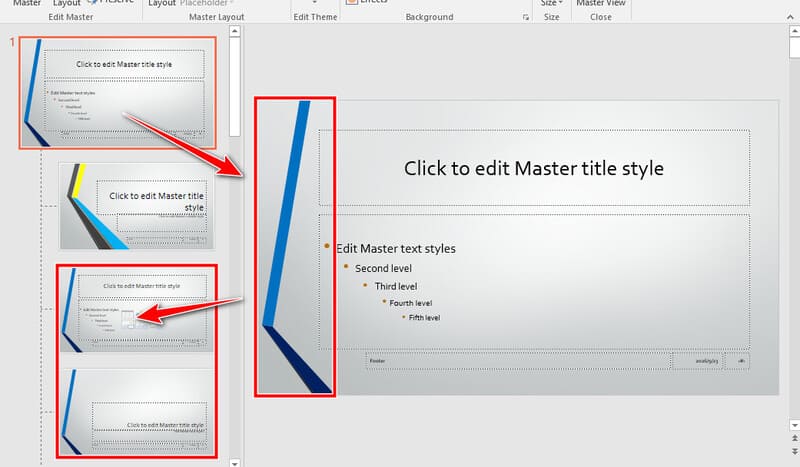
Step 4Close Slide Master
Select Close Master View, then review the affected slides in Normal view.
How to Hide Background Graphics on Selected Slides (Without Deleting Them)
You can hide all the background graphics with a click. They won't be gone for good, just invisible for now.
Step 1Select the slide you want to hide
In Normal view, click the slide (or hold Ctrl/Cmd and click multiple) in which you want to hide those inherited graphics.
Step 2Open Format Background
Go to Design > Format Background.

Step 3Hide the background graphics
Check the box next to Hide Background Graphics. This hides the master graphics only on the slide or slides you selected, while everything stays available for the rest of the deck.
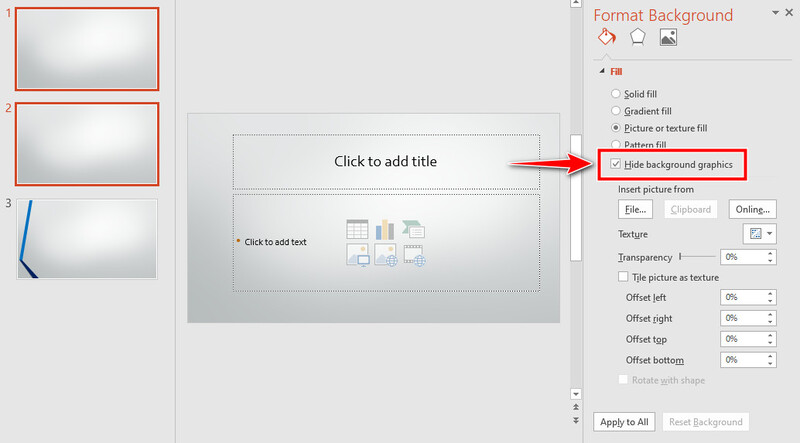
That's it. When you want the graphics back, just return to Design > Format Background and uncheck Hide Background Graphics.
Part 2. How to Edit Background Graphics in Format Background
If the whole slide has a color, gradient, texture, or picture background and there is no selectable object with handles in Slide Master, use Format Background. These settings control the slide background fill.
Step 1Select the slide
Click the slide whose background you want to change. You can also select multiple slides when you want the same background changes applied to all of them.
Step 2Open Format Background
Go to Design > Format Background.
Step 3Choose a fill type
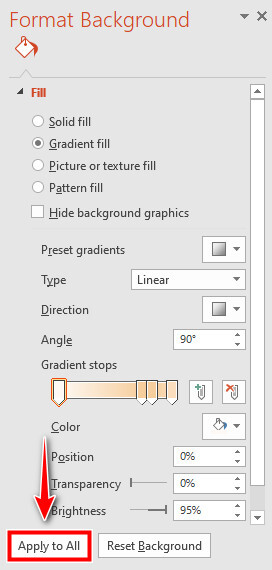
Under Fill, choose Solid fill, Gradient fill, Picture or texture fill, or Pattern fill, depending on the effect you need. Change the color, picture, transparency, or other settings that show up
Step 4Apply the change where needed
By default it only affects the current slide. Hit Apply to All only if you want that same background across the whole presentation.
Part 3. How to Find Hidden Graphics with Selection Pane
If the graphic is actually on the current slide in Normal view but is behind another object or difficult to click, the Selection Pane can help you dig it out.
Step 1Open the Selection Pane
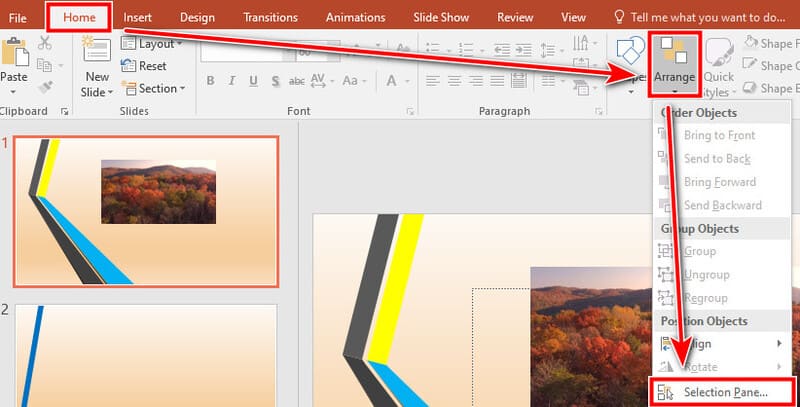
In the top menu, go to Home > Arrange > Selection Pane.
Step 2Find the object
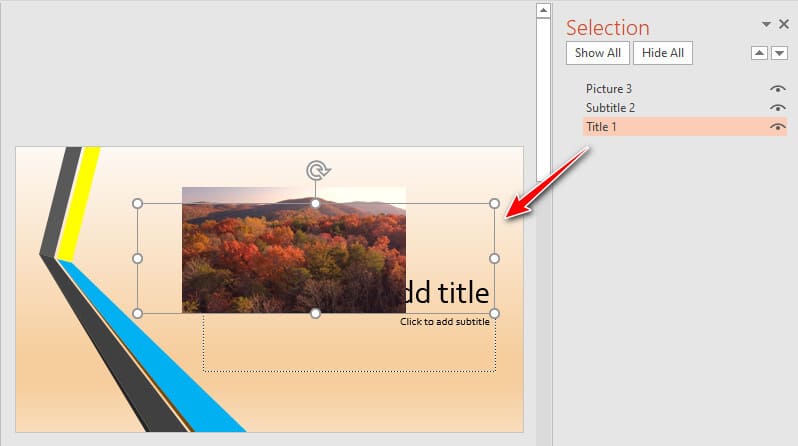
The pane lists every object on the current slide. Select an item by name to highlight the graphic you're looking for.
Step 3Show or hide objects
Use the visibility button to temporarily hide objects that are covering the graphic you want to edit.
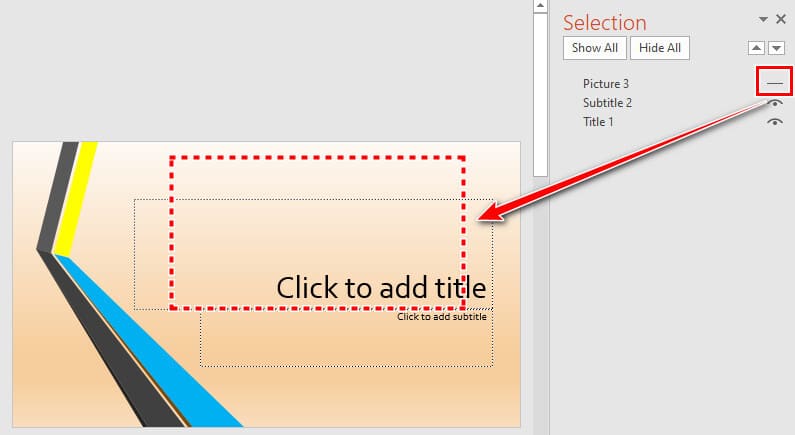
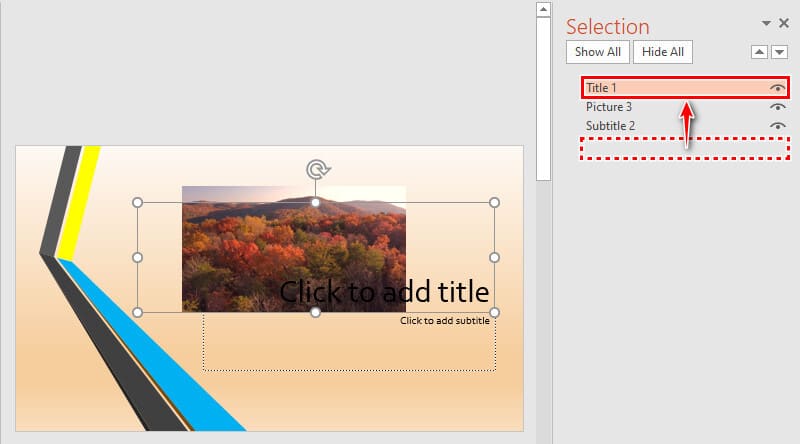
Step 4Reorder objects (Optional)
Drag an item up or down in the list to change its stacking order, then select it on the slide and edit it like normal.
Part 4. How to Remove Background from an Image in PowerPoint
PowerPoint can remove the background from a selected picture, but this tool is for image pixels, not for every type of PowerPoint background. It doesn't unlock a graphic stored in the Slide Master or remove a picture used as the slide background fill. For a supported picture, PowerPoint starts with automatic detection and lets you refine the result with Mark Areas to Keep and Mark Areas to Remove. Some vector formats, including SVG and AI, are not supported by the background-removal tool.
Step 1Select the picture
Click the picture you want to cut out. The Picture Format tab should appear.
Step 2Start background removal
Go to Picture Format > Remove Background.

Step 3Refine the selection
PowerPoint highlights the area it plans to remove. Use Mark Areas to Keep or Mark Areas to Remove to correct the selection when needed.
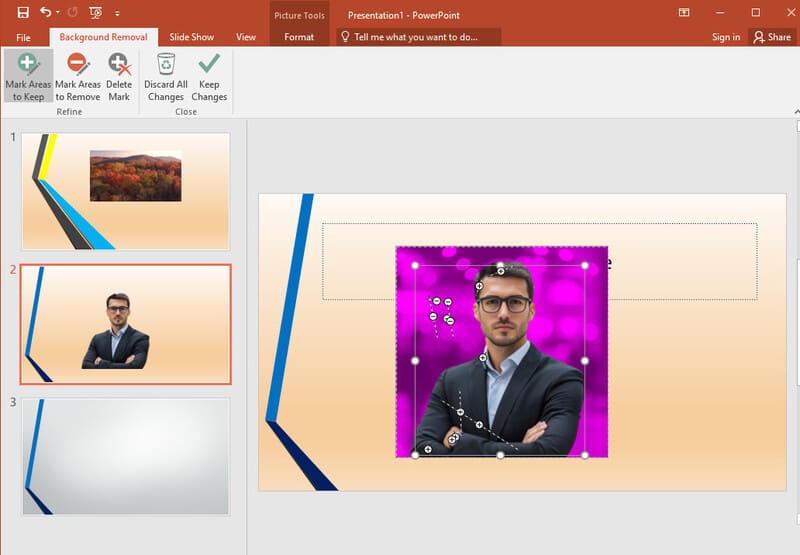
Step 4Keep the changes
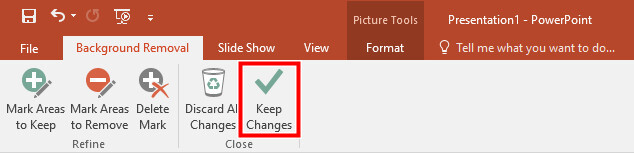
Select Keep Changes when the preview looks right. The removed area becomes transparent.
AVAide Background Eraser: An Alternative for Image Background Removal
PowerPoint is convenient when you are already building a presentation, but you may want a dedicated background-removal tool when you need to cut out several photos or refine an image before placing it in your slide. AVAide Background Eraser is an online option that automatically removes image backgrounds and lets you refine the result or change the image background before downloading it.
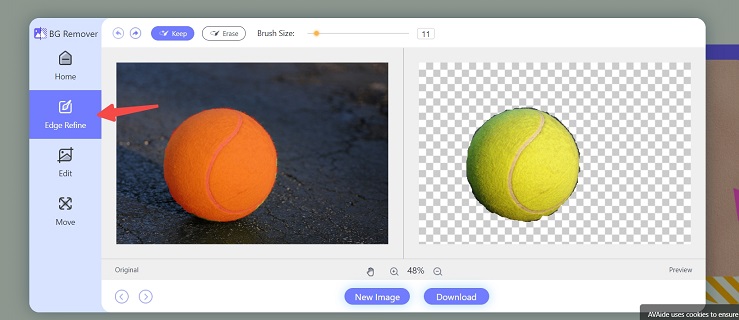
Step 1Enter the Background Eraser page. Choose the photo you need to adjust from the folder, or just drag it here.

Step 2Then, you can click Edge Refine to mark out the area you want to keep or erase to refine the photo.
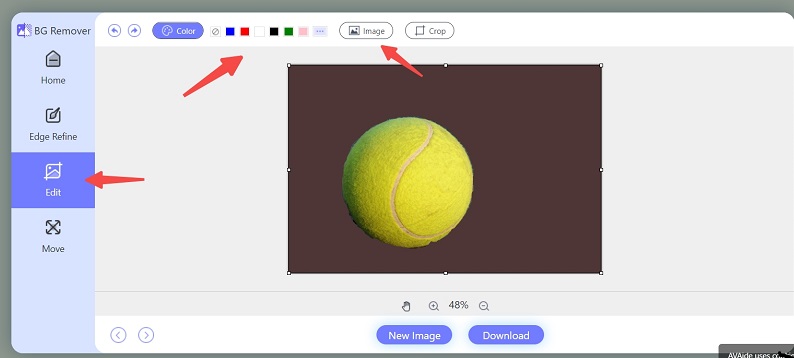
Step 3You can even pick a new color or picture as the background in the Edit tab.
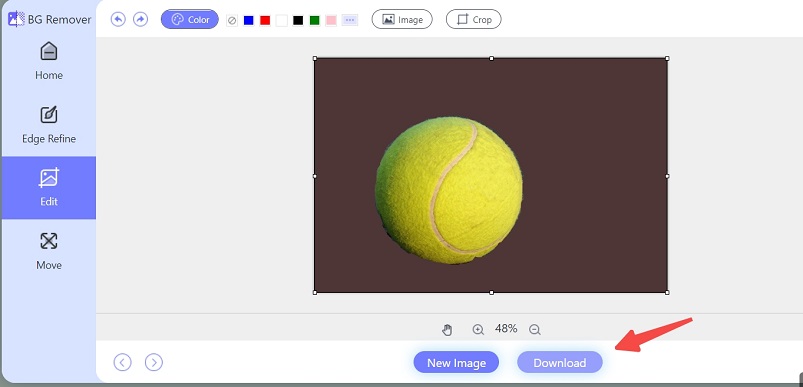
Step 4After you're done, click Download to save your new photo.
FAQs About Editing Background Graphics in PowerPoint
Can you edit multiple slides' backgrounds together?
Yes, but the right method depends on what you are changing. If it's a recurring graphic, edit it in the Slide Master or the relevant layout. For a regular slide background fill, go to Design > Format Background and click Apply to All when you want it everywhere.
Can you remove the image background in PowerPoint?
Yes, Select the picture that you want to remove the background from. On the toolbar, select Picture Format > Remove Background. Then you can easily remove the background from the picture.
Where is Slide Master in PowerPoint on iPad?
Unfortunately, there's currently no Slide Master in the PowerPoint mobile app or PowerPoint web. It's a desktop-only feature.
When you edit a background graphic in PowerPoint, the key is to know where the graphic is stored. Use Slide Master or a specific layout for inherited graphics, or Format Background for slide-wide fills. For a standalone photo, PowerPoint’s built-in Remove Background tool can handle basic cutouts just fine. If the image work is more involved, though, AVAide Background Eraser is the better call.
ABOUT THE AUTHOR


Uses AI and automated background removal technology to capture complex backgrounds from JPG, JPEG, PNG, and GIF.
PROCESS NOW