Google Photos is an app for storing and organizing your media files. Now, you may see your photos taking up a lot of space, and it can fill up your storage speedily. However, Google only offers limited free storage, and buying extra space can be costly.
Of course, you do not want to spend more just for storage. The good news is, you can compress Google Photos to save space without buying more storage. Here, we will show you how to do it. Let us begin!
Part 1: Does Google Drive Compress Photos
Many people wonder, Does Google Drive compress photos? Google Drive itself does not automatically reduce the size of the images you upload.
Your photos are stored in their original clarity unless you use Google Photos backup settings. If you upload straight to Google Drive, the images keep their full resolution. It makes it a safe option if you want to store high-clarity photos without losing detail.
Part 2: How to Compress Google Photos Within the App
Google Photos is not just online; it works on your phone too. Many users ask, Does Google Photos compress images? The answer is yes! It offers a feature that can compress your photos. The images stay clear enough to view, though you might notice a slight loss of sharpness. Follow the steps below to get it done easily!
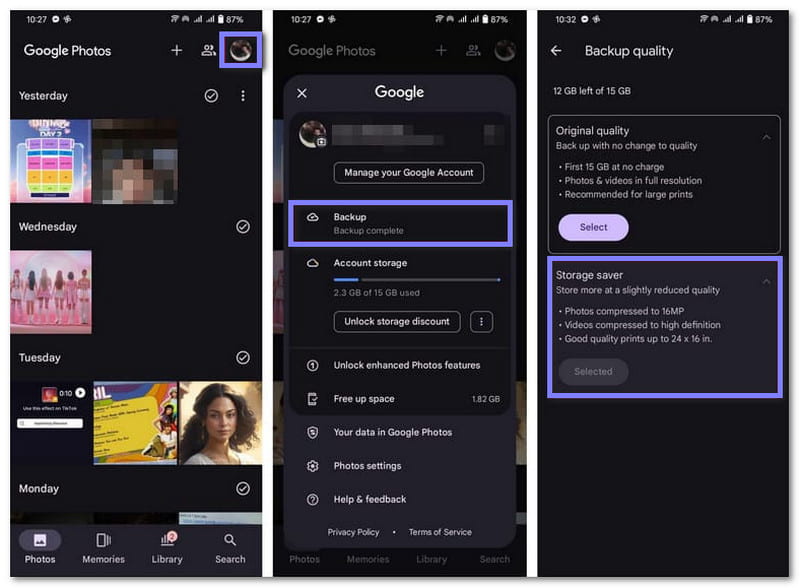
Step 1Start by opening the Google Photos app on your mobile device. Be sure you are logged into your Google account to access all your photos and backup settings.
Step 2Tap your Profile button in the upper right corner. You will see several options. Select Backup, which is listed under your Google account name.
Step 3Press the three vertical dots to open more options. Then, scroll down until you find Settings, and select it. What you need to do now is look for Backup quality and click it to see the available options.
Step 4Choose Storage Saver by pressing the Select button, and it will automatically compress your photos.
- Pros
- New backups are compressed automatically.
- Helps avoid paying for extra Google storage.
- Lets you store more within your free or paid Google storage.
- Cons
- Camera settings or color details may change.
- You cannot restore photos to their original quality.
Part 3: Best Way to Compress Google Photos with One Click
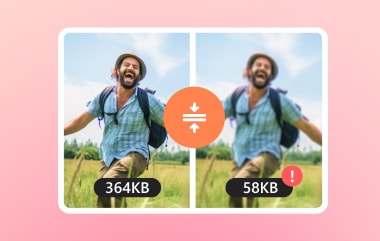
Do you want to save storage space fast without losing your photo quality? AVAide Image Compressor is the easiest solution. With just one click, you can compress Google Photos by 50-80% in seconds. Plus, it is totally free, safe, and perfect for anyone who wants immediate results without any hassle.
Step 1Run your favorite web browser. Next, type AVAide Image Compressor in the search bar and go to the website.
Step 2Once on the website, click the Choose Files button to open your local folder. Then, select the Google Photos you want to compress.

Step 3Once your photos are added, AVAide Image Compressor will automatically begin compressing them. Please wait until you see Finished in green. You will see the original file size and the new compressed size. For example, a photo of 491.53 KB becomes 167.52 KB, saving around 65% of space.

Step 4Save your compressed images by clicking the Download or Download All button to save them all at once. That is it; you have learned how to compress Google Photos using AVAide Image Compressor.

- Pros
- Very fast, completes compression in seconds.
- Compress up to 40 images at once, max 5 megabytes each.
- Works with most popular image formats (JPG, PNG, JPEG, WebP, etc.)
- Cons
- Internet connection required for use.
Part 4: Other Ways to Compress Google Photos
There is more than just the Google Photos app or using AVAide Image Compressor to compress Google Photos. You can also rely on other methods to compress your photos, which we will share below.
1. Squoosh
Squoosh does all the work locally on your device to compress Google Photos. It can resize images by width and height and change clarity with a slider. The side-by-side preview shows the original and compressed photo. No sign-up is needed; you can compress your photos right away.
Step 1Access the Squoosh website using your browser.
Step 2Click the Add button or drag your photos into the interface to import them.
Step 3Enable the Resize button and set your preferred Width and Height. Then, go to Quality and move the slider to the left to shrink the file size.
Step 4You will see the estimated size at the bottom. If the size looks good, click the Save button to download the compressed photo to your device.

- Pros
- No account needed.
- Resize and change clarity freely.
- Shows original and compressed preview.
- Cons
- Best for single images, not batch.
- Many options may confuse beginners.
2. iLoveIMG
This platform compresses JPG, PNG, SVG, or GIF files while keeping good clarity. You can process multiple images at once. Like Squoosh, no login is needed, and it works fully online. Extra features include resizing, rotating, watermarking, cropping, and conversion.
Step 1Open your browser and go to the iLoveIMG website.
Step 2Click Select Images or drag your Google Photos into the site.
Step 3Once the photo is loaded, click Compress Images at the lower left.
Step 4You will see the percentage of space saved. If you are okay with that, click the Download Compressed Images button to save the smaller version to your device.

- Pros
- Extra editing tools included.
- Preview images before saving.
- Compress multiple images at once.
- Cons
- Only shrinks the image lightly.
- Limited control over the exact file size.
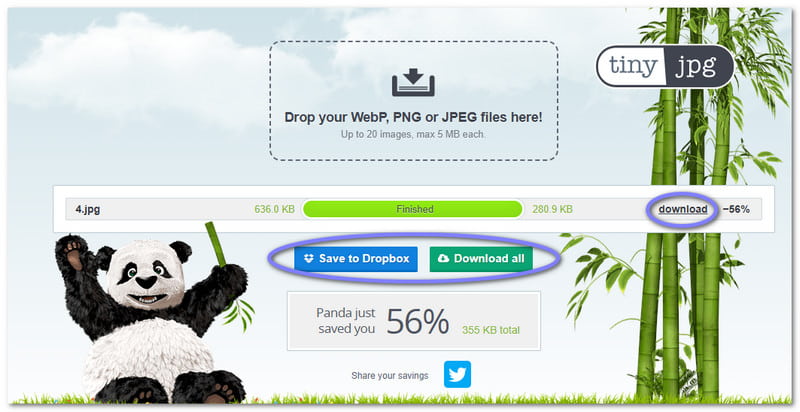
3. TinyJPG
TinyJPG allows you to drop WebP, PNG, or JPEG for compression. The site clearly shows the original and compressed file sizes. If you are wondering how to compress all photos in Google Photos, this tool also supports batch compression. Once finished, you can download single images or all at once.
Step 1Head to the TinyJPG website using your preferred browser.
Step 2Drag and drop your photos in the upload section. You can import up to 20 images at once, each up to 5 megabytes.
Step 3The compression will start automatically. Please wait until you see the word Finished in green.
Step 4Click Download to save the compressed photo. If you uploaded many images, you can click Download All or save them directly to Dropbox.
- Pros
- Fast and automatic.
- Batch compress up to 20 images.
- Shows original and compressed photo size.
- Cons
- Only a 5 megabyte limit per image.
- Only compresses, no editing features.
As already stated above, you can compress a photo in Google Photos, but it affects the quality of your pictures, which is not ideal.
Fortunately, AVAide Image Compressor can help you compress your photos while preserving the quality. Your images stay sharp and look the same, even though the file size is much smaller. For all your compression needs, just use AVAide Image Compressor in your browser and enjoy it for free.

Reduce the file size of an image online within seconds while preserving the quality. We support JPG, PNG, WEBP, GIF, and more.
PROCESS NOW