Vil utforske hvordan du tar opp et Webex-møteOpptak er en ideell måte hvis du vil lagre viktige presentasjoner, diskusjoner eller opplæringsøkter for fremtidig referanse. I tillegg kan du med den innebygde opptaksfunksjonen i Webex ta opp både video og lyd, sammen med delt innhold, slik at du sikrer at ikke noe viktig innhold går glipp av. Så hvis du vil lære hvordan du tar opp et møte på Webex, kan du se denne veiledningen, da vi tilbyr alle de beste metodene du kan bruke.
Del 1. Hvem kan ta opp et Webex-møte
Lurer du på hvem som kan ta opp et møte på Webex? Vel, bare møteverten og eventuelle utpekte medverter kan ta opp økter i Webex. I tillegg kan ikke vanlige deltakere starte opptak med mindre verten spesifikt tillater det. Vær også oppmerksom på at du må ha abonnementet for å få tilgang til opptakerfunksjonen.
Del 2. Slik aktiverer du opptak
Det er like enkelt å aktivere opptaksfunksjonen på nettstedet så lenge du er administrator. For å aktivere opptak må du:
Trinn 1Logg inn på Webex-kontrollhub eller Nettstedsadministrator via administratorlegitimasjon. Fortsett deretter til Tjenester > Møteinnstillinger seksjon.
Steg 2Etter det, finn frem Innspilling seksjonen og slå den av/på for å aktivere opptaket. Du kan også velge lagringstyper, for eksempel skyopptak, lokalt opptak og mer, basert på abonnementet ditt.
Trinn 3I neste prosess angir du tillatelser for verter og medverter til å administrere og kontrollere opptaket.
Del 3. Slik tar du opp et Webex-møte på skrivebordet
Hvis du vil lære hvordan du tar opp møter i Webex, kan du lese all informasjonen i dette innlegget. Vi lærer deg hvordan du tar opp et Webex-møte i skyen og på en lokal datamaskin.
Metode 1: Ta opp Webex-møte i skyen
Å ta opp møtet i skyen er en perfekt metode, spesielt hvis du vil bevare opptakene dine eller dele filen med andre brukere. Du kan til og med få tilgang til videoen hvor som helst uten å laste den ned på enheten din. Så for å starte prosessen kan du følge de enkle instruksjonene nedenfor.

Trinn 1Adgang Webex på datamaskinen din. Etter det kan du til og med opprette kontoen din.
Steg 2Når du er ferdig, kan du nå klikke på Start et Webex-møte alternativ. Klikk deretter på Ta opp knapp.
Trinn 3Velg Opptak i skyen > Ta opp -knappen for å starte innspillingsprosessen. For å stoppe innspillingen, bruk Stoppe knapp.
Metode 2: Ta opp Webex-møte i lokalt opptak
I tillegg til å ta opp i skyen, kan du også lagre og ta opp et Webex-møte på datamaskinen din. Denne metoden er bedre hvis du vil ha ditt eget opptak og samling av møtene dine. Det vi liker her er at opptaksprosessen er enkel, takket være det omfattende oppsettet. Du kan til og med lagre videoen i beste kvalitet for bedre videoavspilling. Sjekk trinnene nedenfor for en effektiv Webex-opptaksprosess.
Trinn 1Etter tilgang Webex, kjør den for å starte prosessen.
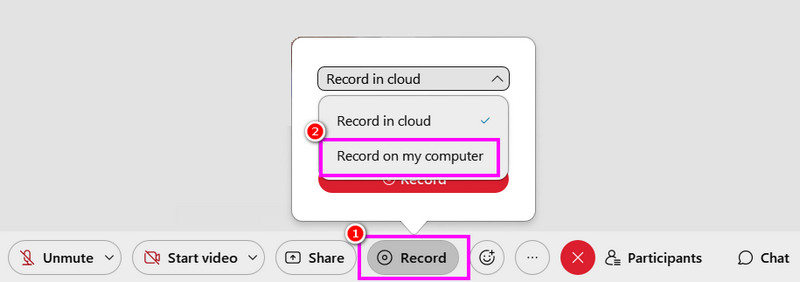
Steg 2Deretter, fra hovedgrensesnittet, trykk på Start et Webex-møte knappen. Etter det, fra Ta opp seksjonen, velg Spill inn på datamaskinen min alternativet for å starte opptaket.
Trinn 3Trykk på Stoppe for å fullføre innspillingsprosessen. Når det er gjort, lagres filen på datamaskinen din.
Metode 3: Ta opp Webex-møte med AVAide-skjermopptaker
Hvis du er en deltaker fra Webex-møtet, kan det være umulig for deg å ta opp møtet, siden bare verter og medverter kan gjøre det. Hvis du ikke har tillatelse til å ta opp, er det beste å bruke en bedre skjermopptaker, som AVAide skjermopptakerDet er enkelt å ta opp et Webex-møte når du bruker denne opptakeren. Dette er fordi programmet har et omfattende og pent brukergrensesnitt. Du kan til og med ta opp/ta opp både video og lyd, noe som gjør det mer elegant og kraftig. Bortsett fra det kan du til og med ta et skjermbilde under opptaksprosessen. Du kan også lagre opptaket med best mulig kvalitet, slik at du får en tilfredsstillende seeropplevelse. For å begynne å ta opp møtet ditt på Webex, følg trinnene nedenfor.
Trinn 1Last ned og start AVAide skjermopptaker på datamaskinen din. Klikk på knappene nedenfor for å få tilgang til opptakeren umiddelbart.

GRATIS NEDLASTING For Windows 7 eller nyere
 Sikker nedlasting
GRATIS NEDLASTING For Mac OS X 10.13 eller nyere
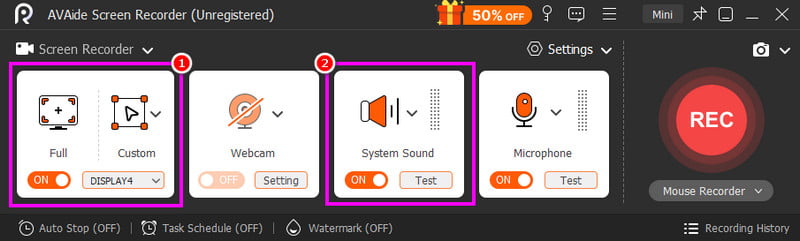
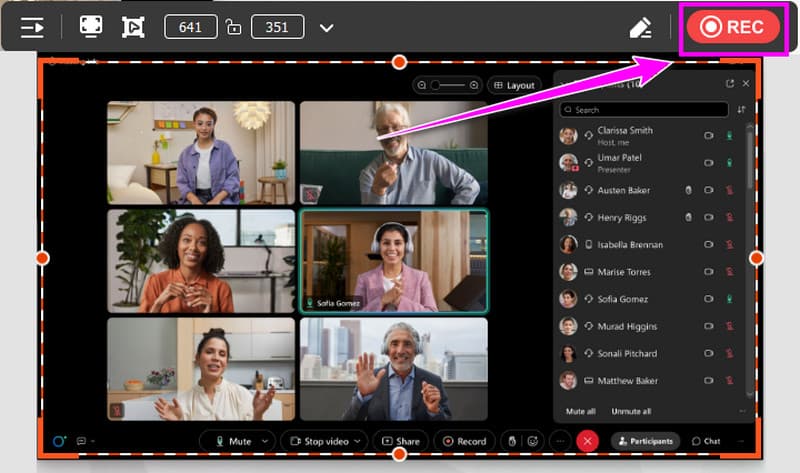
Sikker nedlastingSteg 2Fra hovedgrensesnittet kan du velge hvordan du vil ta opp møtet ved å klikke på Full eller Tilpasset alternativer. Du kan også slå på Systemlyd for å ta opp lyden fra datamaskinen din.
Trinn 3Klikk på REC -knappen, og nedtellingen på tre sekunder vil vises. Etter nedtellingen vil opptaksprosessen starte. Kryss av for Stoppe for å fullføre opptaket.
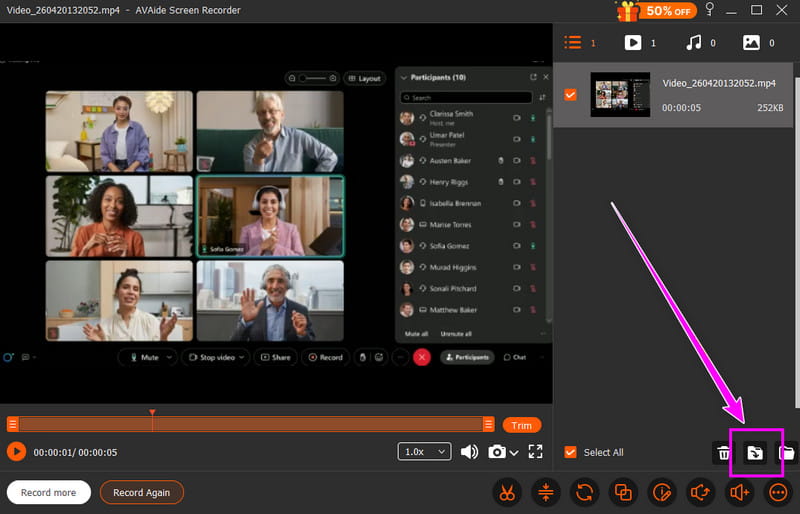
Trinn 4Når forhåndsvisningen vises, kan du begynne å lagre videoen ved å klikke på Eksport knappen nedenfor.
Del 4. Slik tar du opp et Webex-møte på telefonen
Du kan også ta opp en økt i Webex med mobiltelefonen din. Det gode her er at du kan ta opp skjermen på iPhone og Android, takket være den innebygde opptaksfunksjonen. Med denne funksjonen kan du effektivt ta opp et møte uten å laste ned noen tredjepartsopptaker.
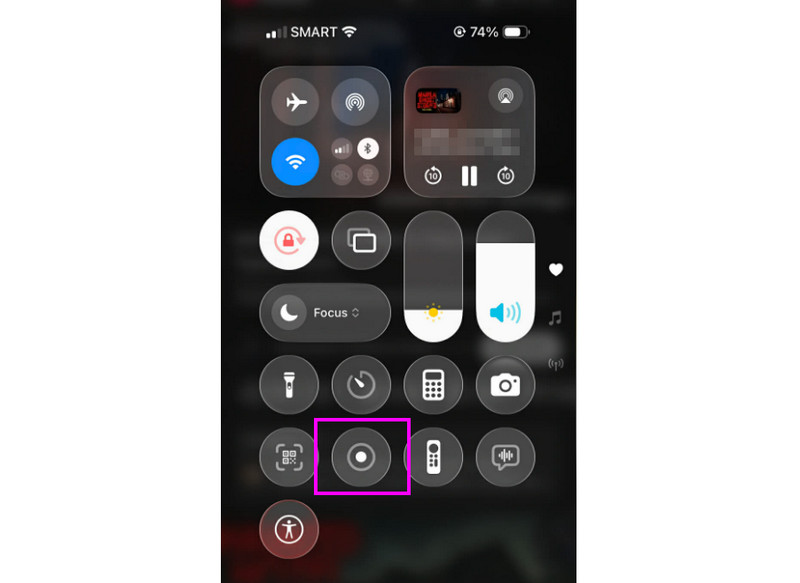
Trinn 1Fra telefonen din kan du gå videre til Melding seksjonen. Se deretter etter Ta opp knapp.
Steg 2Trykk på Ta opp -knappen, og nedtellingen på 3 sekunder vil vises. Etter det vil den offisielle innspillingsprosessen begynne.
Trinn 3trykk Stoppe for å fullføre opptaksprosessen. Deretter kan du sjekke opptakene i Bilder- eller Galleri-appen.
Del 5. Slik tar du opp et Webex-møte i en nettleser
Hvis du vil ha beste online opptaker, kan du prøve å bruke verktøyet Online Screen Recorder. Denne opptakeren er nyttig hvis du vil ta opp et Webex-møte i nettleseren din. Det vi liker her er at opptaksprosessen er enkel. Den kan til og med gi deg en smidig lagringsprosess. Den eneste ulempen her er at den mangler grunnleggende redigeringsfunksjoner for å forbedre videoer. Den viser også diverse irriterende annonser på skjermen.
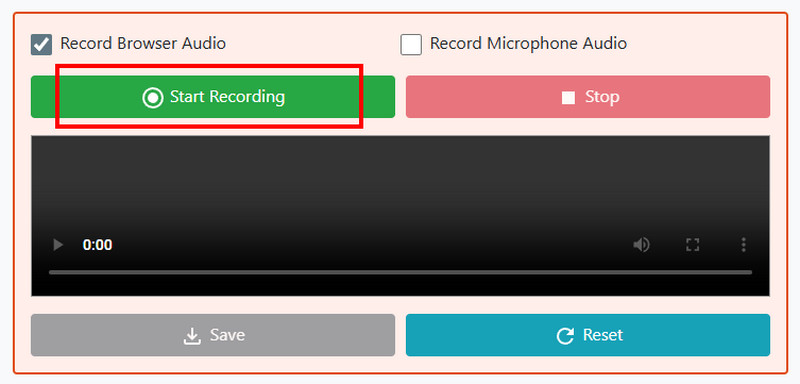
Trinn 1Gå til nettleseren din og få tilgang til Skjermopptaker på nett.
Steg 2Etter det klikker du på Start opptak -knappen. Velg deretter Webex-møtet for å starte innspillingsprosessen.
Trinn 3Til slutt, trykk på Stoppe -knappen for å fullføre opptaket av Webex-møtet.
Del 6. Slik laster du ned Webex-opptak
Fortsett til denne delen og lær hvordan du laster ned Webex-opptak.
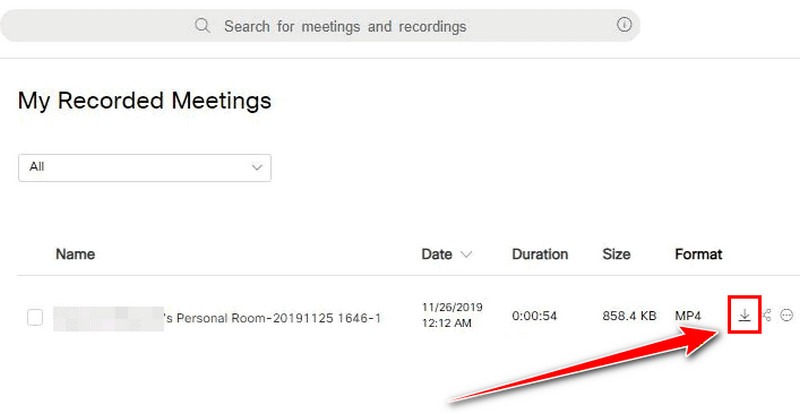
Trinn 1Logg inn på din Webex kontoen og fortsett til Opptak seksjon.
Steg 2Velg deretter opptakene og trykk på nedlasting symbolet fra det høyre grensesnittet.
Trinn 3Deretter lagres opptaket som en MP4-fil på datamaskinen din.
Nå har du lært hvordan du tar opp en økt i WebexDu kan til og med utforske hvordan du lagrer opptakene i skyen og på datamaskinen din. I tillegg, hvis du ønsker en smidigere opptaksprosess, kan du prøve å bruke AVAide skjermopptakerDen kan til og med tilby diverse grunnleggende redigeringsverktøy, slik at du kan forbedre videoen for bedre avspilling.
OM FORFATTEREN

Ta opp skjerm, lyd, webkamera, spilling, nettmøter, samt iPhone/Android-skjerm på datamaskinen din.
Skjermopptak