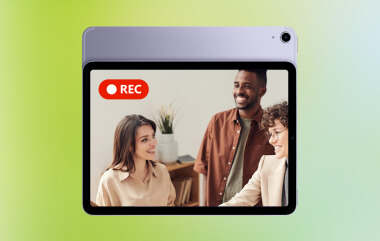
Lenovoノートパソコンで画面録画する方法 使用するツールによって、Windowsの標準機能から高度なソフトウェアまで、方法は異なります。このガイドでは、チュートリアル、会議、ゲームプレイ、日常的な録画など、用途を問わず、Lenovoデバイスの画面をキャプチャするためのシンプルで分かりやすく効率的な方法を紹介します。
方法1:Xboxゲームバーを使用する
Xbox Game Barに内蔵されている録画機能はMicrosoft製で、Windowsとシームレスに統合されており、Lenovoユーザーにとって最も便利な録画ソリューションです。ゲームプレイ用に開発されただけでなく、標準的なアプリケーションレコーダー、チュートリアル作成ツール、ブラウザレコーダーとしても機能します。最大の利点は、設定が不要で、すぐに使用できることです。
しかし、明らかな欠点もあります。デスクトップやファイルエクスプローラーは録画されず、カスタマイズはプロ向けのツールに限られています。とはいえ、品質や手間をそれほど重視しないカジュアルなセッションにおいては、最も便利な内蔵オプションの一つであることに変わりはありません。
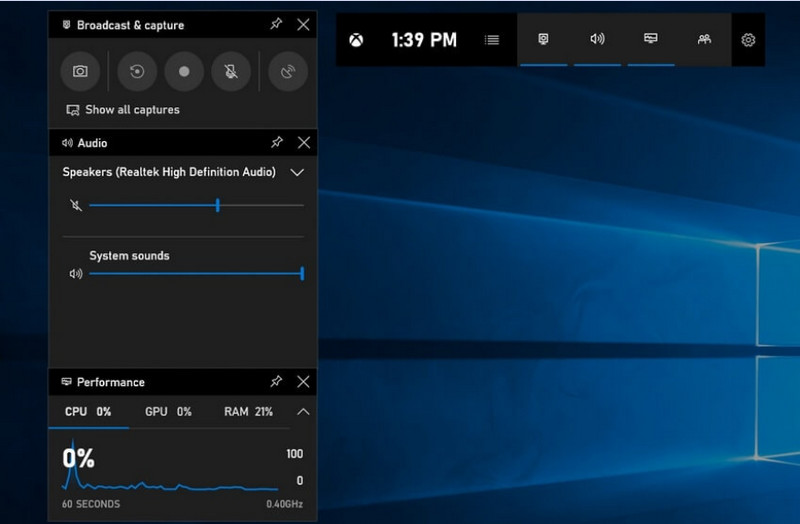
ステップ1Xboxゲームバーを開くには、 ウィンドウズ + G キーボードで。
ステップ2を見つける 捕獲 パネルからクリックするか、 ウィジェット メニュー。
ステップ3クリック 記録(●) ボタンを押すか、を押します Windows + Alt + R.
ステップ4音声を録音したい場合は、 マイクロフォン.
ステップ5プレス Windows + Alt + R もう一度クリックするか、 停止(■) 完了する。
ステップ6録音は以下にあります ビデオ >> キャプチャ.
方法2:Lenovo Vantageを使用する
Lenovo Vantageはスクリーンレコーダーではなく、システム管理および最適化スイートです。録画に関しては間接的な役割を担っており、録画デバイスのモデルによっては、録画プロセスを支援する機能がごくわずかしか搭載されていません。また、一部のデバイスでは、録画プロセスを支援するショートカットやカメラ/ディスプレイツールが提供されています。
これはパフォーマンスと可用性の大きなばらつきです。基本的な録画機能は一部のLenovoデバイスでサポートされている可能性がありますが、他のデバイスでは全くサポートされていない可能性があります。フルスクリーンレコーダーでできることは限られており、やや一貫性がありませんが、Lenovoエコシステム内に留まりたいユーザーにとっては価値があるかもしれません。 ポッドキャストを録音する 基本的なツールで満足できる。
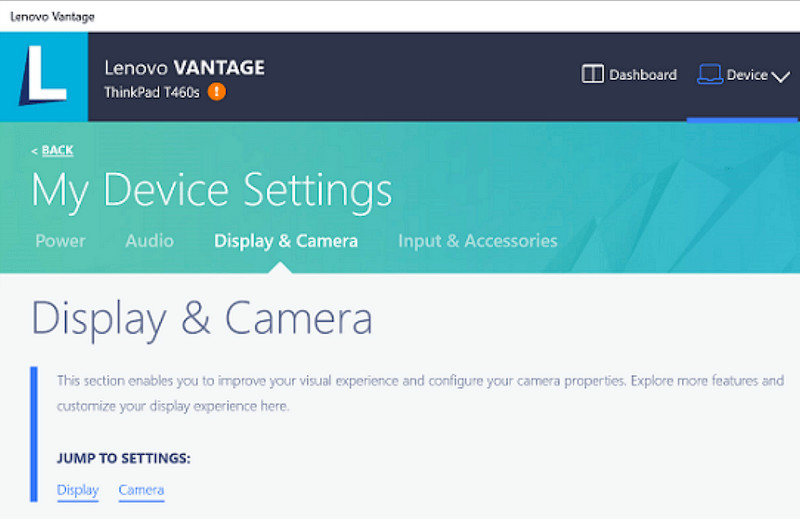
ステップ1に移動します 始める メニューをクリックして レノボ バンテージ.
ステップ2タップ デバイス設定 >> ディスプレイとカメラ.
ステップ3録画機能やその他の利用可能な機能を確認してください。
ステップ4必要なオプションやショートカットをすべて利用できるようにしてください。
ステップ5提供されている機能を使用して音楽を録音してください(可能な場合)。
ステップ6「ビデオ」フォルダに保存した録画ファイルを探してください。
方法3:Legion Zone / Lenovo Nerve Centerを使用する
Lenovo Nerve Center(またはLegion Nerve Center - Legionの新しいツールがNerve Senseに取って代わりました)は、Lenovoデバイス、特にゲーマー向けのLenovo Legionノートパソコンに最適化されています。また、ゲームパフォーマンスツールと緊密に統合されているため、ユーザーはシステムリソースを監視および最適化しながら、ゲームのスクリーンショットを撮影できます。
しかしながら、これはかなり基本的なレコーダーです。カスタマイズ性よりも利便性を重視しており、解像度、ビットレート、詳細設定などの制御は限定的で、基本的な録画オプションしか提供していません。また、一部の新しいシステムでしか利用できず、他のシステムでは代替機能に置き換えられたり、削除されたりしているため、以前ほど信頼性は高くありません。
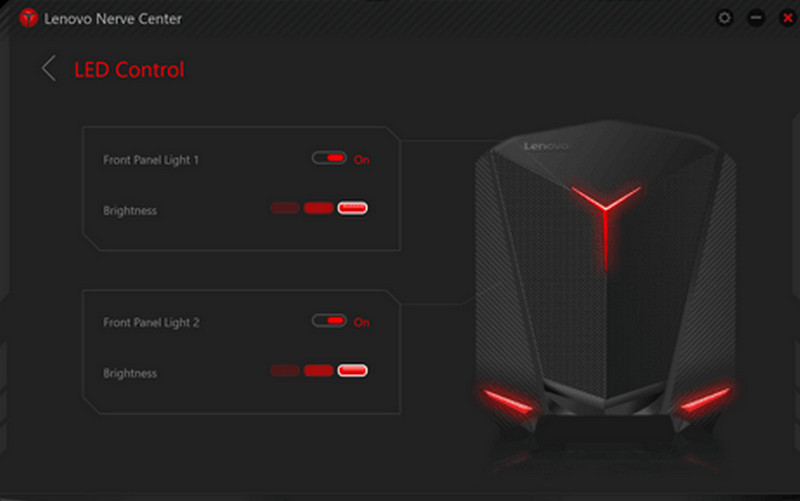
ステップ1アクセスする レノボ神経センター また レギオンゾーン デバイスから。
ステップ2録画ツールまたはゲームツールに移動してください。
ステップ3選択肢がある場合は、解像度や音質などの録画設定を変更してください。
ステップ4ゲームまたはアプリケーションを起動してください。
ステップ5デフォルトのショートカットキーまたはボタンを使用して録画します。
ステップ6録画を停止して、 ビデオ ファイルが記録されているかどうかを確認するためにフォルダを開きます。
方法4.AVAideスクリーンレコーダーを使用する
AVAideスクリーンレコーダー は、Lenovoの内蔵スクリーンレコーダーよりも洗練された多機能なスクリーンレコーダーです。高画質な動画、スムーズな操作性、そして高度な録画コントロールを求めるユーザーのために開発されました。複雑な設定は一切不要で、チュートリアル動画の作成、会議の録画、ゲームプレイのキャプチャなど、プロレベルの映像制作に最適なツールです。
システムサウンド、マイク入力、ウェブカメラ、画面領域をキャプチャできるだけでなく、基本的なレコーダーと比べて遅延が最小限に抑えられ、フルHDや4Kの録画にも対応しています。そのため、仕事にもプライベートにも使えるオールインワンのスクリーンキャプチャアプリケーションと言えるでしょう。
- 1080pまたは4Kの動画を、スムーズで遅延のないパフォーマンスで撮影できます。
- 必要に応じて、フルスクリーンモードまたはカスタムスクリーンモードで録画できます。
- 内部音と音声を同時に、クリアな出力で録音します。
- チュートリアル、プレゼンテーション、ゲームプレイ動画用に、フェイスカム録画機能を追加しましょう。
- 録音後に、トリミング、圧縮、および画質向上を行います。

 安全なダウンロード
ステップ1ソフトウェアをダウンロードしてインストールする
AVAide Screen Recorderの公式サイトにアクセスしてください。Windowsインストーラーをダウンロードし、Lenovoノートパソコンにインストールして実行してください。
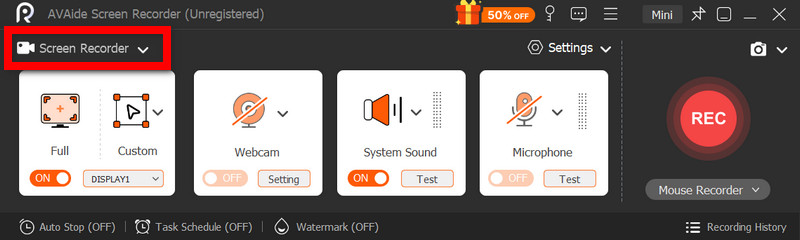
ステップ2録画モードを選択してください
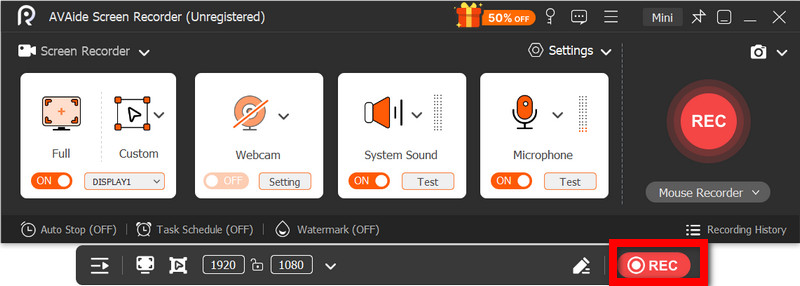
ソフトウェアを開いて、次にクリックします スクリーンレコーダー画面全体を録画します 満杯 または画面の一部 カスタム.
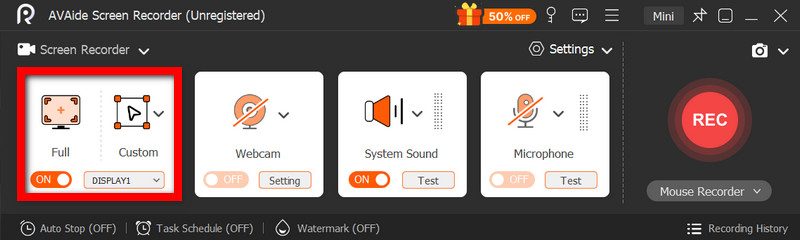
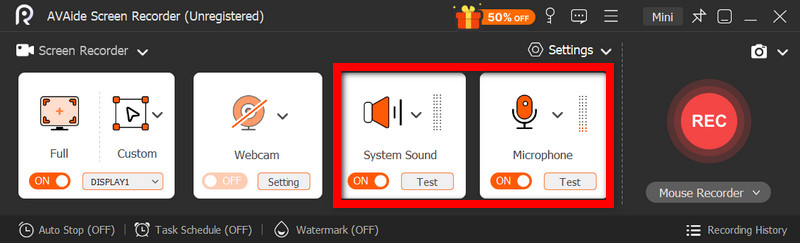
ステップ3オーディオ設定を構成する
コンピューターが発する音を録音するには、 システムサウンド自分の声を加えるには、 マイクロフォン必要に応じてウェブカメラをオンにすることもできます。
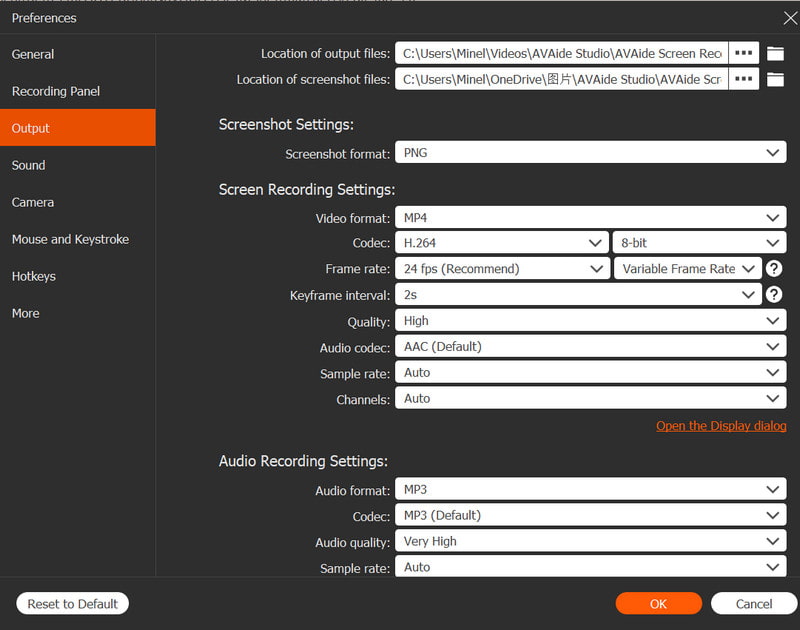
ステップ4録画設定を調整する
使用 設定 最適な録画性能を実現するために、ビデオ品質、解像度、フレームレート、出力フォーマットを設定するためのボタン。
ステップ5録音開始
を押します REC 録画を開始するには、ボタンを押してください。Google Meetの録画、チュートリアル、ゲームプレイ、または画面上のあらゆるアクティビティをスムーズに録画できます。
ステップ6録画を停止して保存する
完了したら、 やめる ボタンをクリックすると、録画内容をプレビューし、必要に応じて素早く編集して、すぐにコンピューターに保存できます。
方法5.クイック設定を使用する
Lenovo製Androidタブレットには、クイック設定に画面録画機能が内蔵されています。チュートリアル、ゲームプレイ、アプリのアクティビティなどをタブレット上で録画する最良の方法は、サードパーティ製アプリをダウンロードせずに録画することです。簡単、迅速、そしてモバイルでの使用に最適化されているため、外出先での手軽な録画に最適です。
他のスクリーンキャプチャツールにあるような高度な編集機能やカスタマイズ機能は備えていませんが、音声付きのシンプルなスクリーンキャプチャには十分です。
ステップ1画面下部から上にスワイプして開く クイック設定.
ステップ2探してください スクリーンレコード また スクリーンレコーダー ボタン。それがない場合は、 編集 ボタンをクリックしてパネルに追加してください。
ステップ3クリック スクリーンレコーダー次に、希望の設定を選択してください。
ステップ4タップ 始める 録音を開始します。録音開始前にカウントダウンが行われます。
ステップ5フローティングツールバーまたは通知バーをタップし、次に やめる 録音を終了するには。
Lenovo製品における一般的な画面録画の問題のトラブルシューティング
Lenovo製デバイスで画面録画を行う際に発生する一般的な問題の解決方法に関するヒントを読むことができます。
Lenovo製デバイスでの画面録画には通常大きな問題はありませんが、使用する画面録画ツールやデバイスによっては問題が発生する可能性は常にあります。以下に、よくある問題とその解決方法を示します。
- 画面録画機能が動作しない: デバイスを再起動して、もう一度お試しください。Xbox Game Barなどの内蔵ツールについては、Windowsの設定の「ゲーム」セクションで有効になっていることを確認してください。
- 録音に音声がありません: 録音する前に、システムサウンドまたはマイクがオンになっているか確認してください。また、システム音量がミュートになっていないかも確認してください。
- 動画の遅延や画質の低下: 動画の画質を下げるか、バックグラウンドで実行されているアプリケーションを終了してください。グラフィックドライバーを最新の状態にアップデートすることも、パフォーマンス向上に役立ちます。
- デスクトップまたはファイルエクスプローラーを録画できません: これは Xbox ゲーム バーの一般的な制限の 1 つです。画面を録画してすべてをキャプチャしたい場合は、AVAide Screen Recorder などの高度なプログラムを使用してください。 Macに最適なスクリーンレコーダー およびWindows。
- 録画が保存されない: ストレージ容量がいっぱいになっていないことを確認し、デフォルトの保存場所を確認してください。設定で出力フォルダを変更し、試してみてください。
Lenovoの画面録画ボタン 使用するデバイスやツールによってオプションは異なります。全体として、内蔵機能とサードパーティ製アプリにより録画は簡単になり、Lenovoデバイス上で画面アクティビティを効率的にキャプチャ、保存、管理するための柔軟な方法が提供されます。
著者について

オーディオ、オンライン会議、ゲームプレイビデオ、音楽、Webカメラなどで画面アクティビティをキャプチャします。