मान लीजिए आप किसी ट्यूटोरियल, गेमप्ले के किसी खास पल या ऑनलाइन मीटिंग को सेव करने की कोशिश कर रहे हैं, लेकिन आपको यह नहीं पता कि इसे अपने डिवाइस पर कैसे कैप्चर करें। iPad पर स्क्रीन रिकॉर्ड कैसे करें इससे इन पलों को सहेजना और साझा करना आसान हो जाता है। यह गाइड आपको रिकॉर्डिंग चालू करने, ध्वनि का उपयोग करने, समस्याओं को हल करने और हर बार बेहतर स्क्रीन रिकॉर्डिंग के लिए गुणवत्ता में सुधार करने के बारे में बताती है।
भाग 1. iPad पर स्क्रीन रिकॉर्डिंग कैसे चालू करें
चिंता न करें, स्क्रीन रिकॉर्डिंग बटन अभी आपके कंट्रोल सेंटर में इंस्टॉल नहीं हुआ है, सिवाय इसके कि यह आपके iPad में पहले से मौजूद न हो। Apple ने इस फ़ंक्शन को iPadOS में पहले से ही शामिल कर दिया है, और इसका उपयोग करने से पहले इसे चालू करना होगा। एक बार जोड़ने के बाद, आप बस एक स्वाइप और टैप से कभी भी अपनी स्क्रीन रिकॉर्ड कर सकते हैं।
स्टेप 1थपथपाएं समायोजन अपने आईपैड पर ऐप डाउनलोड करें।
चरण दोपर क्लिक करें नियंत्रण केंद्र मेनू में नीचे स्क्रॉल करते समय आपको यह दिखाई देगा।
चरण 3थपथपाएं + (जोड़ें) में बटन स्क्रीन रिकॉर्डिंग उपलब्ध नियंत्रणों की सूची का अनुभाग।
चरण 4एक्सेस करने के लिए नियंत्रण केंद्रअपनी स्क्रीन के ऊपरी दाएं कोने से नीचे की ओर स्वाइप करें। अब आपको रिकॉर्ड दिखाई देना चाहिए।
भाग 2. iPad पर स्क्रीन रिकॉर्ड कैसे करें
एक बार इसे सक्रिय करने के बाद, अपने iPad स्क्रीन को रिकॉर्ड करना आसान और तेज़ हो जाता है। iPadOS का बिल्ट-इन रिकॉर्डर एक सहज सुविधा है जो आपको बिना किसी थर्ड-पार्टी ऐप को इंस्टॉल किए गेमप्ले, ट्यूटोरियल या वीडियो कॉल को रिकॉर्ड करने की अनुमति देता है।
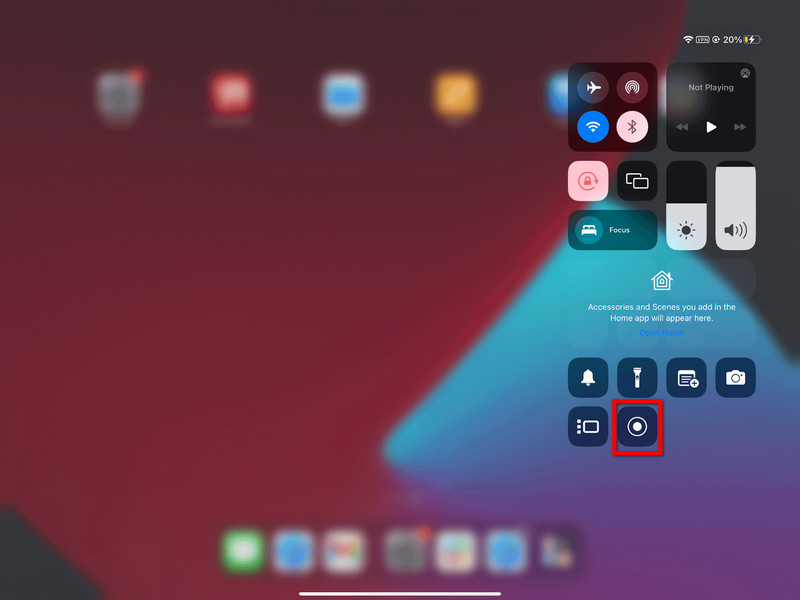
स्टेप 1अपने आईपैड स्क्रीन के ऊपरी दाएं कोने पर टैप करके दबाए रखें, फिर उसे नीचे की ओर खींचें।
चरण दोपर टैप करें स्क्रीन रिकॉर्डिंग बटन दबाएं। रिकॉर्डिंग शुरू होने से पहले 3 सेकंड की उलटी गिनती होगी।
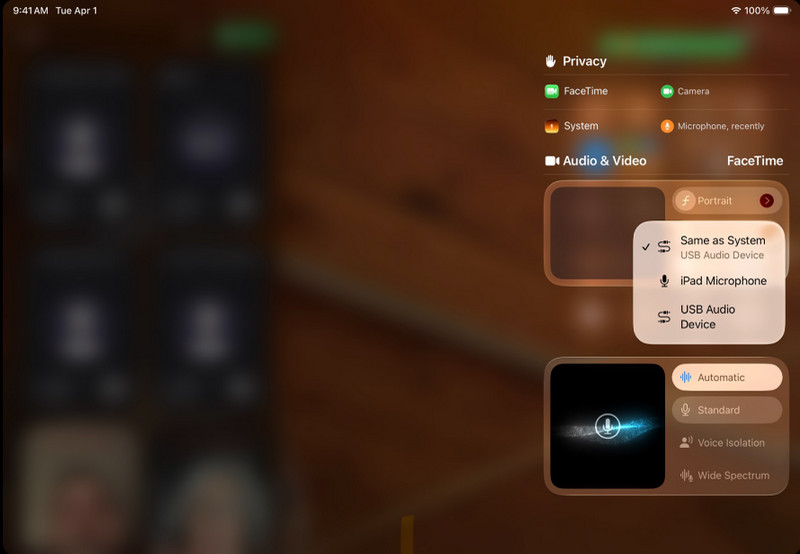
(वैकल्पिक) दबाए रखें स्क्रीन रिकॉर्डिंग बटन दबाएं और टैप करें माइक्रोफ़ोन जब आप अपनी आवाज रिकॉर्ड करना चाहें तो इसे सक्षम करें।
चरण 3आप जिन ऐप्स या गतिविधियों को रिकॉर्ड करना चाहते हैं, उन्हें चुनें।
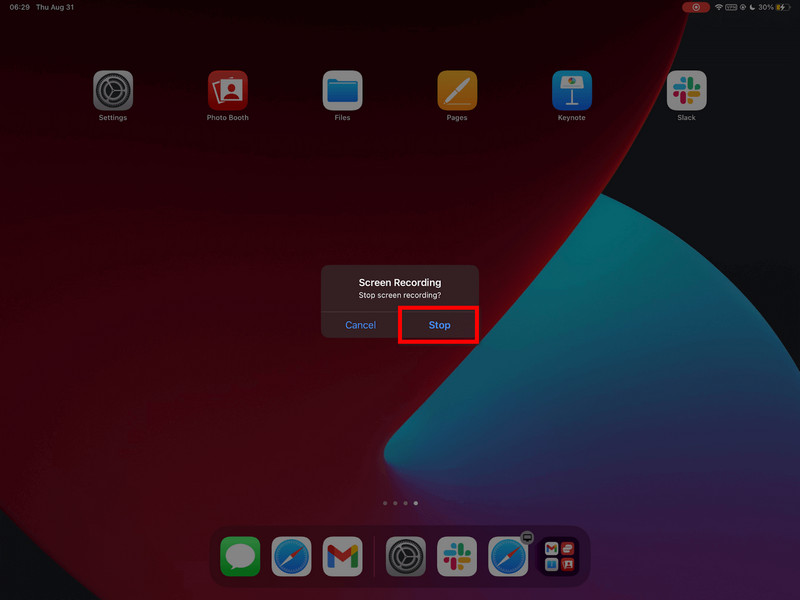
चरण 4लाल स्टेटस बार पर टैप करें और फिर टैप करें विरामया वापस चले जाओ नियंत्रण केंद्र और टैप करें अभिलेख फिर से बटन।
चरण 5आपका वीडियो स्वचालित रूप से सेव हो जाएगा। तस्वीरें एक ऐप, जहां आप इसे संपादित या साझा कर सकते हैं।
भाग 3. iPad पर ध्वनि के साथ स्क्रीन रिकॉर्ड कैसे करें
iPad से स्क्रीन और ऑडियो रिकॉर्ड करना ट्यूटोरियल, गेम, ऑनलाइन क्लास और डेमो के लिए उपयोगी है। iPadOS पर रिकॉर्डिंग सीमित क्षमता के साथ ही काम करती है, इसलिए रिकॉर्डिंग से पहले माइक्रोफ़ोन और सिस्टम ऑडियो के बीच संबंध को समझना ज़रूरी है।
महत्वपूर्ण अंतर: माइक्रोफोन बनाम सिस्टम ऑडियो
| ऑडियो प्रकार | यह क्या रिकॉर्ड करता है | iPadOS पर उपलब्धता | सर्वोत्तम उपयोग के मामले |
| माइक्रोफ़ोन ऑडियो | आपकी आवाज और बाहरी ध्वनियां आईपैड के माइक्रोफोन द्वारा कैप्चर की जाती हैं। | उपलब्ध | टिप्पणी, ट्यूटोरियल, वर्णन। |
| सिस्टम ऑडियो | ऐप्स, गेम्स, वीडियो और मीडिया प्लेबैक से आने वाली आंतरिक ध्वनियाँ। | प्रत्यक्ष रूप से समर्थित नहीं | इसके लिए बाहरी उपकरणों या वैकल्पिक समाधान की आवश्यकता है। |
माइक्रोफ़ोन से ऑडियो रिकॉर्ड करने के चरण
स्टेप 1अपने iPad स्क्रीन के ऊपरी दाएं कोने से ऊपर की ओर स्वाइप करके इसे खोलें। नियंत्रण केंद्र.
चरण दोदबाए रखें स्क्रीन रिकॉर्डिंग अधिक विकल्प देखने के लिए बटन दबाएं।
चरण 3माइक्रोफोन को चालू करने के लिए उसे दबाएं। रिकॉर्डिंग शुरू होने पर माइक्रोफोन लाल हो जाएगा।
चरण 4क्लिक रिकॉर्डिंग शुरूऔर जब 3 सेकंड की उलटी गिनती पूरी हो जाती है, तो रिकॉर्डिंग शुरू हो जाती है।
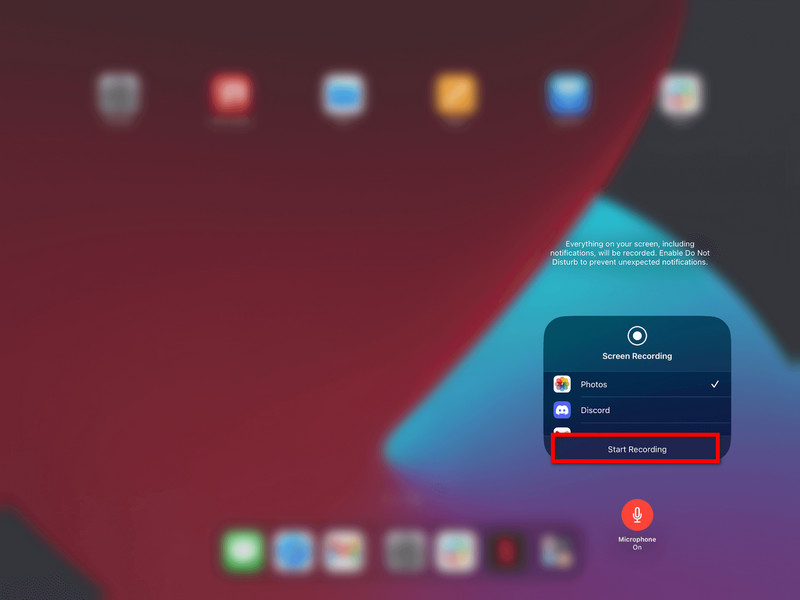
चरण 5जिन गतिविधियों को आप रिकॉर्ड करना चाहते हैं, उन्हें दोहराएं। यदि माइक्रोफ़ोन चालू है, तो आपकी आवाज़ रिकॉर्ड हो जाएगी।
चरण 6स्क्रीन के शीर्ष पर स्थित लाल स्टेटस बार पर टैप करें या वापस लौटें नियंत्रण केंद्र और टैप करें अभिलेख फिर से बटन।
चरण 7वीडियो अपने आप सेव हो जाएगा तस्वीरें एक ऐप, जहां आप इसे देख या संपादित कर सकते हैं।
सिस्टम ऑडियो रिकॉर्डिंग का विकल्प
दुर्भाग्यवश, सिस्टम की सीमाओं के कारण, आप iPad पर सीधे आंतरिक ऑडियो रिकॉर्ड नहीं कर सकते, इसलिए कंप्यूटर-आधारित समाधान की आवश्यकता है। एक उत्कृष्ट उपकरण है... AVAide स्क्रीन रिकॉर्डरजो आपको आईपैड को मिरर करने और स्क्रीन और सिस्टम ऑडियो को एक साथ रिकॉर्ड करने की सुविधा देता है।
AVAide स्क्रीन रिकॉर्डर एक उच्च-गुणवत्ता वाला स्क्रीन रिकॉर्डिंग सॉफ़्टवेयर है जो स्क्रीन गतिविधि को स्पष्टता से कैप्चर करता है। यह 4K/1080p तक बिना किसी रुकावट या विलंब के रिकॉर्ड कर सकता है। यह सिस्टम और माइक्रोफ़ोन ऑडियो की एक साथ रिकॉर्डिंग की सुविधा भी देता है, जो ट्यूटोरियल, गेमप्ले और प्रस्तुतियों के लिए एकदम सही है।
- हाई-क्वालिटी रिकॉर्डिंग आपको स्पष्ट और उच्च-गुणवत्ता वाले परिणामों के साथ 4K या 1080p में वीडियो कैप्चर करने की सुविधा देती है।
- डुअल ऑडियो
- यह रिकॉर्डिंग सिस्टम की ध्वनि और माइक्रोफोन की ऑडियो को एक साथ रिकॉर्ड करने की सुविधा प्रदान करता है।
- आईओएस स्क्रीन मिररिंग आपके आईपैड की स्क्रीन को पीसी या मैक पर प्रदर्शित और रिकॉर्ड करता है।
- फ्लेक्सिबल स्क्रीन मोड फुल-स्क्रीन या कस्टम-एरिया रिकॉर्डिंग को सपोर्ट करते हैं।
- इसमें मौजूद एडिटिंग टूल्स की मदद से आप रिकॉर्डिंग को जल्दी से ट्रिम, बेहतर और एडिट कर सकते हैं।

 सुरक्षित डाऊनलोड
स्टेप 1डाउनलोड करो और इंस्टॉल करो
आधिकारिक वेबसाइट पर जाएं और AVAide स्क्रीन रिकॉर्डर डाउनलोड करें। आधिकारिक वेबसाइट से AVAide स्क्रीन रिकॉर्डर डाउनलोड करें। इंस्टॉल होने के बाद, इसे आप अपने विंडोज या मैक कंप्यूटर से चला सकते हैं।
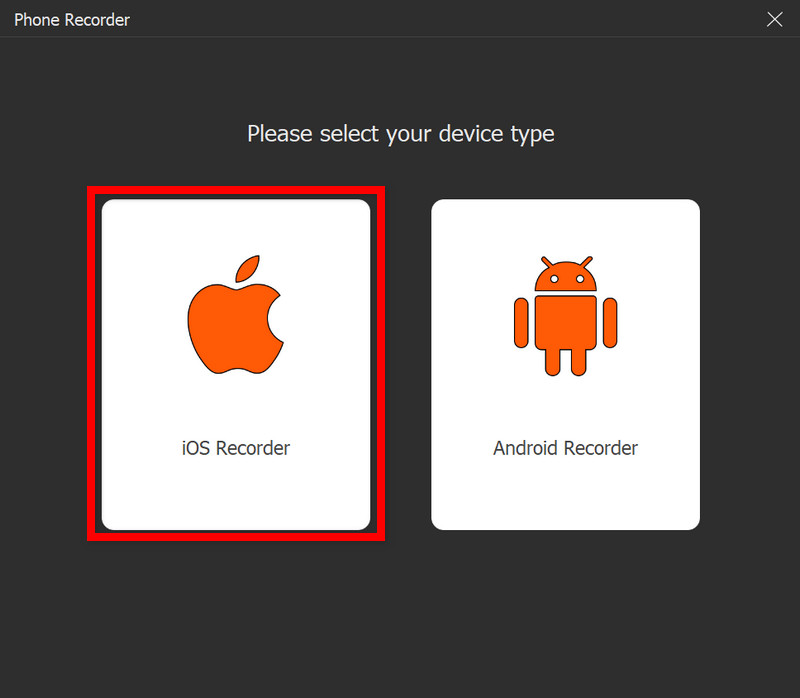
चरण दोiOS विकल्प चुनें
मुख्य इंटरफ़ेस में, क्लिक करें फोन रिकॉर्डर, फिर चुनें आईओएस रिकॉर्डर विकल्पों की सूची से (iOS और Android)।
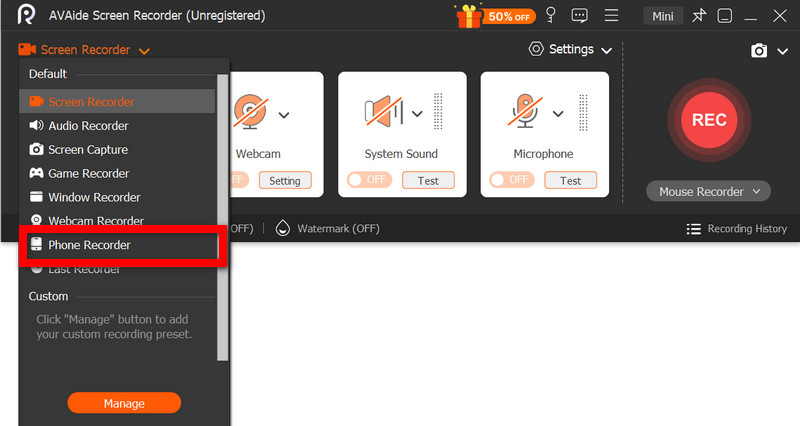
चरण 3आईपैड को पीसी से कनेक्ट करें
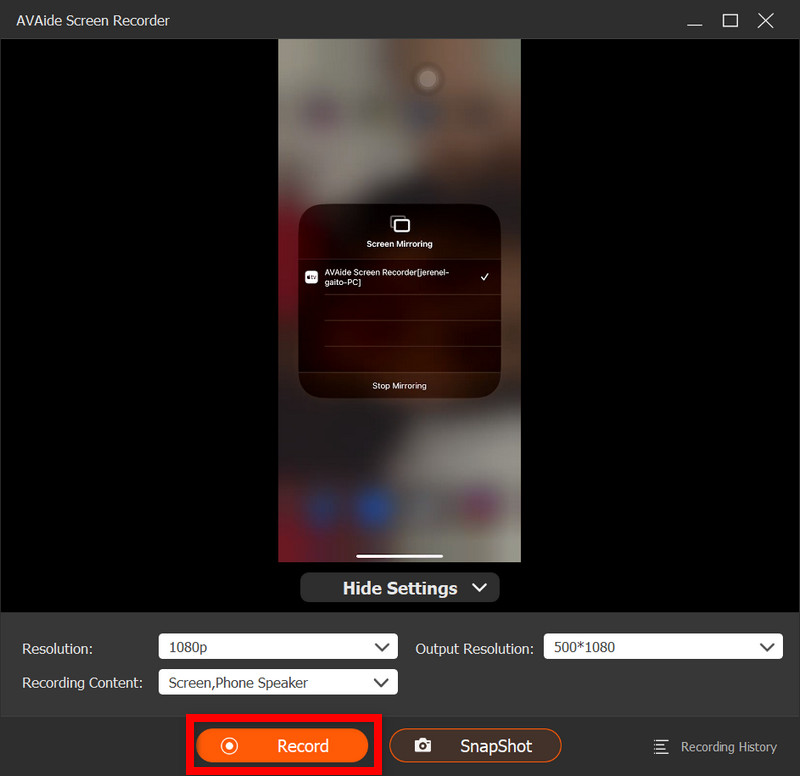
आप अपने iPad को अपने कंप्यूटर पर वायरलेस तरीके से मिरर कर सकते हैं, चाहे आप एक ही नेटवर्क का उपयोग कर रहे हों या USB केबल उपलब्ध हो। अपने iPad पर स्क्रीन मिररिंग ऐप में, AVAide डिवाइस चुनें। कनेक्ट होने के बाद आपको अपने iPad की स्क्रीन अपने कंप्यूटर पर दिखाई देगी।
चरण 4रिकॉर्डिंग शुरू
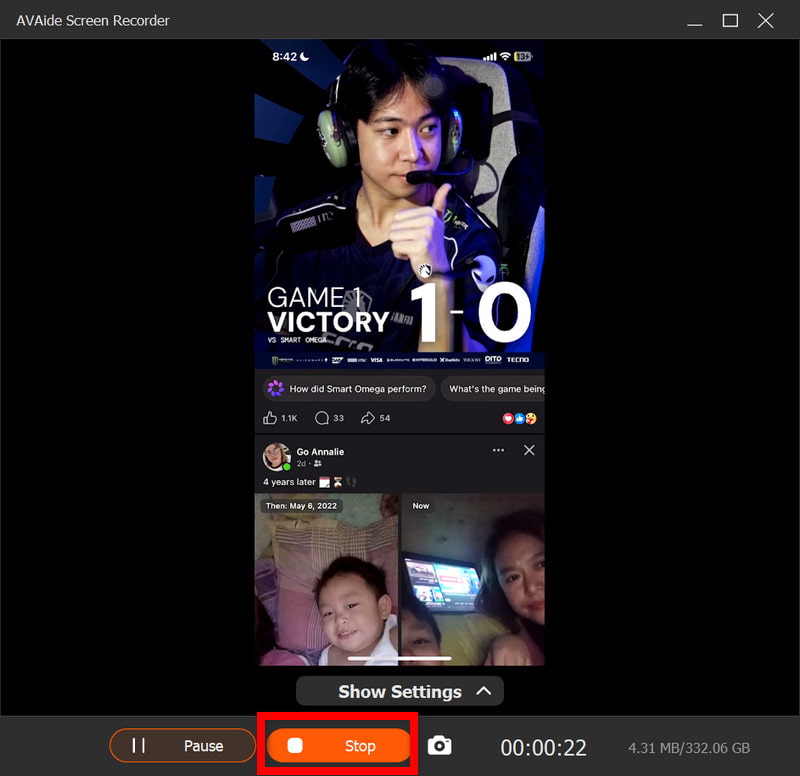
सफल मिररिंग के साथ, दबाएँ अभिलेख अपने आईपैड की स्क्रीन, सिस्टम ऑडियो और माइक्रोफोन इनपुट (यदि कोई हो) को रिकॉर्ड करना शुरू करने के लिए।
चरण 5रिकॉर्डिंग बंद करें
दबाओ विराम रिकॉर्डिंग पूरी होने पर बटन दबाएं। आपकी रिकॉर्डिंग अपने आप आपके कंप्यूटर पर सेव हो जाएगी।
चरण 6वीडियो संपादित करें
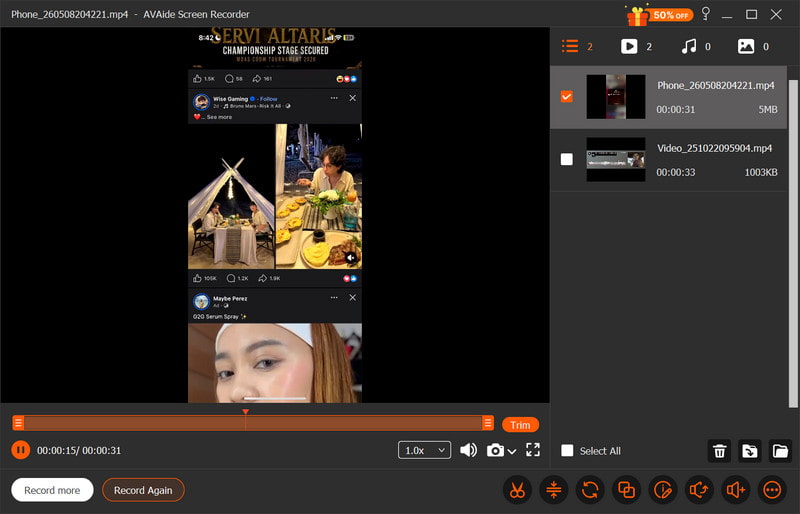
रिकॉर्डिंग पूरी होने के बाद, एक प्रीव्यू विंडो खुल जाएगी। आप वीडियो के अवांछित हिस्सों को हटा सकते हैं, ध्वनि को समायोजित कर सकते हैं या अंतिम वीडियो निर्यात करने से पहले कुछ सरल संपादन कर सकते हैं।
भाग 4. मैं अपने आईपैड पर स्क्रीन रिकॉर्ड क्यों नहीं कर पा रहा/रही हूँ?
आईपैड पर वीडियो रिकॉर्डिंग की समस्या आमतौर पर सेटिंग्स, प्रतिबंधों या प्रदर्शन संबंधी समस्याओं के कारण होती है। सबसे आम समस्याएं और उनके कारण नीचे दिए गए हैं।
1. बटन पूरी तरह से गायब है
यह समस्या तब उत्पन्न होती है जब कंट्रोल सेंटर में स्क्रीन रिकॉर्डिंग इंस्टॉल नहीं होती है। इसे वहां दिखाने के लिए आपको सेटिंग्स > कंट्रोल सेंटर में जाकर इसे मैन्युअल रूप से जोड़ना होगा।
2. बटन धुंधला हो गया है या काम नहीं कर रहा है।
आमतौर पर, ऐसा सिस्टम सेटिंग्स या डिवाइस नियंत्रणों द्वारा स्क्रीन रिकॉर्डिंग पर लगाए गए प्रतिबंध के कारण होता है।
- स्क्रीन टाइम की सीमा निर्धारित की जा सकती है।
- स्कूल या कार्यस्थल पर डिवाइस की प्रोफाइल सेटिंग के कारण रिकॉर्डिंग प्रतिबंधित हो सकती है।
- कुछ ऐप्स आपको उनका उपयोग करते समय स्क्रीनशॉट लेने की अनुमति नहीं दे सकते हैं।
3. रिकॉर्डिंग शुरू होते ही तुरंत बंद हो जाती है
यह समस्या आमतौर पर सिस्टम या स्टोरेज संबंधी समस्याओं से जुड़ी होती है, जैसे कि अपर्याप्त उपलब्ध स्थान या अन्य एप्लिकेशन द्वारा रिकॉर्डिंग प्रक्रिया में बाधा उत्पन्न होना।
4. रिकॉर्डिंग में कोई आवाज़ नहीं है
यह तब होता है जब ऑडियो ठीक से कनेक्ट नहीं होता है या जब उपयोगकर्ता आंतरिक ऑडियो की अपेक्षा करता है; iPadOS पर स्क्रीन को आंतरिक रूप से रिकॉर्ड करना संभव नहीं है, इसलिए इसका उपयोग करना मैक के लिए सर्वश्रेष्ठ स्क्रीन रिकॉर्डर इससे सिस्टम की ध्वनि को सही ढंग से कैप्चर करने में मदद मिल सकती है।
5. रिकॉर्डिंग रुक-रुक कर हो रही है या उसकी गुणवत्ता खराब है।
इसका सामान्य कारण इनमें से कोई एक कारक होता है: डिवाइस में सीमित स्टोरेज, बहुत सारे एप्लिकेशन चलाना, या आईपैड का पुराना मॉडल जो इतने उच्च रिज़ॉल्यूशन पर रिकॉर्ड करने में सक्षम नहीं है।
भाग 5. बेहतर स्क्रीन रिकॉर्डिंग के लिए पेशेवर सुझाव
iPadOS पर रिकॉर्डिंग करते समय, सुनिश्चित करें कि आपका iPad सुचारू, स्पष्ट और उच्च गुणवत्ता वाली रिकॉर्डिंग के लिए सही तरीके से सेट अप किया गया है। वीडियो और ऑडियो गुणवत्ता को बेहतर बनाने के लिए यहां कुछ उपयोगी सुझाव दिए गए हैं।
1. संग्रहण स्थान खाली करें
रिकॉर्डिंग शुरू करने से पहले, सुनिश्चित करें कि आपके आईपैड में पर्याप्त खाली जगह हो ताकि रिकॉर्डिंग के दौरान कोई रुकावट या गड़बड़ी न हो, जिससे फिल्मांकन में समस्या आ सकती है।
2. अप्रयुक्त ऐप्स बंद करें
सिस्टम के प्रदर्शन को बेहतर बनाने और रिकॉर्डिंग के दौरान रुकावटों या धीमेपन को रोकने के लिए सभी अनावश्यक बैकग्राउंड ऐप्स को बंद कर दें।
3. डू नॉट डिस्टर्ब मोड चालू करें
रिकॉर्डिंग के दौरान स्क्रीन पर आने वाली सभी कॉल, मैसेज और नोटिफिकेशन को रोकने और आपको विचलित होने से बचाने के लिए डू नॉट डिस्टर्ब मोड को एक्टिवेट करें।
4. स्क्रीन सेटअप को स्थिर रखें
रिकॉर्डिंग के दौरान ब्राइटनेस, ओरिएंटेशन या सिस्टम सेटिंग्स को न बदलें, क्योंकि अचानक बदलाव से वीडियो की स्थिरता और रिकॉर्डिंग की गुणवत्ता प्रभावित हो सकती है।
5. पहले ऑडियो का परीक्षण करें
वीडियो शूट करना शुरू करने से पहले, एक छोटी सी टेस्ट रिकॉर्डिंग करके यह जांच लें कि माइक्रोफोन का लेवल सही तरीके से सेट है और आपकी आवाज साफ सुनाई दे रही है और ठीक से रिकॉर्ड हो रही है।
6. एक साफ होम स्क्रीन का उपयोग करें
अपनी होम स्क्रीन को साफ करें या संवेदनशील ऐप्स या एप्लिकेशन को किसी दूसरे फोल्डर में ले जाएं ताकि आपकी रिकॉर्डिंग केंद्रित, पेशेवर और साफ-सुथरी दिखे।
7. शांत वातावरण में रिकॉर्डिंग करें
यदि आप कम पृष्ठभूमि शोर वाले शांत कमरे में रिकॉर्डिंग कर सकते हैं, तो आपका माइक्रोफ़ोन बेहतर आवाज़ रिकॉर्ड करेगा और अवांछित ध्वनियों को कम करेगा। मैक पर आवाज रिकॉर्ड करना या आईपैड।
आईपैड स्क्रीन रिकॉर्डिंग यह आपके डिवाइस से सीधे ट्यूटोरियल, गेमप्ले और महत्वपूर्ण पलों को रिकॉर्ड करने का एक सरल लेकिन शक्तिशाली तरीका है। सही सेटिंग्स और टिप्स की मदद से आप बेहतर परिणामों के लिए वीडियो और ऑडियो दोनों की गुणवत्ता में सुधार कर सकते हैं। चाहे आप बिल्ट-इन टूल्स का उपयोग करें या बाहरी सॉफ़्टवेयर का, रिकॉर्डिंग आसान और अधिक विश्वसनीय हो जाती है।
लेखक के बारे में

ऑडियो, ऑनलाइन मीटिंग, गेमप्ले वीडियो, संगीत, वेब कैमरा आदि के साथ स्क्रीन गतिविधियों को कैप्चर करें।
स्क्रीन रिकॉर्डिंग
- विंडोज़ पर स्क्रीन रिकॉर्ड
- इंस्टाग्राम लाइव रिकॉर्ड करें
- टुबी से वीडियो रिप करें
- YouTube वीडियो को MP3 में बदलें
- Fansly से वीडियो डाउनलोड करें
- JW प्लेयर वीडियो डाउनलोड करना
- बिलिबिली वीडियो डाउनलोड करें
- Patreon वीडियो डाउनलोड करें
- SpankBang वीडियो डाउनलोड करें
- डिस्कॉर्ड वीडियो डाउनलोड करें
- DoodSream वीडियो डाउनलोड करें