समझने की कोशिश कर रहा हूँ मैक पर ऑडियो कैसे रिकॉर्ड करें जब आपको किसी क्लास लेक्चर को रिकॉर्ड करना हो, वीडियो कॉल सेव करनी हो, पॉडकास्ट रिकॉर्ड करना हो या जल्दी से वॉइस कंटेंट बनाना हो, तो अक्सर ऐसा होता है। अच्छी बात यह है कि macOS में बिल्ट-इन रिकॉर्डिंग टूल्स मौजूद हैं, और कई थर्ड-पार्टी विकल्प आपको आसानी से उच्च गुणवत्ता वाले माइक्रोफोन और इंटरनल ऑडियो रिकॉर्ड करने में मदद कर सकते हैं।
विधि 1: क्विकटाइम प्लेयर का उपयोग करना
ऐसा लगता है कि लगभग सभी के macOS पर QuickTime इंस्टॉल है। QuickTime एक सहज इंटरफ़ेस, भरोसेमंद माइक्रोफ़ोन रिकॉर्डिंग और तेज़ एक्सपोर्ट की सुविधा देता है, जिसके लिए किसी अन्य एप्लिकेशन की आवश्यकता नहीं होती। यह तकनीक वॉइस-ओवर, व्याख्यान, ऑनलाइन मीटिंग और यहां तक कि सामान्य पॉडकास्ट रिकॉर्डिंग के लिए भी उपयोगी है।
स्टेप 1QuickTime Player को या तो Applications फोल्डर से या Spotlight सर्च के माध्यम से लॉन्च करें।
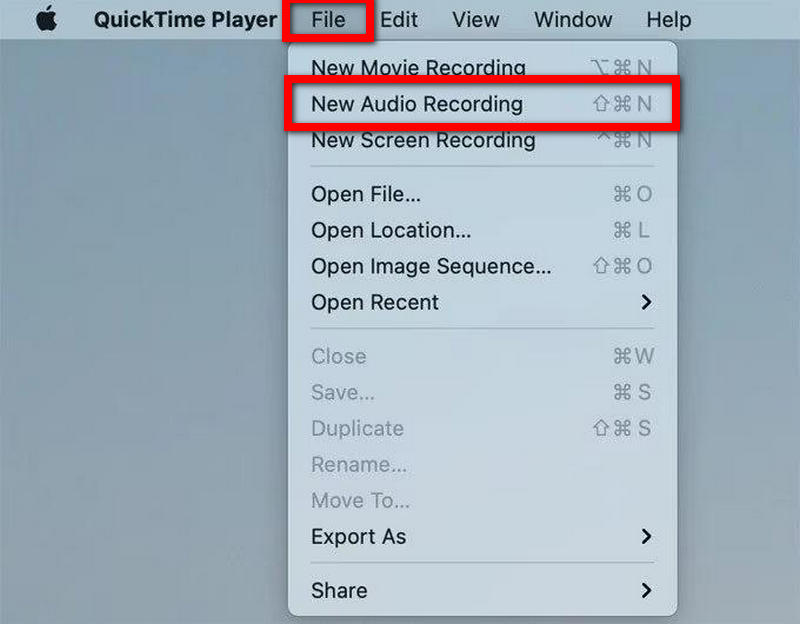
चरण दोके पास जाओ फ़ाइल शीर्ष मेनू बार से मेनू चुनें।
चरण 3क्लिक नई ऑडियो रिकॉर्डिंग.
चरण 4इसके बगल में मौजूद छोटे तीर पर क्लिक करें अभिलेख आप जिस माइक्रोफोन का उपयोग करना चाहते हैं उसे निर्दिष्ट करने के लिए बटन दबाएं।
चरण 5यदि आवश्यक हो, तो इनपुट वॉल्यूम को समायोजित करें।
चरण 6रिकॉर्डिंग शुरू करने के लिए, दबाएं अभिलेख बटन।
चरण 7 माइक्रोफोन में बोलें।
चरण 8दबाओ विराम रिकॉर्डिंग समाप्त करने के लिए बटन दबाएं।
चरण 9रिकॉर्डिंग को अपने मैक पर सेव करने के लिए, यहां जाएं फ़ाइल और चुनें सहेजें.
विधि 2: वॉइस मेमो का उपयोग करना
वॉइस मेमो त्वरित वॉइस रिकॉर्डिंग के लिए बनाया गया है। यह एप्लिकेशन व्यक्तिगत रिमाइंडर बनाने, विचारों पर मंथन करने, छोटे व्याख्यान देने और छोटी ऑडियो रिकॉर्डिंग के लिए उपयुक्त है। रिकॉर्ड किए गए वॉइस मेमो iCloud के माध्यम से स्वचालित रूप से सिंक हो जाते हैं, इसलिए रिकॉर्डिंग सभी Apple डिवाइस पर उपलब्ध होती हैं।
स्टेप 1अपने मैक पर वॉइस मेमो लॉन्च करें।
चरण दोदबाओ अभिलेख बटन।
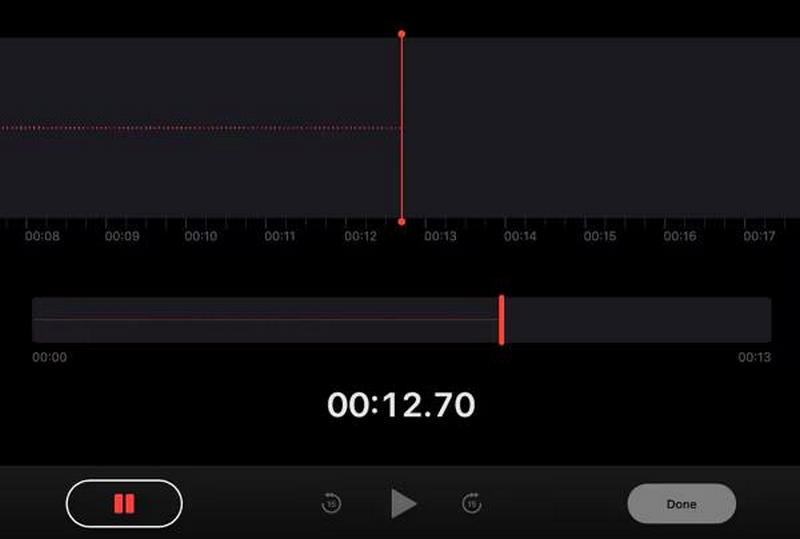
चरण 3माइक्रोफोन के माध्यम से बोलें।
चरण 4यदि आपको कुछ समय के लिए रिकॉर्डिंग बंद करने की आवश्यकता है, तो चुनें ठहराव.
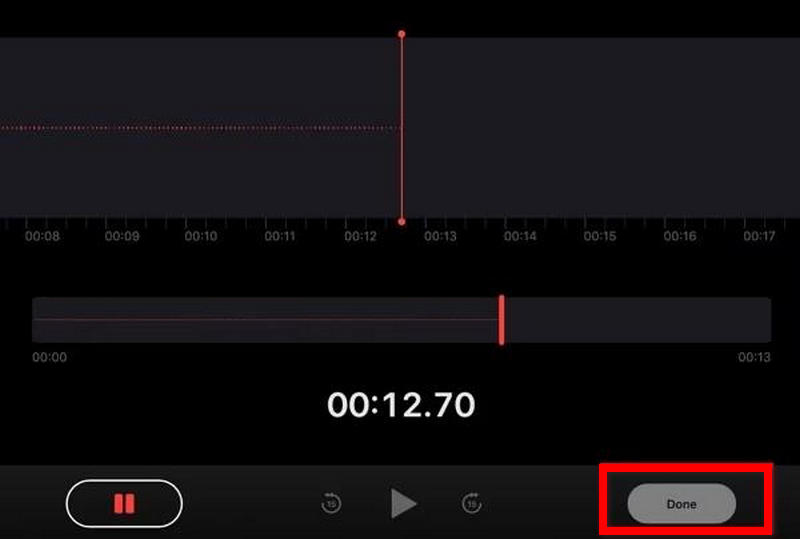
चरण 5प्रेस किया हुआ रिकॉर्डिंग समाप्त करने के लिए।
चरण 6रिकॉर्डिंग को आसानी से ढूंढने के लिए, चुनें नाम बदलें विकल्प।
चरण 7रिकॉर्डिंग को साझा करने, उसकी प्रतिलिपि बनाने या उसे निर्यात करने के लिए, फ़ाइल पर राइट-क्लिक करें।
macOS में आंतरिक ऑडियो रिकॉर्डिंग की सुविधा क्यों नहीं है?
macOS में डिफ़ॉल्ट रूप से माइक्रोफ़ोन का उपयोग करने की सुविधा है। हालांकि, इसमें अंतर्निहित सुविधा के साथ आंतरिक सिस्टम ऑडियो रिकॉर्ड करने का कोई तरीका नहीं है। इसमें ऐप्स में चल रहे मीडिया, संगीत और ब्राउज़र की आवाज़ें शामिल हैं। गोपनीयता, कॉपीराइट संरक्षण और सिस्टम सुरक्षा के कारण macOS में ये प्रतिबंध हैं।
माइक्रोफ़ोन ऑडियो के विपरीत, आंतरिक ऑडियो में ऐप्स से संबंधित संरक्षित मीडिया या निजी संचार सामग्री हो सकती है। इसी कारण, Apple आंतरिक ऑडियो चैनलों तक पहुंच को प्रतिबंधित करता है जब तक कि उपयोगकर्ता अतिरिक्त सॉफ़्टवेयर इंस्टॉल न कर लें।
इन समस्याओं के कारण, क्विकटाइम जैसे उपकरण आंतरिक ऑडियो रिकॉर्ड नहीं कर सकते हैं, लेकिन माइक्रोफोन के माध्यम से बाहरी ऑडियो रिकॉर्ड किया जा सकता है।
इन समस्याओं के उदाहरण:
- वीडियो गेम खेलते समय ऑडियो रिकॉर्ड करें।
- ऑनलाइन क्लास रिकॉर्ड करें।
- ऑनलाइन ऑडियो और वीडियो रिकॉर्ड करें।
- वेब पर मौजूद ऑनलाइन वीडियो से ऑडियो रिकॉर्ड करें।
- कंप्यूटर के आंतरिक ऑडियो का उपयोग करके निर्देशात्मक वीडियो रिकॉर्ड करें।
विधि 3: ब्लैकहोल + क्विकटाइम प्लेयर का उपयोग करना
ब्लैकहोल एक निःशुल्क वर्चुअल ऑडियो ड्राइवर है जो सिस्टम ऑडियो को रिकॉर्डिंग सॉफ़्टवेयर में आंतरिक रूप से भेजने की सुविधा देता है। यदि इस ड्राइवर का उपयोग क्विकटाइम के साथ किया जाता है, तो मैक उपयोगकर्ता आंतरिक ऑडियो और बाहरी माइक्रोफ़ोन ऑडियो दोनों को रिकॉर्ड कर सकते हैं। यह ड्राइवर उपयोगकर्ताओं को ऑनलाइन मीटिंग, ट्यूटोरियल, वीडियो गेम, वेबिनार, पॉडकास्ट और ब्राउज़र ऑडियो को उच्च गुणवत्ता और स्पष्ट ऑडियो में रिकॉर्ड करने की सुविधा देता है।
स्टेप 1आधिकारिक वेबसाइट से अपने मैक पर ब्लैकहोल डाउनलोड और इंस्टॉल करें, फिर ऑडियो एमआईडीआई सेटअप खोलें।
चरण दोएक मल्टी-आउटपुट डिवाइस बनाएं और अपने मैक स्पीकर या हेडफ़ोन और ब्लैकहोल दोनों को सक्षम करें।
चरण 3 ध्वनि सेटिंग्स में मल्टी-आउटपुट डिवाइस को अपना डिफ़ॉल्ट ऑडियो आउटपुट सेट करें।
चरण 4क्विकटाइम प्लेयर खोलें, चुनें फ़ाइल > नई ऑडियो रिकॉर्डिंग, उसके बाद चुनो ब्लैक होल माइक्रोफोन या ऑडियो स्रोत के रूप में।
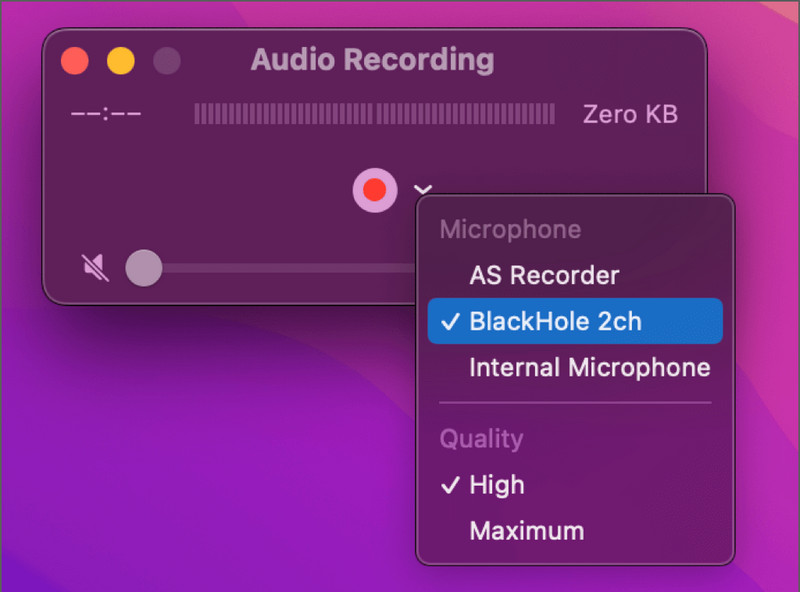
चरण 5दबाएं अभिलेख बटन दबाएं, वह ऑडियो चलाएं जिसे आप रिकॉर्ड करना चाहते हैं, फिर रिकॉर्डिंग पूरी होने पर उसे रोकें और सेव करें।
विधि 4: समर्पित तृतीय-पक्ष सॉफ़्टवेयर का उपयोग करना
1. AVAide स्क्रीन रिकॉर्डर
AVAide स्क्रीन रिकॉर्डर AVAide उन मैक उपयोगकर्ताओं के लिए एकदम सही है जो आवाज और ऑडियो रिकॉर्ड करने के लिए एक सरल लेकिन शक्तिशाली टूल चाहते हैं। स्क्रीन रिकॉर्डिंग के अलावा, AVAide आपके माइक्रोफ़ोन, सिस्टम स्पीकर और वेबकैम के साथ-साथ आपके फ़ोन स्क्रीन से भी ऑडियो कैप्चर कर सकता है। AVAide की सबसे अच्छी विशेषताओं में से एक यह है कि इसे शुरुआती और उन्नत दोनों तरह के उपयोगकर्ताओं के लिए डिज़ाइन किया गया है, जिससे यह मैक पर आवाज रिकॉर्ड करने की आवश्यकता वाले किसी भी व्यक्ति के लिए एक बेहतरीन विकल्प बन जाता है।
- यह माइक्रोफोन और सिस्टम ऑडियो दोनों को एक साथ रिकॉर्ड करता है।
- यह न्यूनतम विलंब के साथ उच्च गुणवत्ता वाली ऑडियो रिकॉर्डिंग का समर्थन करता है।
- यह फुल-स्क्रीन, विंडो या कस्टम एरिया रिकॉर्डिंग की अनुमति देता है।
- इसमें ट्यूटोरियल और पॉडकास्ट के लिए वेबकैम रिकॉर्डिंग शामिल है।
- यह MP3, AAC, FLAC, M4A और अन्य कई निर्यात प्रारूपों का समर्थन करता है।

 सुरक्षित डाऊनलोड
स्टेप 1सॉफ्टवेयर डाउनलोड और इंस्टॉल करें
सॉफ्टवेयर डाउनलोड करने के लिए AVAide वेबसाइट पर जाएं। सॉफ्टवेयर को सफलतापूर्वक इंस्टॉल करने के लिए स्क्रीन पर दिए गए निर्देशों का पालन करें।
चरण दोऑडियो रिकॉर्डर चुनें
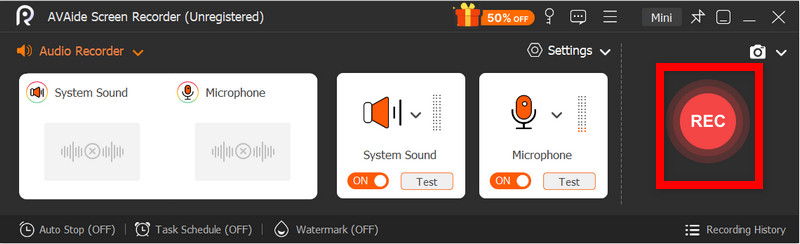
सॉफ्टवेयर खोलें और मुख्य पृष्ठ से चयन करें ऑडियो रिकॉर्डर केवल आवाज रिकॉर्ड करने के लिए।
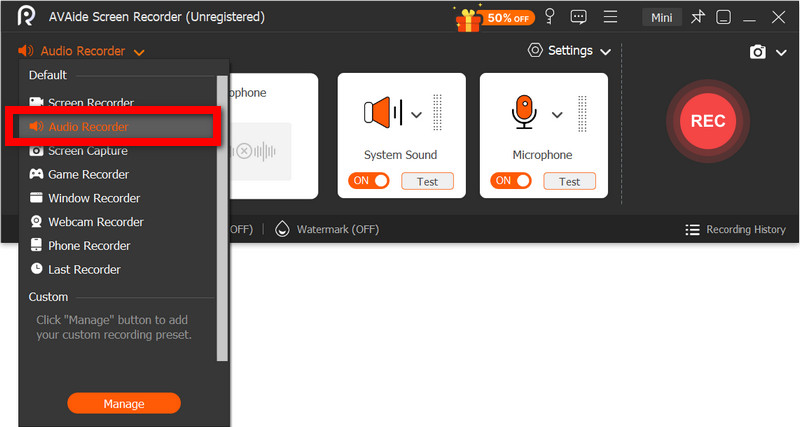
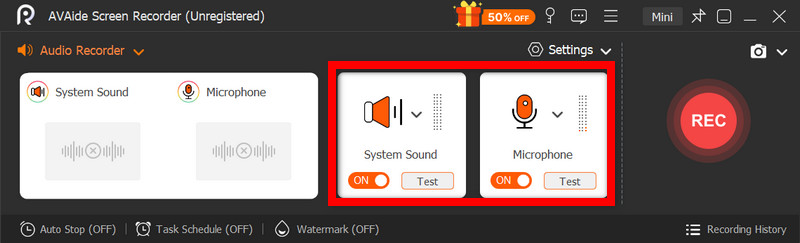
चरण 3माइक्रोफ़ोन और सिस्टम साउंड चालू करें
सक्रिय करें माइक्रोफ़ोन स्पष्ट आवाज रिकॉर्ड करने का विकल्प। इसे सक्रिय करें। सिस्टम साउंड अपने मैक से आंतरिक ऑडियो कैप्चर करने के लिए।
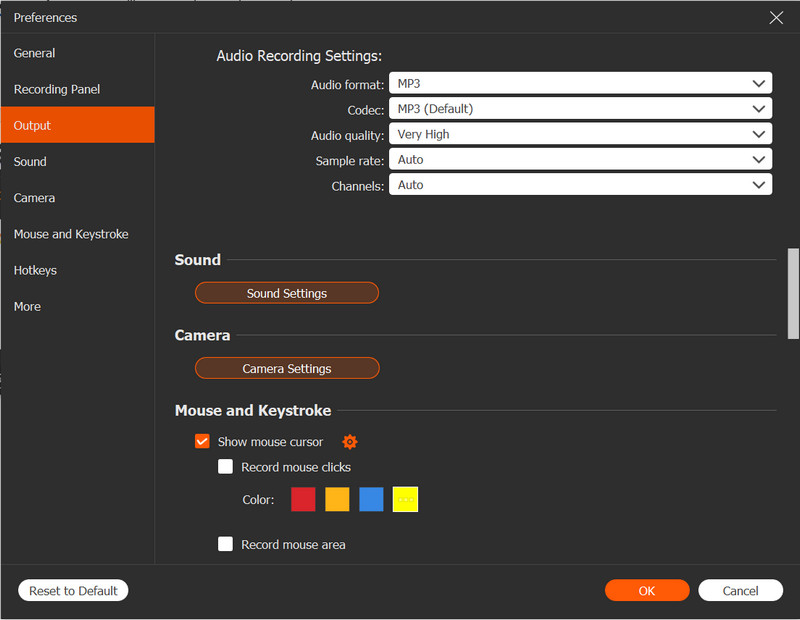
चरण 4रिकॉर्डिंग सेटिंग्स समायोजित करें
से समायोजन मेनू में जाकर, अपना पसंदीदा ऑडियो फॉर्मेट और आउटपुट क्वालिटी चुनें। सेव करने की जगह तय करें और माइक्रोफ़ोन और सिस्टम ऑडियो के लिए वॉल्यूम लेवल एडजस्ट करें।
चरण 5रिकॉर्डिंग शुरू
को चुनिए आरईसी अपनी आवाज़ रिकॉर्ड करना शुरू करने का विकल्प। रिकॉर्डिंग सत्र के दौरान, आप रोक सकते हैं, फिर से शुरू कर सकते हैं या नोट्स जोड़ सकते हैं।
चरण 6सहेजें और पूर्वावलोकन करें
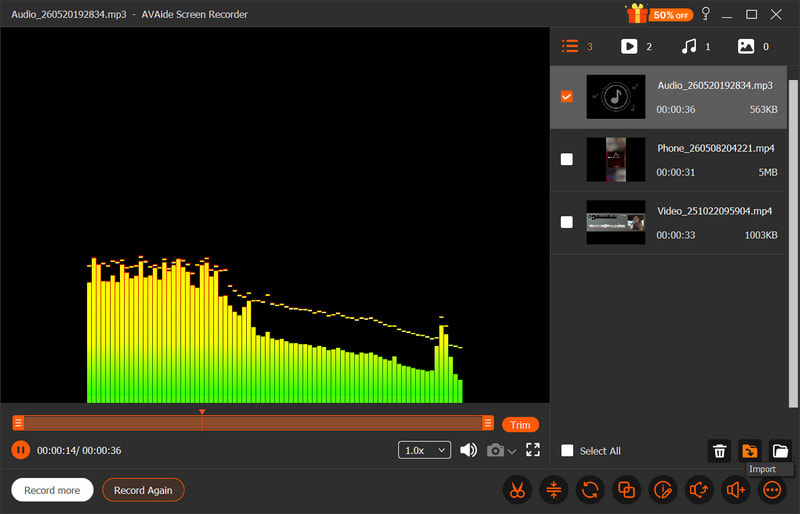
को चुनिए विराम ऑडियो रिकॉर्डिंग समाप्त करने का विकल्प। इसके बाद आप ऑडियो को ट्रिम कर सकते हैं और रिकॉर्ड किए गए ऑडियो को अपने मैक पर सेव कर सकते हैं।
2. ऑडेसिटी का उपयोग करना
ऑडेसिटी एक उपयोग में आसान, शक्तिशाली और मुफ़्त मैक ऑडियो रिकॉर्डर और एडिटर है। पॉडकास्ट और संगीत परियोजनाओं के लिए इसे अक्सर अन्य विकल्पों की तुलना में अधिक पसंद किया जाता है क्योंकि इसमें सरल कार्यप्रणाली और शोर कम करने, ट्रिमिंग और ऑडियो एन्हांसमेंट जैसी पेशेवर सुविधाएँ मौजूद हैं। इन सभी सुविधाओं के बावजूद, ऑडेसिटी का यूजर इंटरफेस सरल है, जो इसे शुरुआती लोगों के लिए एक बेहतरीन विकल्प बनाता है।
स्टेप 1Audacity डाउनलोड करें और इसे अपने Mac पर इंस्टॉल करें। इंस्टॉलेशन पूरा होने पर ऐप खोलें।
चरण दोअपना ऑडियो इनपुट चुनें। इनपुट को अपने ऑडियो डिवाइस पर सेट करें और कैप्चर लेवल को समायोजित करें।
चरण 3रिकॉर्डिंग के लिए तैयार होने पर, बटन दबाएँ। अभिलेख बटन दबाएं और अपने माइक्रोफोन में बोलना शुरू करें।
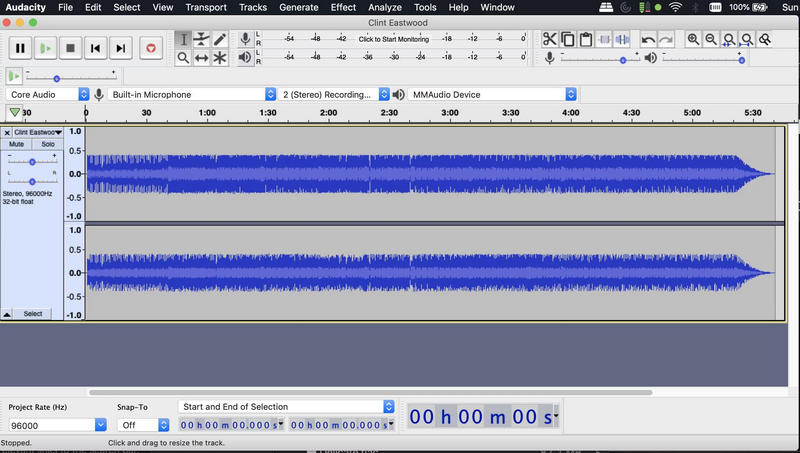
चरण 4रिकॉर्डिंग समाप्त होने पर, बटन दबाएँ विराम बटन।
चरण 5रिकॉर्डिंग से संतुष्ट होने पर, उस प्रोजेक्ट का चयन करें जिसे आप निर्यात करना चाहते हैं। फ़ाइल > निर्यात. चुनना एमपी 3, WAVया कोई अन्य ऑडियो निर्यात विकल्प।
3. गैराजबैंड का उपयोग करना
ऑडेसिटी का एक बेहतरीन विकल्प गैराजबैंड है, जो एप्पल का एक मालिकाना ऐप है और सभी मैक कंप्यूटरों में पहले से इंस्टॉल होता है। गैराजबैंड में ऑडेसिटी के सभी फीचर्स के साथ-साथ और भी कई फीचर्स हैं, जैसे म्यूजिक टूल्स और ऑडियो इफेक्ट्स। गैराजबैंड म्यूजिक प्रोडक्शन के लिए और भी बेहतर है और इसका व्यापक रूप से उपयोग किया जाता है। पॉडकास्ट रिकॉर्ड करें पेशेवर ध्वनि नियंत्रण के साथ सेशन, वॉयसओवर और उच्च गुणवत्ता वाले ऑडियो प्रोजेक्ट।
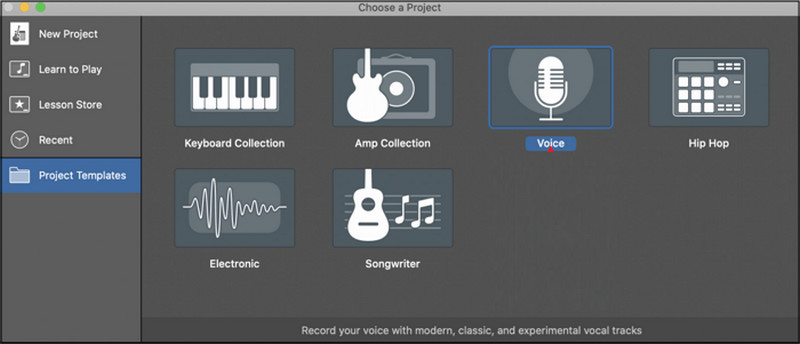
स्टेप 1गैराजबैंड लॉन्च करें और नया प्रोजेक्ट चुनें, विकल्प का चयन करें आवाज़.
चरण दोआप जिस इनपुट का उपयोग करके रिकॉर्डिंग करना चाहते हैं, उसे चुनें। यदि आप चाहें, तो रिकॉर्डिंग के दौरान अपनी आवाज़ सुनने के लिए ऑडियो मॉनिटरिंग को सक्षम करें।
चरण 3मार अभिलेख और अपना सत्र शुरू करें।
चरण 4जब आपकी रिकॉर्डिंग पूरी हो जाए, तो बटन दबाएं। विराम बटन दबाएं। अपनी रिकॉर्डिंग को बेहतर बनाने के लिए गैराजबैंड में संपादन और ध्वनि समायोजन सुविधाओं का उपयोग करें।
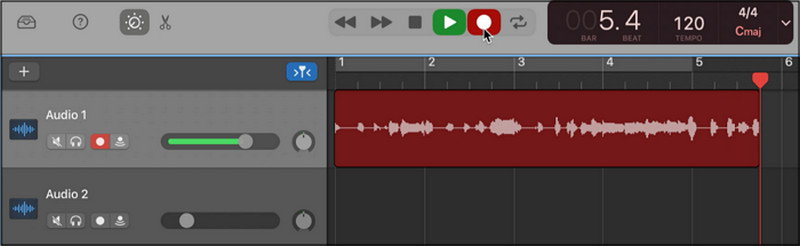
चरण 5तैयार ऑडियो प्रोजेक्ट को अपनी इच्छित गुणवत्ता और प्रारूप में अपने मैक पर निर्यात करें।
बोनस टिप्स
1. मैक पर यूट्यूब से ऑडियो कैसे रिकॉर्ड करें
अपने मैक पर YouTube ऑडियो, ऑनलाइन कोर्स, वेबिनार और पॉडकास्ट व संगीत की रिकॉर्डिंग करने के लिए, आप OBS Studio का उपयोग कर सकते हैं, जो स्क्रीन वीडियो और लाइवस्ट्रीम कैप्चर के लिए एक निःशुल्क रिकॉर्डिंग सॉफ़्टवेयर है। OBS Studio सिस्टम साउंड की उच्च-गुणवत्ता वाली रिकॉर्डिंग प्रदान करता है, इसलिए यह एक बेहतरीन विकल्प है।
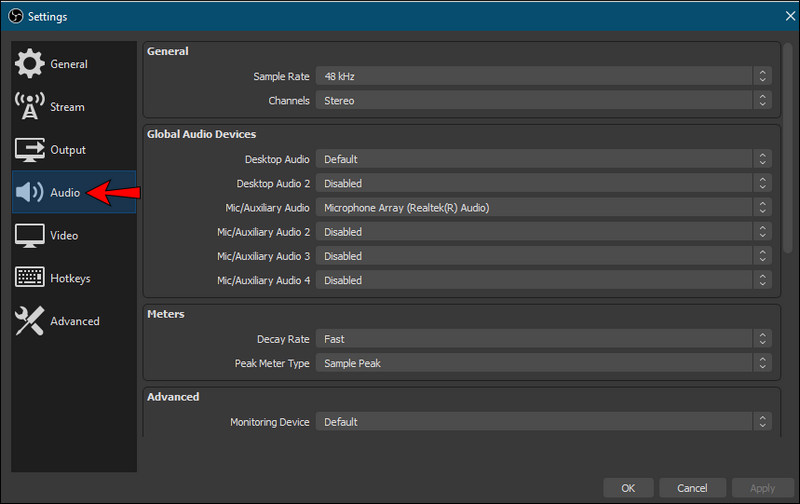
स्टेप 1अपने मैक पर OBS Studio डाउनलोड और इंस्टॉल करें और इंस्टॉल होने के बाद सॉफ्टवेयर खोलें।
चरण दोएक नया स्रोत बनाएँ ऑडियो विकल्प चुनें और अपने सिस्टम ऑडियो डिवाइस या वर्चुअल ऑडियो ड्राइवर का चयन करें।
चरण 3ब्राउज़र में YouTube खोलें और वह वीडियो/ऑडियो लोड करें जिसे आप रिकॉर्ड करना चाहते हैं।
चरण 4मारो रिकॉर्डिंग शुरू फिर बटन दबाएं, और YouTube वीडियो/ऑडियो को सामान्य रूप से चलाएं।
चरण 5जिस ऑडियो को आप रिकॉर्ड करना चाहते हैं, उसके पूरा होने तक प्रतीक्षा करें, फिर बटन दबाएं। विराम बटन दबाएं और ऑडियो फ़ाइल ढूंढें, जो अब आपके मैक पर सेव हो गई है।
2. बाहरी माइक्रोफ़ोन का उपयोग करके मैक पर ऑडियो कैसे रिकॉर्ड करें
अधिकांश मामलों में, बाहरी माइक से आने वाली ऑडियो की गुणवत्ता मैक के आंतरिक माइक की तुलना में बेहतर होती है। यूएसबी माइक्रोफ़ोन सीधे मैक से कनेक्ट होते हैं। हालांकि, बेहतर ध्वनि गुणवत्ता और कम शोर के लिए एक्सएलआर माइक्रोफ़ोन को ऑडियो इंटरफ़ेस की आवश्यकता हो सकती है। मैक के लिए सर्वश्रेष्ठ स्क्रीन रिकॉर्डर ऑडियो और वीडियो कार्यों को संयोजित करते समय यह स्पष्ट रिकॉर्डिंग प्राप्त करने में भी मदद कर सकता है।
स्टेप 1अपने चुने हुए माइक्रोफ़ोन को अपने मैक से कनेक्ट करें, खोलें प्रणाली व्यवस्था, जाओ ध्वनिऔर अभी-अभी कनेक्ट किए गए माइक्रोफोन को इनपुट डिवाइस के रूप में सेट करें।
चरण दोमाइक्रोफोन के इनपुट लेवल को एडजस्ट करें और यह सुनिश्चित करने के लिए ध्वनि की जांच करें कि आपकी आवाज स्पष्ट रूप से सुनाई दे रही है।
चरण 3अपना पसंदीदा रिकॉर्डिंग सॉफ्टवेयर खोलें, जैसे कि AVAide स्क्रीन रिकॉर्डर।
चरण 4सॉफ्टवेयर की सेटिंग में जाकर बाहरी माइक्रोफोन चुनें और अपनी आवाज या ऑडियो सेशन रिकॉर्ड करना शुरू करें।
चरण 5रिकॉर्डिंग रोकें, ध्वनि की गुणवत्ता की समीक्षा करें और अंतिम ऑडियो फ़ाइल को अपने मैक पर सहेजें या निर्यात करें।
मैक की आवाज़ रिकॉर्ड करें QuickTime और Voice Memos जैसे बिल्ट-इन टूल्स या प्रोफेशनल क्वालिटी रिकॉर्डिंग के लिए एडवांस्ड सॉफ्टवेयर का इस्तेमाल करके आसानी से रिकॉर्डिंग करें। चाहे आपको इंटरनल ऑडियो, पॉडकास्ट नरेशन या ऑनलाइन लेक्चर रिकॉर्डिंग की ज़रूरत हो, ये तरीके आपके Mac पर स्पष्ट ध्वनि को कुशलतापूर्वक रिकॉर्ड करने के विश्वसनीय साधन प्रदान करते हैं।
लेखक के बारे में

ऑडियो, ऑनलाइन मीटिंग, गेमप्ले वीडियो, संगीत, वेब कैमरा आदि के साथ स्क्रीन गतिविधियों को कैप्चर करें।