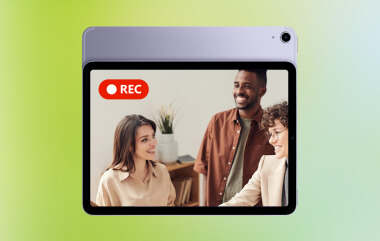
Πώς να κάνετε εγγραφή οθόνης σε φορητό υπολογιστή Lenovo εξαρτάται από το εργαλείο που θα επιλέξετε, από ενσωματωμένες λειτουργίες των Windows έως προηγμένο λογισμικό. Αυτός ο οδηγός δείχνει απλές, σαφείς και αποτελεσματικές μεθόδους για την καταγραφή της οθόνης σας σε συσκευές Lenovo, είτε για εκπαιδευτικά σεμινάρια, συσκέψεις, gameplay είτε για καθημερινή καταγραφή.
Μέθοδος 1. Χρήση της Γραμμής παιχνιδιών Xbox
Η ενσωματωμένη λειτουργία εγγραφής του Xbox Game Bar είναι της Microsoft, ενσωματώνεται άψογα με τα Windows και αποτελεί την πιο βολική λύση εγγραφής για τους χρήστες της Lenovo. Δημιουργήθηκε για παιχνίδια, ενώ παράλληλα χρησιμεύει ως τυπική συσκευή εγγραφής εφαρμογών, δημιουργίας οδηγών και εγγραφής προγράμματος περιήγησης. Το κύριο πλεονέκτημά της είναι ότι δεν απαιτεί εγκατάσταση. Είναι έτοιμη για χρήση αμέσως.
Υπάρχουν όμως και σίγουρα μειονεκτήματα. Δεν καταγράφει την επιφάνεια εργασίας ή την Εξερεύνηση αρχείων και η προσαρμογή περιορίζεται σε επαγγελματικά εργαλεία. Ωστόσο, εξακολουθεί να είναι μια από τις πιο βολικές ενσωματωμένες επιλογές για περιστασιακές συνεδρίες όπου η ποιότητα και η προσπάθεια δεν είναι τόσο σημαντικές.
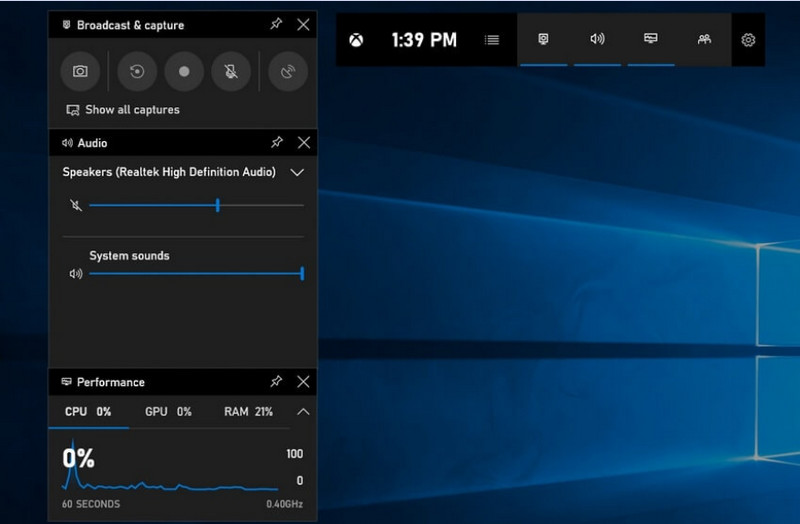
Βήμα 1Για να ανοίξετε τη Γραμμή παιχνιδιών Xbox, πατήστε Windows + G στο πληκτρολόγιό σας.
Βήμα 2Βρες το Πιάνω πίνακα ή κάντε κλικ σε αυτόν από το Γραφικά στοιχεία μενού.
Βήμα 3Κάντε κλικ στο Εγγραφή (●) κουμπί ή πατήστε Windows + Alt + R.
Βήμα 4Αν θέλετε να ηχογραφήσετε φωνή, ενεργοποιήστε την Μικρόφωνο.
Βήμα 5Τύπος Windows + Alt + R ξανά ή κάντε κλικ Σταμάτα (■) να ολοκληρώσω.
Βήμα 6Θα βρείτε την ηχογράφηση σας στο Βίντεο > συλλαμβάνει.
Μέθοδος 2. Χρήση του Lenovo Vantage
Το Lenovo Vantage δεν είναι μια συσκευή εγγραφής οθόνης. Είναι μια σουίτα διαχείρισης και βελτιστοποίησης συστήματος. Έχει περισσότερο έμμεσο ρόλο στην εγγραφή, με πολύ λίγες λειτουργίες που βοηθούν τη διαδικασία εγγραφής με κάποια μορφή, ανάλογα με το μοντέλο της συσκευής εγγραφής, ή ακόμα και με ορισμένες συσκευές που προσφέρουν συντομεύσεις ή εργαλεία κάμερας/οθόνης που μπορούν να βοηθήσουν στη διαδικασία εγγραφής.
Πρόκειται για μια μεγάλη ποικιλία στην απόδοση και τη διαθεσιμότητα. Οι βασικές λειτουργίες εγγραφής ενδέχεται να υποστηρίζονται σε ορισμένες συσκευές Lenovo, αλλά άλλες ενδέχεται να μην τις διαθέτουν καθόλου. Είναι περιορισμένη και κάπως ασυνεπής σε ό,τι μπορεί να κάνει για συσκευές εγγραφής πλήρους οθόνης, αλλά μπορεί να είναι χρήσιμη για χρήστες που θέλουν να παραμείνουν εντός του οικοσυστήματος της Lenovo ή ηχογράφηση podcast περιεχόμενο με βασικά εργαλεία.
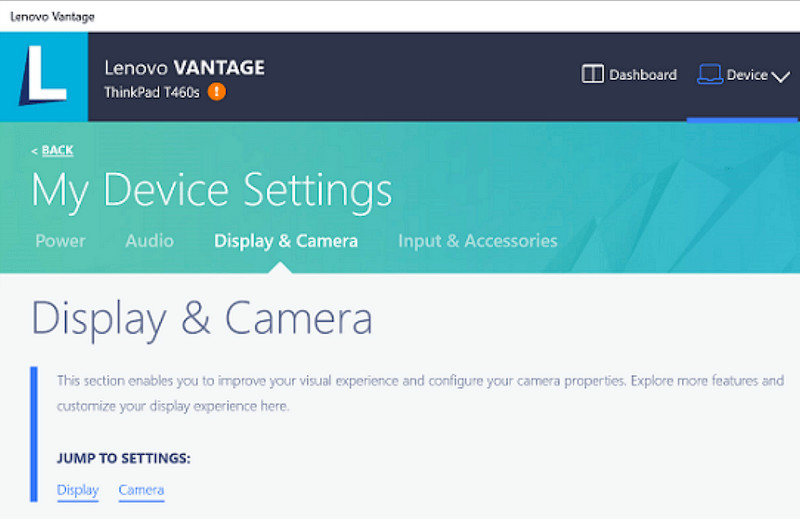
Βήμα 1μεταβείτε στο Αρχή μενού και κάντε κλικ στο Lenovo Vantage.
Βήμα 2Παρακέντηση Ρυθμίσεις συσκευής > Οθόνη & Κάμερα.
Βήμα 3Ελέγξτε για εγγραφές ή άλλες διαθέσιμες λειτουργίες.
Βήμα 4Διαθέστε τυχόν απαραίτητες επιλογές ή συντομεύσεις.
Βήμα 5Ηχογραφήστε τη μουσική χρησιμοποιώντας την παρεχόμενη λειτουργία (αν είναι δυνατόν).
Βήμα 6Βρείτε τις εγγραφές που έχετε αποθηκεύσει στον φάκελο "Βίντεο".
Μέθοδος 3. Χρήση του Legion Zone / Lenovo Nerve Center
Το Lenovo Nerve Center (ή Legion Nerve Center - τα νεότερα εργαλεία της Legion έχουν αντικαταστήσει το Nerve Sense) είναι βελτιστοποιημένο για συσκευές Lenovo, ειδικά για φορητούς υπολογιστές Lenovo Legion, που απευθύνονται σε gamers. Είναι επίσης άρτια ενσωματωμένο με εργαλεία απόδοσης παιχνιδιών, ώστε οι χρήστες να μπορούν να λαμβάνουν στιγμιότυπα οθόνης των παιχνιδιών τους, ενώ παράλληλα παρακολουθούν και βελτιστοποιούν τους πόρους του συστήματος.
Ωστόσο, είναι μια μάλλον βασική συσκευή εγγραφής. Αφορά περισσότερο την ευκολία παρά την προσαρμογή και προσφέρει μόνο βασικές επιλογές εγγραφής με περιορισμένο έλεγχο της ανάλυσης, του ρυθμού μετάδοσης bit και των προηγμένων ρυθμίσεων. Επίσης, είναι διαθέσιμη μόνο σε ορισμένα νεότερα συστήματα, ενώ άλλα την έχουν αντικαταστήσει ή την έχουν αφαιρέσει από τα συστήματά τους, επομένως δεν είναι τόσο αξιόπιστη όσο ήταν κάποτε.
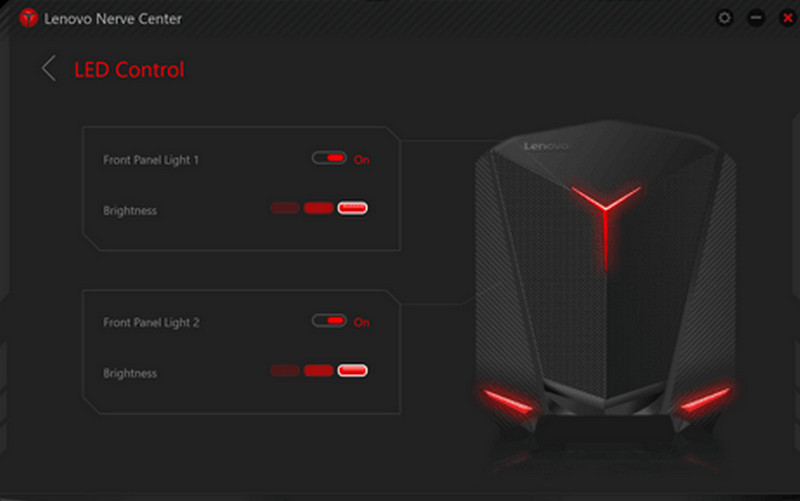
Βήμα 1Πρόσβαση στο Κέντρο Νεύρων Lenovo ή Ζώνη Λεγεώνας από τη συσκευή.
Βήμα 2Μεταβείτε στα εργαλεία εγγραφής ή/και παιχνιδιού.
Βήμα 3Εάν υπάρχει επιλογή, αλλάξτε τις ρυθμίσεις εγγραφής, όπως την ανάλυση ή την ποιότητα ήχου.
Βήμα 4Ξεκινήστε το παιχνίδι ή την εφαρμογή.
Βήμα 5Εγγραφή με την προεπιλεγμένη συντόμευση ή κουμπί.
Βήμα 6Σταματήστε την εγγραφή και κοιτάξτε μέσα σας Βίντεο φάκελο για να δείτε αν το αρχείο έχει εγγραφεί.
Μέθοδος 4. Χρήση της συσκευής εγγραφής οθόνης AVAide
Εγγραφή οθόνης AVAide είναι μια πιο εξελιγμένη και ευέλικτη συσκευή εγγραφής οθόνης για Lenovo από την ενσωματωμένη συσκευή εγγραφής οθόνης. Είναι κατασκευασμένη για όσους θέλουν ποιότητα βίντεο, ομαλότερη λειτουργία και μεγαλύτερο έλεγχο εγγραφής. Είναι το τέλειο εργαλείο για τη δημιουργία εκπαιδευτικών σεμιναρίων, την εγγραφή συσκέψεων ή την καταγραφή παιχνιδιού, χωρίς να απαιτείται περίπλοκη ρύθμιση, όλα σε επαγγελματικό επίπεδο.
Ενώ μπορεί να καταγράψει τον ήχο του συστήματος, την είσοδο μικροφώνου, την κάμερα web και τις περιοχές της οθόνης, υποστηρίζει επίσης εγγραφή full HD και ακόμη και 4K με ελάχιστη καθυστέρηση σε σύγκριση με τις βασικές συσκευές εγγραφής. Αυτό το καθιστά μια ολοκληρωμένη εφαρμογή λήψης οθόνης για εργασία και αναψυχή.
- Τραβήξτε βίντεο σε 1080p ή 4K με ομαλή απόδοση χωρίς καθυστερήσεις.
- Εγγραφή σε λειτουργία ΠΛΗΡΟΥΣ ή ΠΡΟΣΑΡΜΟΣΜΕΝΗΣ οθόνης ανάλογα με τις ανάγκες σας.
- Ηχογραφήστε ταυτόχρονα εσωτερικό ήχο και φωνή με καθαρή έξοδο.
- Προσθέστε εγγραφή Facecam για εκπαιδευτικά σεμινάρια, παρουσιάσεις ή βίντεο παιχνιδιού.
- Περικοπή, συμπίεση και βελτίωση εγγραφών μετά τη λήψη.

 Ασφαλής λήψη
Βήμα 1Λήψη και εγκατάσταση του λογισμικού
Επισκεφθείτε την επίσημη ιστοσελίδα του AVAide Screen Recorder. Κατεβάστε το Windows Installer, εγκαταστήστε το στον φορητό υπολογιστή Lenovo και εκτελέστε το.
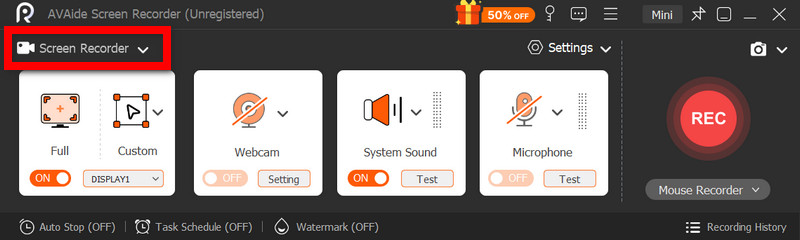
Βήμα 2Επιλέξτε λειτουργία εγγραφής
Ανοίξτε το λογισμικό και, στη συνέχεια, κάντε κλικ στο Εγγραφή οθόνης. Εγγράψτε ολόκληρη την οθόνη με Γεμάτος ή ένα μέρος της οθόνης με Εθιμο.
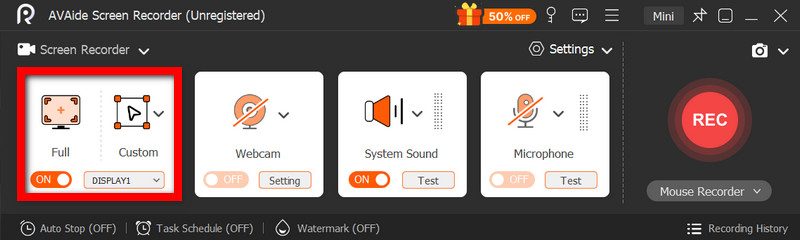
Βήμα 3Ρύθμιση παραμέτρων ήχου
Για να ηχογραφήσετε τυχόν ήχους που παράγονται από τον υπολογιστή, ενεργοποιήστε Ήχος συστήματοςΓια να συμπεριλάβετε τη δική σας φωνή, ενεργοποιήστε το ΜικρόφωνοΗ κάμερα web μπορεί επίσης να ενεργοποιηθεί ανάλογα με την περίπτωση.
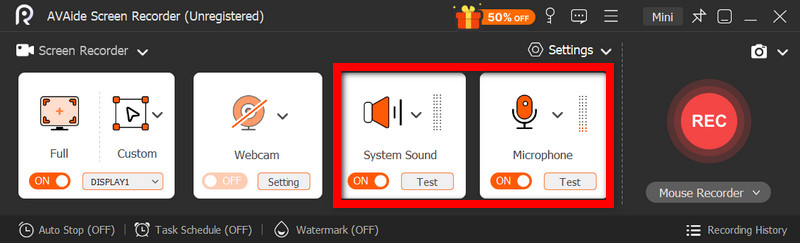
Βήμα 4Προσαρμογή ρυθμίσεων εγγραφής
Χρησιμοποιήστε το Ρυθμίσεις για να ρυθμίσετε την ποιότητα, την ανάλυση, τον ρυθμό καρέ και τη μορφή εξόδου βίντεο, ώστε να επιτευχθεί η βέλτιστη απόδοση εγγραφής.
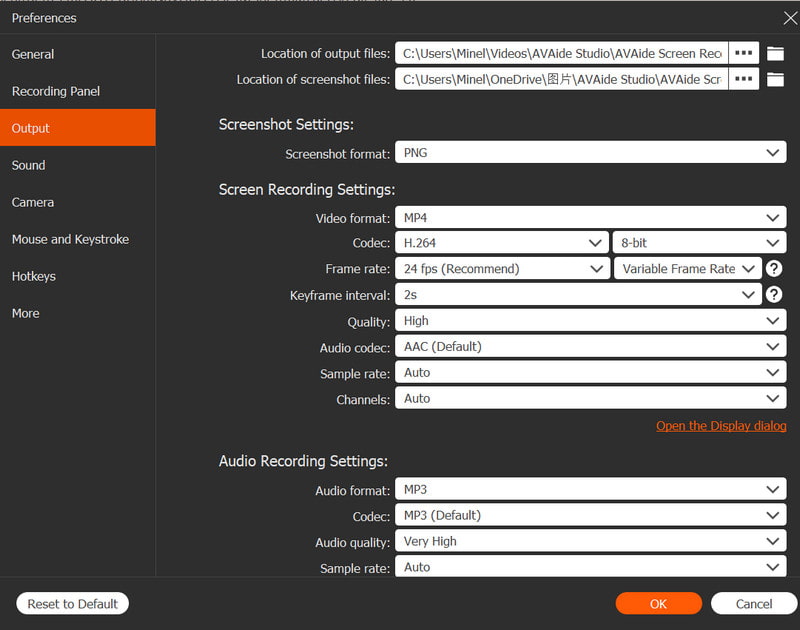
Βήμα 5Ξεκινήστε την εγγραφή
Πάτα το REC για να ξεκινήσετε την εγγραφή. Οι ηχογραφήσεις, τα εκπαιδευτικά βίντεο, το gameplay ή οποιαδήποτε δραστηριότητα στην οθόνη του Google Meet μπορούν να καταγραφούν ομαλά.
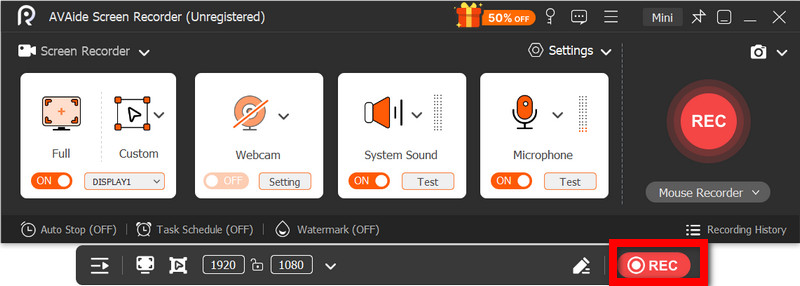
Βήμα 6Διακοπή και αποθήκευση της εγγραφής
Όταν τελειώσετε, κάντε κλικ στο Να σταματήσει κουμπί. Κάντε προεπισκόπηση της εγγραφής σας, επεξεργαστείτε την γρήγορα εάν είναι απαραίτητο και αποθηκεύστε την αμέσως στον υπολογιστή σας.
Μέθοδος 5. Χρήση Γρήγορων Ρυθμίσεων
Στα tablet Lenovo Android, υπάρχει μια ενσωματωμένη επιλογή εγγραφής οθόνης στις γρήγορες ρυθμίσεις. Ο καλύτερος τρόπος για να καταγράψετε εκπαιδευτικά βίντεο, gameplay ή δραστηριότητα εφαρμογών στο tablet σας είναι χωρίς να κατεβάσετε εφαρμογές τρίτων. Εύκολο, γρήγορο και βελτιστοποιημένο για χρήση σε κινητά, είναι ιδανικό για γρήγορες εγγραφές εν κινήσει.
Δεν διαθέτει τις προηγμένες λειτουργίες επεξεργασίας και προσαρμογής που υπάρχουν σε άλλα εργαλεία λήψης οθόνης, αλλά επαρκεί για απλές λήψεις οθόνης με ήχο.
Βήμα 1Σύρετε το δάχτυλό σας προς τα πάνω από το κάτω μέρος της οθόνης για να ανοίξετε το Γρήγορες ρυθμίσεις.
Βήμα 2Ψάξτε για το Εγγραφή οθόνης ή Εγγραφή οθόνης κουμπί. Εάν δεν υπάρχει, κάντε κλικ στο Επεξεργασία κουμπί και προσθέστε το στον πίνακα ελέγχου σας.
Βήμα 3Κάντε κλικ Εγγραφή οθόνηςκαι, στη συνέχεια, επιλέξτε τις επιθυμητές ρυθμίσεις.
Βήμα 4Παρακέντηση Αρχή για να ξεκινήσει η εγγραφή. Θα υπάρξει αντίστροφη μέτρηση πριν ξεκινήσει η εγγραφή.
Βήμα 5Πατήστε την πλωτή γραμμή εργαλείων ή τη γραμμή ειδοποιήσεων και, στη συνέχεια, πατήστε Να σταματήσει για να τερματίσετε την ηχογράφηση.
Αντιμετώπιση συνηθισμένων προβλημάτων εγγραφής οθόνης στη Lenovo
Μπορείτε να διαβάσετε συμβουλές για την επίλυση συνηθισμένων προβλημάτων κατά την εγγραφή της οθόνης σε μια συσκευή Lenovo.
Ενώ γενικά δεν υπάρχουν σημαντικές επιπλοκές με την εγγραφή οθόνης σε συσκευές Lenovo, υπάρχει πάντα η πιθανότητα εμφάνισης προβλημάτων ανάλογα με το εργαλείο ή τη συσκευή εγγραφής οθόνης που χρησιμοποιείται. Παρακάτω παρατίθενται τα πιο συνηθισμένα προβλήματα και ο τρόπος επίλυσής τους.
- Η εγγραφή οθόνης δεν λειτουργεί: Επανεκκινήστε τη συσκευή σας και δοκιμάστε ξανά. Για ενσωματωμένα εργαλεία όπως το Xbox Game Bar, βεβαιωθείτε ότι είναι ενεργοποιημένο στις Ρυθμίσεις των Windows στην ενότητα Παιχνίδια.
- Δεν υπάρχει ήχος στην εγγραφή: Ελέγξτε αν ο Ήχος Συστήματος ή το Μικρόφωνο είναι ενεργοποιημένοι πριν από την εγγραφή. Επίσης, βεβαιωθείτε ότι η ένταση του συστήματός σας δεν είναι σε σίγαση.
- Βίντεο με καθυστέρηση ή χαμηλή ποιότητα: Μειώστε την ποιότητα βίντεο ή κλείστε εφαρμογές στο παρασκήνιο. Η αναβάθμιση των προγραμμάτων οδήγησης γραφικών μπορεί επίσης να βελτιώσει την απόδοση.
- Δεν είναι δυνατή η εγγραφή της επιφάνειας εργασίας ή της Εξερεύνησης αρχείων: Αυτός είναι ένας από τους συνηθισμένους περιορισμούς του Xbox Game Bar. Αν θέλετε να εγγράψετε την οθόνη σας και να καταγράψετε τα πάντα, χρησιμοποιήστε ένα προηγμένο πρόγραμμα όπως το AVAide Screen Recorder, ένα από τα οι καλύτερες συσκευές εγγραφής οθόνης για Mac και Windows.
- Η εγγραφή δεν αποθηκεύεται: Βεβαιωθείτε ότι ο αποθηκευτικός σας χώρος δεν είναι πλήρης και επαληθεύστε την προεπιλεγμένη τοποθεσία αποθήκευσης. Στις ρυθμίσεις, αλλάξτε τον φάκελο εξόδου και δοκιμάστε το.
Κουμπί εγγραφής οθόνης Lenovo Οι επιλογές ποικίλλουν ανάλογα με τη συσκευή σας και το εργαλείο που χρησιμοποιείτε. Συνολικά, οι ενσωματωμένες λειτουργίες και οι εφαρμογές τρίτων κάνουν την καταγραφή απλή, παρέχοντάς σας ευέλικτους τρόπους για να καταγράφετε, να αποθηκεύετε και να διαχειρίζεστε αποτελεσματικά τη δραστηριότητα της οθόνης σε συσκευές Lenovo.
ΣΧΕΤΙΚΑ ΜΕ ΤΟΝ ΣΥΓΓΡΑΦΕΑ

Καταγράψτε δραστηριότητες οθόνης με ήχο, διαδικτυακές συσκέψεις, βίντεο παιχνιδιού, μουσική, κάμερα web κ.λπ.