Φανταστείτε ότι προσπαθείτε να αποθηκεύσετε ένα σεμινάριο, μια στιγμή παιχνιδιού ή μια διαδικτυακή σύσκεψη, αλλά δεν είστε σίγουροι πώς να το καταγράψετε στη συσκευή σας. πώς να κάνετε εγγραφή οθόνης στο iPad μπορεί να διευκολύνει την αποθήκευση και την κοινοποίηση αυτών των στιγμών. Αυτός ο οδηγός σας καθοδηγεί στην ενεργοποίηση της εγγραφής, στη χρήση του ήχου, στην επίλυση προβλημάτων και στη βελτίωση της ποιότητας για ομαλότερες και καλύτερες εγγραφές οθόνης κάθε φορά.
Μέρος 1. Πώς να ενεργοποιήσετε την εγγραφή οθόνης στο iPad
Μην ανησυχείτε, το κουμπί εγγραφής οθόνης δεν είναι ακόμα εγκατεστημένο στο Κέντρο Ελέγχου σας, εκτός αν δεν το έχετε εγκαταστήσει στο iPad σας. Η Apple έχει συμπεριλάβει αυτήν τη λειτουργία εγγενώς στο iPadOS και πρέπει να είναι ενεργοποιημένη για να μπορεί να χρησιμοποιηθεί. Μόλις προστεθεί, μπορείτε να εγγράψετε την οθόνη σας οποιαδήποτε στιγμή με ένα απλό σύρσιμο και ένα άγγιγμα.
Βήμα 1Πατήστε το Ρυθμίσεις εφαρμογή στο iPad σας.
Βήμα 2Κάντε κλικ στο Κέντρο ελέγχου στο μενού καθώς κάνετε κύλιση προς τα κάτω.
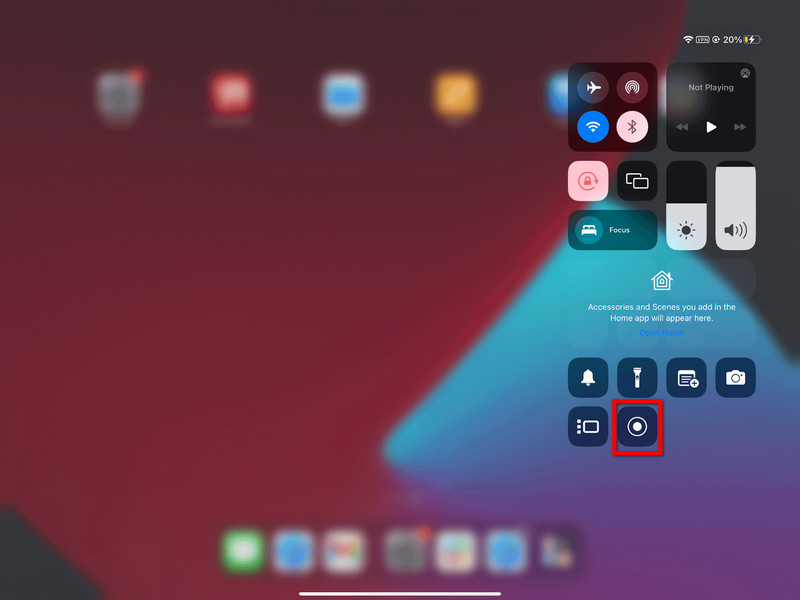
Βήμα 3Πατήστε το + (Προσθήκη) κουμπί στο Εγγραφή οθόνης ενότητα της λίστας διαθέσιμων στοιχείων ελέγχου.
Βήμα 4Για πρόσβαση στο Κέντρο ελέγχου, σύρετε προς τα κάτω από την επάνω δεξιά γωνία της οθόνης σας. Τώρα θα πρέπει να δείτε την εγγραφή.
Μέρος 2. Πώς να κάνετε εγγραφή οθόνης στο iPad
Μόλις το ενεργοποιήσετε, η εγγραφή της οθόνης του iPad σας είναι εύκολη και γρήγορη. Η ενσωματωμένη συσκευή εγγραφής του iPadOS είναι μια απρόσκοπτη λειτουργία που σας επιτρέπει να καταγράφετε παιχνίδια, εκπαιδευτικά βίντεο ή ακόμα και βιντεοκλήσεις χωρίς να εγκαταστήσετε εφαρμογές τρίτων.
Βήμα 1Πατήστε παρατεταμένα την επάνω δεξιά γωνία της οθόνης του iPad σας και, στη συνέχεια, σύρετέ την προς τα κάτω.
Βήμα 2Πατήστε στο Εγγραφή οθόνης κουμπί. Θα υπάρξει μια αντίστροφη μέτρηση 3 δευτερολέπτων πριν από την έναρξη της εγγραφής.
(Προαιρετικός) Κρατήστε πατημένο το Εγγραφή οθόνης κουμπί και πατήστε το Μικρόφωνο για να το ενεργοποιήσετε όταν θέλετε να ηχογραφήσετε τη φωνή σας.
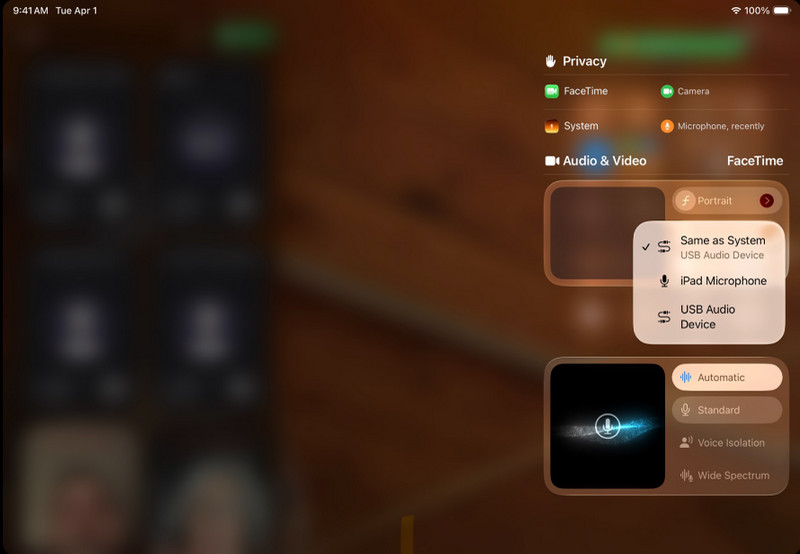
Βήμα 3Επιλέξτε τις εφαρμογές ή τις δραστηριότητες που θέλετε να καταγράψετε.
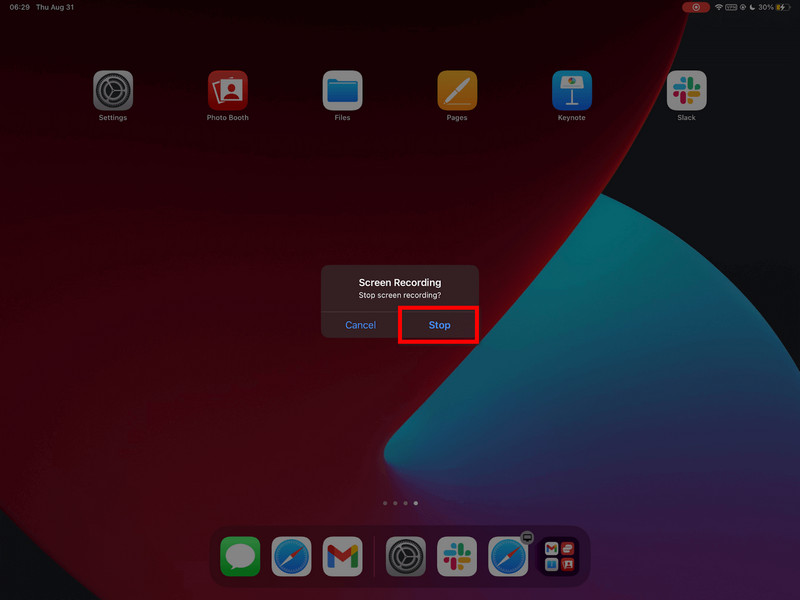
Βήμα 4Πατήστε την κόκκινη γραμμή κατάστασης και, στη συνέχεια, πατήστε Να σταματήσει, ή επιστρέψτε στο Κέντρο ελέγχου και πατήστε το Ρεκόρ κουμπί ξανά.
Βήμα 5Το βίντεό σας θα αποθηκευτεί αυτόματα στο Φωτογραφίες εφαρμογή, όπου μπορείτε να την επεξεργαστείτε ή να την κοινοποιήσετε.
Μέρος 3. Πώς να κάνετε εγγραφή οθόνης σε iPad με ήχο
Η καταγραφή της οθόνης και του ήχου με το iPad είναι χρήσιμη για μαθήματα, παιχνίδια, διαδικτυακά μαθήματα και επιδείξεις. Η εγγραφή στο iPadOS λειτουργεί μόνο σε περιορισμένο βαθμό και είναι σημαντικό να κατανοήσετε τη σχέση μεταξύ του μικροφώνου και του ήχου του συστήματος πριν από την εγγραφή.
Σημαντική διάκριση: Μικρόφωνο vs. Ήχος συστήματος
| Τύπος ήχου | Τι καταγράφει | Διαθεσιμότητα σε iPadOS | Βέλτιστες περιπτώσεις χρήσης |
| Ήχος μικροφώνου | Η φωνή σας και οι εξωτερικοί ήχοι καταγράφονται από το μικρόφωνο του iPad. | Διαθέσιμος | Σχολιασμός, εκπαιδευτικά βοηθήματα, αφήγηση. |
| Ήχος συστήματος | Εσωτερικοί ήχοι από εφαρμογές, παιχνίδια, βίντεο και αναπαραγωγή πολυμέσων. | Δεν υποστηρίζεται άμεσα | Απαιτούνται εξωτερικά εργαλεία ή κάποια λύση. |
Βήματα για την εγγραφή ήχου με μικρόφωνο
Βήμα 1Σύρετε το δάχτυλό σας προς τα πάνω από την επάνω δεξιά γωνία της οθόνης του iPad σας για να ανοίξετε το Κέντρο ελέγχου.
Βήμα 2Κρατήστε πατημένο το Εγγραφή οθόνης κουμπί για να δείτε περισσότερες επιλογές.
Βήμα 3Πατήστε το μικρόφωνο για να το ενεργοποιήσετε. Θα πρέπει να γίνει κόκκινο για να υποδείξει ότι η φωνητική εγγραφή είναι ενεργοποιημένη.
Βήμα 4Κάντε κλικ Ξεκινήστε την εγγραφήκαι όταν ολοκληρωθεί η αντίστροφη μέτρηση των 3 δευτερολέπτων, ξεκινά η εγγραφή.
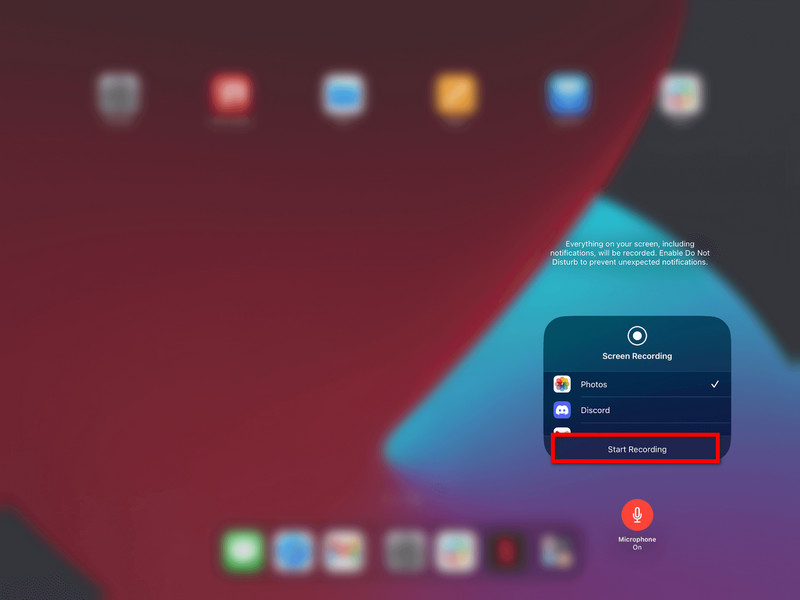
Βήμα 5Επαναλάβετε τις κινήσεις που θέλετε να ηχογραφήσετε. Εάν το μικρόφωνο είναι ενεργοποιημένο, τότε η φωνή σας θα ηχογραφηθεί.
Βήμα 6Πατήστε την κόκκινη γραμμή κατάστασης στο επάνω μέρος της οθόνης ή επιστρέψτε στο Κέντρο ελέγχου και πατήστε το Ρεκόρ κουμπί ξανά.
Βήμα 7Το βίντεο θα αποθηκευτεί αυτόματα στο Φωτογραφίες εφαρμογή, όπου μπορείτε να την δείτε ή να την επεξεργαστείτε.
Εναλλακτική λύση για την εγγραφή ήχου συστήματος
Δυστυχώς, λόγω περιορισμών του συστήματος, δεν μπορείτε να εγγράψετε εσωτερικό ήχο απευθείας στο iPad, επομένως απαιτείται μια λύση που βασίζεται σε υπολογιστή. Ένα εξαιρετικό εργαλείο είναι το Εγγραφή οθόνης AVAide, το οποίο σας επιτρέπει να αντικατοπτρίζετε ένα iPad και να εγγράφετε ταυτόχρονα τον ήχο της οθόνης και του συστήματος.
Το AVAide Screen Recorder είναι ένα λογισμικό εγγραφής οθόνης υψηλής ποιότητας που καταγράφει την δραστηριότητα της οθόνης με ευκρίνεια. Μπορεί να καταγράψει χωρίς καθυστέρηση ή καθυστέρηση έως και 4 K/1080p. Επιτρέπει επίσης την ταυτόχρονη εγγραφή ήχου συστήματος και μικροφώνου, ιδανική για μαθήματα, gameplay και παρουσιάσεις.
- Η εγγραφή υψηλής ποιότητας σάς επιτρέπει να καταγράφετε βίντεο σε 4K ή 1080p με καθαρά αποτελέσματα υψηλής ποιότητας.
- Διπλός ήχος
- Υποστήριξη ήχου συστήματος εγγραφής και ήχου μικροφώνου ταυτόχρονα.
- Το iOS Screen Mirroring εμφανίζει και καταγράφει την οθόνη του iPad σας σε PC ή Mac.
- Οι ευέλικτες λειτουργίες οθόνης υποστηρίζουν εγγραφή σε πλήρη οθόνη ή σε προσαρμοσμένη περιοχή.
- Τα ενσωματωμένα εργαλεία επεξεργασίας σάς βοηθούν να περικόπτετε, να βελτιώνετε και να επεξεργάζεστε γρήγορα ηχογραφήσεις.

 Ασφαλής λήψη
Βήμα 1Λήψη και εγκατάσταση
Επισκεφθείτε την επίσημη ιστοσελίδα και κατεβάστε το AVAide Screen Recorder. Κατεβάστε το AVAide Screen Recorder από την επίσημη ιστοσελίδα. Μόλις εγκατασταθεί, μπορείτε να το εκτελέσετε από τον υπολογιστή σας με Windows ή Mac.
Βήμα 2Επιλογή iOS
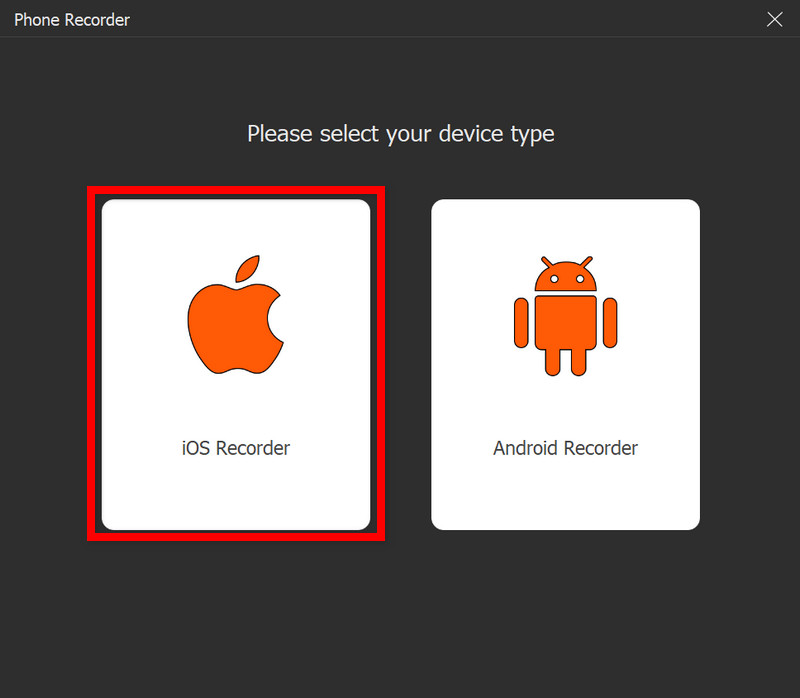
Στην κύρια διεπαφή, κάντε κλικ στο Συσκευή εγγραφής τηλεφώνου, μετά επιλέξτε iOS Recorder από τη λίστα επιλογών (iOS και Android).
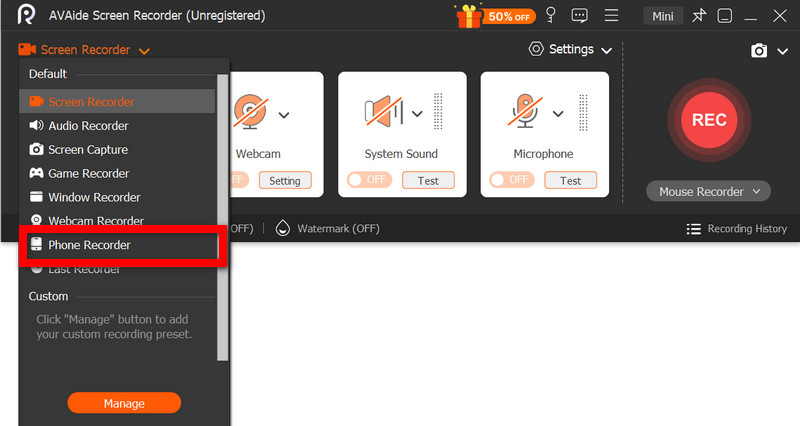
Βήμα 3Συνδέστε το iPad στον υπολογιστή
Η ασύρματη αντιγραφή του iPad σας στον υπολογιστή σας είναι δυνατή μέσω του ίδιου δικτύου ή μέσω καλωδίου USB, εάν υπάρχει διαθέσιμο. Στην εφαρμογή Screen Mirroring στο iPad σας, επιλέξτε τη συσκευή AVAide. Θα δείτε την οθόνη του iPad σας να εμφανίζεται στον υπολογιστή σας μόλις συνδεθείτε.
Βήμα 4Ξεκινήστε την εγγραφή
Με επιτυχή κατοπτρισμό, πατήστε Ρεκόρ για να ξεκινήσετε την εγγραφή της οθόνης του iPad, του ήχου συστήματος και της εισόδου μικροφώνου (εάν υπάρχει).
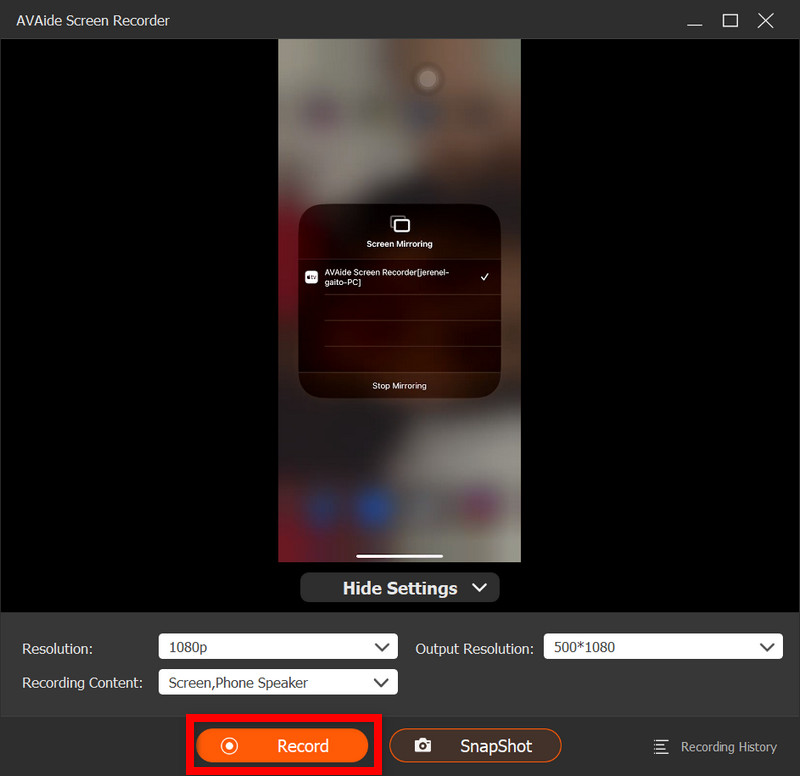
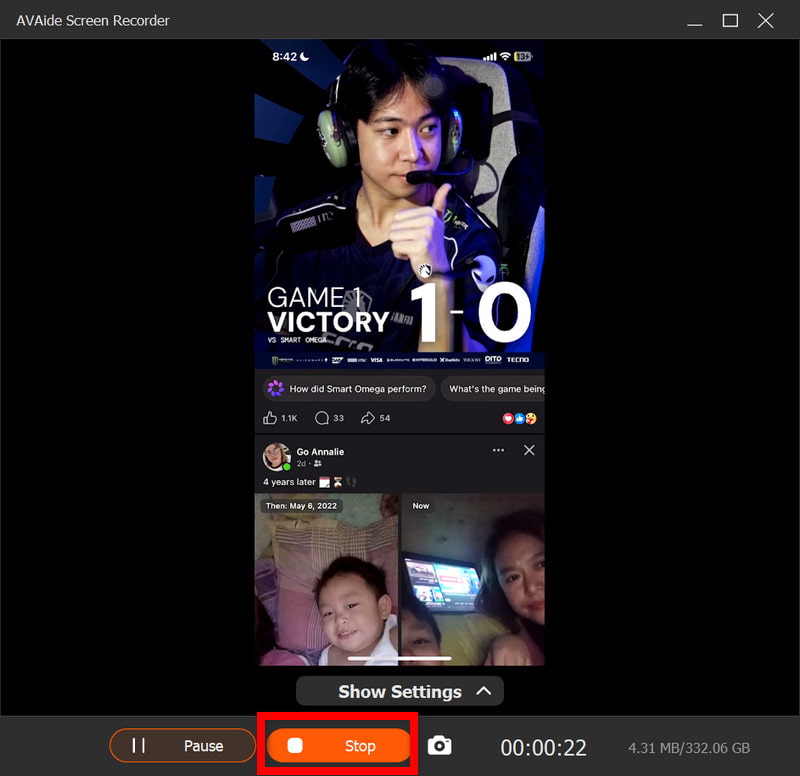
Βήμα 5Διακοπή εγγραφής
Πάτα το Να σταματήσει όταν τελειώσετε. Η εγγραφή σας θα αποθηκευτεί αυτόματα στον υπολογιστή σας.
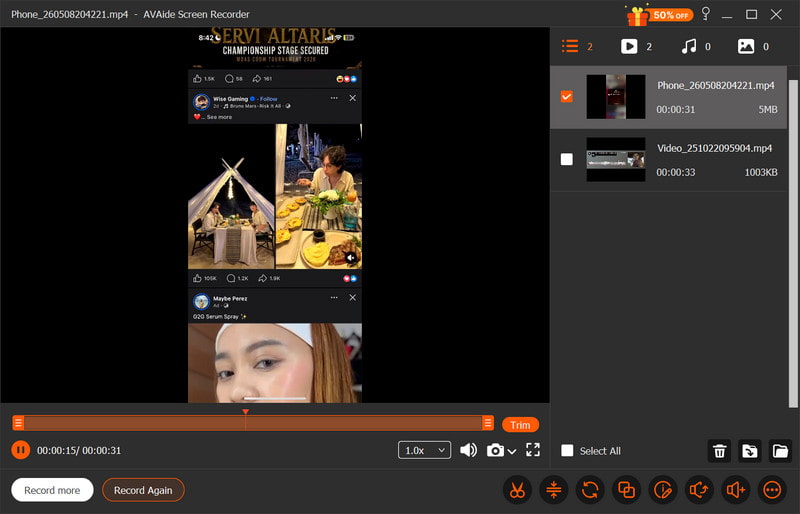
Βήμα 6Επεξεργασία του βίντεο
Μόλις ολοκληρωθεί η εγγραφή, θα ανοίξει ένα παράθυρο προεπισκόπησης. Τα ανεπιθύμητα μέρη μπορούν να αφαιρεθούν, να ρυθμιστεί ο ήχος ή να γίνει απλή επεξεργασία πριν από την εξαγωγή του τελικού βίντεο.
Μέρος 4. Γιατί δεν μπορώ να κάνω εγγραφή οθόνης στο iPad μου;
Ένα πρόβλημα εγγραφής βίντεο στο iPad συνήθως προκύπτει λόγω ρυθμίσεων, περιορισμών ή προβλημάτων απόδοσης. Τα πιο συνηθισμένα προβλήματα και αιτίες εμφανίζονται παρακάτω.
1. Το κουμπί λείπει εντελώς
Αυτό συμβαίνει εάν η Εγγραφή οθόνης δεν είναι εγκατεστημένη στο Κέντρο ελέγχου. Πρέπει να προσθέσετε χειροκίνητα την Εγγραφή οθόνης στις Ρυθμίσεις > Κέντρο ελέγχου για να εμφανιστεί εκεί.
2. Το κουμπί είναι γκριζαρισμένο ή δεν ανταποκρίνεται
Συνήθως, αυτό οφείλεται σε έναν περιορισμό στην εγγραφή οθόνης από τις ρυθμίσεις συστήματος ή τα στοιχεία ελέγχου της συσκευής.
- Μπορούν να οριστούν όρια χρόνου οθόνης.
- Η εγγραφή ενδέχεται να απαγορεύεται από τις ρυθμίσεις προφίλ της σχολικής ή επαγγελματικής συσκευής.
- Ορισμένες εφαρμογές ενδέχεται να μην σας επιτρέπουν να τραβήξετε στιγμιότυπο οθόνης ενώ τις χρησιμοποιείτε.
3. Η εγγραφή σταματά αμέσως μετά την έναρξη
Το πρόβλημα σχετίζεται συνήθως με προβλήματα συστήματος ή αποθήκευσης, όπως ανεπαρκής διαθέσιμος χώρος ή άλλες εφαρμογές που παρεμβαίνουν στη διαδικασία εγγραφής.
4. Δεν υπάρχει ήχος στην ηχογράφηση
Αυτό συμβαίνει όταν ο ήχος δεν είναι σωστά συνδεδεμένος ή όταν ο χρήστης αναμένει εσωτερικό ήχο. Δεν είναι δυνατή η εσωτερική εγγραφή της οθόνης στο iPadOS, επομένως χρησιμοποιώντας το καλύτερη εγγραφή οθόνης για Mac μπορεί να βοηθήσει στη σωστή καταγραφή του ήχου του συστήματος.
5. Η εγγραφή είναι ακανόνιστη ή χαμηλής ποιότητας
Αυτό συνήθως προκαλείται από έναν από τους ακόλουθους παράγοντες: περιορισμένος χώρος αποθήκευσης στη συσκευή, εκτέλεση πάρα πολλών εφαρμογών ή ένα παλαιότερο μοντέλο iPad που δεν μπορεί να κάνει εγγραφή σε τόσο υψηλή ανάλυση.
Μέρος 5. Επαγγελματικές συμβουλές για καλύτερες εγγραφές οθόνης
Κατά την εγγραφή σε iPadOS, βεβαιωθείτε ότι το iPad σας έχει ρυθμιστεί σωστά για ομαλή, καθαρή εγγραφή υψηλής ποιότητας. Ακολουθούν ορισμένες χρήσιμες συμβουλές για τη βελτιστοποίηση της ποιότητας βίντεο και ήχου.
1. Ελευθερώστε χώρο αποθήκευσης
Πριν ξεκινήσετε την εγγραφή, βεβαιωθείτε ότι υπάρχει αρκετός ελεύθερος χώρος στο iPad σας, ώστε να μην παρουσιάζει καθυστερήσεις ή σφάλματα, τα οποία μπορεί να προκαλέσουν προβλήματα εγγραφής κατά τη διάρκεια της βιντεοσκόπησης.
2. Κλείστε τις αχρησιμοποίητες εφαρμογές
Κλείστε όλες τις περιττές εφαρμογές στο παρασκήνιο για να βελτιώσετε την απόδοση του συστήματος και να αποτρέψετε διακοπές ή επιβραδύνσεις κατά την εγγραφή.
3. Ενεργοποιήστε τη λειτουργία Μην ενοχλείτε
Ενεργοποιήστε τη λειτουργία "Μην ενοχλείτε" για να αποτρέψετε την εμφάνιση όλων των εισερχόμενων κλήσεων, μηνυμάτων και ειδοποιήσεων στην οθόνη και την αποτροπή της προσοχής σας κατά την εγγραφή.
4. Διατηρήστε μια σταθερή ρύθμιση οθόνης
Μην προσαρμόζετε τη φωτεινότητα, τον προσανατολισμό ή τις ρυθμίσεις συστήματος κατά την εγγραφή, καθώς οι ξαφνικές αλλαγές ενδέχεται να επηρεάσουν τη συνέπεια και την ποιότητα εγγραφής του βίντεο.
5. Δοκιμάστε πρώτα τον ήχο
Πριν ξεκινήσετε τη λήψη του βίντεό σας, κάντε μια σύντομη δοκιμαστική ηχογράφηση για να ελέγξετε ότι τα επίπεδα έντασης του μικροφώνου έχουν ρυθμιστεί σωστά και ότι η φωνή σας ακούγεται καθαρή και ηχογραφείται σωστά.
6. Χρησιμοποιήστε μια καθαρή αρχική οθόνη
Καθαρίστε την αρχική σας οθόνη ή μετακινήστε ευαίσθητες εφαρμογές ή εφαρμογές σε διαφορετικό φάκελο, ώστε η εγγραφή σας να φαίνεται εστιασμένη, επαγγελματική και τακτοποιημένη.
7. Ηχογράφηση σε ήσυχο περιβάλλον
Αν μπορείτε να ηχογραφήσετε σε ένα ήσυχο δωμάτιο με λίγο θόρυβο περιβάλλοντος, το μικρόφωνό σας θα λαμβάνει καλύτερο φωνητικό ήχο και θα ελαχιστοποιεί τους ανεπιθύμητους ήχους όταν ηχογράφηση φωνής σε Mac ή iPad.
Εγγραφή οθόνης iPad είναι ένας απλός αλλά ισχυρός τρόπος για να καταγράφετε εκπαιδευτικά βίντεο, gameplay και σημαντικές στιγμές απευθείας από τη συσκευή σας. Με τις σωστές ρυθμίσεις και συμβουλές, μπορείτε να βελτιώσετε την ποιότητα τόσο του βίντεο όσο και του ήχου για καλύτερα αποτελέσματα. Είτε χρησιμοποιείτε ενσωματωμένα εργαλεία είτε εξωτερικό λογισμικό, η εγγραφή γίνεται ευκολότερη και πιο αξιόπιστη.
ΣΧΕΤΙΚΑ ΜΕ ΤΟΝ ΣΥΓΓΡΑΦΕΑ

Καταγράψτε δραστηριότητες οθόνης με ήχο, διαδικτυακές συσκέψεις, βίντεο παιχνιδιού, μουσική, κάμερα web κ.λπ.