Προσπαθώντας να καταλάβω πώς να εγγράψετε ήχο σε Mac συμβαίνει συχνά όταν χρειάζεται να καταγράψετε μια διάλεξη στην τάξη, να αποθηκεύσετε μια βιντεοκλήση, να ηχογραφήσετε ένα podcast ή να δημιουργήσετε γρήγορα φωνητικό περιεχόμενο. Ευτυχώς, το macOS περιλαμβάνει ενσωματωμένα εργαλεία ηχογράφησης και αρκετές επιλογές τρίτων μπορούν να σας βοηθήσουν να ηχογραφήσετε εύκολα μικρόφωνο και εσωτερικό ήχο υψηλής ποιότητας.
Μέθοδος 1: Χρήση του QuickTime Player
Όλοι φαίνεται να έχουν το QuickTime στο macOS τους. Το QuickTime παρέχει ένα εύχρηστο περιβάλλον εργασίας, αξιόπιστη ηχογράφηση από μικρόφωνο και γρήγορες εξαγωγές που δεν απαιτούν άλλη εφαρμογή. Αυτή η τεχνική είναι χρήσιμη για φωνητικές εντολές, διαλέξεις, διαδικτυακές συσκέψεις, ακόμη και βασικές ηχογραφήσεις podcast.
Βήμα 1Εκκινήστε το QuickTime Player είτε από τον φάκελο Εφαρμογές είτε μέσω της αναζήτησης Spotlight.
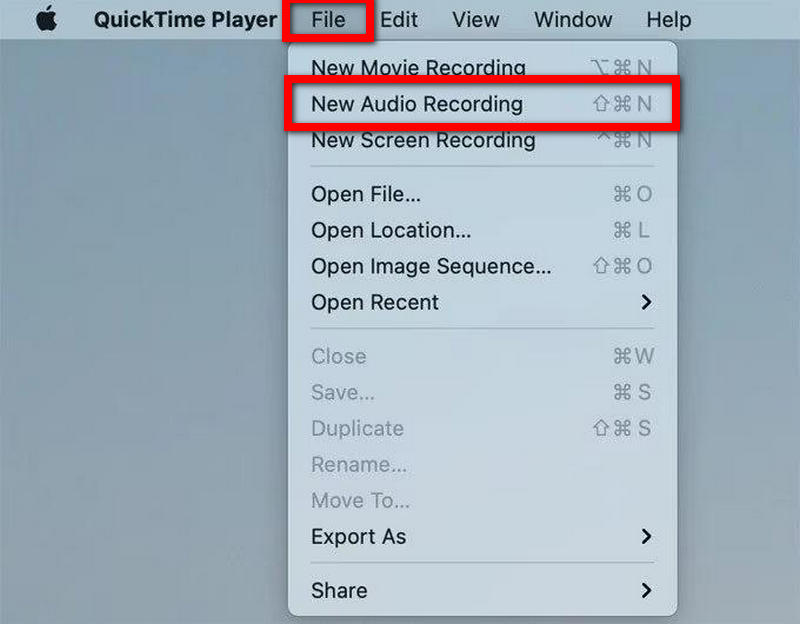
Βήμα 2μεταβείτε στο Αρχείο μενού από την επάνω γραμμή μενού.
Βήμα 3Κάντε κλικ Νέα ηχογράφηση.
Βήμα 4Πατήστε το μικρό βέλος δίπλα στο Ρεκόρ για να καθορίσετε το μικρόφωνο που θέλετε να χρησιμοποιήσετε.
Βήμα 5Εάν είναι απαραίτητο, ρυθμίστε την ένταση εισόδου.
Βήμα 6Για να ξεκινήσετε την εγγραφή, πατήστε το Ρεκόρ κουμπί.
Βήμα 7 Μιλήστε στο μικρόφωνο.
Βήμα 8Πάτα το Να σταματήσει κουμπί για να τερματίσετε την εγγραφή.
Βήμα 9Για να αποθηκεύσετε την ηχογράφηση στον Mac σας, μεταβείτε στη διεύθυνση Αρχείο και επιλέξτε Σώσει.
Μέθοδος 2: Χρήση φωνητικών σημειώσεων
Το Voice Memos έχει σχεδιαστεί για γρήγορη ηχογράφηση φωνής. Αυτή η εφαρμογή είναι ιδανική για τη δημιουργία προσωπικών υπενθυμίσεων, την ανταλλαγή ιδεών, σύντομων διαλέξεων και σύντομων ηχογραφήσεων. Τα ηχογραφημένα φωνητικά μηνύματα συγχρονίζονται αυτόματα μέσω του iCloud, επομένως οι ηχογραφήσεις είναι διαθέσιμες σε όλες τις συσκευές Apple.
Βήμα 1Εκκινήστε τα Φωνητικά μηνύματα στον Mac σας.
Βήμα 2Πάτα το Ρεκόρ κουμπί.
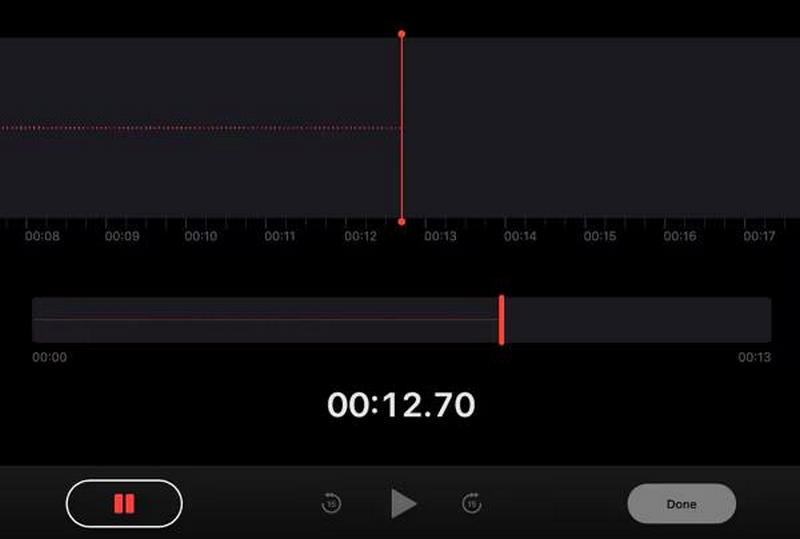
Βήμα 3Μιλήστε μέσω του μικροφώνου.
Βήμα 4Αν χρειαστεί να διακόψετε την εγγραφή για μια στιγμή, επιλέξτε Παύση.
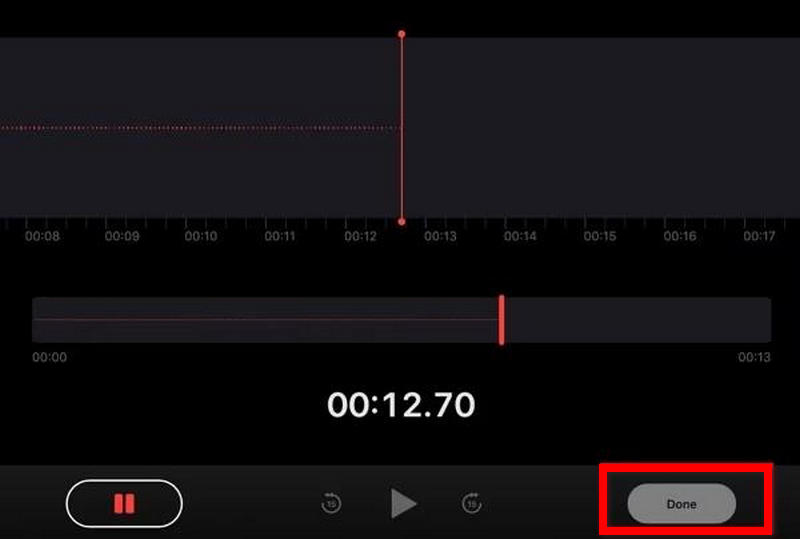
Βήμα 5Τύπος Ολοκληρώθηκε για να ολοκληρώσετε την ηχογράφηση.
Βήμα 6Για να βρείτε πιο εύκολα την ηχογράφηση, επιλέξτε το Μετονομάζω επιλογή.
Βήμα 7Για να μοιραστείτε, να αντιγράψετε ή να εξαγάγετε την εγγραφή, κάντε δεξί κλικ στο αρχείο.
Γιατί το macOS δεν υποστηρίζει εγγενώς την εσωτερική εγγραφή ήχου
Από την πρώτη κιόλας στιγμή, το macOS επιτρέπει τη χρήση του μικροφώνου. Ωστόσο, δεν υπάρχει τρόπος εγγραφής εσωτερικού ήχου συστήματος με την ενσωματωμένη λειτουργικότητα. Αυτό περιλαμβάνει την αναπαραγωγή πολυμέσων σε εφαρμογές, μουσική και ήχους προγράμματος περιήγησης. Το απόρρητο, η προστασία πνευματικών δικαιωμάτων και η ασφάλεια του συστήματος είναι οι λόγοι για τους οποίους το macOS έχει αυτούς τους περιορισμούς.
Σε αντίθεση με τον ήχο του μικροφώνου, ο εσωτερικός ήχος μπορεί να περιέχει προστατευμένα πολυμέσα ή ιδιωτικές επικοινωνίες από εφαρμογές. Εξαιτίας αυτού, η Apple περιορίζει την πρόσβαση στα εσωτερικά κανάλια ήχου, εκτός εάν οι χρήστες εγκαταστήσουν πρόσθετο λογισμικό.
Λόγω αυτών των προβλημάτων, εργαλεία όπως το QuickTime δεν μπορούν να εγγράψουν εσωτερικό ήχο, αλλά ο εξωτερικός ήχος μέσω μικροφώνου μπορεί.
Παραδείγματα αυτών των ζητημάτων:
- Εγγραφή βιντεοπαιχνιδιού με ήχο.
- Ηχογραφήστε ένα διαδικτυακό μάθημα.
- Εγγραφή ήχου και βίντεο στο διαδίκτυο.
- Εγγραφή ήχου από ένα διαδικτυακό βίντεο στο διαδίκτυο.
- Εγγραφή εκπαιδευτικών βίντεο με ενσωματωμένο ήχο υπολογιστή.
Μέθοδος 3: Χρήση του BlackHole + QuickTime Player
Το BlackHole είναι ένα δωρεάν πρόγραμμα οδήγησης εικονικού ήχου που επιτρέπει την εσωτερική δρομολόγηση του ήχου συστήματος σε λογισμικό εγγραφής. Εάν αυτό το πρόγραμμα οδήγησης χρησιμοποιηθεί μαζί με το QuickTime, τότε οι χρήστες Mac μπορούν να εγγράψουν εσωτερικό ήχο και ήχο εξωτερικού μικροφώνου. Αυτή η μονάδα δίσκου επιτρέπει στους χρήστες να εγγράφουν διαδικτυακές συσκέψεις, σεμινάρια, βιντεοπαιχνίδια, διαδικτυακά σεμινάρια, podcast και ήχο προγράμματος περιήγησης, όλα με υψηλής ποιότητας και καθαρό ήχο.
Βήμα 1Κατεβάστε και εγκαταστήστε το BlackHole στον Mac σας από την επίσημη ιστοσελίδα και, στη συνέχεια, ανοίξτε το Audio MIDI Setup.
Βήμα 2Δημιουργήστε μια συσκευή πολλαπλών εξόδων και ενεργοποιήστε τόσο τα ηχεία ή τα ακουστικά του Mac σας όσο και το BlackHole.
Βήμα 3 Ορίστε τη Συσκευή Πολλαπλών Εξόδων ως την προεπιλεγμένη έξοδο ήχου στις ρυθμίσεις ήχου.
Βήμα 4Ανοίξτε το QuickTime Player, επιλέξτε Αρχείο > Νέα ηχογράφηση, μετά επιλέξτε Μαύρη Τρύπα ως μικρόφωνο ή πηγή ήχου.
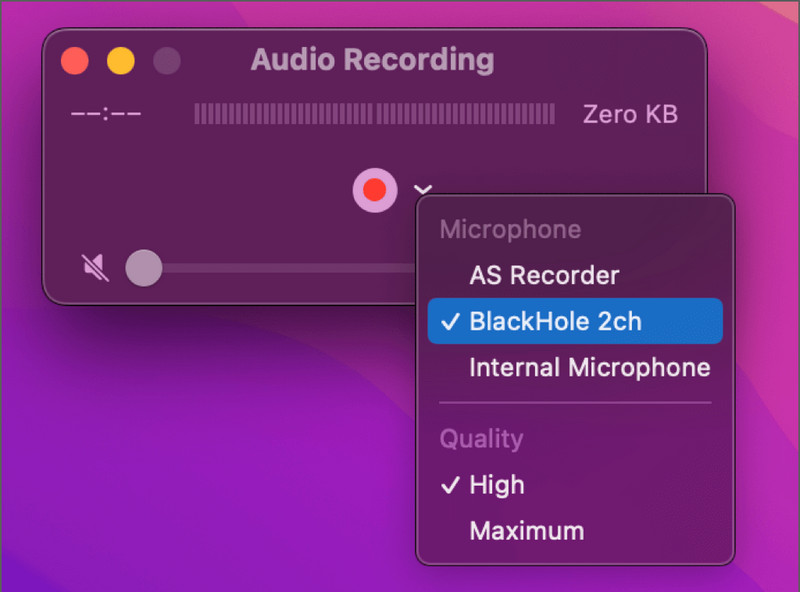
Βήμα 5Κάντε κλικ στο Ρεκόρ , αναπαράγετε τον ήχο που θέλετε να καταγράψετε και, στη συνέχεια, σταματήστε και αποθηκεύστε την εγγραφή μόλις ολοκληρωθεί.
Μέθοδος 4: Χρήση ειδικού λογισμικού τρίτων κατασκευαστών
1. AVAide Screen Recorder
Εγγραφή οθόνης AVAide Είναι ιδανικό για χρήστες Mac που θέλουν ένα απλό αλλά ισχυρό εργαλείο για την εγγραφή φωνής και ήχου. Εκτός από την εγγραφή οθόνης, το AVAide μπορεί να καταγράψει ήχο από το μικρόφωνό σας, τα ηχεία του συστήματος και την κάμερα web, καθώς και από την οθόνη του τηλεφώνου σας. Ένα από τα καλύτερα χαρακτηριστικά του AVAide είναι ότι έχει σχεδιαστεί για αρχάριους και προχωρημένους χρήστες, καθιστώντας το μια εξαιρετική επιλογή για όποιον χρειάζεται να εγγράψει φωνή σε Mac.
- Εγγράφει ταυτόχρονα τον ήχο του μικροφώνου και του συστήματος.
- Υποστηρίζει εγγραφή ήχου υψηλής ποιότητας με ελάχιστη καθυστέρηση.
- Επιτρέπει την εγγραφή σε πλήρη οθόνη, παράθυρο ή προσαρμοσμένη περιοχή.
- Περιλαμβάνει εγγραφή από κάμερα web για εκπαιδευτικά βίντεο και podcast.
- Υποστηρίζει πολλαπλές μορφές εξαγωγής όπως MP3, AAC, FLAC, M4A και πολλά άλλα.

 Ασφαλής λήψη
Βήμα 1Λήψη και εγκατάσταση του λογισμικού
Μεταβείτε στον ιστότοπο του AVAide για να κατεβάσετε το λογισμικό. Ακολουθήστε τις οδηγίες εγκατάστασης στην οθόνη για να εγκαταστήσετε το λογισμικό με επιτυχία.
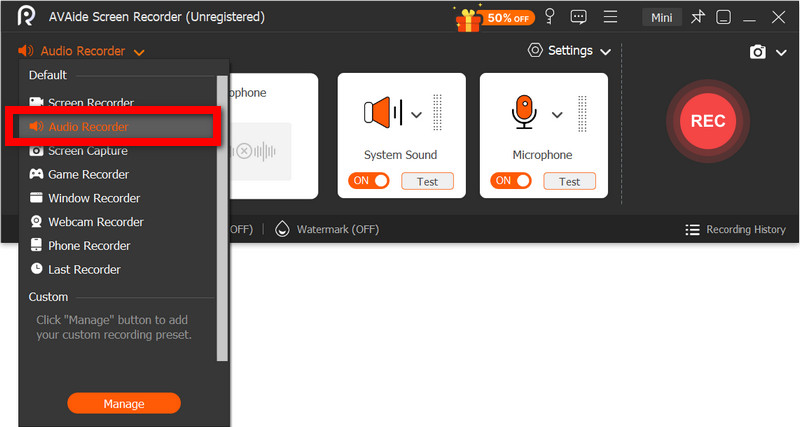
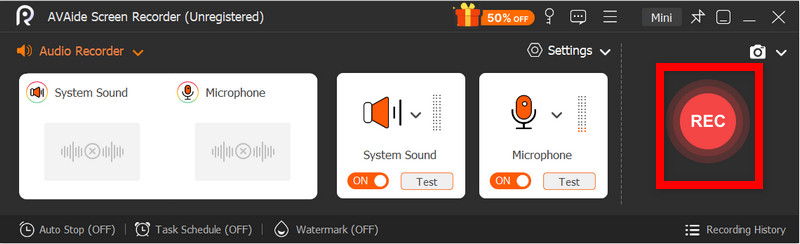
Βήμα 2Επιλέξτε Audio Recorder
Ανοίξτε το λογισμικό και από την κύρια σελίδα, επιλέξτε Συσκευή εγγραφής ήχου για να ηχογραφήσετε μόνο φωνή.
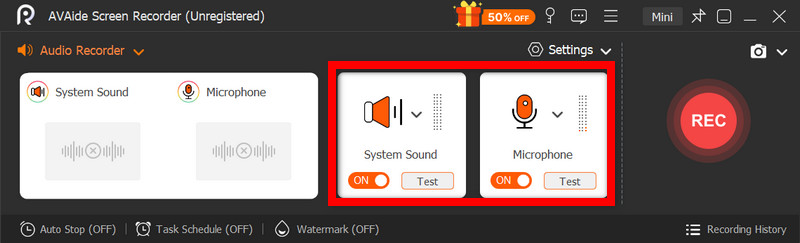
Βήμα 3Ενεργοποίηση μικροφώνου και ήχου συστήματος
Ενεργοποιήστε το Μικρόφωνο επιλογή για καθαρή ηχογράφηση φωνής. Ενεργοποιήστε την Ήχος συστήματος για να καταγράψετε τον εσωτερικό ήχο από το Mac σας.
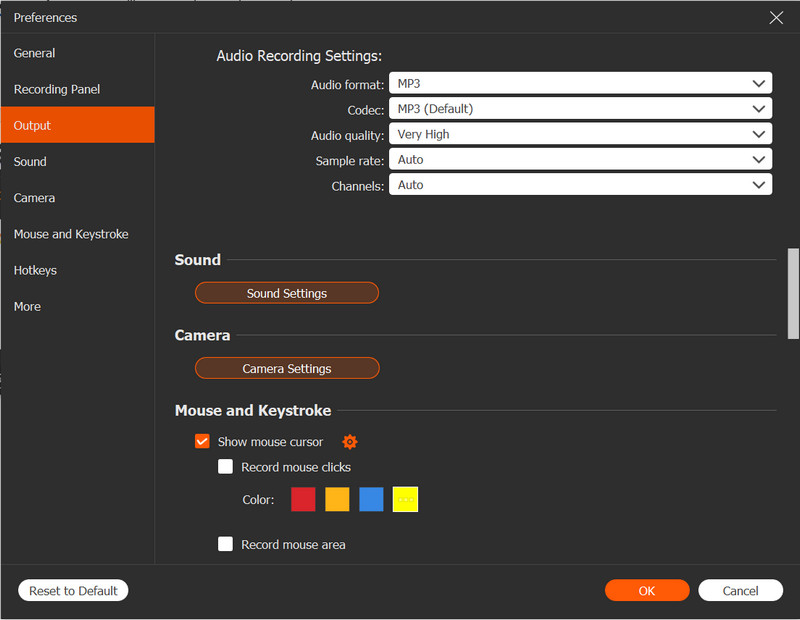
Βήμα 4Προσαρμογή ρυθμίσεων εγγραφής
Από το Ρυθμίσεις Στο μενού, επιλέξτε τη μορφή ήχου και την ποιότητα εξόδου που προτιμάτε. Προσδιορίστε την τοποθεσία αποθήκευσης και ρυθμίστε την ένταση ήχου για το μικρόφωνο και τον ήχο συστήματος.
Βήμα 5Ξεκινήστε την εγγραφή
Επίλεξε το REC επιλογή για να ξεκινήσετε την ηχογράφηση της φωνής σας. Κατά τη διάρκεια της περιόδου ηχογράφησης, μπορείτε να κάνετε παύση, να συνεχίσετε ή να προσθέσετε σημειώσεις.
Βήμα 6Αποθήκευση και προεπισκόπηση
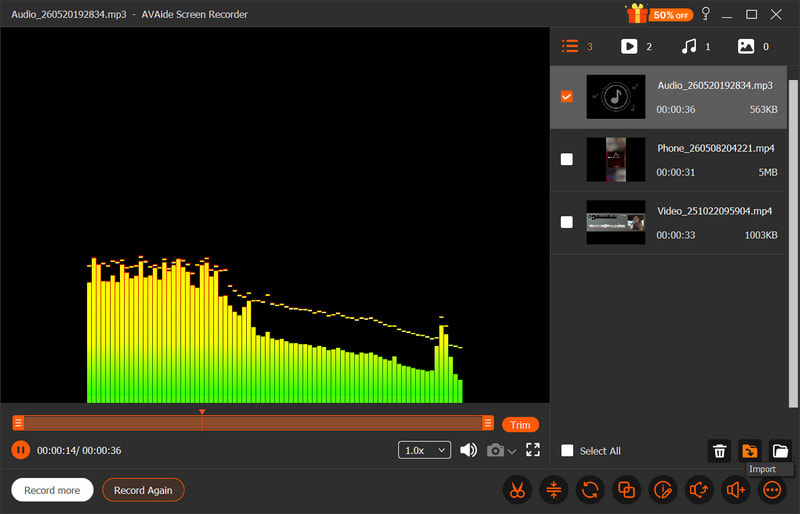
Επίλεξε το Να σταματήσει επιλογή τερματισμού της ηχογράφησης. Στη συνέχεια, μπορείτε να περικόψετε τον ήχο και να αποθηκεύσετε τον ηχογραφημένο ήχο στον Mac σας.
2. Χρήση του Audacity
Το Audacity είναι μια εύχρηστη, ισχυρή, δωρεάν συσκευή εγγραφής και επεξεργασίας ήχου για Mac. Συχνά προτιμάται έναντι άλλων επιλογών για podcast και μουσικά έργα λόγω των απλών ροών εργασίας και των επαγγελματικών λειτουργιών του, όπως η μείωση θορύβου, η περικοπή και η βελτίωση ήχου. Ακόμα και με όλα αυτά τα χαρακτηριστικά, το Audacity διαθέτει ένα απλό περιβάλλον εργασίας χρήστη, καθιστώντας το μια εξαιρετική επιλογή για αρχάριους.
Βήμα 1Κατεβάστε το Audacity και εγκαταστήστε το στον Mac σας. Ανοίξτε την εφαρμογή όταν ολοκληρώσετε την εγκατάσταση.
Βήμα 2Επιλέξτε την είσοδο ήχου σας. Ορίστε την είσοδο στη συσκευή ήχου σας και προσαρμόστε το επίπεδο λήψης.
Βήμα 3Όταν είστε έτοιμοι για εγγραφή, πατήστε το Ρεκόρ κουμπί και αρχίστε να μιλάτε στο μικρόφωνό σας.
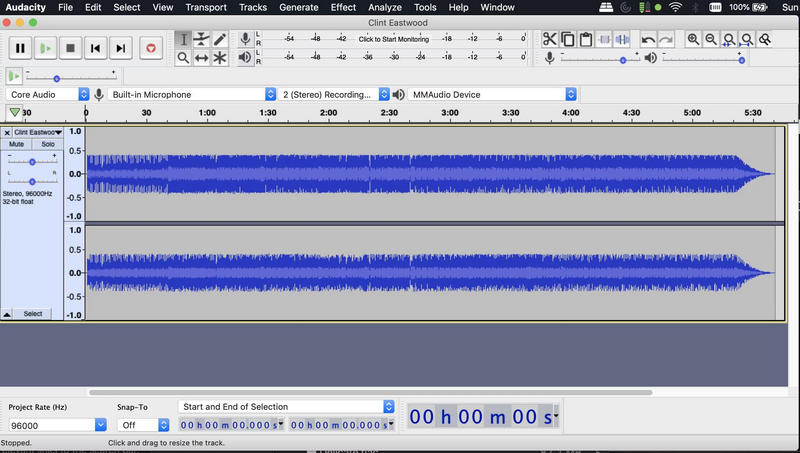
Βήμα 4Όταν ολοκληρωθεί η εγγραφή, πατήστε το κουμπί Να σταματήσει κουμπί.
Βήμα 5Όταν είστε ικανοποιημένοι με την εγγραφή, επιλέξτε το έργο που θέλετε να εξαγάγετε μεταβαίνοντας στο Αρχείο > Εξαγωγή. Επιλέγω MP3, WAVή άλλη επιλογή εξαγωγής ήχου.
3. Χρήση του GarageBand
Μια εξαιρετική εναλλακτική λύση για το Audacity είναι το GarageBand, μια ιδιόκτητη εφαρμογή της Apple προεγκατεστημένη σε όλα τα Mac. Το GarageBand διαθέτει όλα τα ίδια χαρακτηριστικά με το Audacity και πολλά άλλα, όπως μουσικά εργαλεία και ηχητικά εφέ. Το GarageBand είναι ακόμα καλύτερο για μουσικές παραγωγές και χρησιμοποιείται ευρέως για... ηχογράφηση podcast συνεδρίες, φωνητικές εντολές και ηχητικά έργα υψηλής ποιότητας με επαγγελματικό έλεγχο ήχου.
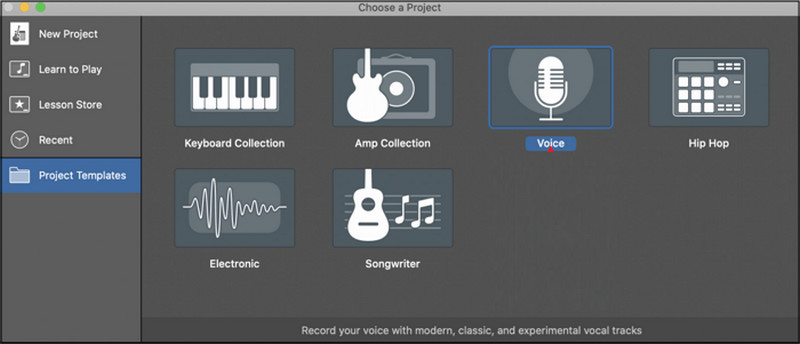
Βήμα 1Εκκινήστε το GarageBand και επιλέξτε Νέο έργο, επιλέγοντας την επιλογή Φωνή.
Βήμα 2Επιλέξτε την είσοδο με την οποία θέλετε να κάνετε εγγραφή. Αν θέλετε, ενεργοποιήστε την Παρακολούθηση ήχου για να ακούτε τη φωνή σας κατά την εγγραφή.
Βήμα 3Κτύπημα Ρεκόρ και ξεκινήστε τη συνεδρία σας.
Βήμα 4Όταν ολοκληρώσετε την ηχογράφηση, πατήστε το κουμπί Να σταματήσει κουμπί. Χρησιμοποιήστε τις λειτουργίες επεξεργασίας και ρύθμισης ήχου στο GarageBand για να βελτιώσετε την ηχογράφηση σας.
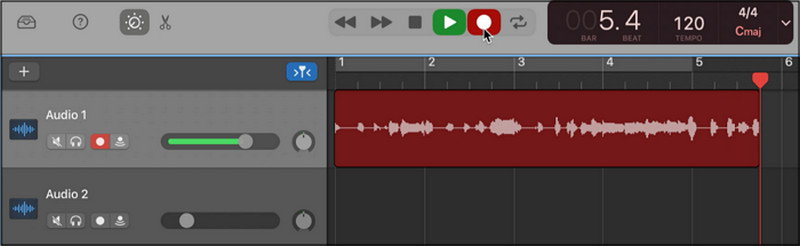
Βήμα 5Εξαγάγετε το ολοκληρωμένο ηχητικό έργο στην επιθυμητή ποιότητα και μορφή στον Mac σας.
Μπόνους συμβουλές
1. Πώς να εγγράψετε ήχο από το YouTube σε Mac
Για να καταγράψετε ήχο από το YouTube, διαδικτυακά μαθήματα, διαδικτυακά σεμινάρια και την αναπαραγωγή podcast και μουσικής στον Mac σας, μπορείτε να χρησιμοποιήσετε το OBS Studio, ένα δωρεάν λογισμικό εγγραφής για βίντεο οθόνης και ζωντανή ροή. Δεδομένου ότι το OBS Studio προσφέρει υψηλής ποιότητας ηχογραφήσεις ήχων συστήματος, είναι μια εξαιρετική επιλογή.
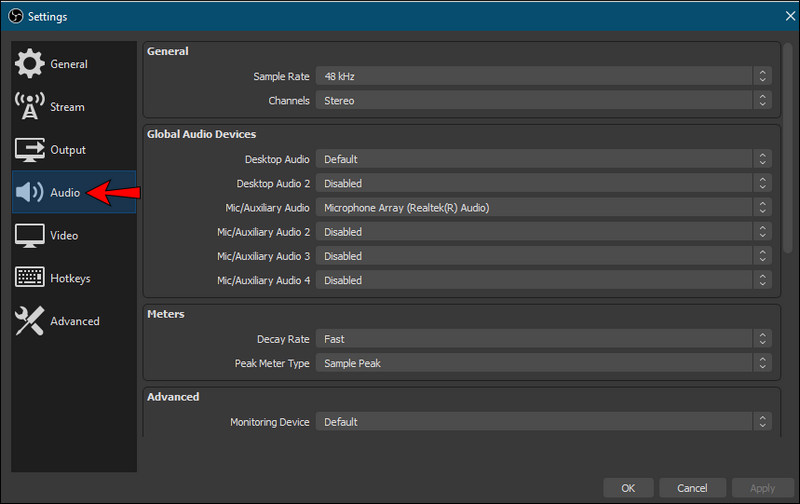
Βήμα 1Κατεβάστε και εγκαταστήστε το OBS Studio στον Mac σας και ανοίξτε το λογισμικό όταν εγκατασταθεί.
Βήμα 2Δημιουργήστε μια νέα πηγή στο Ήχος και επιλέξτε τη συσκευή ήχου συστήματος ή το εικονικό πρόγραμμα οδήγησης ήχου.
Βήμα 3Ανοίξτε το YouTube στο πρόγραμμα περιήγησης και φορτώστε το βίντεο/ήχο που θέλετε να εγγράψετε.
Βήμα 4Χτύπα το Ξεκινήστε την εγγραφή και, στη συνέχεια, αναπαράγετε κανονικά το βίντεο/ήχο του YouTube.
Βήμα 5Περιμένετε μέχρι να ολοκληρωθεί η εγγραφή του ήχου και, στη συνέχεια, πατήστε το κουμπί Να σταματήσει και εντοπίστε το αρχείο ήχου, το οποίο είναι πλέον αποθηκευμένο στον Mac σας.
2. Πώς να εγγράψετε ήχο σε Mac με εξωτερικό μικρόφωνο
Ο ήχος από εξωτερικά μικρόφωνα, στις περισσότερες περιπτώσεις, έχει υψηλότερη ποιότητα ήχου σε σύγκριση με το εσωτερικό μικρόφωνο σε Mac. Τα μικρόφωνα USB έχουν άμεση σύνδεση σε Mac. Ωστόσο, τα μικρόφωνα XLR ενδέχεται να χρειάζονται μια διεπαφή ήχου για καλύτερη ποιότητα ήχου και χαμηλότερο θόρυβο. Χρησιμοποιώντας το καλύτερη εγγραφή οθόνης για Mac μπορεί επίσης να βοηθήσει στην καταγραφή πιο καθαρών εγγραφών κατά τον συνδυασμό εργασιών ήχου και βίντεο.
Βήμα 1Συνδέστε το μικρόφωνο που έχετε επιλέξει στον Mac σας, ανοίξτε Ρυθμίσεις συστήματος, πηγαίνετε στο Ήχοςκαι ορίστε το μικρόφωνο που μόλις συνδέσατε ως συσκευή εισόδου.
Βήμα 2Ρυθμίστε την ένταση εισόδου του μικροφώνου και δοκιμάστε τον ήχο για να βεβαιωθείτε ότι η φωνή σας ανιχνεύεται καθαρά.
Βήμα 3Ανοίξτε το λογισμικό εγγραφής που προτιμάτε, όπως το AVAide Screen Recorder.
Βήμα 4Επιλέξτε το εξωτερικό μικρόφωνο στις ρυθμίσεις του λογισμικού και ξεκινήστε την ηχογράφηση της φωνής ή της ηχητικής σας συνεδρίας.
Βήμα 5Διακόψτε την εγγραφή, ελέγξτε την ποιότητα του ήχου και αποθηκεύστε ή εξαγάγετε το τελικό αρχείο ήχου στον Mac σας.
Εγγραφή φωνής Mac εύκολα χρησιμοποιώντας ενσωματωμένα εργαλεία όπως το QuickTime και το Voice Memos ή προηγμένο λογισμικό για ηχογραφήσεις επαγγελματικής ποιότητας. Είτε χρειάζεστε εσωτερικό ήχο, αφήγηση podcast είτε ηχογραφήσεις διαλέξεων στο διαδίκτυο, αυτές οι μέθοδοι παρέχουν αξιόπιστους τρόπους για να καταγράφετε καθαρό ήχο αποτελεσματικά στον Mac σας.
ΣΧΕΤΙΚΑ ΜΕ ΤΟΝ ΣΥΓΓΡΑΦΕΑ

Καταγράψτε δραστηριότητες οθόνης με ήχο, διαδικτυακές συσκέψεις, βίντεο παιχνιδιού, μουσική, κάμερα web κ.λπ.