Removing a background is easy in theory, but harder in practice. Fine edges, soft shadows, and low contrast often cause issues. This article explains how to remove the background from a picture in Photoshop using simple steps that work on real images. You will understand what makes photos cut and not cut, and those that require more attention. It is all about sharp lines, pure transparency and consistent outcomes. Both techniques leverage the built-in Photoshop tools, which you can rely on. No magic, no magic, just a straightforward procedure. The article will kick off each method at a time, so that you may select the best method to suit your image.
- Part 1: Make Image Background Transparent with Remove Background
- Part 2: Make Image Background Transparent in Photoshop with Quick Selection
- Part 3: Make Image Background Transparent in Photoshop with Eraser
- Part 4: Make Image Background Transparent in Photoshop Elements
- Part 5: The Easiest Way to Remove Image Background
Part 1: Make Image Background Transparent with Remove Background
The Remove Background tool is the fastest way to get started in Photoshop. It works best when the subject is clear, and the background is simple. This method is ideal for quick edits where speed matters more than fine detail. This section explains how to remove background from an image in Photoshop using the built-in Remove Background feature, while also showing where the tool may fall short on complex edges.
Step 1Sign in to Photoshop and upload your image. Click Create + from the left menu or select Upload file on the welcome screen. Once the image opens, confirm it is active in the editing area.
Step 2Select the image. At the bottom of the editing screen, click Remove background. Photoshop scans the image, finds the main subject, and deletes the surrounding background.

Step 3The background is removed and replaced with transparency. Review the edges for rough cuts or missing details. For images with hair or shadows, additional tools may be needed to refine the result.
Part 2: Make Image Background Transparent in Photoshop with Quick Selection
The Quick Selection tool provides more control over the removal compared to the one-click. It applies Adobe Sensei to identify edges as you paint to make it valuable on images whose contrast is clear and more detailed. The technique is effective in instances where the subject is distinguished, although it must be carefully chosen. This section explains how to remove the background from an image in Photoshop using Quick Selection, step by step, without overcomplicating the process.
Step 1Sign in to Photoshop and upload your image. Click Create + from the left menu or choose Upload file from the welcome screen. Make sure the image is active in the workspace.
Step 2Go to the top toolbar and click Select. From the dropdown options, choose Quick Selection. In the tool settings, turn on Detect objects so Photoshop can recognize the main subject.

Step 3Hover over the subject you want to keep and select it. Photoshop highlights the detected subject with a pink overlay and moving edge lines. This confirms the correct area is selected.
Step 4On Windows, copying is done by pressing Ctrl + C, and on Mac, it is done by pressing CMD + C. This only takes the subject and not the background.
Step 5In the Layers panel, click the + button to create a new layer. Select the new layer, then press Ctrl + V or CMD + V to paste the subject.
Step 6Press the eye button beside the original image layer in order to conceal it. You are now left with a clean subject on a transparent background, ready for export or further editing.
Part 3: Make Image Background Transparent in Photoshop with Eraser
The Eraser tool gives you direct control over every part of the background removal process. It works best when you need to remove small sections by hand or clean up areas that automatic tools miss. This method requires patience, but it is useful for irregular shapes and detailed edges. This section shows how Photoshop removes the background from an image using the Eraser tool in a careful, manual way.
Step 1Sign in to Photoshop and upload your image. Click Create + from the left menu or choose Upload file from the welcome screen. Confirm the image is open and active in the workspace.
Step 2Click Paint in the left menu, then choose the Eraser option. The eraser appears as a circular cursor over the image.
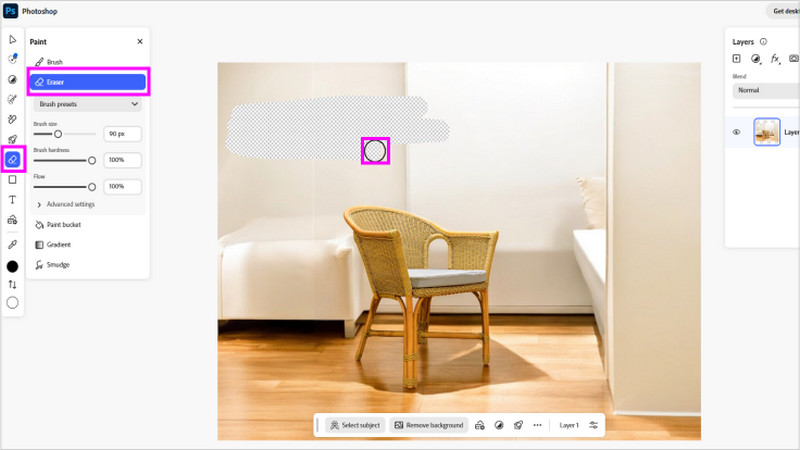
Step 3Change the brush size to match the area you want to erase. Use a softer edge for smooth blending and a harder edge for sharp lines. Smaller brushes help protect the subject edges.
Step 4Slowly move the eraser over the background areas. Zoom in when working near fine details to avoid removing parts of the subject. Work in short strokes for better control.
Step 5Check the image for uneven edges or missed spots. When finished, click the blue Download button in the top menu bar to save your image with a transparent background.
Part 4: Make Image Background Transparent in Photoshop Elements
Removing a background in Photoshop Elements is simple when the image has a solid color. This photo background editor app works best for clear, single-color backgrounds and offers a fast way to achieve transparency. This section explains how to remove background from a picture in Photoshop using the Magic Eraser and basic layer adjustments.
Step 1On the Photoshop Elements home page, click File, then Open. Select the image you want to edit and click Open in the pop-up window. The image will appear in the workspace, ready for editing.
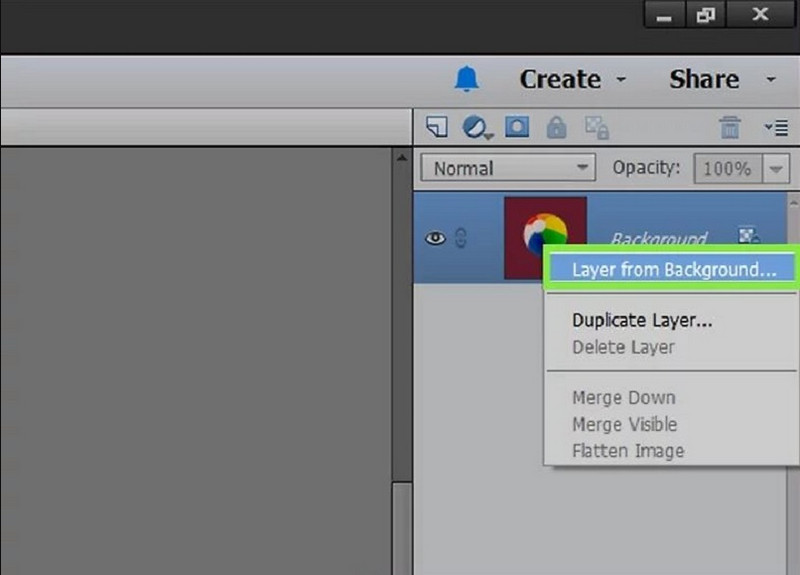
Step 2In the Layers panel on the right, locate the original Background layer. Right-click it and select Layer From Background, then press OK. This converts the locked background into a standard layer, allowing full edits.
Step 3In the left toolbar, Eraser is selected, and at the bottom of the screen, Magic Eraser is selected. It is faster to clear solid backgrounds because this tool automatically removes areas of similar color.
Step 4Adjust the tolerance to be between 20 and 30 in order to eliminate portions of the subject. Make sure that Contiguous and Anti-alias are on, and the Opacity is set to 100. These environments produce smoother edges and maintain the subject.
Step 5Click on the background to erase it. If any areas remain or were removed accidentally, use Ctrl + Z or Command + Z to undo actions. Apply the standard Eraser tool that has a soft brush to the remaining parts. Adjust brush size and hardness when required, with a hardness of about 10 percent. To the edges to form a smooth.
Step 6After making the background completely transparent, go to File and Save As, give it a name and select a file format that allows transparency, like PNG, PSD, or GIF. Click Save to finish. Now that you have removed it, you can add a background color to the photo.
Part 5: The Easiest Way to Remove Image Background
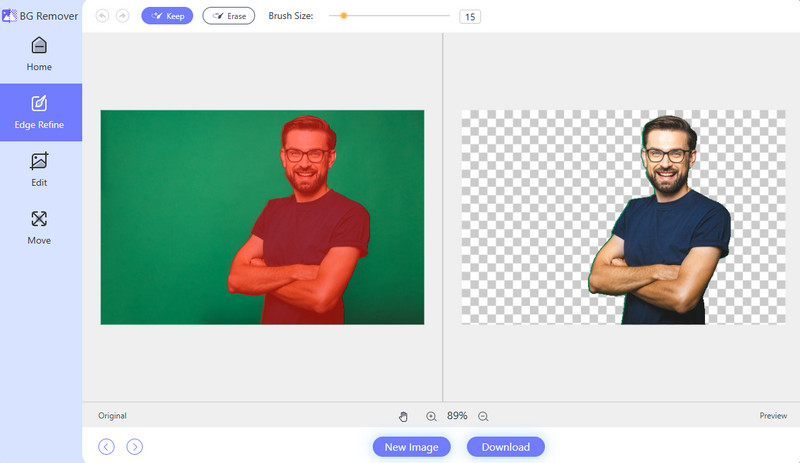
AVAide Background Eraser is a simple and effective tool to use in order to erase the background quickly. It is online, no need to install, and it supports many types of images. The user-friendly interface enables one to erase the background or add a color within a few seconds, which is perfect in case of novices or those who seek quick solutions but do not need advanced software. Coming to terms with how to remove the white background of an image in Photoshop can be overwhelming, which explains the usefulness of this tool. AVAide has clean, reliable results at minimal effort.
Removing a background in Photoshop is simple with the right tools. Whether using automatic, manual, or online methods, you can get clean, transparent results. This guide shows how to remove the background from an image in Photoshop confidently.

Uses AI and automated background removal technology to capture complex backgrounds from JPG, JPEG, PNG, and GIF.
PROCESS NOW