The attempt at enlarging photos results in distorted images with visible pixel areas. Time has passed since your last photo enlargement attempt, and you will experience astonishment at the progress of technology. AI-powered photo enlargers have entirely transformed the process, using deep learning to restore details, sharpen edges, and enhance textures—without sacrificing quality. The functionality of these tools remains unclear, as well as their effectiveness in producing excellent results.
Part 1. What Are Photo Enlargements Used for
A photo enlargement goes beyond mere size modifications because businesses and individuals rely on it to fulfill essential needs. Photo enlargers are powerful tools for improving image resolution because they can handle various tasks, including old photo restoration, ample print preparation, and digital image optimization. Three primary reasons lead people to use photo enlargements include:
1. Restoring and Preserving Old Photos
Old photos with small dimensions present obstacles to observing delicate pictorial information. The enlargement process protects vital pictures, including ancestral item records and childhood images. AI photo enhancement software restores faded photographs while minimizing grain and color distortion and creates vibrant, high-resolution results from damaged historical imagery.
2. Optimizing Posters, Banners, and Artwork
Artists, photographers, and designers must enlarge their images for printing. Professional printing requires High-resolution enlargements to deliver crisp and appealing displays on posters, banners, and gallery artworks. A top-quality photo enlarger helps maintain the original definition of details, so large-format printing produces crisp output with increased photo DPI.
3. Enhancing Product Images for E-commerce
E-commerce businesses need great product images to attract customers to their stores. Product photos need resizing for different online platforms. Users must keep the resolution and detail high while doing this. AI-based enlarging technology helps businesses make blurry images clear. This creates professional-quality product photos. As a result, customer engagement and sales increase.
4. Improving Social Media & Digital Marketing
Marketers need to adjust their images for different platforms. They should keep quality resolution and visual appeal. Larger images are great for Instagram posts, YouTube thumbnails, and banner ads. Photo enlargers help keep the clarity when you resize images. Artificial intelligence tools improve textures and details, leading to attractive digital content.
5. Upscaling Images
The only available digital imagery is usually in reduced file quality or static screenshot formats. Users no longer need to tolerate poor image quality or blurry pixelation because modern photo enlargers enhance the resolution level and detail accuracy. Such graphic files function well in presentations and documents alongside other digital content while preserving image quality.
Part 2. How to Use a Photo Enlarger to Enlarge Photos
Follow the tutorial here to learn how to enlarge photos without losing quality. But remember that this procedure can only be completed if you have the equipment at your reach.
Step 1. Setting Up the Photo Enlarger
You must locate a darkroom space or a wholly darkened area free from light to handle photo development. Placing the enlarger on a solid platform, using proper power outlets, and checking the equipment works without issues. The negative film that needs insertion must fit into the enlarger's negative carrier and properly align before continuing. The head of the enlarger adjusts vertically to modify image size, and a focus knob enhances the projected picture on either the baseboard or easel. After image clarity meets your expectations, choose the appropriate lens aperture to manage lighting exposure and contrast level.
Step 2. Exposing the Photo Paper
You should position light-sensitive photographic paper carefully on the easel where the projected image will fall. Set the paper in the correct position according to composition needs. The enlarger timer allows users to decide how much time light remains on the paper, which generally takes between a few seconds based on image brightness. The selected exposure time can be determined through a test strip sequence where different paper segments receive light adjustments for the perfect exposure. The final step is to expose the entire sheet of paper after finding the correct timing parameters for development.
Step 3. Developing the Enlarged Photo
The image should be transferred to the photographic developer solution tray after displaying it on the paper surface. Use gentle agitation of the tray during development because it takes one to two minutes to achieve an even outcome. The development process must be stopped with a stop bath before transferring the paper to a fixer solution to create a permanent image. Dry the photo by hanging it in a clean area free of dust until complete drying is achieved. Your enlarged photo reaches completion after complete drying.
Part 3. How to Enlarge Photo Without Losing Quality Online
AVAide Image Upscaler is a free online tool. It uses smart AI to enlarge images by up to 8x. Best of all, it keeps the quality high. Traditional methods can cause pixelation and blurriness. AVAide fixes that. It sharpens images, cuts down noise, and keeps textures intact. This leads to clear, high-quality results. This tool is great for old, low-res, or print photos. It gives professional results in seconds. Simply upload your image to get started.
Designed for beginners and professionals, AVAide Image Upscaler is easy to use. Just choose from scaling options like 2x, 4x, or 8x, and the AI will automatically enhance your image. You don't need to download anything. Its web-based features make it easy and efficient to enlarge photos without losing quality. Below is a step-by-step guide on how to enlarge a photo using AVAide Image Upscaler.
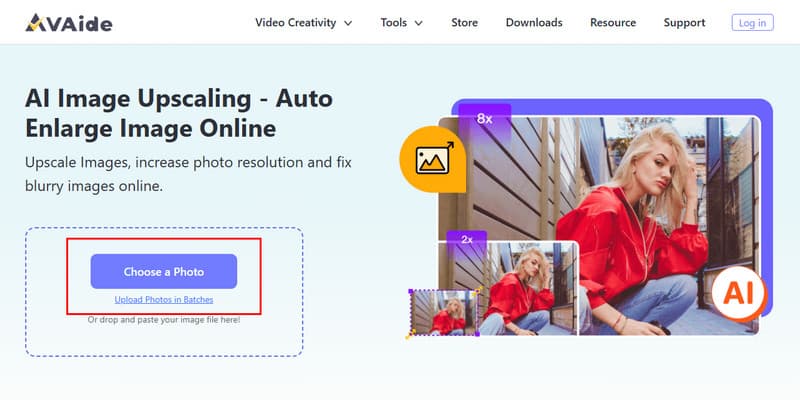
Step 1Open a new tab on your browser and search the official webpage of AVAide Image Upscaler to use it.
Step 2Here, prepare the image you want to enlarge and click the Choose a Photo to import it.
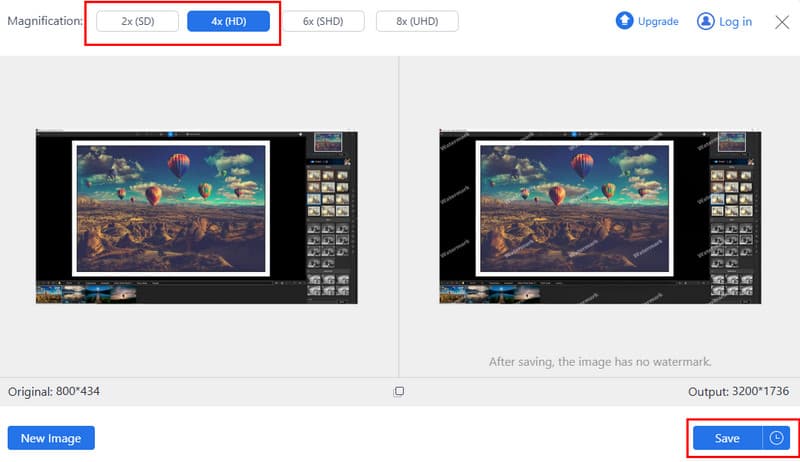
Step 3Wait for the loading process, then choose the magnification level you want to apply, such as 2x, 4x, 6x, or 8x. After selecting the magnification, you must wait until the process is complete. To get a copy of it, click the Save button. As easy as that, you have learned how to enlarge pictures for printing and other purposes with the help of this AI image upscaler.
There are ways to enlarge a printed photo like the ones we have added in this article. However, you will need the appropriate tools or find a service that enlarges your photo's size. But, if you want to enlarge a digitalized photo saved on your device quickly, then the AVAide tool is for you. It matches your original image, so enlarge it without distorting the quality. Plus, with the selection of magnification levels, selecting the proper size is not limited to one. Try it now to see how powerful the app is in helping you enlarge your images quickly and for free.

Our AI technology will automatically enhance the quality of your images, remove noise and fix blurry images online.
PROCESS NOW