Download AVAide Video Converter and install it following the on-screen instructions. It may take a few seconds to finish the installation. Then launch it on your computer.
AVAide Video Converter supports the trial version which has limitations. To enjoy the full functions, you can registfer the software.
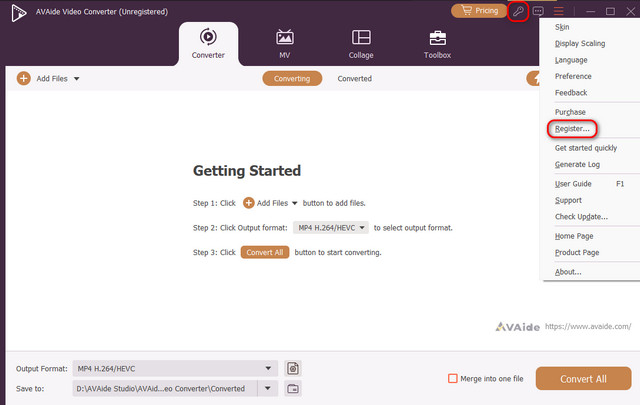
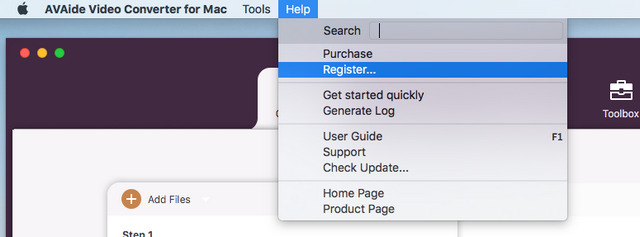
Method 1 Each time when you start AVAide Video Converter on your computer, you can register it by clicking Register at the bottom-right of the window popping up.
Method 2 If you close the window by accident, don’t worry. Click the Register button (a key image) or click the Menu button and then choose Register….
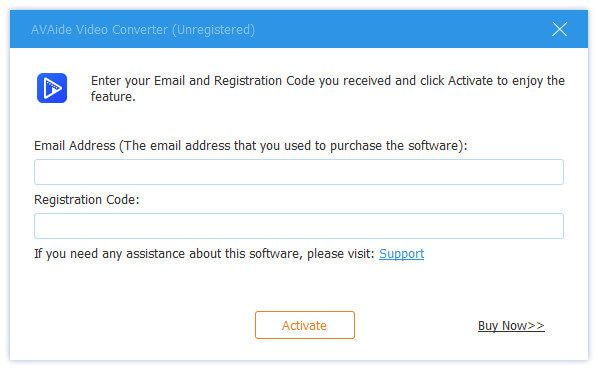
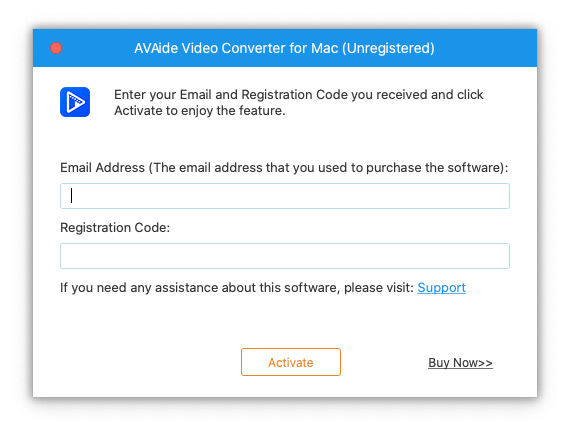
Enter your Email Address you used to purchase the software and the Registration Code you received. Then click Activate to enjoy the full feature of the registered version.
AVAide Video Converter will fix bugs and add functions from time to time. Please make sure that the software on your computer is the latest version.
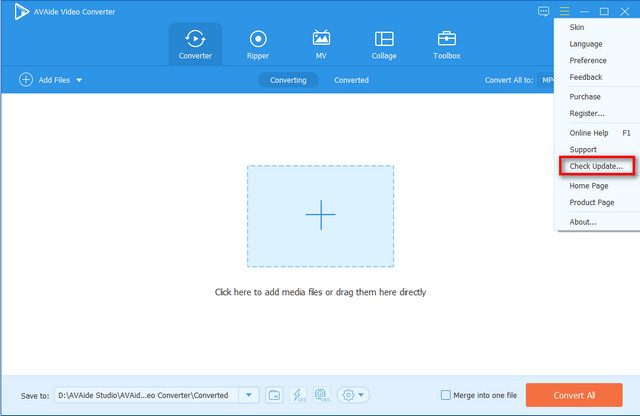
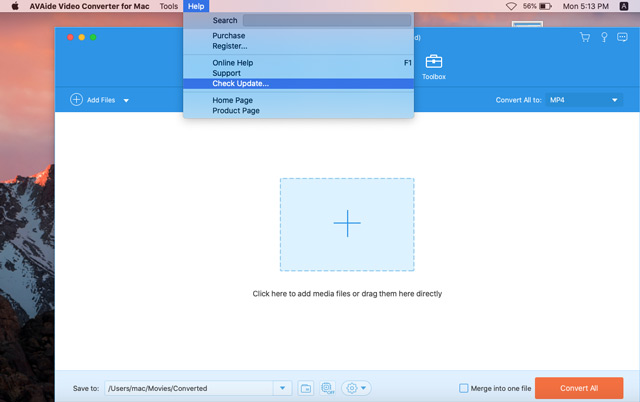
Method 1 Click the Menu button and choose Check Update…. After the Updates Checking, you can download and install the latest version if there is an update.
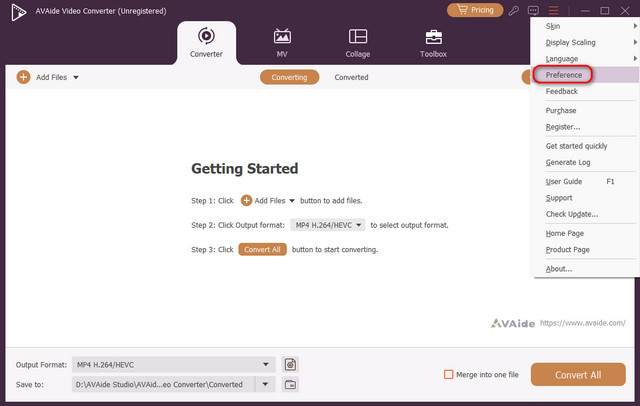
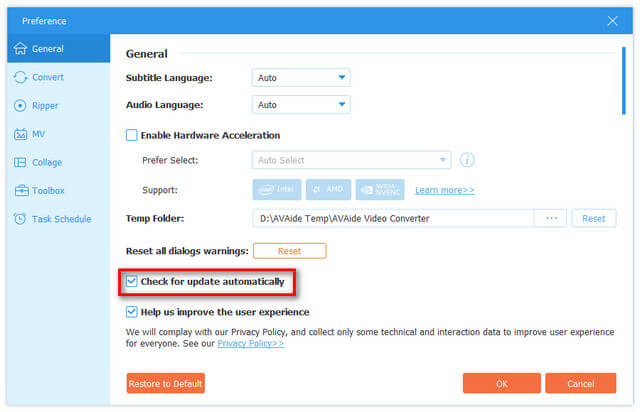
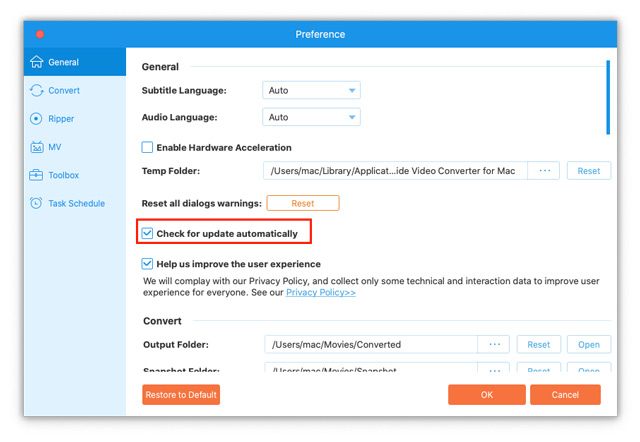
Method 2 Choose Preference from the menu popping up.
Check Check for update automatically. Then you’ll be notified when there is an update.
Method 3 Visit our website to download and install the latest version.
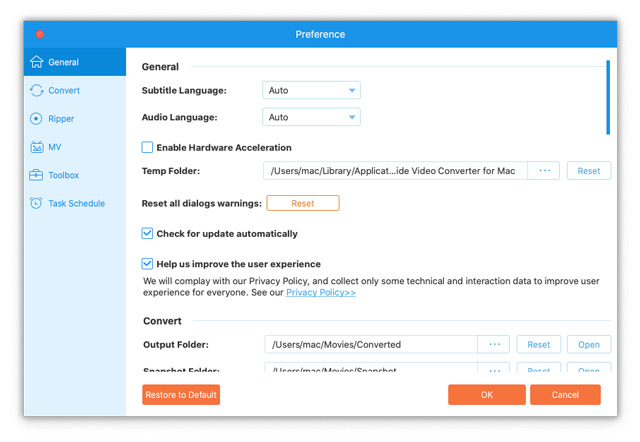
Click the Menu button and choose Preference. You can adjust all the settings according to your operating habits.
1. General Preference
You can adjust Subtitle Language and Audio Language. You can also choose to Enable Hardware Acceleration to get better experience. Choose the Temp Folder. We recommend you to Help us improve the user experience to update the software.

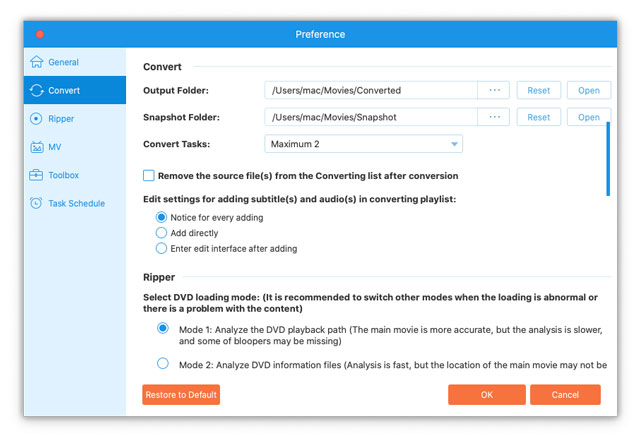
2. Converter Preference
Here you can choose the Output Folder and Snapshot Folder. You can also set the maximum Convert Tasks.

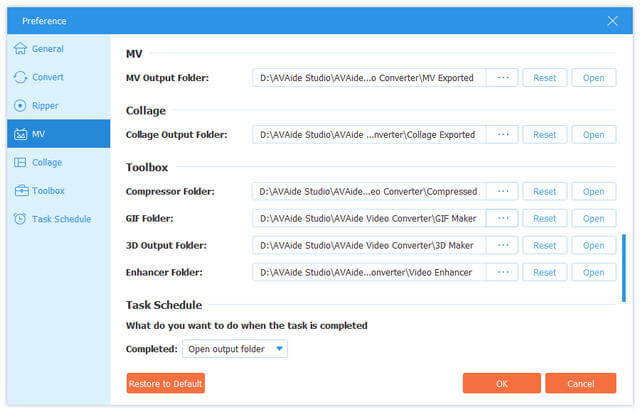
3. MV, Collage, and Toolbox Preference
You can change the Output Folder for each when the operation is over.
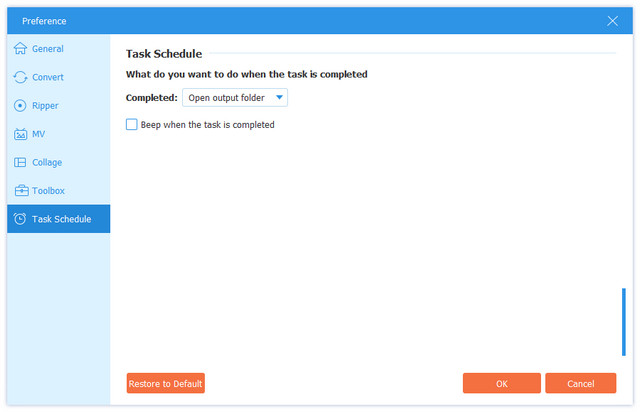
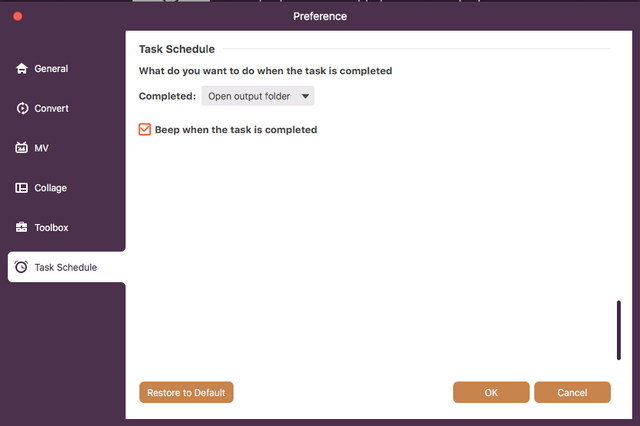
4. Task Schedule Preference
Select the operation and whether to let the software beep when the task is done here.
| Product Version | Supported OS | CPU/Processor | RAM |
| Windows | Windows 11/10/8.1/8/7 (32-bit/64-bit) | 1GHz Intel/AMD CPU or above | 2GB RAM or above |
| Mac | macOS 10.12 – 26 | 1GHz or above Intel and Apple Silicon processor | 2GB RAM or above |
| File Types | |
| 8K/5K Video | MP4, MKV |
| 8K/5K Video Encoding | H.265/HEVC |
| 4K UHD Video | MP4, AVI, FLV, WebM, TS, MKV, MOV, MXF |
| 4K UHD Encoding | H.265/HEVC, H.264, VP8, VP9, MPEG, XviD |
| HD Video | 3GP(*.3gp;*.3g2), AVI, DV Files (*.dv;*.dif), MOD, MJPEG (*.mjpg;*.mjpeg), Flash Files (*.flv;*.swf;*.f4v), MKV, MPEG (*.mpg;*.mpeg;*.mpeg2;*.vob;*.dat), MPEG4 (*.mp4;*.m4v), MPV, QuickTime Files (*.qt;*.mov), Real Media Files (*.rm;*.rmvb), TOD, Video Transport Stream Files (*.ts;*.trp;*.tp), Windows Media Files (*.wmv;*.asf) |
| Audio | AAC, AIFF Files (*.aif;*.aiff), CUE, FLAC, M4A, MPEG Files (*.mp3;*.mp2), Monkey’s Audio Files (*.ape), Ogg, Raw AC3 Files (*.ac3), Real Audio Files (*.ra;*.ram), SUN AU Files (*.au), WAV, WMA |
| Image | GIF |
| File Types | |
| Video | MPG, MPEG-1, MPEG-2, MPEG-4, H.264, H.264/MPEG-4 AVC, DivX, XviD, AVI, FLV, MP4, M4V, MKV, MOV, 3GP, 3G2, MTV, SWF, WMV, ASF, DPG, TS, MTS, M2TS, DV, VOB, AMV, WebM, MXF, MPEG, OGV, TRP, F4V |
| 8K/5K Video | 8K H.265/HEVC MP4, 8K H.265/HEVC MKV, 5K H.265/HEVC MP4, 5K H.265/HEVC MKV |
| 4K UHD Video | 4K H.265/HEVC Video(*.mp4), 4K H.264/MPEG-4 Video(*.mp4), 4K H.264 MOV Video(*.mov), 4K ProRes Video(*.mov), 4K ProRes_KS Video(*.mov), 4K MPEG-4 Video(*.mp4), WebM-VP8 4K WebM Video(*.webm), WebM-VP9 4K WebM Video(*.webm), 4K AVI Video(*.avi), 4K H.265/MKV Video(*.mkv), YouTube 4K Video(*.mp4) |
| HD Video | H.265/HEVC Video, H.264/MPEG-4 AVC, AVI, ASF, MKV, MOV, MPG, TS, MTS, M2TS, WMV, MP4, WebM, MKV, MXF, M4V, XviD, MPEG, OGV, DivX, TRP, MPG, FLV, F4V, SWF |
| 3D Video | MP4 Side by Side 3D, MP4 Top and Bottom 3D, MP4 Anaglyph 3D, MOV Side by Side 3D, MOV Top and Bottom 3D, MOV Anaglyph 3D, MKV Side by Side 3D, MKV Top and Bottom 3D, MKV Anaglyph 3D, WMV Side by Side 3D, WMV Top and Bottom 3D, WMV Anaglyph 3D, WebM Side by Side 3D, WebM Top and Bottom 3D, WebM Anaglyph 3D, M4V Side by Side 3D, M4V Top and Bottom 3D, M4V Anaglyph 3D, TS Side by Side 3D, TS Top and Bottom 3D, TS Anaglyph 3D, AVI Side by Side 3D, AVI Top and Bottom 3D, AVI Anaglyph 3D, FLV Side by Side 3D, FLV Top and Bottom 3D, FLV Anaglyph 3D, VOB Side by Side 3D, VOB Top and Bottom 3D, VOB Anaglyph 3D, TRP Side by Side 3D, TRP Top and Bottom 3D, TRP Anaglyph 3D, SWF Side by Side 3D, SWF Top and Bottom 3D, SWF Anaglyph 3D, ASF Side by Side 3D, ASF Top and Bottom 3D, ASF Anaglyph 3D, OGV Side by Side 3D, OGV Top and Bottom 3D, OGV Anaglyph 3D |
| Audio | AAC, AC3, AIFF, AMR, AU, FLAC, M4A, M4B, M4R, MKA, MP2, MP3, OGG, WAV, WMA, DTS, APE, ALAC |
| Image | GIF |
| Device Types | |
| Apple | iPhone 17, iPhone 17e, iPhone Air, iPhone 17 Pro, iPhone 17 Pro Max, iPhone 16, iPhone 16 Plus, iPhone 16 Pro, iPhone 16 Pro Max, iPhone 15, iPhone 15 Plus, iPhone 15 Pro, iPhone 15 Pro Max, iPhone 14, iPhone 14 Pro, iPhone 14 Pro Max, 14 Plus, iPhone 13, iPhone 13 Pro, iPhone 13 Pro Max, iPhone 13 mini, iPhone 12, iPhone 12 Pro, iPhone 12 Pro Max, iPhone 12 mini, iPhone 11, iPhone 11 Pro, iPhone 11 Pro Max, iPhone XS, iPhone XS Max, iPhone XR, iPhone X, iPhone 8, iPhone 8 Plus, iPhone 7, iPhone 7 Plus, iPhone SE, iPhone 6s, iPhone 6s Plus, iPhone 6, iPhone 6 Plus, iPhone 5s/5c, iPhone 5, iPhone 4S/4, iPhone 3GS, iPhone, etc. iPad 2019, iPad Pro, iPad Air, iPad mini with Retina Display, iPad mini, iPad 4, the new iPad, iPad 2, etc. iPod touch 7, iPod touch 6, iPod touch 5, iPod touch 4, iPod touch 3, iPod touch 2, iPod touch. Apple TV |
| Android | Samsung Galaxy, Motorola, Google, LG, Sony, HTC, etc. |
| Game hardware | Wii, PS4, PS3, PSP, NDS, Xbox |
| SoftwareTypes | |
| Editing software | iMovie, Final Cut Pro, Final Cut Express, Sony Vegas, Adobe Premiere, Avid Media Composer, etc. |
| File Types | |
| Output Video | FLV, SWF, DV, AMV, MTV, DPG, PSP Video MPEG4 (*.mp4), PSP Video H.264(*.mp4), PSP H.264 Video for TV(*.mp4), PSP H.264 Video for firmware 2.0 and above(*.mp4), PSP 3000 Video MPEG4 (*.mp4), PSP 3000 Video H.264(*.mp4), PS3 H.264 Video(480P)(*.mp4), PS3 H.264 HD Video(720P)(*.mp4), PS3 H.264 HD Video(1080P)(*.mp4), PS Vita MPEG-4 Video (*.mp4), PS4 H.264 HD Video (*.mp4), PSP GO Video MPEG4 (*.mp4), PSP GO Video H.264(*.mp4), PS Vita Video H.264 (*.mp4) |
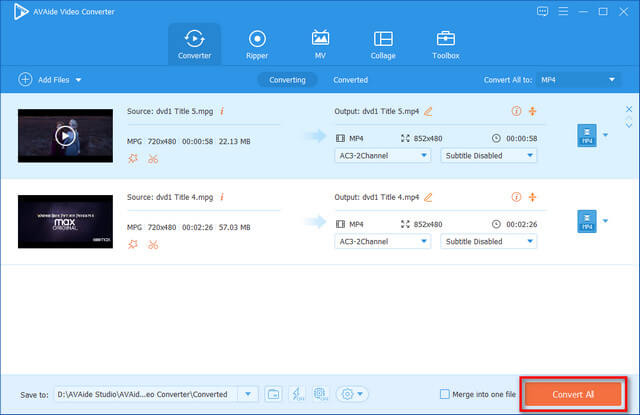
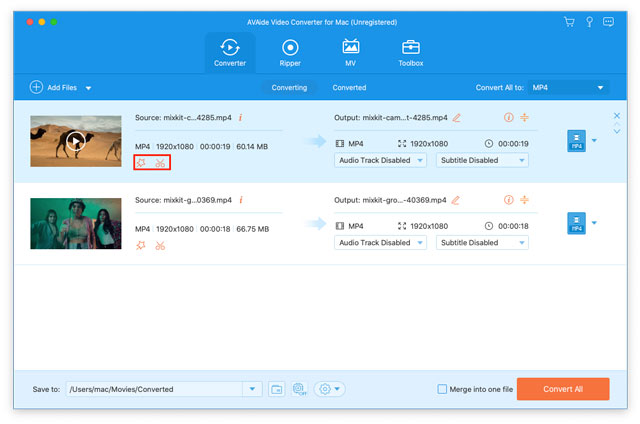
AVAide Video Converter can convert your video/audio files to any popular format quickly and conveniently. Follow the steps and try to convert your files on your own.
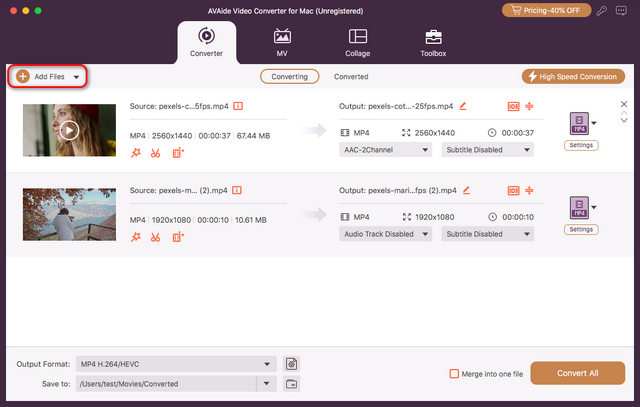
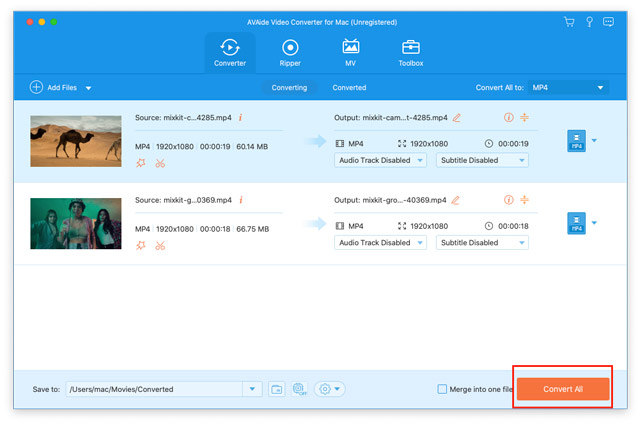
Step 1Add Files
Start AVAide Video Converter on your computer. Click Add Files at the top-left of the interface. Choose the folder or files you want to convert. You can also drag your files into the converter.

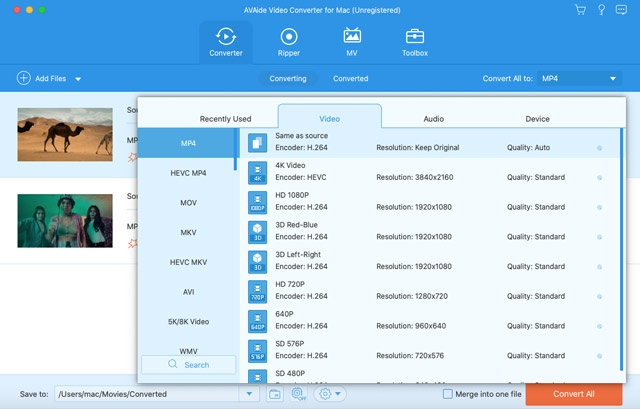
Step 2Choose Output Format
Click the inverted triangle next to Convert All to. Choose the format you want to convert your video/audio files to. If you need to keep the original quality, select Same as source.

Step 3Start Converting
Before conversion, you can change the folder where the converted file is kept by clicking the Folder icon. Then click Convert All to get your converted video/audio.
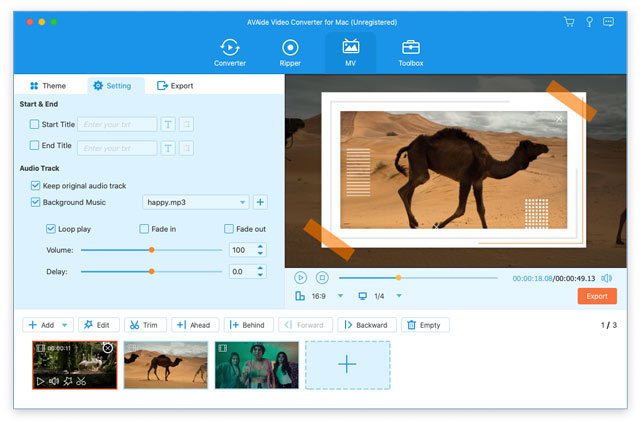
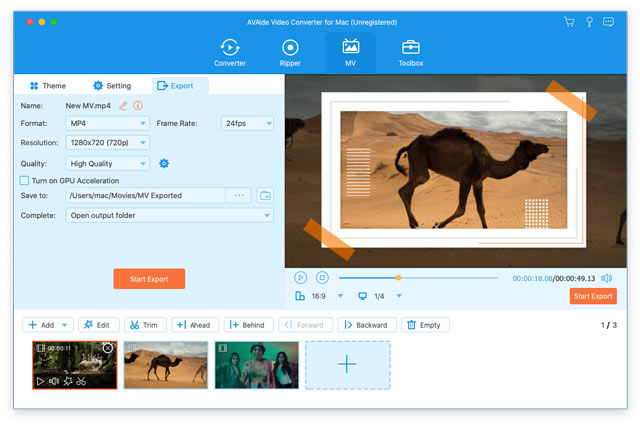
MV Maker provides you with multiple choices to make your own MV. You can add a theme or your favorite music to it.
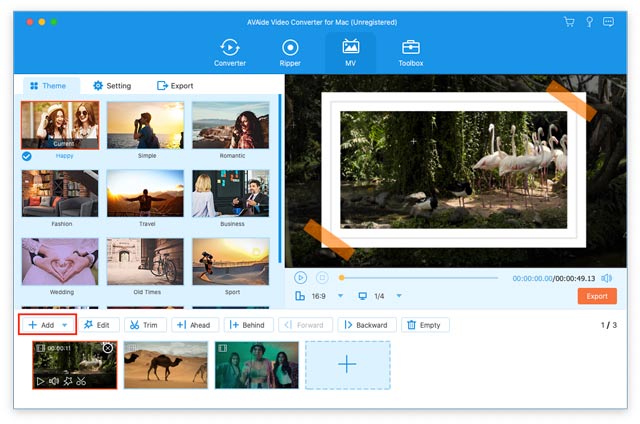
Step 1Upload Files
Start AVAide Video Converter on your computer. Click the Add button to add your video files to this program. You can rearrange the order of the added video by clicking Forward or Backward.
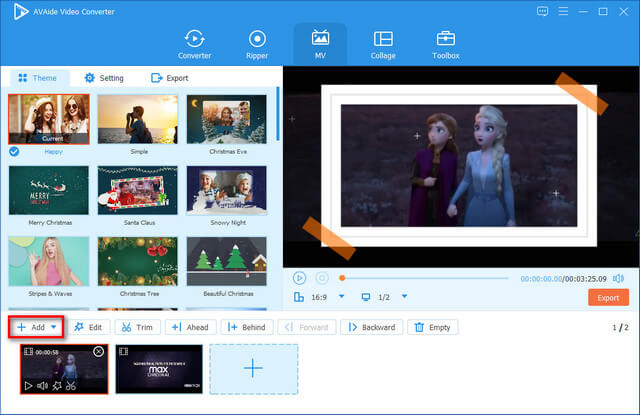
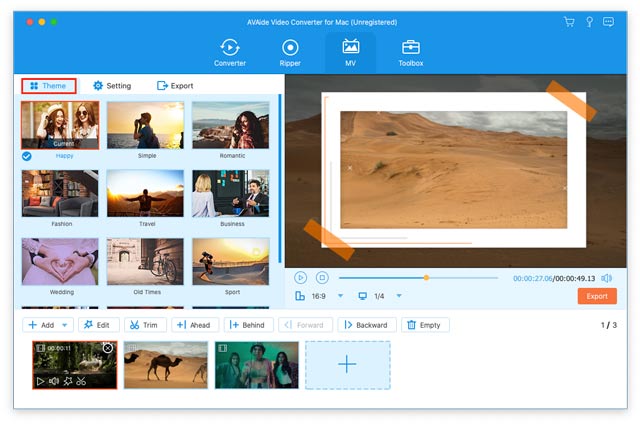
Step 2Add a Theme
Choose an appropriate theme for your video and you can preview it on the right.

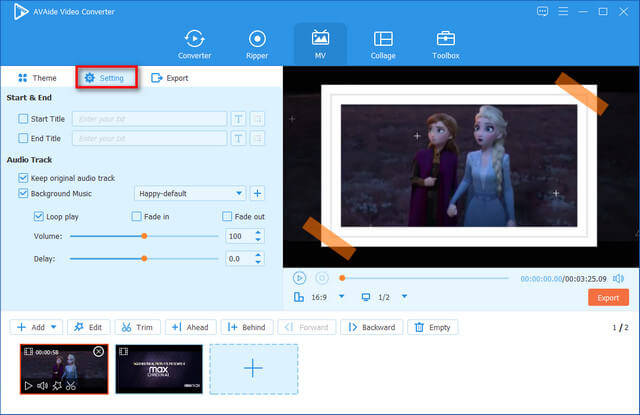
Step 3Set Title and Audio Track
Click Setting at the top of the interface. Enter the text you want to use as the Start Title and End Title. You can change the Background Music by clicking the Plus icon. Volume and Delay can also be adjusted.
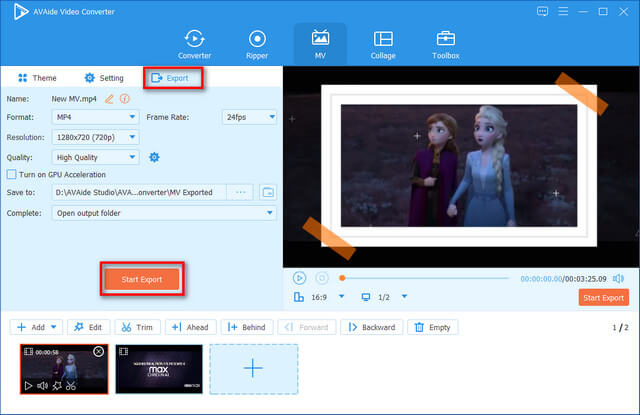
Step 4Export MV
Click Export and watch the music movie you made.
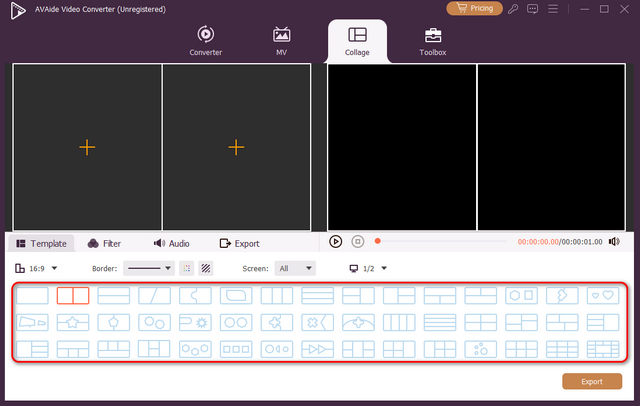
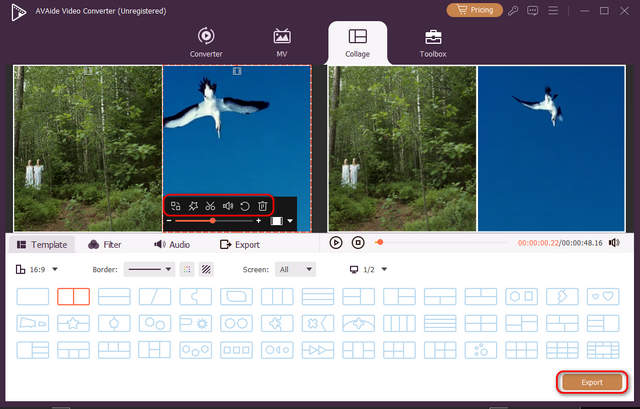
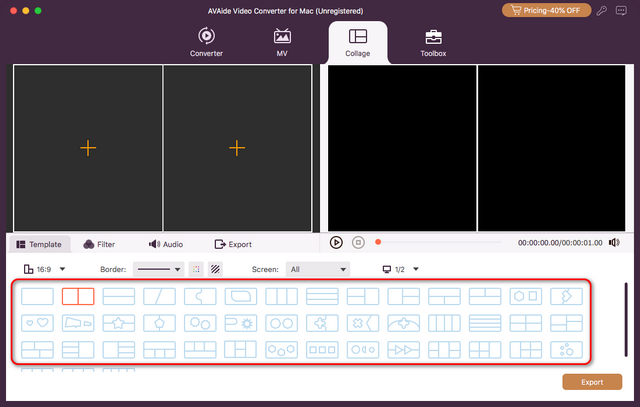
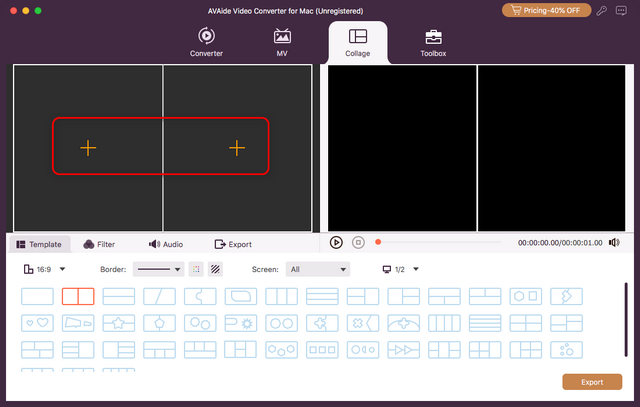
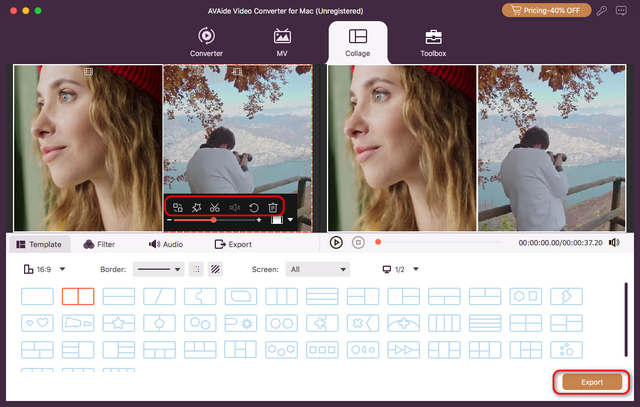
You can also make a video collage with this program. Video collage is very popular and can help you create appealing videos on social media.
Step 1 Choose the Collage tool on the top ribbon. Then, you can select a desired video collage template.
Step 2 Click the Add button to import your videos.
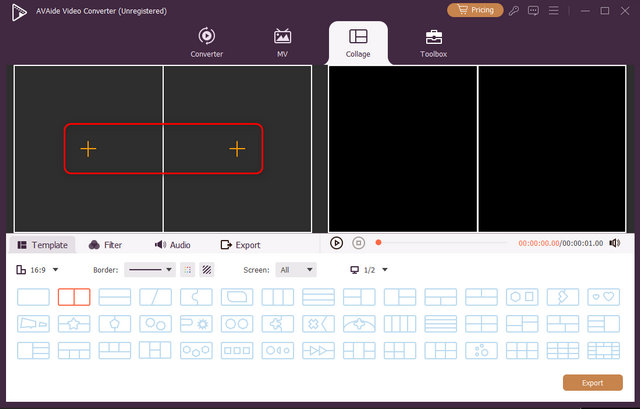
Step 3 You can use some video editing and enhancement tools to polish each video. Then, click the Export button to export the video collage.
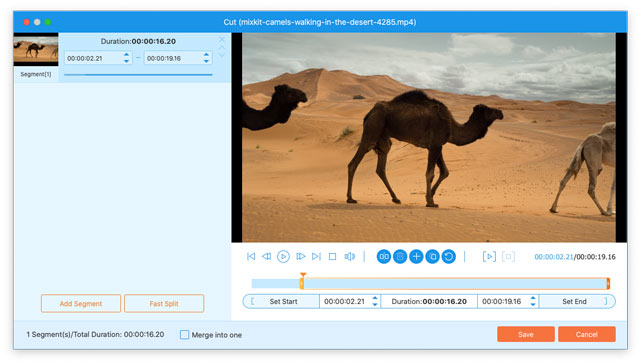
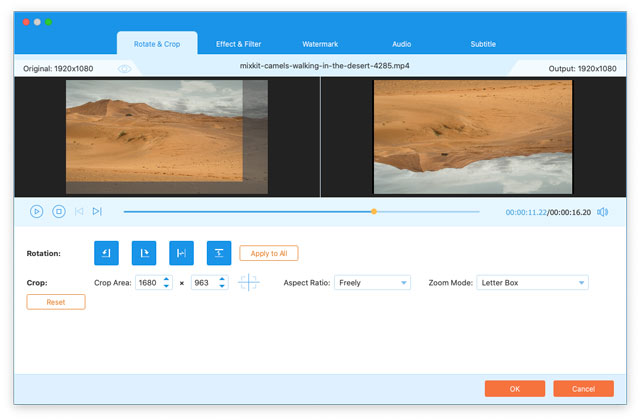
No matter what function you’re using, you can edit your video by clicking the Edit button (a star image) or the Cut button (a scissor image). Now, let’s take the Converter for example.

Step 1Click the Cut button and enter the cut window.
Step 2Drag the orange rectangle to choose the part you want. You can also change the time in Set Start, Set End and Duration down below.
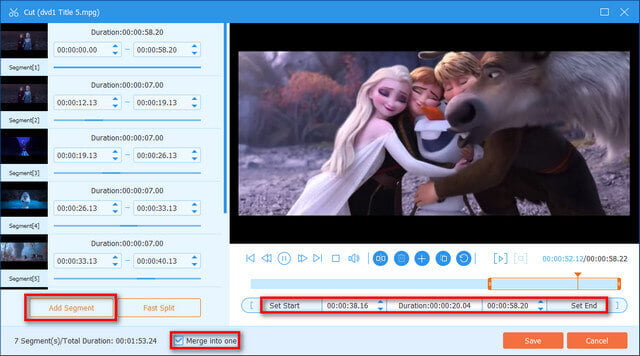
Step 3If you want two or more different clips out of one video, you can click Add Segment and check Merge into one according to your need.
Step 4Choose the output folder and click Save.
Step 1Click the Edit button and you’ll see the edit window.
Step 2Here appears the Rotate & Crop interface first. You can rotate the video by clicking the Left Rotate, Right Rotate, Horizontal Flip and Vertical Flip icon correspondingly.
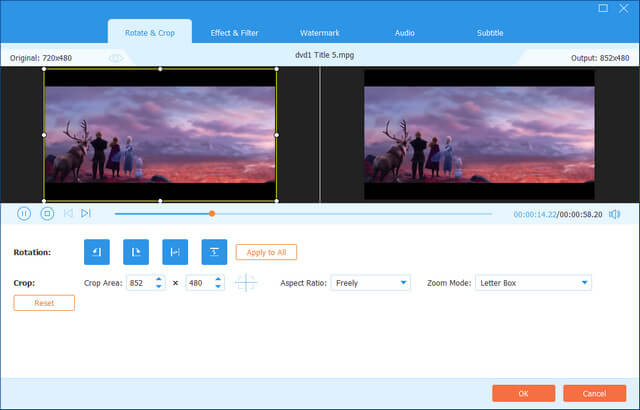
Step 3Drag the rectangle to crop the video or change the Crop Area number. Change Aspect Ratio and Zoom Mode based on your need.
Step 4You can preview the edited video on the right. Then click OK if there is no problem.
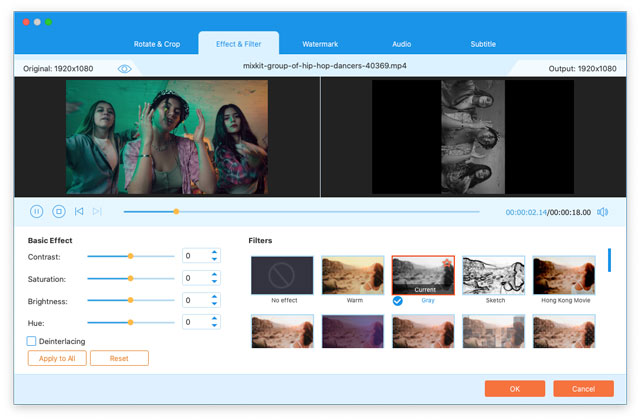
Click Effect & Filter at the top of the interface. You can change Basic Effect like Contrast, Saturation, Brightness, and Hue on the left. Then choose a filter for your video and click OK.

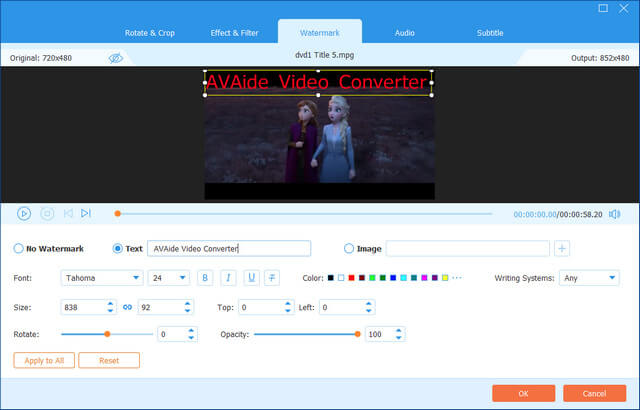
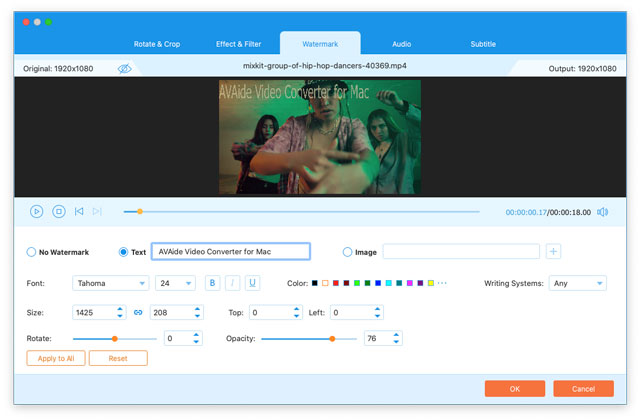
Step 1 Move to Watermark.
Step 2 Adding watermark protects your copyright. You can add Text or Image as the watermark. For text watermark, you can change the font, color, size, and more. If you add a picture as the watermark, you can change its size, rotate it, and more.
Step 3 Click OK to save the settings.
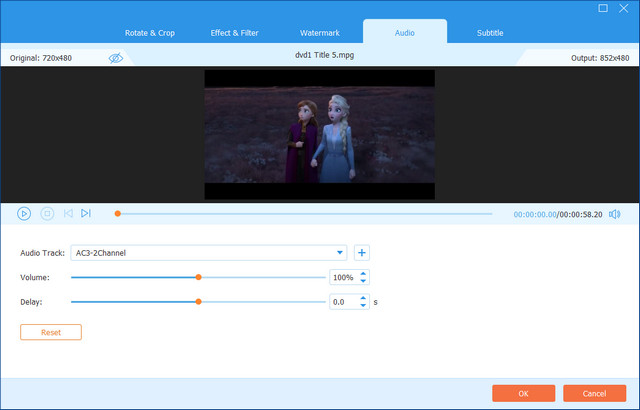
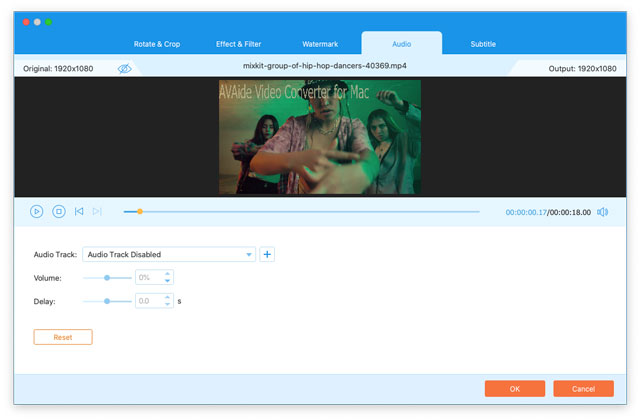
Step 1 Click Audio to the right of Watermark.
Step 2 You can change the audio track and adjust Volume and Delay down below.
Step 3 Click OK if you’re satisfied with the result.
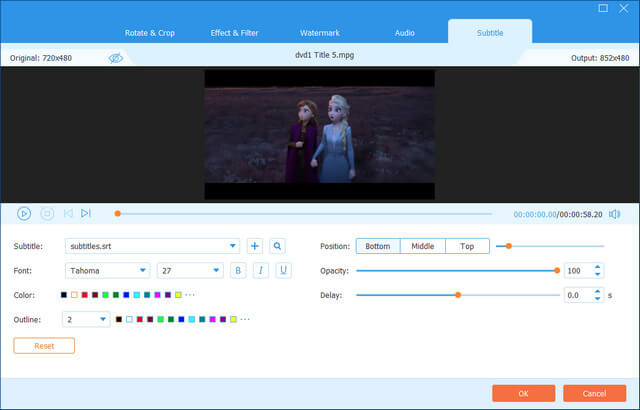
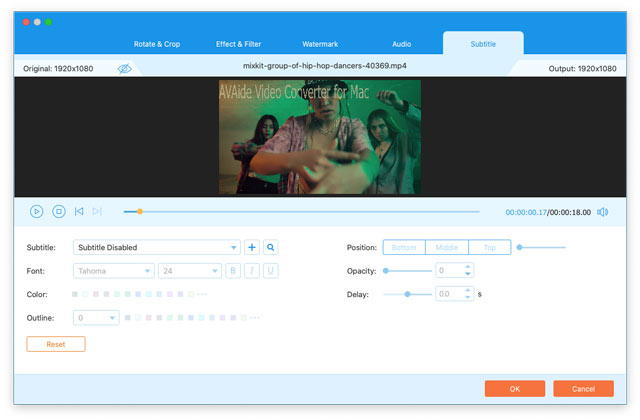
Step 1 Click Subtitle at the top-right of the interface.
Step 2 Click the Add button to add subtitle file (*.srt; *.ssa; *.ass) to the video. After that, you can change the position, font, opacity, color, etc.
Step 3 Click OK to save the settings.
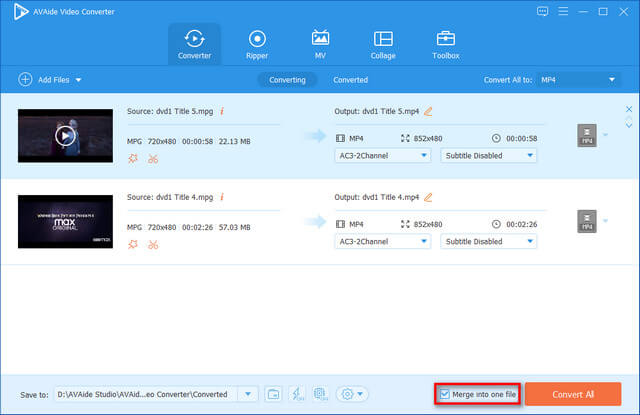
In terms of Converter and Ripper, you can merge the target videos into one. Let’s take Converter for example.
Step 1 Make sure that you choose the right output format. Then click the Move down or Move up button. You can adjust the order of the video clips.
Step 2 Check Merge into one file.
Step 3 Click Convert All to combine video clips together.
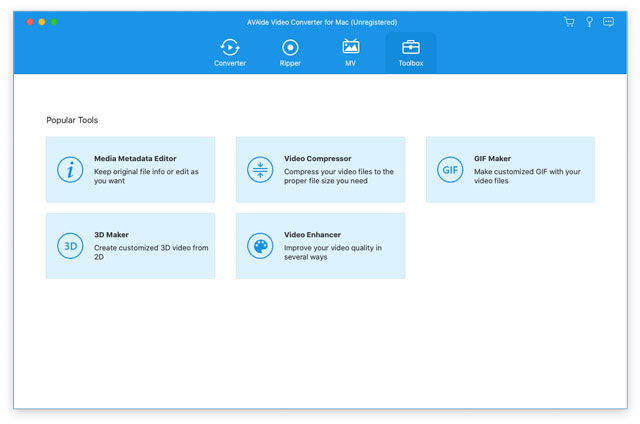
AVAide Video Converter provides many AI-driven techniques to edit or enhance your videos easily. Here are some top-rated features you can try.
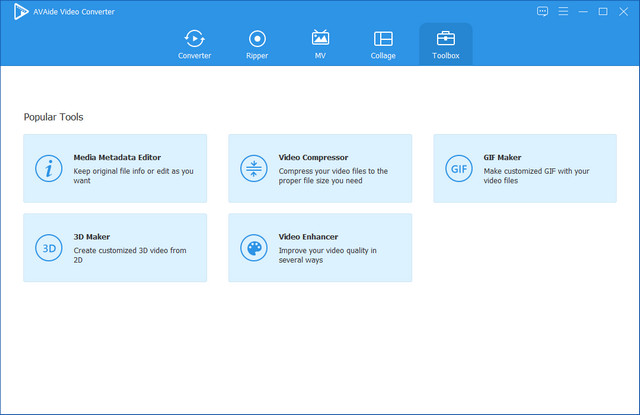
This tool helps you keep original file or edit as you want.
Step 1Click Toolbox in the main interface and choose Media Metadata Editor.
Step 2Click the Add button to add your file. Then you can add a cover and edit the title, artist, compressor, etc.
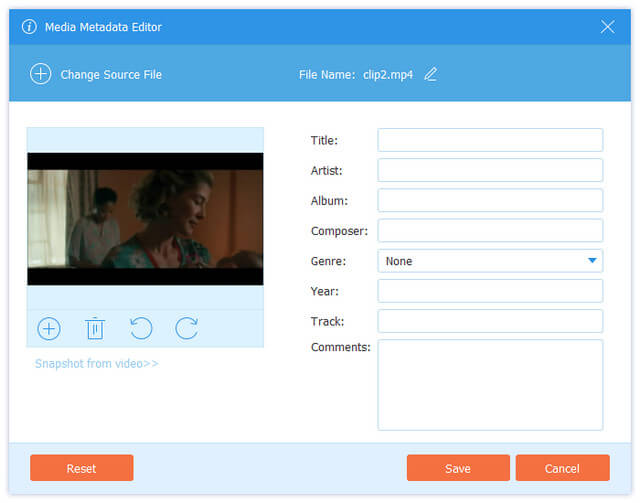
Step 3Click Save to save all the editing.
Video Compressor provides you a way to compress your video as you need.
Step 1Click Toolbox in the main interface and choose Media Metadata Editor.
Step 2 Click the Add button to add your file into the compressor. You can change the size, format, resolution, etc. You can click Preview to watch the compressed video.

Step 3If you’re satisfied with the result, click Compress to export the video to your computer.
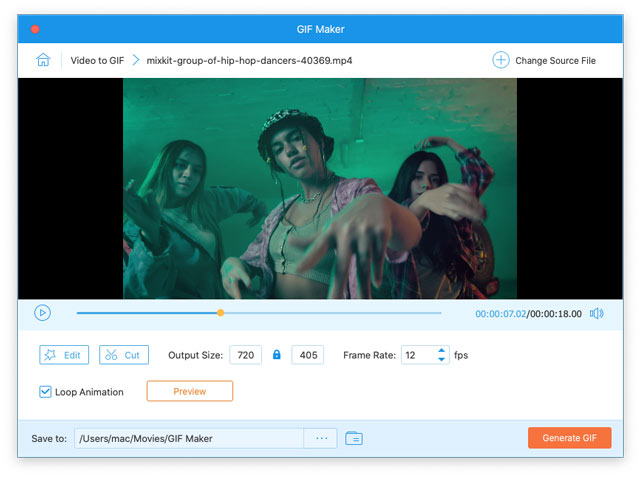
GIF Maker enables you to make GIF from videos.
Step 1Click Toolbox and choose GIF Maker.
Step 2 Click the Add button. After the video is loaded successfully, you can change the Output Size and Frame Rate. If the duration is too long, you can click the Cut (a scissor image) button to trim the video.
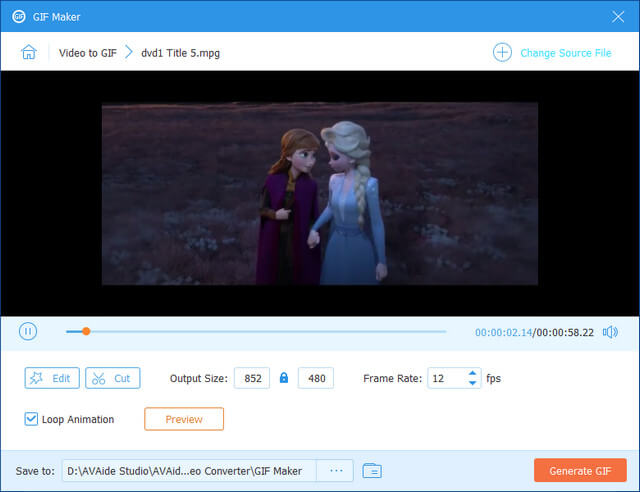
Step 3If there is no problem, click Generate GIF.
GIF Maker enables you to make GIF from videos.
Step 1 Click Toolbox and choose .
Step 2 Click the Add button. After the video is loaded successfully, you can change the Output Size and Frame Rate. If the duration is too long, you can click the Cut (a scissor image) button to trim the video.
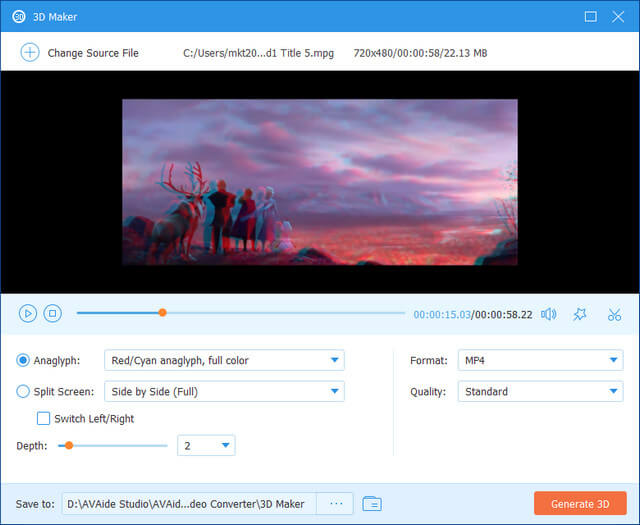
Step 3 Click Generate 3D to enjoy your 3D movie.
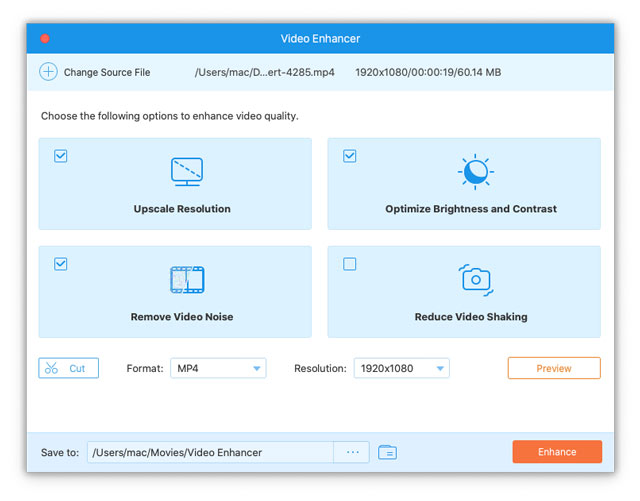
Video Enhancer is designed to improve the quality of the imported video to optimize your experience.
Step 1Click Toolbox and choose Video Enhancer.
Step 2 Click the Add button to import your video file. Then you can adjust the Upscale Resolution, Brightness and Contrast, Video Noise, and Video Shaking. Click Preview to check the output result.

Step 3Click Enhance to enjoy your quality-improved video.
Audio Compressor can highly reduce your audio files. After compression, you can still enjoy the excellent audio quality.
Step 1Click Toolbox and choose Audio Compressor.
Step 2Click the Add button to import your audio files.
Step 3You can drag the controller to the left to reduce the audio file size. You can also manually input a size value. You can also reduce the channel, sample rate, and bitrate to compress your audio. Then, click the Compress button to compress the audio file.
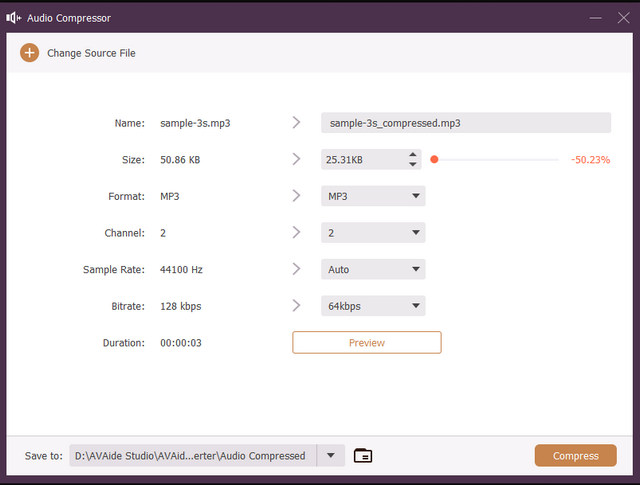
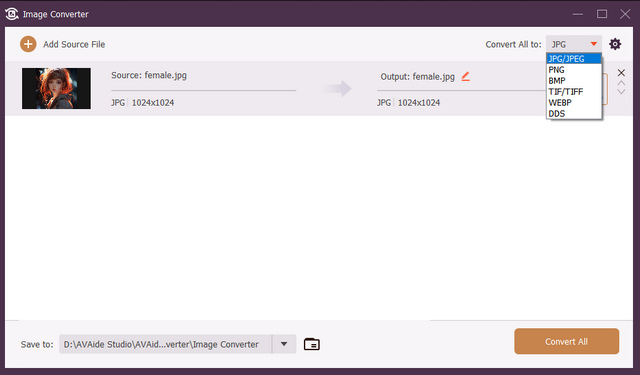
Image Converter can convert all types of image formats to other popular or rare but very useful formats.
Step 1Click Toolbox and choose Image Converter.
Step 2Click the Add button to import your image files. It supports batch conversion.
Step 3Click the dropdown button in the top right corner to choose your desired image format. Then, click the Export button to convert your image files.
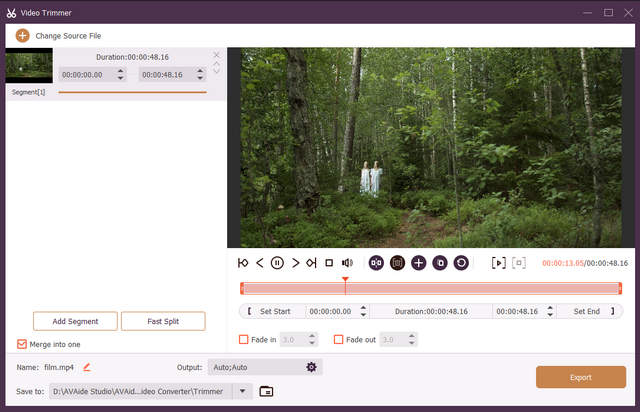
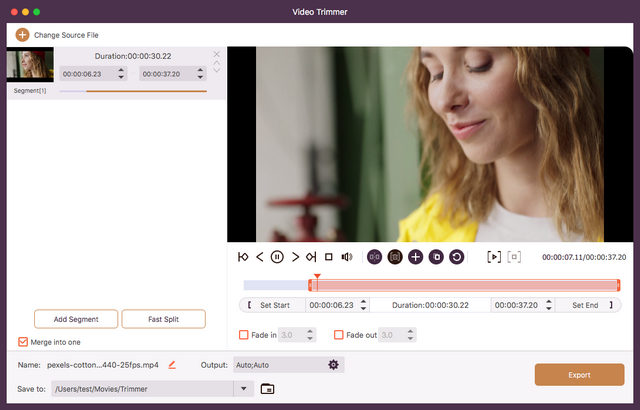
Video Trimmer offers convenient features for you to trim a video. What’s impressive is that it lets you keep the trimmed video clips for extra editing.
Step 1Click Toolbox and choose Video Trimmer.
Step 2Click the Add button to import your video.
Step 3You can drag the ends of your video track to choose your desired part. You can click the Add Segment button to preserve the chosen clip in the left video clip box. Then, click the Export button to save your chosen video clip.
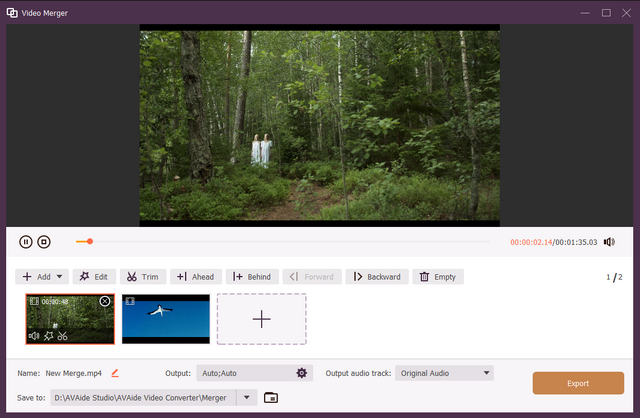
The Video Merger tool can combine many videos into one video. You can also edit each video clips with many practical editing features.
Step 1Click Toolbox and choose Video Merger.
Step 2Click the Add button to import your video files.
Step 3You can click the Edit or Trim button to edit your video clips. You can also click the Add button to add more video files. Then, click the Export button to merge these videos.
Video Cropper is one of the most essential tools for every video editor. It can help you crop out unwanted video frames and change the aspect ratio.
Step 1Click Toolbox and choose Video Cropper.
Step 2Click the Add button to import your video file.
Step 3You can drag the controllers on your video to crop the video. You can also click the Aspect Ratio dropdown button to change the aspect ratio. Then, click the Export button to save the cropped video.
The Video Watermark feature can add a text or image watermark to your video.
Step 1Click Toolbox and choose the Video Watermark tool.
Step 2Click the Add button to import your video.
Step 3You can choose Text Watermark or Image Watermark.
Step 4If you choose Text Watermark, you can input your desired text in the Text box, and then drag the watermark on your video anywhere you want. Click the Export button to save the video.
Step 5If you choose Image Watermark, you should choose an image. Then, you can drag the image anywhere you want on the video. You can also rotate the image and adjust the opacity. Then, click the Export button to save the video.
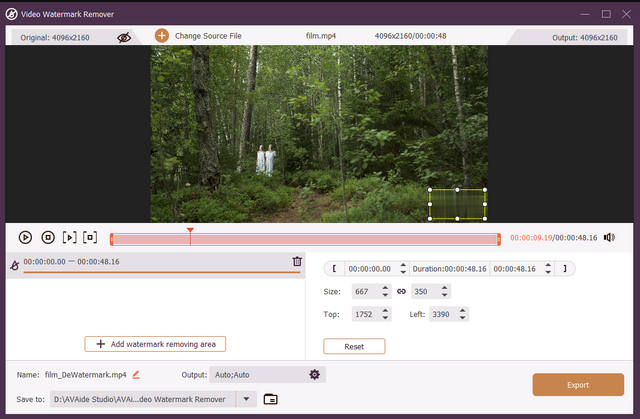
The Video Watermark Remover tool can accurately remove the watermark from your video and pad the video without distortion.
Step 1Click Toolbox and choose Video Watermark Remover.
Step 2Click the Add button to import your video that has a watermark.
Step 3Click the Add watermark remover area button, and then a selection area will appear on your video. You can drag it to cover the watermark on your video. Then, click the Export button to remove watermark on your video.
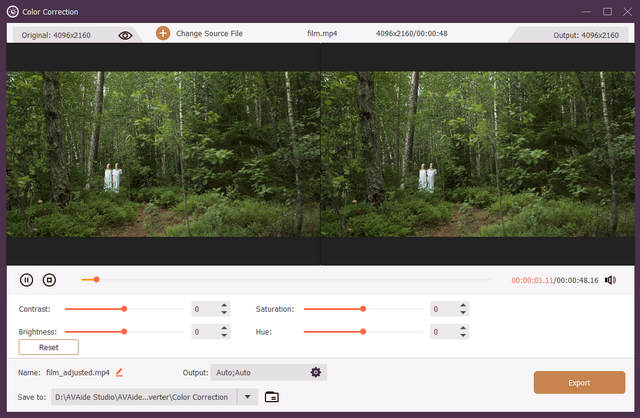
It’s also very necessary for a video editor to be able to adjust your video tone.
Step 1Click Toolbox and choose Color Correction.
Step 2Click the Add button to add your video to this program.
Step 3Just drag the controllers to adjust the contrast, brightness, saturation, and hue of your video. Check your video on the right preview window. Click the Export button to save your video.
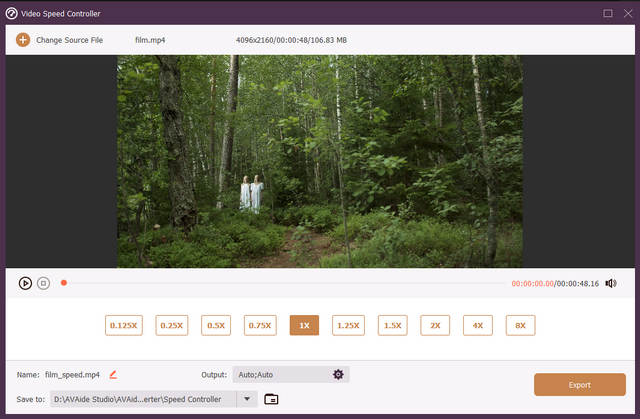
Video Speed Controller can speed up or slow down your video.
Step 1Click Toolbox and choose Video Speed Controller.
Step 2Click the Add button to import your video.
Step 3Choose your desired speed, such as 1.5x. 2x, 0.5x, or 0.25x. Then, click the Export button to save the video.
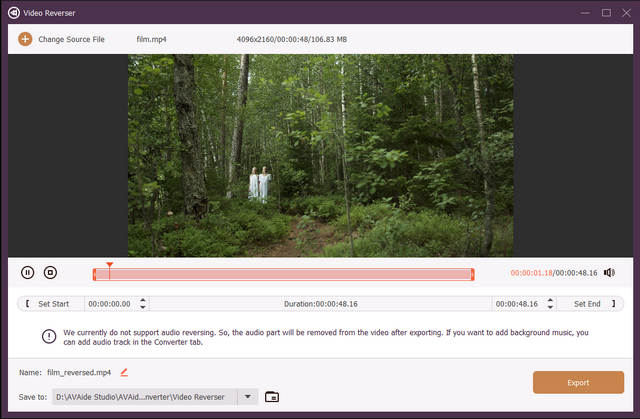
Video Reverser is a popular feature. You can reverse your video to fulfill an amazing effect.
Step 1Click Toolbox and choose the Video Reverser tool.
Step 2Click the Add button to import your video.
Step 3You can choose a specific part of your whole video to reverse or just reverse the whole video. Click the Export button to reverse your video.
AVAide Video Converter can rotate your video 90 degrees clockwise or anti-clockwise. It can also flip your video vertically or horizontally.
Step 1Click the Toolbox button and choose Video Rotator.
Step 2Click the Add button to import your video.
Step 3Choose your desired rotate or flip feature. You can rotate your video 90 degrees clockwise or anti-clockwise. You can also directly flip your video horizontally or vertically.
If your video’s volume is very low, you can use Volume Booster to increase the volume.
Step 1Click the Toolbox button and choose Volume Booster.
Step 2Click the Add button to import your video.
Step 3You can drag the Volume controller to increase the volume. Then, click the Export button to save the video.
If your video track is delayed compared with the audio track, you can use the Audio Sync feature to fix the problem.
Step 1Click Toolbox and choose Audio Sync.
Step 2Click the Add button to add your video.
Step 3You can drag the Delay controller to the left or right to fix the audio and video out of sync problem. Click the Export button to save your video.
The File Date Changer is a very practical feature. You can change the detailed date information of your files to protect your privacy.
Step 1Click Toolbox and choose File Date Changer.
Step 2Click the Add button to import your file.
Step 3You can adjust the file’s created date, modified date, and accessed date. Just click the Apply button to change your file’s date information.
To use Video/Audio Recorder, you should install AVAide Screen Recorder first. Then, follow the AVAide Screen Recorder User Guide to learn how to record your computer windows, video, audio, webcam, microphone, and external devices’ screens easily.
Download AVAide Video Converter and install it following the on-screen instructions. It may take a few seconds to finish the installation. Then launch it on your computer.
AVAide Video Converter supports the trial version which has limitations. To enjoy the full functions, you can registfer the software.
Method 1 Each time when you start AVAide Video Converter on your computer, you can register it by clicking Register at the bottom-right of the window popping up.
Method 2 If you close the window by accident, don’t worry. Click the Register button (a key image) or click the Menu button and then choose Register….
Enter your Email Address you used to purchase the software and the Registration Code you received. Then click Activate to enjoy the full feature of the registered version.
AVAide Video Converter will fix bugs and add functions from time to time. Please make sure that the software on your computer is the latest version.
Method 1 Click the Menu button and choose Check Update…. After the Updates Checking, you can download and install the latest version if there is an update.
Method 2 Choose Preference from the menu popping up.
Check Check for update automatically. Then you’ll be notified when there is an update.
Method 3 Visit our website to download and install the latest version.
Click the Menu button and choose Preference. You can adjust all the settings according to your operating habits.
1. General Preference
You can adjust Subtitle Language and Audio Language. You can also choose to Enable Hardware Acceleration to get better experience. Choose the Temp Folder. We recommend you to Help us improve the user experience to update the software.
2. Converter Preference
Here you can choose the Output Folder and Snapshot Folder. You can also set the maximum Convert Tasks.
3. MV, Collage, and Toolbox Preference
You can change the Output Folder for each when the operation is over.

4. Task Schedule Preference
Select the operation and whether to let the software beep when the task is done here.
| Product Version | Supported OS | CPU/Processor | RAM |
| Windows | Windows 11/10/8.1/8/7 (32-bit/64-bit) | 1GHz Intel/AMD CPU or above | 2GB RAM or above |
| Mac | macOS 10.12 – 26 | 1GHz or above Intel and Apple Silicon processor | 2GB RAM or above |
| File Types | |
| 8K/5K Video | MP4, MKV |
| 8K/5K Video Encoding | H.265/HEVC |
| 4K UHD Video | MP4, AVI, FLV, WebM, TS, MKV, MOV, MXF |
| 4K UHD Encoding | H.265/HEVC, H.264, VP8, VP9, MPEG, XviD |
| HD Video | 3GP(*.3gp;*.3g2), AVI, DV Files (*.dv;*.dif), MOD, MJPEG (*.mjpg;*.mjpeg), Flash Files (*.flv;*.swf;*.f4v), MKV, MPEG (*.mpg;*.mpeg;*.mpeg2;*.vob;*.dat), MPEG4 (*.mp4;*.m4v), MPV, QuickTime Files (*.qt;*.mov), Real Media Files (*.rm;*.rmvb), TOD, Video Transport Stream Files (*.ts;*.trp;*.tp), Windows Media Files (*.wmv;*.asf) |
| Audio | AAC, AIFF Files (*.aif;*.aiff), CUE, FLAC, M4A, MPEG Files (*.mp3;*.mp2), Monkey’s Audio Files (*.ape), Ogg, Raw AC3 Files (*.ac3), Real Audio Files (*.ra;*.ram), SUN AU Files (*.au), WAV, WMA |
| Image | GIF |
| File Types | |
| Video | MPG, MPEG-1, MPEG-2, MPEG-4, H.264, H.264/MPEG-4 AVC, DivX, XviD, AVI, FLV, MP4, M4V, MKV, MOV, 3GP, 3G2, MTV, SWF, WMV, ASF, DPG, TS, MTS, M2TS, DV, VOB, AMV, WebM, MXF, MPEG, OGV, TRP, F4V |
| 8K/5K Video | 8K H.265/HEVC MP4, 8K H.265/HEVC MKV, 5K H.265/HEVC MP4, 5K H.265/HEVC MKV |
| 4K UHD Video | 4K H.265/HEVC Video(*.mp4), 4K H.264/MPEG-4 Video(*.mp4), 4K H.264 MOV Video(*.mov), 4K ProRes Video(*.mov), 4K ProRes_KS Video(*.mov), 4K MPEG-4 Video(*.mp4), WebM-VP8 4K WebM Video(*.webm), WebM-VP9 4K WebM Video(*.webm), 4K AVI Video(*.avi), 4K H.265/MKV Video(*.mkv), YouTube 4K Video(*.mp4) |
| HD Video | H.265/HEVC Video, H.264/MPEG-4 AVC, AVI, ASF, MKV, MOV, MPG, TS, MTS, M2TS, WMV, MP4, WebM, MKV, MXF, M4V, XviD, MPEG, OGV, DivX, TRP, MPG, FLV, F4V, SWF |
| 3D Video | MP4 Side by Side 3D, MP4 Top and Bottom 3D, MP4 Anaglyph 3D, MOV Side by Side 3D, MOV Top and Bottom 3D, MOV Anaglyph 3D, MKV Side by Side 3D, MKV Top and Bottom 3D, MKV Anaglyph 3D, WMV Side by Side 3D, WMV Top and Bottom 3D, WMV Anaglyph 3D, WebM Side by Side 3D, WebM Top and Bottom 3D, WebM Anaglyph 3D, M4V Side by Side 3D, M4V Top and Bottom 3D, M4V Anaglyph 3D, TS Side by Side 3D, TS Top and Bottom 3D, TS Anaglyph 3D, AVI Side by Side 3D, AVI Top and Bottom 3D, AVI Anaglyph 3D, FLV Side by Side 3D, FLV Top and Bottom 3D, FLV Anaglyph 3D, VOB Side by Side 3D, VOB Top and Bottom 3D, VOB Anaglyph 3D, TRP Side by Side 3D, TRP Top and Bottom 3D, TRP Anaglyph 3D, SWF Side by Side 3D, SWF Top and Bottom 3D, SWF Anaglyph 3D, ASF Side by Side 3D, ASF Top and Bottom 3D, ASF Anaglyph 3D, OGV Side by Side 3D, OGV Top and Bottom 3D, OGV Anaglyph 3D |
| Audio | AAC, AC3, AIFF, AMR, AU, FLAC, M4A, M4B, M4R, MKA, MP2, MP3, OGG, WAV, WMA, DTS, APE, ALAC |
| Image | GIF |
| Device Types | |
| Apple | iPhone 17, iPhone 17e, iPhone Air, iPhone 17 Pro, iPhone 17 Pro Max, iPhone 16, iPhone 16 Plus, iPhone 16 Pro, iPhone 16 Pro Max, iPhone 15, iPhone 15 Plus, iPhone 15 Pro, iPhone 15 Pro Max, iPhone 14, iPhone 14 Pro, iPhone 14 Pro Max, 14 Plus, iPhone 13, iPhone 13 Pro, iPhone 13 Pro Max, iPhone 13 mini, iPhone 12, iPhone 12 Pro, iPhone 12 Pro Max, iPhone 12 mini, iPhone 11, iPhone 11 Pro, iPhone 11 Pro Max, iPhone XS, iPhone XS Max, iPhone XR, iPhone X, iPhone 8, iPhone 8 Plus, iPhone 7, iPhone 7 Plus, iPhone SE, iPhone 6s, iPhone 6s Plus, iPhone 6, iPhone 6 Plus, iPhone 5s/5c, iPhone 5, iPhone 4S/4, iPhone 3GS, iPhone, etc. iPad 2019, iPad Pro, iPad Air, iPad mini with Retina Display, iPad mini, iPad 4, the new iPad, iPad 2, etc. iPod touch 7, iPod touch 6, iPod touch 5, iPod touch 4, iPod touch 3, iPod touch 2, iPod touch. Apple TV |
| Android | Samsung Galaxy, Motorola, Google, LG, Sony, HTC, etc. |
| Game hardware | Wii, PS4, PS3, PSP, NDS, Xbox |
| SoftwareTypes | |
| Editing software | iMovie, Final Cut Pro, Final Cut Express, Sony Vegas, Adobe Premiere, Avid Media Composer, etc. |
| File Types | |
| Output Video | FLV, SWF, DV, AMV, MTV, DPG, PSP Video MPEG4 (*.mp4), PSP Video H.264(*.mp4), PSP H.264 Video for TV(*.mp4), PSP H.264 Video for firmware 2.0 and above(*.mp4), PSP 3000 Video MPEG4 (*.mp4), PSP 3000 Video H.264(*.mp4), PS3 H.264 Video(480P)(*.mp4), PS3 H.264 HD Video(720P)(*.mp4), PS3 H.264 HD Video(1080P)(*.mp4), PS Vita MPEG-4 Video (*.mp4), PS4 H.264 HD Video (*.mp4), PSP GO Video MPEG4 (*.mp4), PSP GO Video H.264(*.mp4), PS Vita Video H.264 (*.mp4) |
AVAide Video Converter can convert your video/audio files to any popular format quickly and conveniently. Follow the steps and try to convert your files on your own.
Step 1Add Files
Start AVAide Video Converter on your computer. Click Add Files at the top-left of the interface. Choose the folder or files you want to convert. You can also drag your files into the converter.
Step 2Choose Output Format
Click the Output Format dropdown button. Choose the format you want to convert your video/audio files to. If you need to keep the original quality, select Same as source.
Step 3Start Converting
Before conversion, you can change the folder where the converted file is kept by clicking the Folder icon. Then click Convert All to get your converted video/audio.
MV Maker provides you with multiple choices to make your own MV. You can add a theme or your favorite music to it.
Step 1Upload Files
Start AVAide Video Converter on your computer. Click the Add button to add your video files to this program. You can rearrange the order of the added video by clicking Forward or Backward.
Step 2Add a Theme
Choose an appropriate theme for your video and you can preview it on the right.
Step 3Set Title and Audio Track
Click Setting at the top of the interface. Enter the text you want to use as the Start Title and End Title. You can change the Background Music by clicking the Plus icon. Volume and Delay can also be adjusted.
Step 4Export MV
Click Export and watch the music movie you made.
You can also make a video collage with this program. Video collage is very popular and can help you create appealing videos on social media.
Step 1 Choose the Collage tool on the top ribbon. Then, you can select a desired video collage template.
Step 2 Click the Add button to import your videos.
Step 3 You can use some video editing and enhancement tools to polish each video. Then, click the Export button to export the video collage.
No matter what function you’re using, you can edit your video by clicking the Edit button (a star image) or the Cut button (a scissor image). Now, let’s take the Converter for example.
Step 1Click the Cut button and enter the cut window.
Step 2Drag the orange rectangle to choose the part you want. You can also change the time in Set Start, Set End and Duration down below.
Step 3If you want two or more different clips out of one video, you can click Add Segment and check Merge into one according to your need.
Step 4Choose the output folder and click Save.
Step 1Click the Edit button and you’ll see the edit window.
Step 2Here appears the Rotate & Crop interface first. You can rotate the video by clicking the Left Rotate, Right Rotate, Horizontal Flip and Vertical Flip icon correspondingly.
Step 3Drag the rectangle to crop the video or change the Crop Area number. Change Aspect Ratio and Zoom Mode based on your need.
Step 4You can preview the edited video on the right. Then click OK if there is no problem.
Click Effect & Filter at the top of the interface. You can change Basic Effect like Contrast, Saturation, Brightness, and Hue on the left. Then choose a filter for your video and click OK.
Step 1 Move to Watermark.
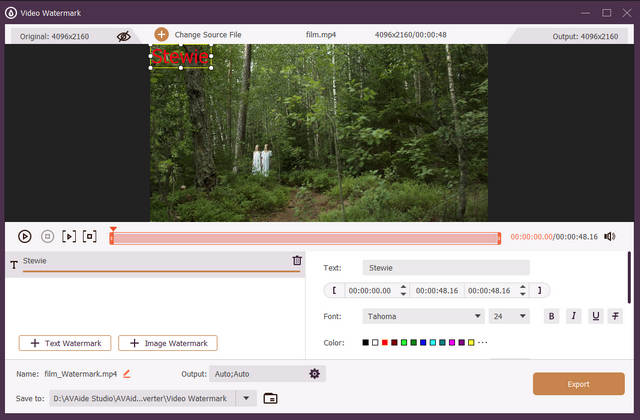
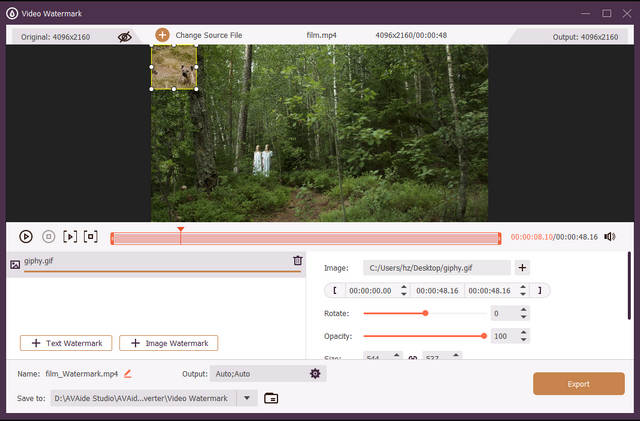
Step 2 Adding watermark protects your copyright. You can add Text or Image as the watermark. For text watermark, you can change the font, color, size, and more. If you add a picture as the watermark, you can change its size, rotate it, and more.
Step 3 Click OK to save the settings.
Step 1 Click Audio to the right of Watermark.
Step 2 You can change the audio track and adjust Volume and Delay down below.
Step 3 Click OK if you’re satisfied with the result.
Step 1 Click Subtitle at the top-right of the interface.
Step 2 Click the Add button to add subtitle file (*.srt; *.ssa; *.ass) to the video. After that, you can change the position, font, opacity, color, etc.
Step 3 Click OK to save the settings.
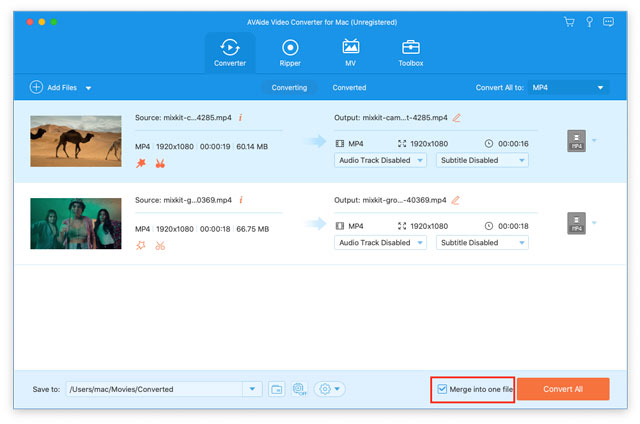
In terms of Converter and Ripper, you can merge the target videos into one. Let’s take Converter for example.
Step 1 Make sure that you choose the right output format. Then click the Move down or Move up button. You can adjust the order of the video clips.
Step 2 Check Merge into one file.
Step 3 Click Convert All to combine video clips together.
AVAide Video Converter provides various tools like compressing videos and making 3D videos to meet your need.
This tool helps you keep original file or edit as you want.
Step 1Click Toolbox in the main interface and choose Media Metadata Editor.
Step 2 Click the Add button to add your file. Then you can add a cover and edit the title, artist, compressor, etc.
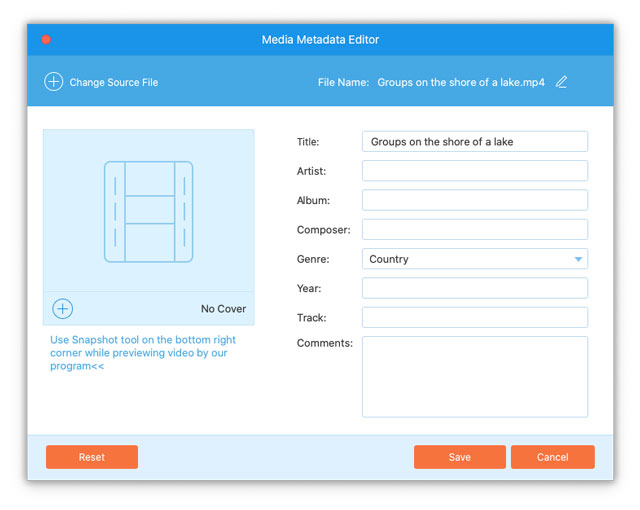
Step 3Click Save to save all the editing.
Video Compressor provides you a way to compress your video as you need.
Step 1Click Toolbox in the main interface and choose Media Metadata Editor.
Step 2 Click the Add button to add your file into the compressor. You can change the size, format, resolution, etc. You can click Preview to watch the compressed video.
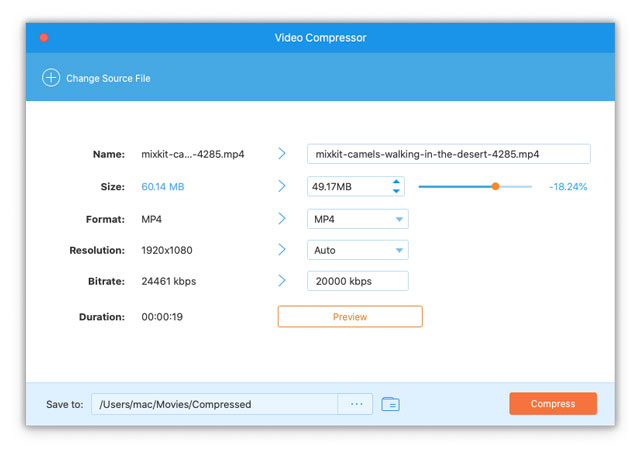
Step 3If you’re satisfied with the result, click Compress to export the video to your computer.
GIF Maker enables you to make GIF from videos.
Step 1Click Toolbox and choose GIF Maker.
Step 2 Click the Add button. After the video is loaded successfully, you can change the Output Size and Frame Rate. If the duration is too long, you can click the Cut (a scissor image) button to trim the video.
Step 3If there is no problem, click Generate GIF.
GIF Maker enables you to make GIF from videos.
Step 1 Click Toolbox and choose .
Step 2 Click the Add button. After the video is loaded successfully, you can change the Output Size and Frame Rate. If the duration is too long, you can click the Cut (a scissor image) button to trim the video.

Step 3 Click Generate 3D to enjoy your 3D movie.
Video Enhancer is designed to improve the quality of the imported video to optimize your experience.
Step 1Click Toolbox and choose Video Enhancer.
Step 2 Click the Add button to import your video file. Then you can adjust the Upscale Resolution, Brightness and Contrast, Video Noise, and Video Shaking. Click Preview to check the output result.
Step 3Click Enhance to enjoy your quality-improved video.
Audio Compressor can highly reduce your audio files. After compression, you can still enjoy the excellent audio quality.
Step 1Click Toolbox and choose Audio Compressor.
Step 2Click the Add button to import your audio files.
Step 3You can drag the controller to the left to reduce the audio file size. You can also manually input a size value. You can also reduce the channel, sample rate, and bitrate to compress your audio. Then, click the Compress button to compress the audio file.
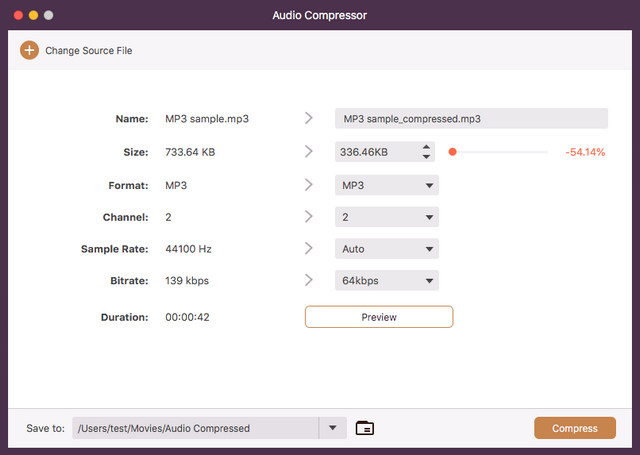
Image Converter can convert all types of image formats to other popular or rare but very useful formats.
Step 1Click Toolbox and choose Image Converter.
Step 2Click the Add button to import your image files. It supports batch conversion.
Step 3Click the dropdown button in the top right corner to choose your desired image format. Then, click the Export button to convert your image files.

Video Trimmer offers convenient features for you to trim a video. What’s impressive is that it lets you keep the trimmed video clips for extra editing.
Step 1Click Toolbox and choose Video Trimmer.
Step 2Click the Add button to import your video.
Step 3You can drag the ends of your video track to choose your desired part. You can click the Add Segment button to preserve the chosen clip in the left video clip box. Then, click the Export button to save your chosen video clip.
The Video Merger tool can combine many videos into one video. You can also edit each video clips with many practical editing features.
Step 1Click Toolbox and choose Video Merger.
Step 2Click the Add button to import your video files.
Step 3You can click the Edit or Trim button to edit your video clips. You can also click the Add button to add more video files. Then, click the Export button to merge these videos.

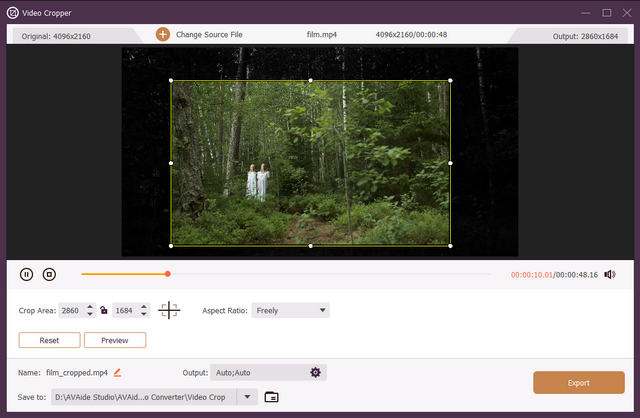
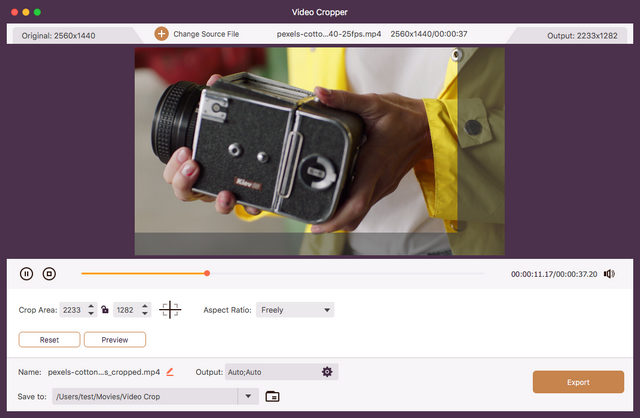
Video Cropper is one of the most essential tools for every video editor. It can help you crop out unwanted video frames and change the aspect ratio.
Step 1Click Toolbox and choose Video Cropper.
Step 2Click the Add button to import your video file.
Step 3You can drag the controllers on your video to crop the video. You can also click the Aspect Ratio dropdown button to change the aspect ratio. Then, click the Export button to save the cropped video.
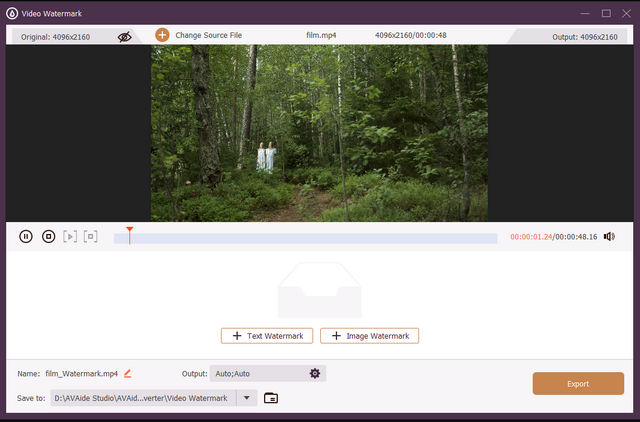
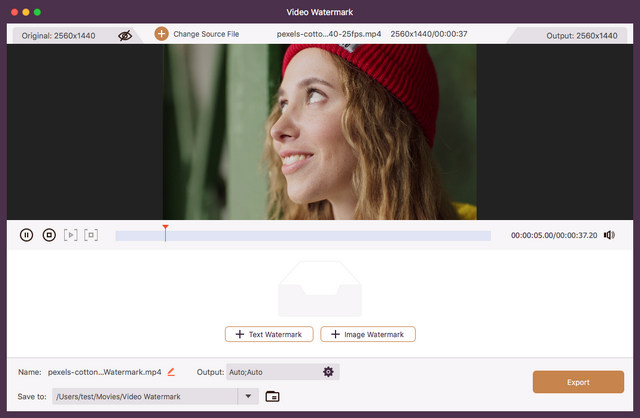
The Video Watermark feature can add a text or image watermark to your video.
Step 1Click Toolbox and choose the Video Watermark tool.
Step 2Click the Add button to import your video.
Step 3You can choose Text Watermark or Image Watermark.
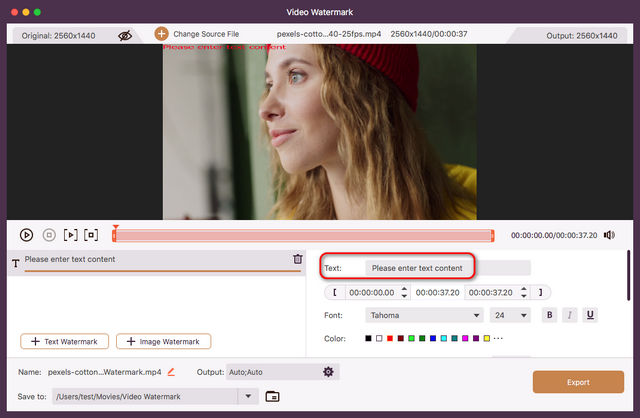
Step 4If you choose Text Watermark, you can input your desired text in the Text box, and then drag the watermark on your video anywhere you want. Click the Export button to save the video.
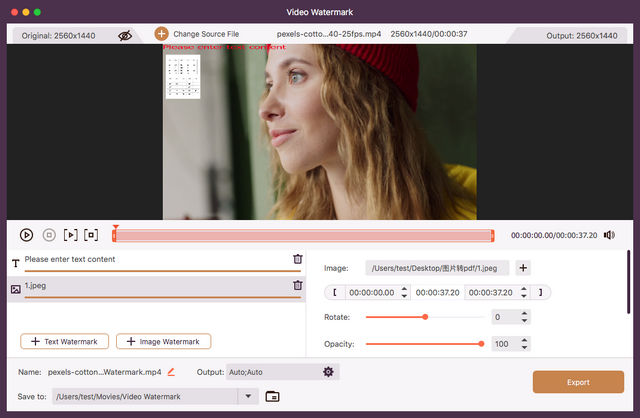
Step 5If you choose Image Watermark, you should choose an image. Then, you can drag the image anywhere you want on the video. You can also rotate the image and adjust the opacity. Then, click the Export button to save the video.
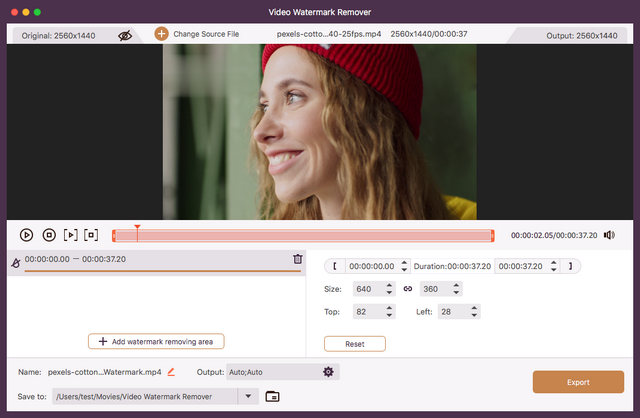
The Video Watermark Remover tool can accurately remove the watermark from your video and pad the video without distortion.
Step 1Click Toolbox and choose Video Watermark Remover.
Step 2Click the Add button to import your video that has a watermark.
Step 3Click the Add watermark remover area button, and then a selection area will appear on your video. You can drag it to cover the watermark on your video. Then, click the Export button to remove watermark on your video.
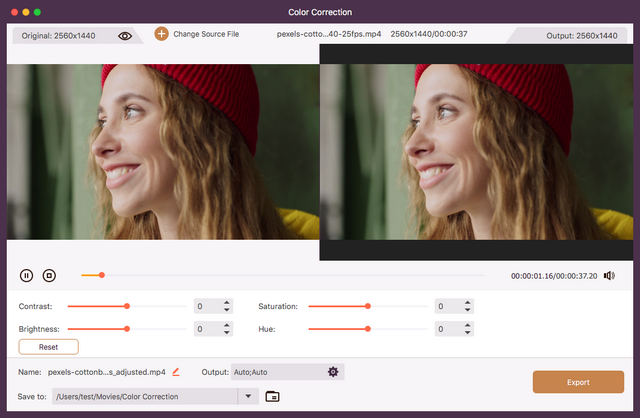
It’s also very necessary for a video editor to be able to adjust your video tone.
Step 1Click Toolbox and choose Color Correction.
Step 2Click the Add button to add your video to this program.
Step 3Just drag the controllers to adjust the contrast, brightness, saturation, and hue of your video. Check your video on the right preview window. Click the Export button to save your video.
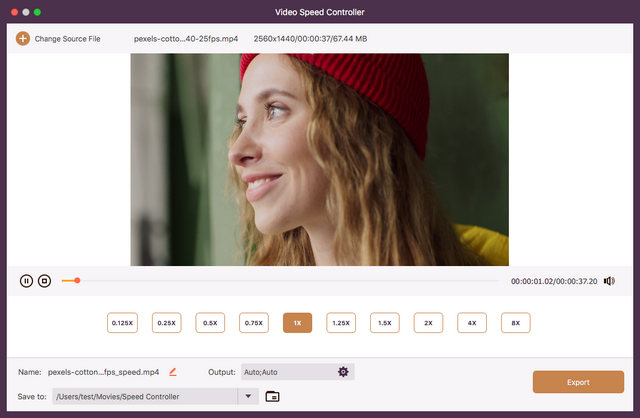
Video Speed Controller can speed up or slow down your video.
Step 1Click Toolbox and choose Video Speed Controller.
Step 2Click the Add button to import your video.
Step 3Choose your desired speed, such as 1.5x. 2x, 0.5x, or 0.25x. Then, click the Export button to save the video.
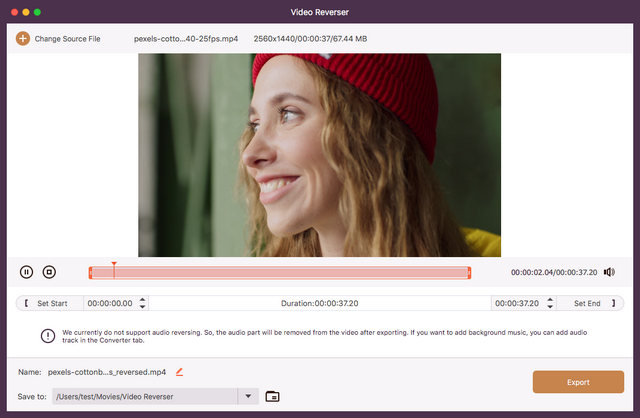
Video Reverser is a popular feature. You can reverse your video to fulfill an amazing effect.
Step 1Click Toolbox and choose the Video Reverser tool.
Step 2Click the Add button to import your video.
Step 3You can choose a specific part of your whole video to reverse or just reverse the whole video. Click the Export button to reverse your video.
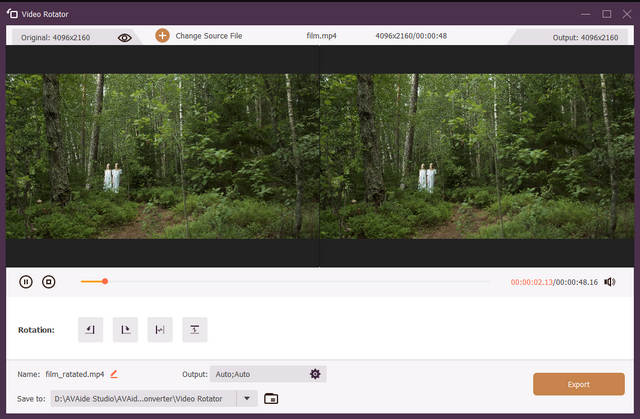
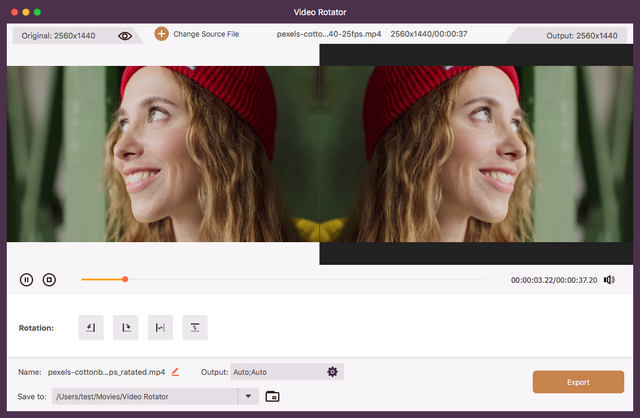
AVAide Video Converter can rotate your video 90 degrees clockwise or anti-clockwise. It can also flip your video vertically or horizontally.
Step 1Click the Toolbox button and choose Video Rotator.
Step 2Click the Add button to import your video.
Step 3Choose your desired rotate or flip feature. You can rotate your video 90 degrees clockwise or anti-clockwise. You can also directly flip your video horizontally or vertically.
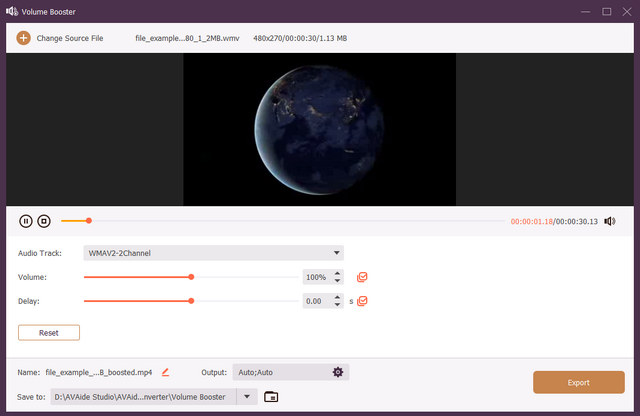
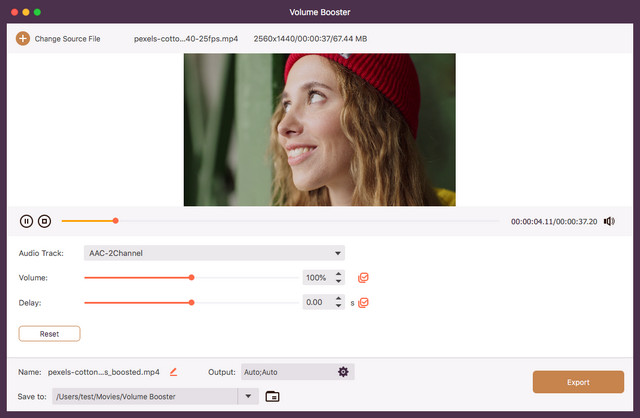
If your video’s volume is very low, you can use Volume Booster to increase the volume.
Step 1Click the Toolbox button and choose Volume Booster.
Step 2Click the Add button to import your video.
Step 3You can drag the Volume controller to increase the volume. Then, click the Export button to save the video.
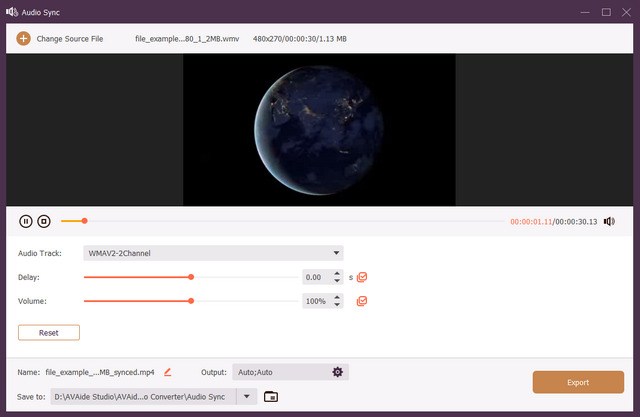
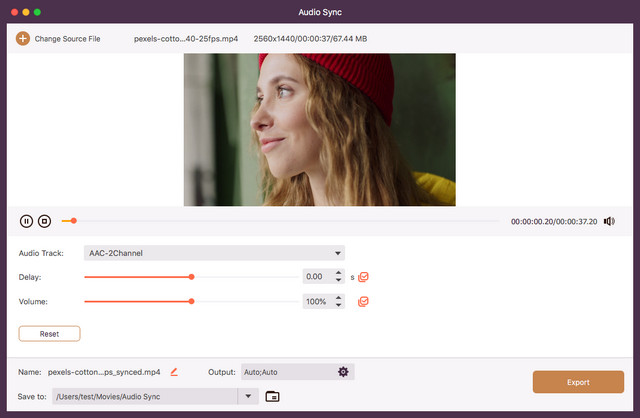
If your video track is delayed compared with the audio track, you can use the Audio Sync feature to fix the problem.
Step 1Click Toolbox and choose Audio Sync.
Step 2Click the Add button to add your video.
Step 3You can drag the Delay controller to the left or right to fix the audio and video out of sync problem. Click the Export button to save your video.
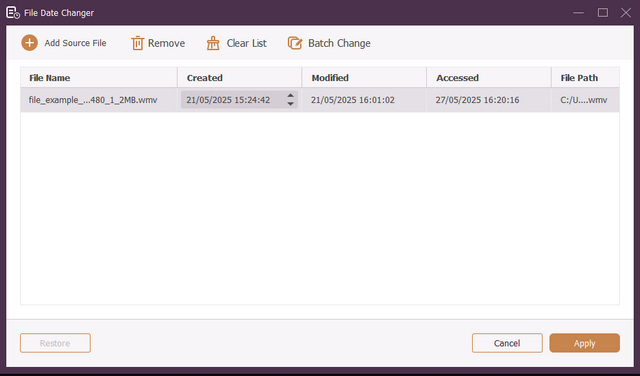
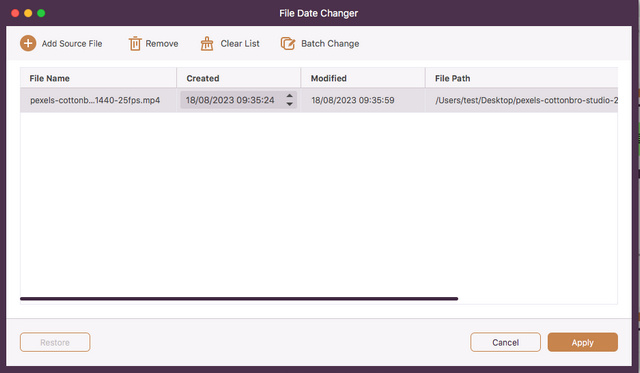
The File Date Changer is a very practical feature. You can change the detailed date information of your files to protect your privacy.
Step 1Click Toolbox and choose File Date Changer.
Step 2Click the Add button to import your file.
Step 3You can adjust the file’s created date, modified date, and accessed date. Just click the Apply button to change your file’s date information.
Copyright © 2026 AVAide. All rights reserved.