Bir eğitim videosunu, oyun anını veya çevrimiçi toplantıyı kaydetmeye çalıştığınızı ancak cihazınızda nasıl kaydedeceğinizden emin olmadığınızı hayal edin. iPad'de ekran kaydı nasıl yapılır? Bu sayede bu anları kaydetmek ve paylaşmak kolaylaşır. Bu kılavuz, kayıt özelliğini etkinleştirme, ses kullanma, sorunları çözme ve her seferinde daha akıcı ve daha iyi ekran kayıtları için kaliteyi iyileştirme konularında size yol gösterir.
Bölüm 1. iPad'de Ekran Kaydını Etkinleştirme
Merak etmeyin, ekran kaydı düğmesi henüz Kontrol Merkezi'nize yüklenmedi, ancak iPad'inizde yüklü değilse durum farklı olabilir. Apple bu işlevi iPadOS'a yerleşik olarak dahil etti ve kullanılabilmesi için önce etkinleştirilmesi gerekiyor. Eklendikten sonra, tek bir kaydırma ve dokunma hareketiyle ekranınızı istediğiniz zaman kaydedebilirsiniz.
Aşama 1öğesine dokunun. Ayarlar iPad'inizdeki uygulama.
Adım 2Tıklamak Kontrol Merkezi Menüyü aşağı kaydırdıkça.
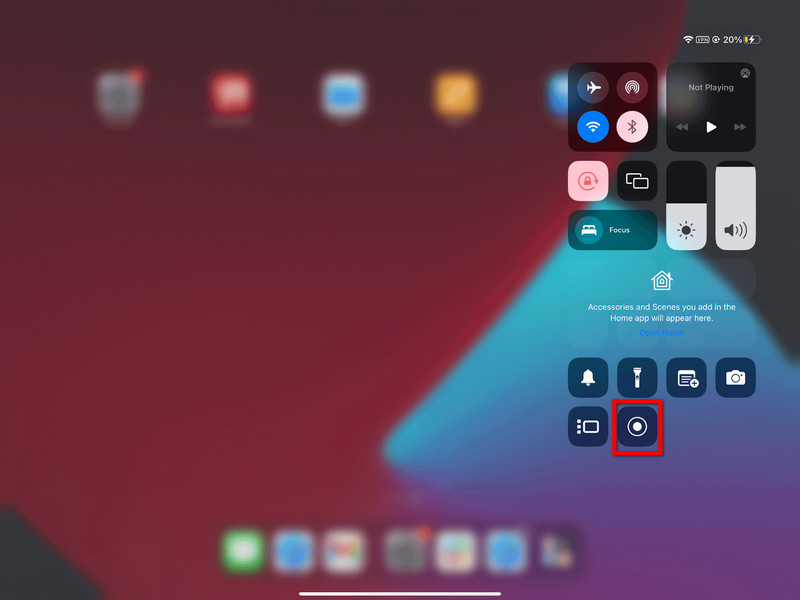
Aşama 3öğesine dokunun. + (Ekle) düğmesindeki Ekran Kaydı Mevcut kontroller listesinin bir bölümü.
4. Adımerişmek için Kontrol MerkeziEkranınızın sağ üst köşesinden aşağı doğru kaydırın. Şimdi kaydı görmelisiniz.
Bölüm 2. iPad'de Ekran Kaydı Nasıl Yapılır?
Etkinleştirdikten sonra iPad ekranınızı kaydetmek kolay ve hızlıdır. iPadOS'un yerleşik kaydedicisi, üçüncü taraf uygulamalar yüklemeye gerek kalmadan oyun oynama, eğitim videoları veya hatta görüntülü görüşmeleri kaydetmenizi sağlayan sorunsuz bir özelliktir.
Aşama 1iPad ekranınızın sağ üst köşesine dokunup basılı tutun, ardından aşağı doğru sürükleyin.
Adım 2üzerine dokunun Ekran Kaydı Düğmeye basın. Kayıt başlamadan önce 3 saniyelik bir geri sayım olacaktır.
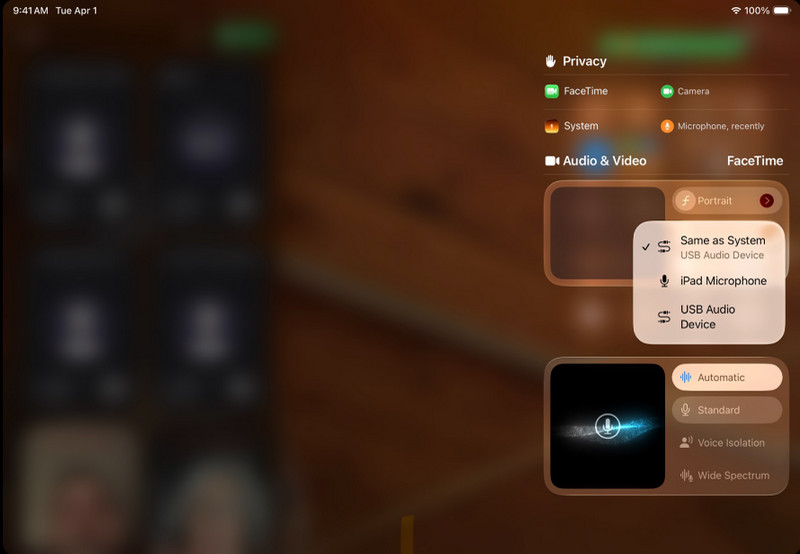
(İsteğe bağlı) tuşunu basılı tutun Ekran Kaydı düğmeye dokunun ve Mikrofon Sesinizi kaydetmek istediğinizde etkinleştirmek için.
Aşama 3Kaydetmek istediğiniz uygulamaları veya etkinlikleri seçin.
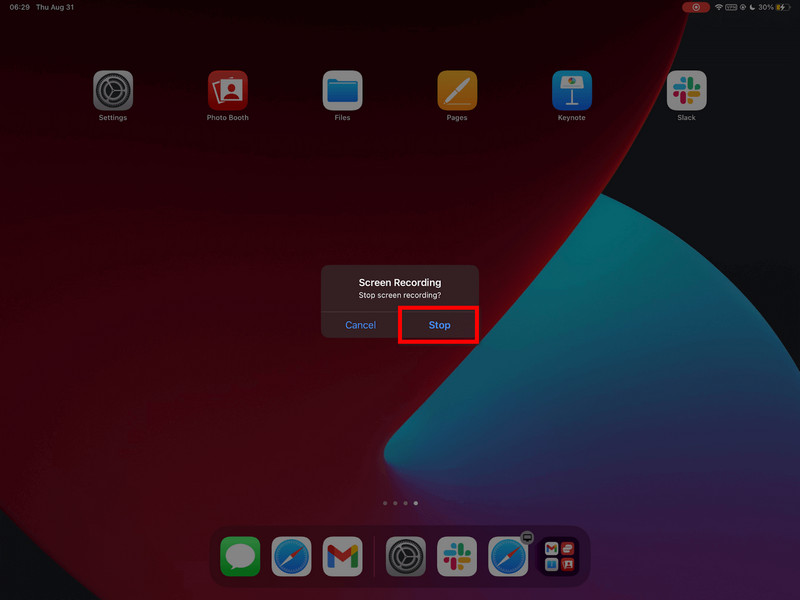
4. AdımKırmızı durum çubuğuna dokunun ve ardından dokunun. Durmakveya geri dön Kontrol Merkezi ve öğesine dokunun Kayıt düğmesine tekrar basın.
Adım 5Videonuz otomatik olarak kaydedilecektir. Fotoğraflar Uygulama üzerinden düzenleme yapabilir veya paylaşabilirsiniz.
Bölüm 3. iPad'de Sesli Ekran Kaydı Nasıl Yapılır
iPad ile ekran ve ses kaydı almak, eğitim videoları, oyunlar, çevrimiçi dersler ve sunumlar için faydalıdır. iPadOS'te kayıt yalnızca sınırlı ölçüde çalışır ve kayıttan önce mikrofon ile sistem sesi arasındaki ilişkiyi anlamak önemlidir.
Önemli Ayrım: Mikrofon ve Sistem Sesi
| Ses Türü | Ne Kaydediyor? | iPadOS'te kullanılabilirlik | En İyi Kullanım Örnekleri |
| Mikrofon Sesi | Sesiniz ve dışarıdan gelen sesler iPad'in mikrofonu tarafından kaydedilir. | Mevcut | Yorumlar, öğreticiler, anlatımlar. |
| Sistem Sesi | Uygulamalardan, oyunlardan, videolardan ve medya oynatımından kaynaklanan dahili sesler. | Doğrudan desteklenmiyor. | Harici araçlar veya bir çözüm yolu gerektirir. |
Mikrofonla Ses Kaydı Yapmanın Adımları
Aşama 1iPad ekranınızın sağ üst köşesinden yukarı doğru kaydırarak uygulamayı açın. Kontrol Merkezi.
Adım 2tuşunu basılı tutun Ekran Kaydı Daha fazla seçenek görmek için düğmeye tıklayın.
Aşama 3Mikrofonu açmak için üzerine basın. Ses kaydının açık olduğunu belirtmek için kırmızıya dönecektir.
4. AdımTıklamak Kayda başla3 saniyelik geri sayım tamamlandığında kayıt başlar.
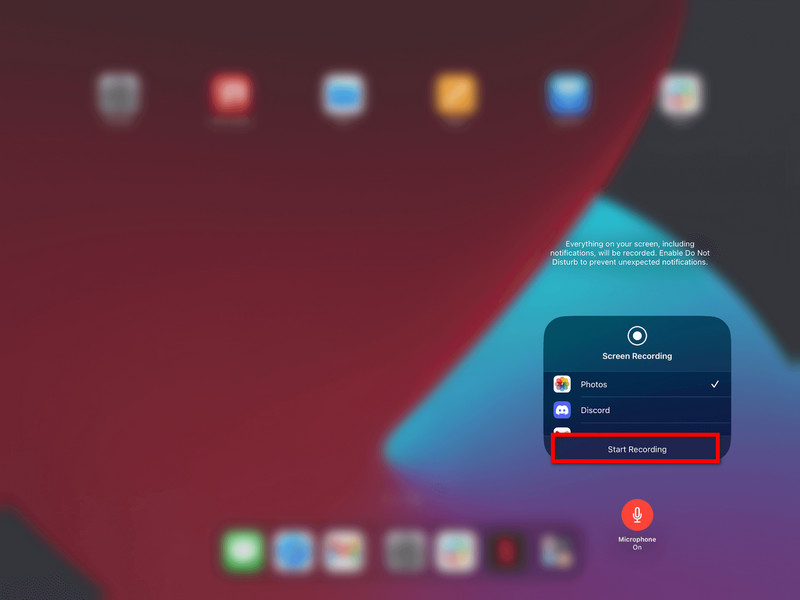
Adım 5Kaydetmek istediğiniz hareketleri tekrarlayın. Mikrofon açıksa, sesiniz kaydedilecektir.
6. AdımEkranın üst kısmındaki kırmızı durum çubuğuna dokunun veya geri dönün. Kontrol Merkezi ve öğesine dokunun Kayıt düğmesine tekrar basın.
7. AdımVideo otomatik olarak kaydedilecektir. Fotoğraflar Uygulama üzerinden görüntüleyebilir veya düzenleyebilirsiniz.
Sistem Ses Kaydı için Alternatif
Maalesef, sistem sınırlamaları nedeniyle iPad'de doğrudan dahili ses kaydı yapamazsınız, bu nedenle bilgisayar tabanlı bir çözüme ihtiyaç duyulmaktadır. Bunun için mükemmel bir araç şudur: AVAide Ekran KaydediciBu özellik, iPad'inizi yansıtmanıza ve aynı anda ekran ve sistem sesini kaydetmenize olanak tanır.
AVAide Screen Recorder, ekran etkinliğini net bir şekilde yakalayan yüksek kaliteli bir ekran kayıt yazılımıdır. 4K/1080p'ye kadar gecikme veya aksama olmadan kayıt yapabilir. Ayrıca, eğitim videoları, oyun oynama ve sunumlar için mükemmel olan sistem ve mikrofon sesinin eş zamanlı olarak kaydedilmesine de olanak tanır.
- Yüksek Kaliteli Kayıt özelliği, net ve yüksek kaliteli sonuçlarla 4K veya 1080p videolar çekmenizi sağlar.
- Çift Ses
- Sistem sesini ve mikrofon sesini aynı anda kaydetmeyi destekler.
- iOS Ekran Yansıtma özelliği, iPad ekranınızı bir PC veya Mac'te görüntüler ve kaydeder.
- Esnek Ekran Modları, tam ekran veya özel alan kaydını destekler.
- Dahili düzenleme araçları, kayıtları hızlı bir şekilde kırpmanıza, iyileştirmenize ve düzenlemenize yardımcı olur.

 Güvenli indirme
Aşama 1İndir ve Yükle
Resmi web sitesini ziyaret edin ve AVAide Ekran Kaydedici'yi indirin. AVAide Ekran Kaydedici'yi resmi web sitesinden indirin. Kurulum tamamlandıktan sonra, Windows veya Mac bilgisayarınızdan çalıştırabilirsiniz.
Adım 2iOS Seçeneğini Seçin
Ana arayüzde tıklayın. Telefon Kaydediciöğesini seçin, ardından iOS Kaydedici Seçenekler listesinden (iOS ve Android).
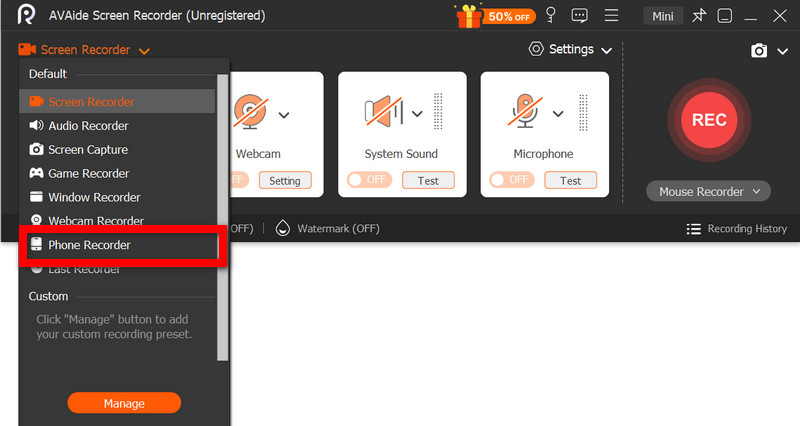
Aşama 3iPad'i bilgisayara bağlayın.
iPad'inizi bilgisayarınıza kablosuz olarak yansıtmak, aynı ağ üzerinden veya varsa bir USB kablosu aracılığıyla mümkündür. iPad'inizdeki Ekran Yansıtma uygulamasında AVAide cihazını seçin. Bağlantı kurulduktan sonra iPad ekranınız bilgisayarınızda görüntülenecektir.
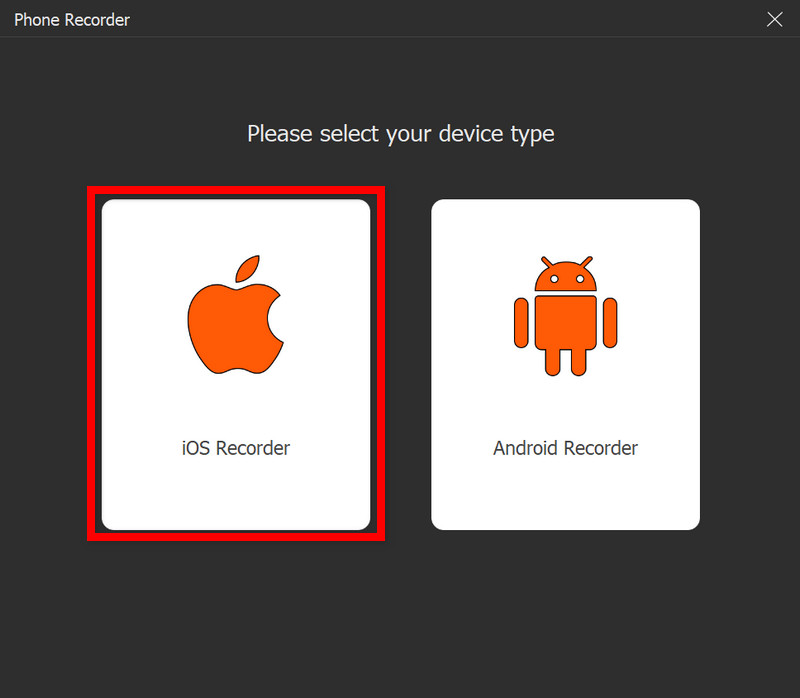
4. AdımKayda başla
Başarılı aynalama ile basın Kayıt iPad ekranınızı, sistem sesini ve mikrofon girişini (varsa) kaydetmeye başlamak için.
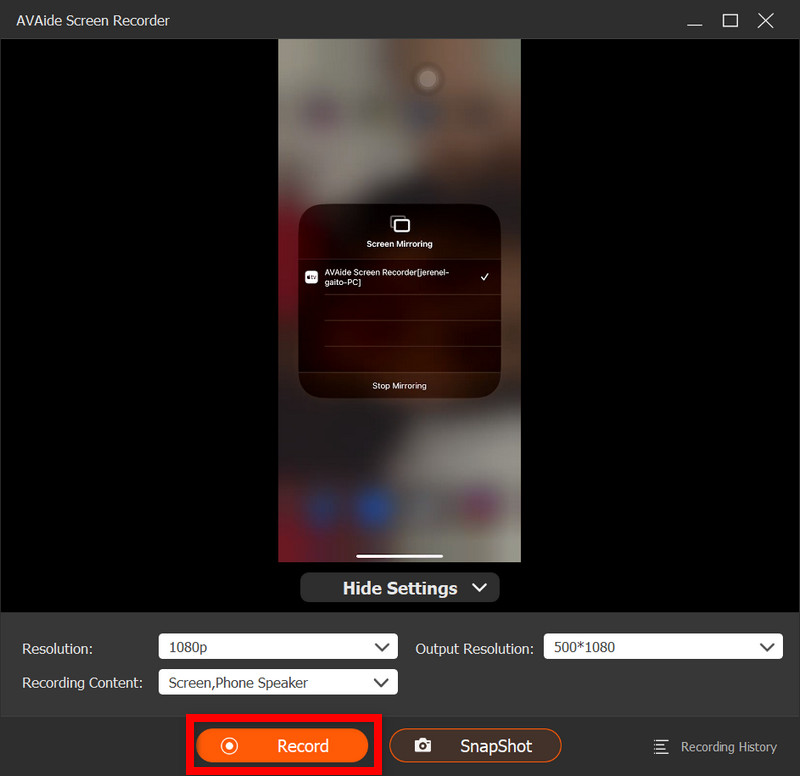
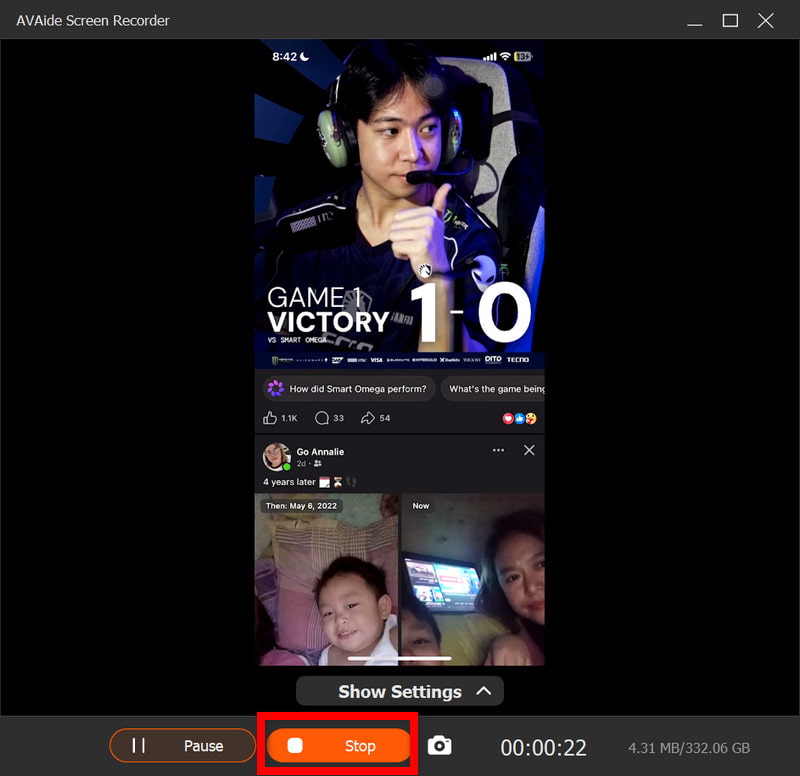
Adım 5Kaydetmeyi bırak
basın Durmak İşlem tamamlandığında düğmeye basın. Kaydınız otomatik olarak bilgisayarınıza kaydedilecektir.
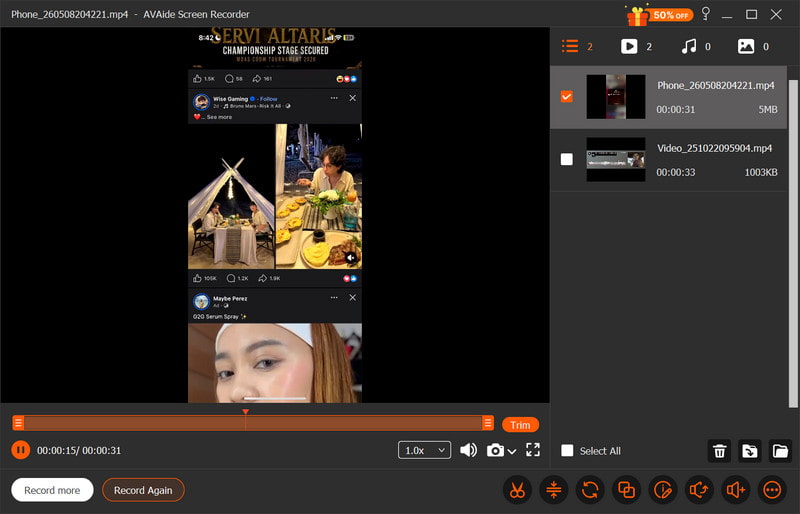
6. AdımVideoyu Düzenle
Kaydı tamamladıktan sonra bir önizleme penceresi açılacaktır. İstenmeyen kısımlar kesilebilir, ses ayarları yapılabilir veya son videoyu dışa aktarmadan önce basit düzenlemeler yapılabilir.
Bölüm 4. iPad'imde Neden Ekran Kaydı Yapamıyorum?
iPad'de video kaydı sorunları genellikle ayarlar, kısıtlamalar veya performans sorunlarından kaynaklanır. En yaygın sorunlar ve nedenleri aşağıda gösterilmiştir.
1. Düğme Tamamen Eksik
Bu durum, Ekran Kaydı özelliğinin Denetim Masası'na yüklenmemiş olması halinde ortaya çıkar. Ekran Kaydı özelliğinin orada görünmesi için Ayarlar > Denetim Masası bölümünden manuel olarak eklemeniz gerekir.
2. Düğme Gri Renkte veya Yanıt Vermiyor
Bu durum genellikle sistem ayarlarından veya cihaz kontrollerinden kaynaklanan ekran kaydı kısıtlamasından kaynaklanır.
- Ekran süresi sınırları ayarlanabilir.
- Kayıt işlemi, okul veya iş yeri cihazınızın profil ayarları tarafından yasaklanmış olabilir.
- Bazı uygulamalar, kullanım sırasında ekran görüntüsü almanıza izin vermeyebilir.
3. Kayıt Başladıktan Hemen Sonra Durur
Sorun genellikle yetersiz kullanılabilir alan veya kayıt işlemine müdahale eden diğer uygulamalar gibi sistem veya depolama sorunlarıyla ilgilidir.
4. Kayıtta Ses Yok
Bu durum, ses düzgün bağlanmadığında veya kullanıcı dahili ses beklediğinde ortaya çıkar; iPadOS'te ekran kaydı dahili olarak yapılamadığından, Mac için en iyi ekran kaydedici Sistem sesini doğru şekilde yakalamaya yardımcı olabilir.
5. Kayıt Kesintili veya Düşük Kalitede
Bu durum genellikle şu faktörlerden birinden kaynaklanır: sınırlı cihaz depolama alanı, çok fazla uygulama çalıştırılması veya bu kadar yüksek çözünürlükte kayıt yapamayan eski bir iPad modeli.
Bölüm 5. Daha İyi Ekran Kayıtları İçin Profesyonel İpuçları
iPadOS'te kayıt yaparken, sorunsuz, net ve yüksek kaliteli bir kayıt için iPad'inizin doğru şekilde ayarlandığından emin olun. İşte video ve ses kalitesini optimize etmek için bazı faydalı ipuçları.
1. Depolama Alanını Boşaltın
Kayda başlamadan önce, iPad'inizde yeterli boş alan olduğundan emin olun, aksi takdirde çekim sırasında gecikme veya takılmalar yaşanabilir ve kayıt sorunlarına yol açabilir.
2. Kullanılmayan Uygulamaları Kapatın
Sistem performansını artırmak ve kayıt sırasında kesintileri veya yavaşlamaları önlemek için gereksiz tüm arka plan uygulamalarını kapatın.
3. Rahatsız Etmeyin Modunu Açın
Kayıt sırasında gelen aramaların, mesajların ve bildirimlerin ekranda görünmesini ve dikkatinizi dağıtmasını önlemek için Rahatsız Etme modunu etkinleştirin.
4. Sabit Bir Ekran Kurulumu Sağlayın
Kayıt sırasında parlaklık, yönlendirme veya sistem ayarlarını değiştirmeyin, çünkü ani değişiklikler video tutarlılığını ve kayıt kalitesini etkileyebilir.
5. Önce Sesi Test Edin
Video çekimine başlamadan önce, mikrofon seviyelerinin doğru ayarlandığından ve sesinizin net bir şekilde kaydedildiğinden emin olmak için kısa bir test kaydı yapın.
6. Ana Ekranınızı Temiz Tutun
Ana ekranınızı temizleyin veya hassas uygulamaları ya da diğer uygulamaları farklı bir klasöre taşıyın, böylece kaydınız odaklanmış, profesyonel ve düzenli görünür.
7. Sessiz Bir Ortamda Kayıt Yapın
Arka plan gürültüsünün az olduğu sessiz bir odada kayıt yaparsanız, mikrofonunuz ses kalitesini daha iyi yakalayacak ve istenmeyen sesleri en aza indirecektir. Mac'te ses kaydı veya iPad.
iPad ekran kaydı Bu, cihazınızdan doğrudan eğitim videoları, oyun kayıtları ve önemli anları yakalamanın basit ama güçlü bir yoludur. Doğru ayarlar ve ipuçlarıyla, daha iyi sonuçlar için hem video hem de ses kalitesini iyileştirebilirsiniz. Dahili araçlar veya harici yazılımlar kullanılsın, kayıt daha kolay ve daha güvenilir hale gelir.
YAZAR HAKKINDA

Ses, çevrimiçi toplantılar, oyun videoları, müzik, web kamerası vb. ile ekran etkinliklerini yakalayın.
Ekran Kaydı
- Windows'ta Ekran Kaydı
- Instagram Canlı Yayınını Kaydedin
- Tubi'den Videoları Kopyala
- YouTube Videolarını MP3'e Dönüştürün
- Fansly'den Video İndir
- JW Player Videolarını İndirme
- Bilibili Videolarını İndirin
- Patreon Videolarını İndirin
- SpankBang Videolarını İndirin
- Discord Videolarını İndirin
- DoodSream Videosunu İndirin