โปรแกรมบันทึกหน้าจอในตัวของ Android อาจมีฟีเจอร์ไม่มากนัก อย่างไรก็ตาม มีเคล็ดลับที่เป็นประโยชน์บางอย่างที่คุณสามารถเรียนรู้เพื่อบันทึกหน้าจอโทรศัพท์ของคุณได้ง่ายขึ้นและหลากหลายมากขึ้น บทความนี้จะแสดงวิธีการบันทึกหน้าจออย่างละเอียดให้คุณทราบ การบันทึกหน้าจอ Android บทช่วยสอน
หากคุณต้องการบันทึกหน้าจอขั้นสูงสำหรับการเล่นเกม บทเรียน หรือการสาธิตระดับมืออาชีพ เราก็สามารถช่วยคุณคัดกรองข้อมูลที่ไม่จำเป็นออกไป เพื่อนำเสนอวิธีการและแอปบันทึกหน้าจอ Android ที่ดีที่สุดที่มีอยู่ในปัจจุบัน พร้อมด้วยบทแนะนำทีละขั้นตอนเพื่อช่วยให้คุณได้ผลลัพธ์ที่คมชัดและมีความละเอียดสูง
- ส่วนที่ 1: วิธีใช้โปรแกรมบันทึกหน้าจอในตัวของ Android
- ส่วนที่ 2: เครื่องมือบันทึกหน้าจอ Android เฉพาะแบรนด์บางตัว
- ส่วนที่ 3: 4 วิธีอเนกประสงค์เพิ่มเติมในการบันทึกหน้าจอบน Android
- โบนัส: บันทึกหน้าจอทั้งบนคอมพิวเตอร์และโทรศัพท์มือถือด้วยคุณภาพที่ดีที่สุด
- ส่วนที่ 4: คำถามที่พบบ่อยเกี่ยวกับวิธีการบันทึกหน้าจอใน Android
ส่วนที่ 1: วิธีใช้โปรแกรมบันทึกหน้าจอในตัวของ Android
อุปกรณ์ส่วนใหญ่ที่ใช้ระบบปฏิบัติการ Android 11 หรือสูงกว่า จะมีแอปบันทึกหน้าจอในตัว ซึ่งอยู่ในแผงการตั้งค่าด่วน คุณสามารถใช้แอปนั้นบันทึกหน้าจอโทรศัพท์ของคุณได้เลย
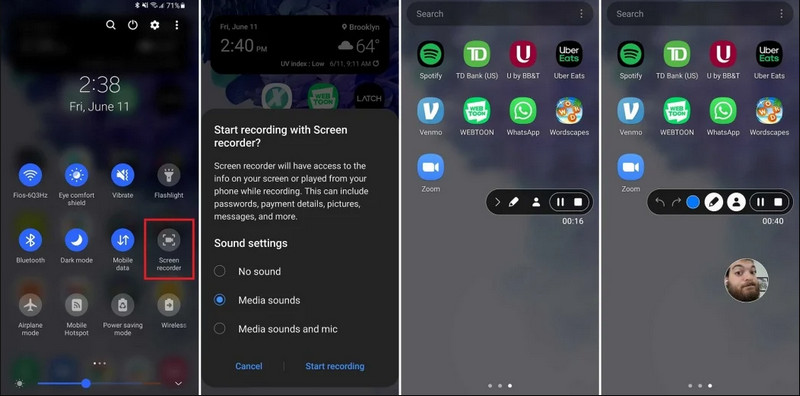
ขั้นตอนที่ 1เข้าถึงการตั้งค่าด่วน
ปัดนิ้วลงสองครั้งจากด้านบนของหน้าจอเพื่อขยายเมนูการตั้งค่าด่วนแบบเต็ม
ขั้นตอนที่ 2เลือกโปรแกรมบันทึกหน้าจอ
ค้นหา บันทึกหน้าจอถ้าคุณไม่เห็น ให้แตะที่ แก้ไข กดปุ่ม (ที่มีไอคอนรูปดินสอ) แล้วลากไทล์บันทึกหน้าจอลงในตารางที่ใช้งานอยู่ของคุณ
ขั้นตอนที่ 3กำหนดค่าการตั้งค่าการบันทึก
เมื่อคุณพบแอนดรอยด์ บันทึกหน้าจอ โปรแกรมนี้มีตัวเลือกการบันทึกหลายแบบ การเลือกตัวเลือกที่เหมาะสมจะช่วยให้การบันทึกหน้าจอ Android ของคุณมีประสิทธิภาพมากขึ้น
- ไม่มีเสียง: บันทึกเฉพาะหน้าจอโทรศัพท์ โดยไม่บันทึกเสียงระบบหรือเสียงภายนอก
- เสียงประกอบสื่อ: บันทึกหน้าจอพร้อมเสียงระบบทั้งหมด รวมถึงเสียงจากแอปพลิเคชันทั้งหมดในโทรศัพท์ของคุณ
- เสียงประกอบสื่อและไมโครโฟน: บันทึกทั้งเสียงระบบและเสียงภายนอก (ไมโครโฟนในตัวของโทรศัพท์หรือไมโครโฟนจากหูฟังของคุณ)
ขั้นตอนที่ 4เริ่มและหยุดการบันทึกหน้าจอ
เลือกตัวเลือกของคุณแล้วแตะ เริ่มบันทึกใหม่ ปุ่ม จะมีตัวนับถอยหลังปรากฏขึ้นในแถบสถานะ หากต้องการหยุดการบันทึกหน้าจอ Android ให้แตะที่ปุ่ม หยุด ปุ่ม (ถ้ามีแถบสถานะการบันทึก) หรือปัดลงจากแถบแจ้งเตือนแล้วแตะที่ปุ่มสีแดง หยุด ปุ่ม.
ส่วนที่ 2: เครื่องมือบันทึกหน้าจอ Android เฉพาะแบรนด์บางตัว
ผู้ผลิตโทรศัพท์ Android หลายรายมีแอปบันทึกหน้าจอเฉพาะของตนเองพร้อมคุณสมบัติขั้นสูง เช่น การซ้อนภาพจากกล้องเซลฟี่ ลองดูคุณสมบัติการบันทึกพิเศษของแบรนด์ Android ยอดนิยมบางแบรนด์:
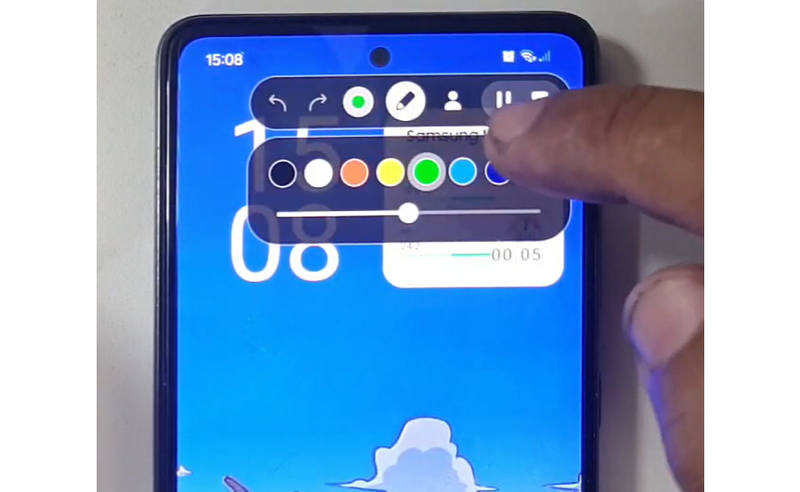
ซัมซุง (One UI): มีโปรแกรมบันทึกหน้าจอพร้อมแถบเครื่องมือที่ช่วยให้คุณสามารถวาดบนหน้าจอได้แบบเรียลไทม์
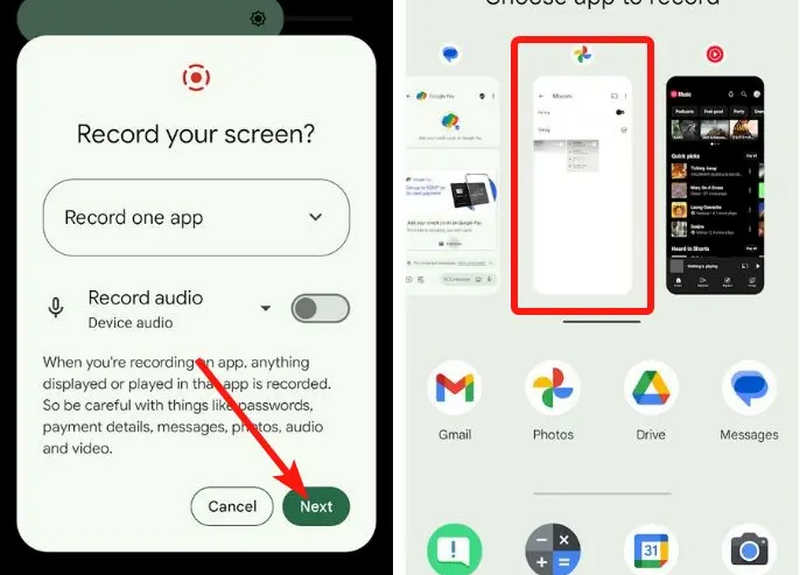
Google Pixel: คุณสามารถเลือกแอปพลิเคชันเฉพาะ (เช่น แอปธนาคารหรือ WhatsApp) เพื่อบันทึกได้ หากคุณออกจากแอปหรือเลื่อนแถบแจ้งเตือนลงระหว่างการบันทึก การกระทำเหล่านั้นจะไม่ปรากฏในวิดีโอสุดท้าย
Xiaomi (MIUI/HyperOS): มีแอป "บันทึกหน้าจอ" โดยเฉพาะ พร้อมตัวเลือกการปรับแต่งขั้นสูงสำหรับอัตราเฟรม (FPS) และอัตราบิต
หัวเว่ยและเกียรติยศ (HarmonyOS / MagicOS): เป็นการผสานการทำงานระหว่างฮาร์ดแวร์และซอฟต์แวร์ที่ไม่เหมือนใคร โดยคุณสามารถเริ่มหรือหยุดการบันทึกได้ง่ายๆ เพียงแค่เคาะหน้าจอสองครั้งด้วยข้อนิ้วสองข้อ
OPPO, vivo และ realme (ColorOS / OriginOS): เมื่อเริ่มเกม โปรแกรมบันทึกหน้าจอจะปรับทรัพยากร CPU/GPU โดยอัตโนมัติ เพื่อให้แน่ใจว่าการบันทึกวิดีโอ 4K/60FPS จะไม่ทำให้เกิดอาการกระตุกหรือเฟรมเรตตกในเกม
ส่วนที่ 3: 4 วิธีอเนกประสงค์เพิ่มเติมในการบันทึกหน้าจอบน Android
หากโทรศัพท์ Android ของคุณไม่มีฟีเจอร์บันทึกหน้าจอที่น่าพอใจ คุณสามารถลองใช้แอปบันทึกหน้าจอ Android ทั้งสี่แอปนี้ได้ แอปเหล่านี้มีฟีเจอร์ที่สะดวกและใช้งานได้จริง
1. โปรแกรมบันทึกหน้าจอ AZ
โปรแกรมบันทึกหน้าจอ AZ เป็นแอปบันทึกหน้าจอ Android ที่ได้รับความนิยมอย่างมากใน Play Store สามารถบันทึกวิดีโอความละเอียดสูงบนหน้าจอโทรศัพท์ Android ของคุณได้ แอปพลิเคชันนี้ยังช่วยให้คุณปรับความละเอียด อัตราเฟรม และอัตราบิตได้ตามวัตถุประสงค์การบันทึกที่แตกต่างกัน
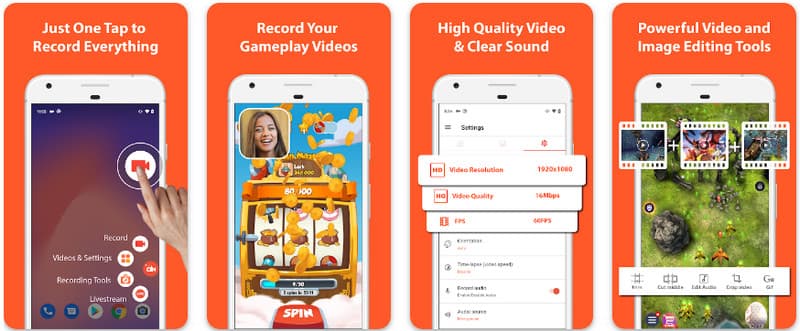
นอกจากนี้ AZ Screen Recorder ยังช่วยให้ผู้ใช้สามารถบันทึกเสียงที่เล่นบนอุปกรณ์โดยใช้ไมโครโฟน ทำให้สามารถบันทึกได้แม้กระทั่งการบันทึกที่ซับซ้อนและมีมาตรฐานสูงที่สุด การจัดวางปุ่มที่เรียบง่ายและประสิทธิภาพที่สม่ำเสมอทำให้แอปนี้เป็นที่ชื่นชอบของใครหลายคน เรียนรู้วิธีบันทึกหน้าจอ Android โดยใช้แอปนี้โดยใช้บทช่วยสอนด้านล่าง
ขั้นตอนที่ 1หลังจากที่คุณดาวน์โหลดแอปบน Android แล้ว ให้เปิดใช้งาน จากนั้นคลิก กล้อง ปุ่มเพื่อเข้าถึงคุณสมบัติบันทึกหน้าจอของมัน
ขั้นตอนที่ 2แตะ เริ่มเลย เพื่อเริ่มการบันทึกหน้าจอในอุปกรณ์ Android ของคุณ และจะมีตัวนับถอยหลังปรากฏขึ้นบนหน้าจอ
ขั้นตอนที่ 3หากต้องการหยุดการบันทึกหน้าจอในโทรศัพท์ Android ให้แตะที่ไอคอน บันทึก กดปุ่มอีกครั้ง ด้วยแอปนี้ คุณยังสามารถทำสิ่งต่อไปนี้ได้อีกด้วย บันทึกหน้าจอบน iPhone ของคุณพร้อมเสียง เปิดใช้งานแล้ว
2. เครื่องบันทึกหน้าจอ Mobizen
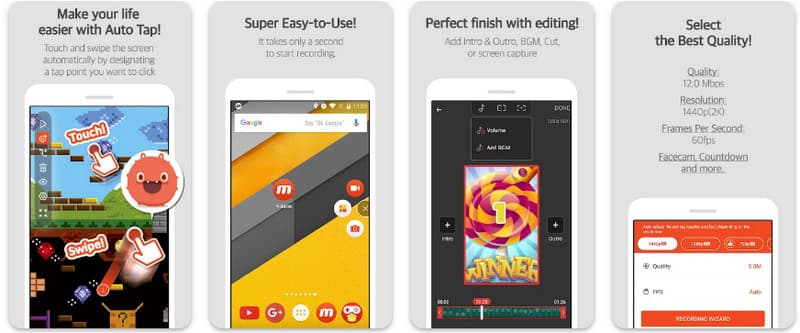
โปรแกรมบันทึกหน้าจอ Mobizen Mobizen เป็นอีกแอปพลิเคชันหนึ่งสำหรับบันทึกหน้าจอ Android ที่ดาวน์โหลดได้ฟรีจาก Play Store และรับประกันการบันทึกที่ง่ายและมีคุณภาพสูง มีตัวเลือกสำหรับการบันทึกความละเอียดสูงพร้อมพารามิเตอร์ที่ปรับได้ และการบันทึกแบบสะอาดเพื่อลบลายน้ำ นอกจากนี้ Mobizen ยังมีการบันทึกเสียงภายในซึ่งสามารถใช้ในการบันทึกได้ รวมถึงกล้องหน้าและ GIF ที่สามารถเพิ่มสีสันให้กับการบันทึกได้ อีกทั้งยังมีการใช้งานฟีเจอร์และการควบคุมต่างๆ อย่างง่ายดาย ช่วยให้ผู้ใช้เริ่มต้นการบันทึกหน้าจอ Android หรือแก้ไขเนื้อหาได้โดยไม่ต้องยุ่งยากกับการใช้งานแอป มาดูวิธีการบันทึกหน้าจอด้วย Android โดยใช้แอปนี้กัน
ขั้นตอนที่ 1ดาวน์โหลดทันทีบน Android ของคุณและเปิดแอป
ขั้นตอนที่ 2ทำการตั้งค่าที่จำเป็นก่อนจึงจะสามารถใช้โปรแกรมบันทึกหน้าจอได้ แถบบันทึกแบบลอยจะปรากฏขึ้นบนหน้าจอของคุณ แตะที่แถบนั้น กล้อง ปุ่มแล้ว เริ่มเลย เพื่อเริ่มการบันทึกหน้าจอ
ขั้นตอนที่ 3เมื่อเสร็จแล้ว ให้แตะ เอ็ม และ หยุด ปุ่มสำหรับหยุดการบันทึกหน้าจอในโทรศัพท์ Android ของคุณ
3. โปรแกรมบันทึกหน้าจอ - XRecorder โดย Inshot
โปรแกรมบันทึกหน้าจอ - XRecorder เป็นแอปพลิเคชันอเนกประสงค์ทรงพลังสำหรับ Android ที่ช่วยให้การบันทึกหน้าจอทำได้ง่ายขึ้น ด้วยการบันทึกความละเอียดสูงถึง 1080p ที่ 60FPS โดยไม่ต้องใช้สิทธิ์ Root หรือใส่ลายน้ำ ในฐานะที่เป็นวิธีการบันทึกหน้าจอชั้นนำบน Android 17/16 แอปนี้มอบประสบการณ์การใช้งานที่ราบรื่นผ่านหน้าต่างควบคุมแบบลอยตัวที่ช่วยให้คุณเริ่ม หยุดชั่วคราว และวาดบนหน้าจอแบบเรียลไทม์โดยใช้เครื่องมือแปรงในตัว นอกเหนือจากการบันทึกวิดีโอแบบง่ายๆ แล้ว ยังรองรับการบันทึกเสียงภายใน การซ้อนภาพหน้ากล้องสำหรับสตรีมเมอร์ และการตัดต่อวิดีโอในตัว ทำให้เป็นตัวเลือกที่เหมาะสำหรับทุกคนที่ต้องการสร้างบทเรียนระดับมืออาชีพ คลิปเกม หรือการสาธิตที่ชัดเจนโดยตรงจากอุปกรณ์มือถือของตน
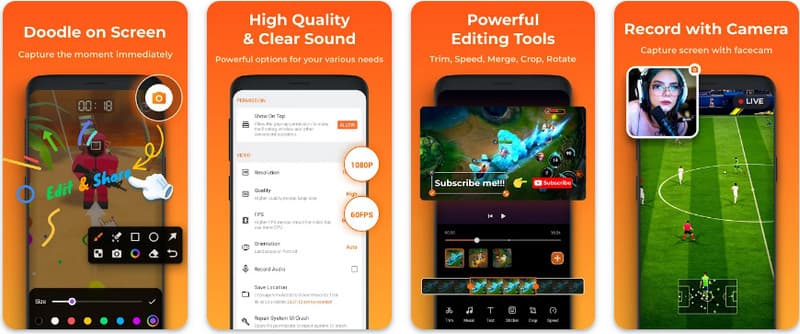
ขั้นตอนที่ 1เมื่อดาวน์โหลด XRecorder เสร็จแล้ว ให้เปิดและแตะ เปิดใช้งานไอคอนลอย.
ขั้นตอนที่ 2หลังจากนั้นให้แตะ บันทึก ปุ่มสำหรับเริ่มการบันทึกและ เริ่มเลย เพื่อยืนยัน.
ขั้นตอนที่ 3ตามที่คุณเห็น ความยาวของการบันทึกจะปรากฏเป็นไอคอนลอย ให้แตะ หยุด ปุ่มเพื่อบันทึกการบันทึก
4. โปรแกรมบันทึกหน้าจอสุดเจ๋ง
เครื่องบันทึกหน้าจอแบบซุปเปอร์ Super Screen Recorder เป็นโซลูชันระดับแนวหน้าสำหรับทุกคนที่กำลังมองหาวิธีการบันทึกหน้าจอแบบมืออาชีพบน Android ที่มีความยืดหยุ่นสูงสุด แอปทรงพลังนี้ให้การบันทึกภาพความละเอียดสูงและโดดเด่นด้วยการนำเสนอประสบการณ์การใช้งานแบบไร้ลายน้ำแม้ในเวอร์ชันฟรี ทำให้มั่นใจได้ว่าเนื้อหาของคุณจะสะอาดและดูเป็นมืออาชีพ มีฟีเจอร์กล้องหน้าในตัวสำหรับการบันทึกปฏิกิริยาแบบเรียลไทม์ และเครื่องมือแปรงอเนกประสงค์ที่ช่วยให้คุณวาดบนหน้าจอระหว่างการบันทึก ซึ่งเป็นฟังก์ชันสำคัญสำหรับการสร้างบทเรียนหรือคำแนะนำที่น่าสนใจ ไม่ว่าคุณจะเป็นผู้เริ่มต้นหรือผู้ใช้ขั้นสูง Super Screen Recorder ก็มีการปรับแต่งที่แข็งแกร่งที่จำเป็นต่อการใช้งานการบันทึกหน้าจอ Android ได้อย่างง่ายดาย
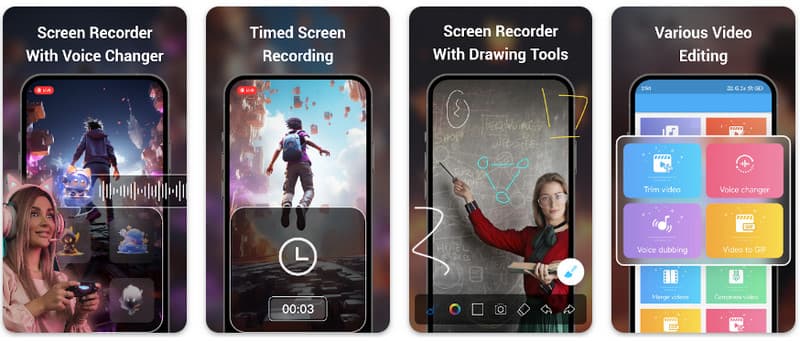
ขั้นตอนที่ 1เปิด Super Screen Recorder บน Android ของคุณ จากนั้นเปิดใช้งานคุณสมบัติลอยของแอปเพื่อใช้งาน
ขั้นตอนที่ 2บนหน้าจอของคุณ แตะ กล้อง ปุ่มยืนยันการตั้งค่าและแตะ เริ่มเลยจากนั้นระบบจะเริ่มนับถอยหลัง 3 วินาทีก่อนการบันทึก
ขั้นตอนที่ 3แตะ สี่เหลี่ยม ปุ่มเพื่อสิ้นสุดการบันทึกและบันทึกไว้ในอุปกรณ์ Android ของคุณ
โบนัส: บันทึกหน้าจอทั้งบนคอมพิวเตอร์และโทรศัพท์มือถือด้วยคุณภาพที่ดีที่สุด
คุณเชื่อหรือไม่ว่าคุณสามารถบันทึกหน้าจอโทรศัพท์ Android ของคุณลงบนคอมพิวเตอร์ได้? โปรแกรมบันทึกหน้าจอ AVAide โปรแกรมนี้ออกแบบมาเพื่อบันทึกหน้าจอบน Windows และ Mac เป็นหลัก แต่ก็สามารถบันทึกหน้าจอแบบเต็มรูปแบบของโทรศัพท์ Android ได้เช่นกัน ซึ่งมีประโยชน์อย่างยิ่งเมื่อคุณต้องการสร้างวิดีโอสอนการใช้งานบางอย่างบน Android แล้วนำไปตัดต่อโดยตรงบน Mac หรือ Windows
โปรแกรม AVAide Screen Recorder รองรับการบันทึกหน้าจอทั้งบน Windows และ Mac โดยใช้ตัวแปลงสัญญาณ AV1 และ HEVC ซึ่งสามารถบีบอัดไฟล์บันทึกได้อย่างมากในขณะที่ยังคงคุณภาพวิดีโอที่ดีที่สุด การเร่งความเร็วฮาร์ดแวร์เต็มรูปแบบช่วยให้คุณบันทึกวิดีโอขนาดยาวได้โดยใช้ CPU น้อยมาก ที่น่าสนใจยิ่งกว่านั้นคือมีไมโครโฟนที่ได้รับการปรับปรุงซึ่งช่วยเพิ่มความคมชัดโดยการตัดเสียงรบกวนพื้นหลังและเสียงสะท้อน โปรแกรมนี้สร้างการบันทึกที่ยอดเยี่ยมด้วยการนำทางและคุณสมบัติการแก้ไขที่ง่าย เช่น การตัดแต่งและการใส่คำอธิบายประกอบ แม้ว่าจะเป็นซอฟต์แวร์ที่มีราคาสูง แต่ก็ขอแนะนำเป็นอย่างยิ่งเพราะสามารถใช้งานได้ทั้งเพื่อวัตถุประสงค์ส่วนตัวและธุรกิจ
- บันทึกภาพจากอุปกรณ์ Android หรือ iOS ของคุณด้วยคุณภาพวิดีโอที่ดีที่สุด
- สร้างวิดีโอสอนการใช้งานพร้อมฟีเจอร์การวาดภาพและการใส่คำอธิบายประกอบได้อย่างง่ายดาย
- รองรับโคเด็กเอาต์พุต AV1 และ HEVC เพื่อบีบอัดวิดีโอเอาต์พุตในระดับสูง
- นำเสนอคุณสมบัติการตัดต่อวิดีโอที่ใช้งานง่าย เพื่อช่วยคุณแก้ไขวิดีโอที่บันทึกไว้บนระบบ Android
ขั้นตอนที่ 1ตอนนี้คุณสามารถดาวน์โหลดโปรแกรมบันทึกหน้าจอลงในพีซีของคุณได้โดยทำเครื่องหมายที่ปุ่มดาวน์โหลดที่นี่ จากนั้นติดตั้งแอปโดยทำตามคำแนะนำบนหน้าจอและเปิดใช้งานเพื่อดำเนินการขั้นตอนถัดไป

ดาวน์โหลดฟรี สำหรับ Windows 7 หรือใหม่กว่า
 ดาวน์โหลดอย่างปลอดภัย
ดาวน์โหลดฟรี สำหรับ Mac OS X 10.13 หรือใหม่กว่า
ดาวน์โหลดอย่างปลอดภัยขั้นตอนที่ 2เมื่อระบบเริ่มทำงานแล้ว ให้วางเฟรมการบันทึกไว้ในบริเวณที่คุณต้องการเริ่มบันทึก ในที่นี้ คุณสามารถบันทึกทั้งหน้าจอได้โดยเลือกตัวเลือกเต็มหน้าจอแทนตัวเลือกภูมิภาค

ขั้นตอนที่ 3จากนั้นสามารถตั้งค่าระบบและไมโครโฟนสำหรับการบันทึกได้หากจำเป็น หากต้องการเพิ่มใบหน้าของคุณลงในการบันทึก ให้เปิดใช้งานตัวเลือกเว็บแคมที่นี่ จากนั้นคลิก REC เพื่อเริ่มนับถอยหลังและเริ่มการบันทึก

ขั้นตอนที่ 4เมื่อคุณเสร็จสิ้นการบันทึก ให้คลิก หยุด ปุ่มซึ่งเป็นสี่เหลี่ยมสีแดง ในหน้าต่างถัดไปที่ปรากฏขึ้น คุณสามารถแก้ไขการบันทึกที่คุณถ่ายไว้ก่อนหน้านี้ด้วยตัวเลือกที่พร้อมใช้งานที่นี่ จากนั้นวางเคอร์เซอร์ของคุณบนการบันทึกและคลิก ดาวน์โหลด ปุ่มเพื่อบันทึก แอปนี้พิสูจน์คุณค่าของมันได้ เครื่องบันทึกโอเพ่นซอร์สที่ดีที่สุด มีอยู่.

ส่วนที่ 4: คำถามที่พบบ่อยเกี่ยวกับวิธีการบันทึกหน้าจอใน Android
ฉันจะหาตัวเลือกบันทึกหน้าจอได้จากที่ไหนในเมนูการตั้งค่า?
เพื่อเข้าถึงฟีเจอร์ในตัวเพื่อ บันทึกหน้าจอบน Android หากไม่ได้ใช้แอปพลิเคชันจากภายนอก ให้ปัดนิ้วลงสองครั้งจากด้านบนของหน้าจอเพื่อเปิด การตั้งค่าด่วน แผงและมองหา บันทึกหน้าจอ (หรือไอคอน "การบันทึกหน้าจอ") หากไม่ปรากฏ ให้แตะที่ไอคอนนั้น แก้ไข กดปุ่ม (รูปดินสอ) เพื่อลากไอคอนบันทึกหน้าจอไปยังไอคอนที่ใช้งานอยู่ เมื่อเพิ่มแล้ว คุณสามารถแตะไอคอน เลือกการตั้งค่าเสียง เช่น บันทึกเสียงระบบภายในหรือไมโครโฟน แล้วกดเริ่มเพื่อเริ่มบันทึกหน้าจอได้โดยตรงจากเมนูการตั้งค่าระบบของคุณ
ทำไมฉันถึงหาฟังก์ชันบันทึกหน้าจอใน Android ของฉันไม่เจอ?
การที่ไม่มีตัวเลือกการบันทึกหน้าจอในตัวบน Android มักเป็นเพราะอุปกรณ์ของคุณใช้ระบบปฏิบัติการรุ่นเก่า เนื่องจากฟีเจอร์นี้เพิ่งได้รับการกำหนดให้เป็นมาตรฐานเมื่อ... แอนดรอยด์ 11หากซอฟต์แวร์ของคุณเป็นเวอร์ชันล่าสุด ตัวเลือกเปิด/ปิดอาจถูกซ่อนไว้จากคุณ การตั้งค่าด่วน เมนู; โดยปกติคุณสามารถแสดงเมนูได้โดยการแตะที่ไอคอน แก้ไข กดปุ่มในแถบแจ้งเตือนแล้วลากไอคอน "บันทึกหน้าจอ" ไปยังมุมมองที่ใช้งานอยู่ นอกจากนี้ อุปกรณ์ "Go Edition" ระดับเริ่มต้นบางรุ่นหรือธีมเฉพาะของผู้ผลิตอาจปิดใช้งานคุณสมบัตินี้เพื่อประหยัดทรัพยากรระบบ ในกรณีดังกล่าว การใช้แอปพลิเคชันของบุคคลที่สาม เช่น XRecorder หรือ Super Screen Recorder จะเป็นวิธีแก้ปัญหาที่มีประสิทธิภาพที่สุด
ทำไมปุ่มบันทึกหน้าจอถึงหายไป?
ปุ่มบันทึกหน้าจอมักจะหายไปเนื่องจากถูกย้ายออกนอกพื้นที่ใช้งานของการตั้งค่าด่วนโดยไม่ได้ตั้งใจ คุณสามารถเรียกกลับคืนมาได้โดยการแตะที่ปุ่มนั้น แก้ไข (ไอคอนรูปดินสอ) ในแถบแจ้งเตือนของคุณแล้วลากไอคอนกลับมา อาจถูกซ่อนไว้เนื่องจากโหมดประหยัดพลังงาน ถูกจำกัดโดยโปรไฟล์การทำงาน หรืออาจต้องรีสตาร์ทระบบเพื่อรีเฟรช UI หลังจากการอัปเดตซอฟต์แวร์
โดยใช้บทช่วยสอนที่แสดงไว้ที่นี่ คุณจะได้เรียนรู้ วิธีการบันทึกหน้าจอบน Android Samsungบทช่วยสอนนี้จะเป็นประโยชน์อย่างมากต่องานบันทึกหน้าจอของคุณ โดยเฉพาะอย่างยิ่งหากคุณเป็นผู้ใช้ Android แบ่งปันข้อมูลนี้กับเพื่อนผู้ใช้ Android ของคุณเพื่อให้พวกเขาได้ทราบว่าต้องทำอย่างไร
เกี่ยวกับผู้เขียน

บันทึกหน้าจอ เสียง เว็บแคม การเล่นเกม การประชุมออนไลน์ ตลอดจนหน้าจอ iPhone/Android บนคอมพิวเตอร์ของคุณ