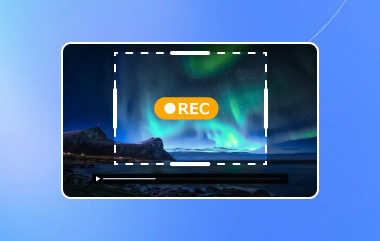
You might want to record yourself for school projects, online meetings, tutorials, presentations, or even fun content creation. If you are a Mac user looking for ways to record yourself on a Mac, this write-up is just what you need. We will show you several easy methods, each with its own perks.
So, please get ready, set up your camera, and follow along to learn how to record yourself on a Mac, step by step.
Part 1: The Easiest Way to Overlay Your Webcam on Mac
If it is your first time recording yourself, whether for school, work, or content creation, it is smart to use a recorder that is simple and reliable. Fortunately, AVAide Screen Recorder makes overlaying your webcam on a Mac easy.
With it, you can adjust the picture-in-picture size to fit your video perfectly. Of course, you can also record your screen, system sound, webcam, and microphone in top quality. Moreover, you can use annotation tools to highlight ideas. Another best part about it is that you can record for long hours without stopping, which is beneficial if you are going to do some tutorials or discuss something.
Without further ado, start recording yourself on a Mac below!
Step 1First and foremost, download and install AVAide Screen Recorder on your Mac. Once installed, please open it and explore the interface a little. Do not worry, it is easy to use, and you will get comfortable quickly.

FREE DOWNLOAD For Windows 7 or later
 Secure Download
FREE DOWNLOAD For Mac OS X 10.13 or later
Secure DownloadStep 2It is time to pick the screen size for your recording. The Full will capture everything on your screen, while Custom lets you pick just a part. Think carefully about what you want viewers to see.

Step 3Turn on the Webcam option to overlay yourself on the screen. Make sure your face is visible, you have good lighting, and your background looks neat. Are you centered? Check that!

Step 4Enable System Sound to record your Mac's audio and Microphone for your voice. Test the levels so everything sounds clear. A quick sound check can save a lot of headaches later.
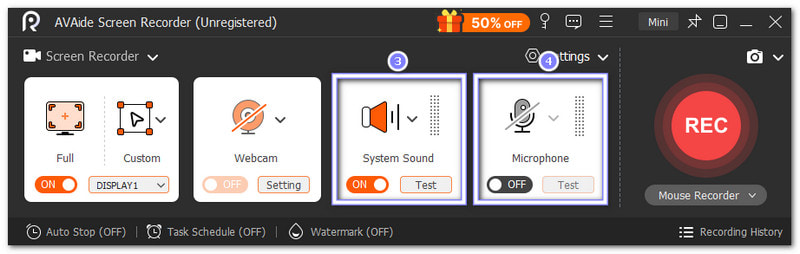
Step 5Hit the REC button to start recording. Stay in the frame, move naturally, and have fun! Once you finish, click Stop. You can preview your video and make sure it looks and sounds just right before saving.

- AVAide Screen Recorder can do more than just overlay your webcam. You can also use it to record long gameplay, movies, or even take screenshots on Snapchat without them knowing, which is a good feature because it will not send alerts to the users.
Part 2: How to Record Yourself with QuickTime
QuickTime Player lets you easily record yourself on a Mac with clear video and audio. You can also record webinar sessions with ease. You can pick which camera and microphone to use, and even set the recording clarity. QuickTime is built in, so you do not need an extra application. It is recommended for users who want fast, reliable recordings with basic editing options.
Learn how to record a video of yourself on a Mac using QuickTime below:
Step 1Open the QuickTime Player on your Mac computer. You can find it in the Applications folder or use Spotlight to search for it.
Step 2At the top left of your screen, click File and then choose New Movie Recording. It will open a recording window with your camera view.

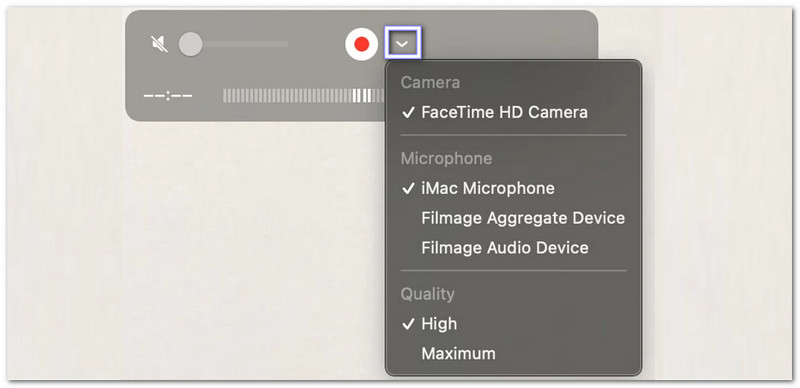
Step 3Press the Arrow next to the Record button to open the Options menu. Here, you can pick your camera, microphone, and even choose the recording quality. Make sure everything looks and sounds right before you start.
Step 4Hit Record at the bottom of the window to start recording yourself. Speak clearly and make sure you stay in frame. You can pause and resume if needed.

Step 5Once you finish, press the Stop button. Then, click File and Save to name your recording and choose where to keep it. e.
Part 3: How to Record Yourself with Photobooth
To record yourself on a Mac, Photobooth shows a live preview and lets you switch quickly between photos and videos. You can see yourself while recording, which helps with framing and expressions. It is easy to start and save your videos instantly. It is ideal for casual recordings, messages, or short clips where you want to check yourself while filming.
Step 1Check that your camera or built-in webcam is working properly. Make sure it is clean and positioned so your face fits in the frame.
Step 2Open the Photobooth app on your Mac. You can find it in Applications or use Spotlight to search for it.
Step 3At the bottom of the Photobooth window, switch to the Video mode using the toggle. It will prepare the program to record a video instead of photos.
Step 4Hit Record at the bottom to begin recording yourself. Speak clearly and stay in the frame. You can move a little if needed.
Step 5Once you finish, press Stop. Then, click Save to name your video and choose where to keep it.

Part 4: How to Record Yourself with Continuity Camera
You are probably thinking about how to record myself on a Mac with Continuity Camera. To answer your question, you can turn your iPhone or iPad into a high-clarity webcam for your Mac with Continuity Camera.
It lets you record yourself with better clarity and even use your device's microphone for clear sound. The camera connects wirelessly or via USB, making it stable and versatile. It works well for online meetings, tutorials, and personal recordings.
Step 1Step 1. Please set up your iPhone or iPad near your Mac so it stays steady during recording. Use a stand or mount if you have one. Keep your device charged by plugging it into your Mac or a USB charger.

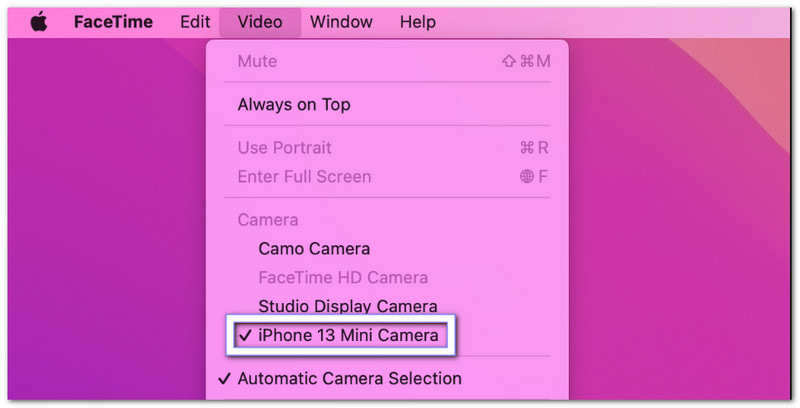
Step 2Step 2. Open FaceTime or another application that works with Continuity Camera. If the application does not automatically use your iPhone or iPad camera, go to the application's video or camera menu and select it as the input.
Step 3Step 3. To use your device's microphone, go to the Apple menu, open System Settings, select Sound, and choose your iPhone or iPad under the Input tab. It will capture clear audio along with your video.
Step 4Step 4. Press Record once you are ready. Look at your iPhone or iPad camera while recording to stay centered and focused. Move a little if needed, but stay in view.
Step 5Step 5. Once you finish, press Stop. Please save your video carefully, ideally keeping a copy on both your Mac and your iPhone or iPad. Now, your recording is ready to watch, edit, or share.
Whatever your reason for wanting to learn the best way to record yourself on a Mac, as long as you have a good recording tool, your videos will look great, and you will not be shy to share them.
For the easiest way to overlay your webcam with a microphone and system sound in high clarity, check out AVAide Screen Recorder. It is powerful and lets you do a lot, from long recordings to screenshots, all in one tool. It offers the best way to record yourself on a Mac!
Record screen, audio, webcam, gameplay, online meetings, as well as iPhone/Android screen on your computer.