


When you see something hilarious or some information you think is useful, a screenshot is one of the best ways to record it and share it with others.
On Android, though, taking screenshots can be a bit confusing: methods vary greatly among different brands and device models. This article will try to include all effective ways to take a screenshot on Android, from basic built-in to brand-specific solutions, and advanced methods that give you more control.
- Part 1. The Standard Methods (Works on Almost All Androids)
- Part 2. Brand-Specific Screenshot Methods
- Part 3. How to Take a Scrolling Screenshot (Full Page)
- Part 4. Advanced Screenshot Features
- Part 5. How to Take Screenshots on Android Auto
- Part 6. Where to Find & Manage Your Screenshots
- Part 7. Troubleshooting Common Screenshot Problems
- Bonus: More Advanced Way to Capture Your Android Screen
Part 1. The Standard Methods (Works on Almost All Androids)
Method 1: Physical Button Combo (The Universal Way)
Step 1Open the page or app you want to capture.
Step 2Press the Side button and Volume Down together at the same time. On my Xiaomi, I needed to hold the buttons for a second before they worked. But on some other Android devices, you only need to press and release quickly. Experiment on your own device.
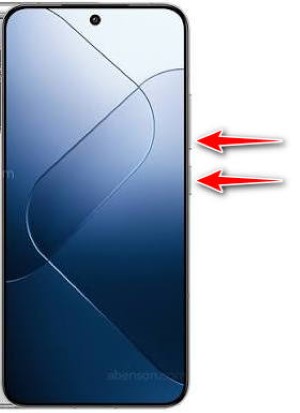
Step 3If it works, you'll see the screen flash. Then a thumbnail of the screenshot appears at the corner of your screen (where it appears may vary depending on your device model).
This button combination can take a full-screen picture of the Android home screen, camera, or any other apps or pages. It should work for screenshots on most Android tablets and phones.
Method 2: Using the Power Button Menu (Android 11+)
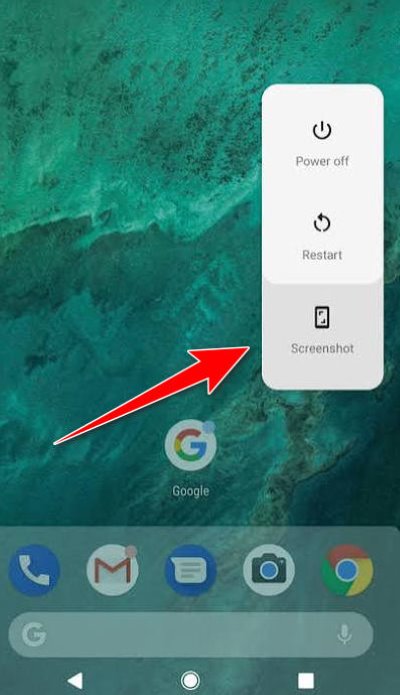
Another shortcut that works on Android 11 and later is to press and hold the Power button until expanded options appear on your screen. There should be a Screenshot button among those options.
Part 2. Brand-Specific Screenshot Methods
Some manufacturers have introduced their unique ways of taking screenshots. Learn how to screenshot on Android phones of specific brands.
Screenshot on Samsung Galaxy (One UI)
1. Palm Swipe
Palm Swipe is a specific screenshot gesture on Samsung. First, hold your hand vertically as if you are chopping something. Then, place the side of your hand on the left edge of the screen, and swipe across to the right edge. When the screen flashes, it means a screenshot is taken.
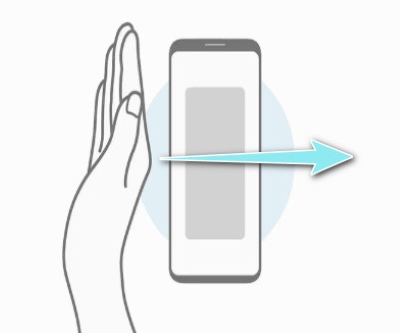
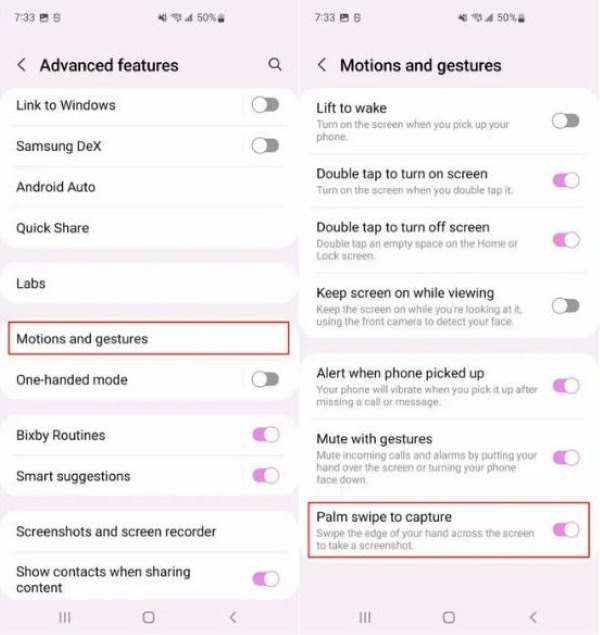
If it doesn't work, the feature is likely disabled on your Samsung. Here's how to turn it on:
Step 1Go to Settings > Advanced Features > Motions and Gestures.
Step 2Scroll down to find Palm Swipe To Capture. Switch it on.
2. Smart Select / AI Select
Smart Select, a.k.a. AI Select on newer models with One UI 6.1.1 and later, lets you capture a specific part of your screen instead of an entire one.
Step 1Use your finger to swipe from the right edge of the screen to the left, to summon the Edge Panel.
- If you fail to open Edge Panel like this, it might be turned off. Go to Settings > Display > Edge Panel to switch it on.
Step 2From the panel, tap Smart Select or AI Select.
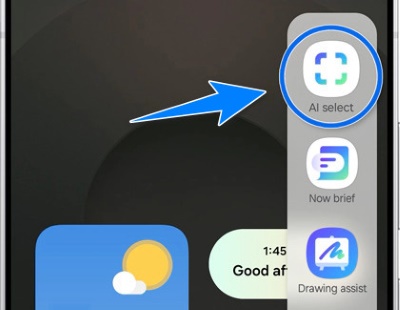
Step 3Choose a capture mode and select the area you want.
Step 4Edit, save, or share the image as you like.
3. Voice Control for Bixby
Bixby is a Samsung voice assistant first introduced in Galaxy S8. Two ways to get Bixby to take a screenshot for you:
- Simply say "Hey Bixby", and when it appears on screen, ask it to "take a screenshot".
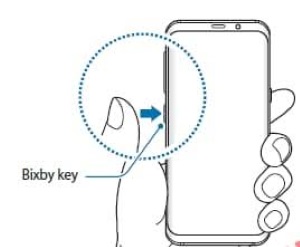
- Press and hold the Bixby key on the side of the phone, then say "take a screenshot".
4. S Pen
The S Pen is a digital stylus built into the Galaxy Note series as well as some later Galaxy Tabs. There's a Screen Write feature that lets you take a screenshot and annotate it with the pen.
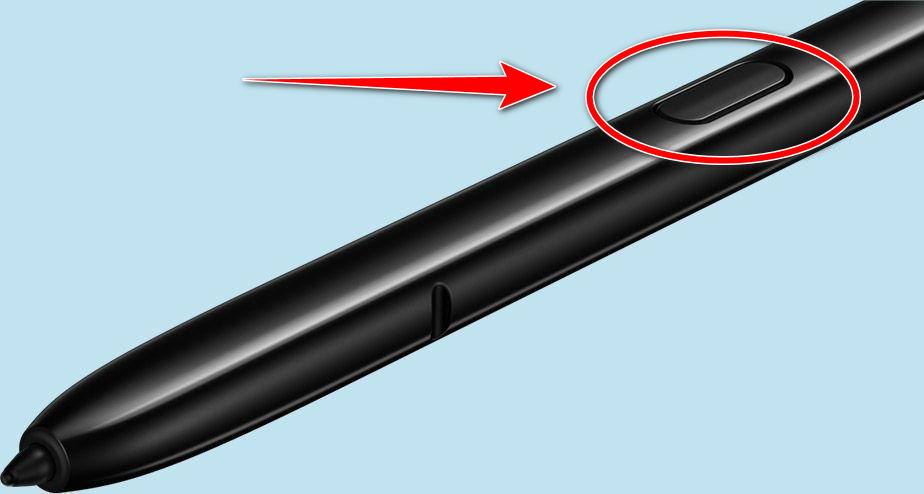
Step 1Pull out the S Pen from its slot and open Air Command. It should open automatically as you take the pen; but if it doesn't, hover your S Pen tip over the screen and press its side button.
Step 2Tap Screen Write. The phone instantly takes a full-screen picture and lets you write, draw, highlight, or crop it.
Step 3Remember to save the image after you're done. The screenshot goes to Gallery > Screenshots by default.
Screenshot on Android Google Pixel (Stock Android)
1. Quick Tap
Quick Tap lets you double-tap the back of your Pixel to perform a shortcut. What the tapping does is up to you: you can customize the shortcut for taking screenshots.
Step 1Open Settings. Go to System > Gestures > Quick Tap.
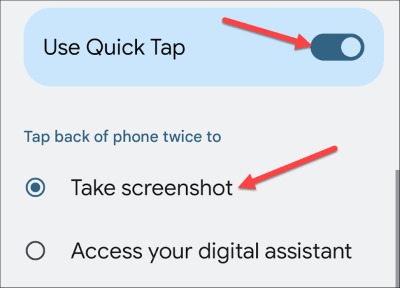
Step 2Toggle on Use Quick Tap.
Step 3Scroll down to find the Take Screenshot option and select it.
You can now take a screenshot by tapping twice on the back of your phone.
2. Recent Apps Screenshot
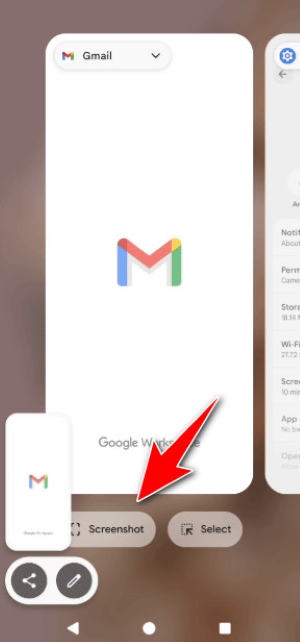
As long as you’re running Android 12 and newer on Pixel, you can use a swipe gesture to take a screenshot from the Recent Apps Overview.
All you need to do is swipe up from the bottom of the screen and hold your finger on the screen for a second. This will open your Recent Apps. Tap the Screenshot button beneath the app card to capture it directly.
3. Google Voice Assistant
Like Samsung, Google Pixels also have a built-in voice assistant that can take screenshots for you. You can activate the assistant by:
- Saying "Hey Google".
- Pressing and holding the Power button on Pixel 6 and later.
- Opening the Google Assistant app.
After it's activated, say "take a screenshot" and it will do it.
Screenshot on OnePlus / Oppo (OxygenOS/ColorOS)
Three-finger Swipe
You can do different types of screenshots using three-finger gestures on OnePlus / Oppo.
- For full-screen capture, swipe down on the screen with three fingers simultaneously.
- For partial capture, tap and hold the screen with three fingers, then drag the area you want.
Screenshot on Xiaomi / Redmi (MIUI/HyperOS)
1. Three-finger Swipe
Xiaomi / Redmi Android also supports the same three-finger gestures as OnePlus and Oppo.
If you haven't enabled the features, go to Settings > Additional Settings > Gesture Shortcuts. Tap on Take a Screenshot, and then toggle on Slide 3 fingers down. Do the same with Partial Screenshot > Press and hold with 3 fingers.
2. Screenshot from the Control Center
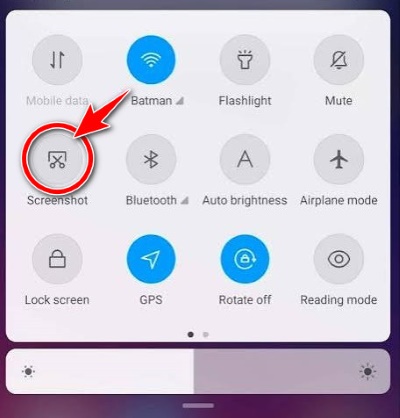
Swipe down on your screen to open the Control Center, then tap the Screenshot tile. This takes a full screenshot immediately and saves to your Gallery app.
Part 3. How to Take a Scrolling Screenshot on Android (Full Page)
You already know how to take a regular full-screen picture from the first two chapters. Taking a full-page screenshot in Android is just one step further.
On Samsung Galaxy
Step 1Open the page you want to capture. Take a full screenshot using any method you prefer.
Step 2Tap the Scroll Capture button on the toolbar, which appears as a pair of downward arrows.

Step 3Repeatedly tap on the screen to scroll it down and capture more content. On some Samsung models, you might need to long-press instead of tapping.
Step 4When it's finished, tap anywhere outside the toolbar to stop and save.
On Other Android Devices
Step 1Capture a full-screen image like before. Next to the thumbnail popping up on your screen, tap the Capture More button.
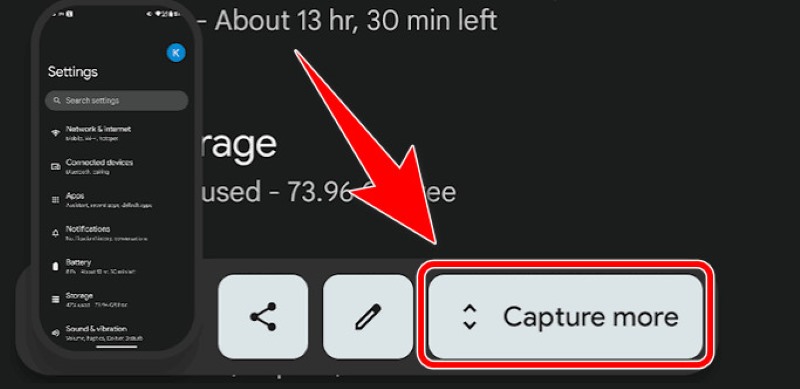
Step 2Drag the edges of the selection box to include the content you want.
Step 3Tap Save.
Part 4. Third-Party Screenshot Apps for Advanced Control
In more complex situations, such as blurring sensitive information or creating professional tutorials, the native screenshot features on Android might feel too basic. That's when third-party screenshot apps come in. They support annotation, stitching long shots, converting, and more advanced features, filling the gap where built-in tools can't reach.
In this part, we will recommend two dedicated Android apps for taking screenshots.
Screenshot Touch
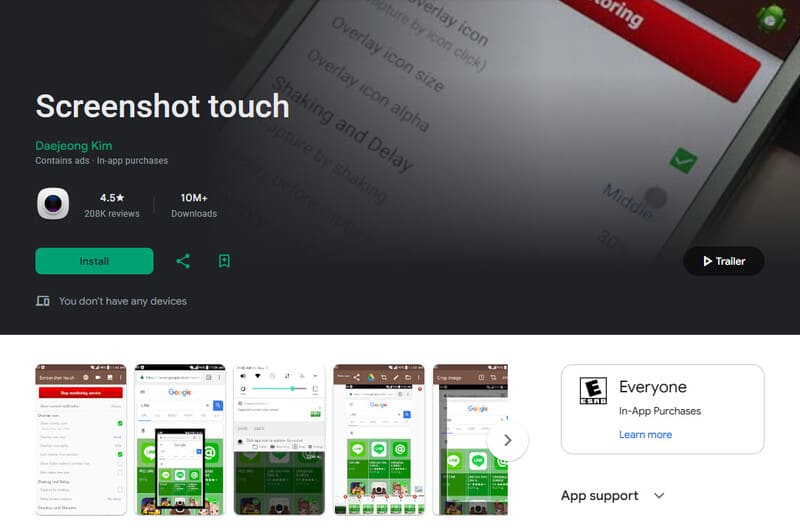
Screenshot Touch by Daejeong Kim is a one-stop app for all types of recording and photo-editing features: scrolling screenshot, video recording, image editing, and more.
One of the advantages of Screenshot Touch is that it makes screen capture easy with only a tap on the floating button or a shake of the phone, which is very helpful for taking many screenshots a day.
Screenshot Touch includes basic editing tools such as cropping, drawing, and adding text. It supports sharing images directly to installed apps on the phone. And I find it especially pleasant to use because I can set multiple saving locations, grouping the images to make them more organized.
ScreenMaster
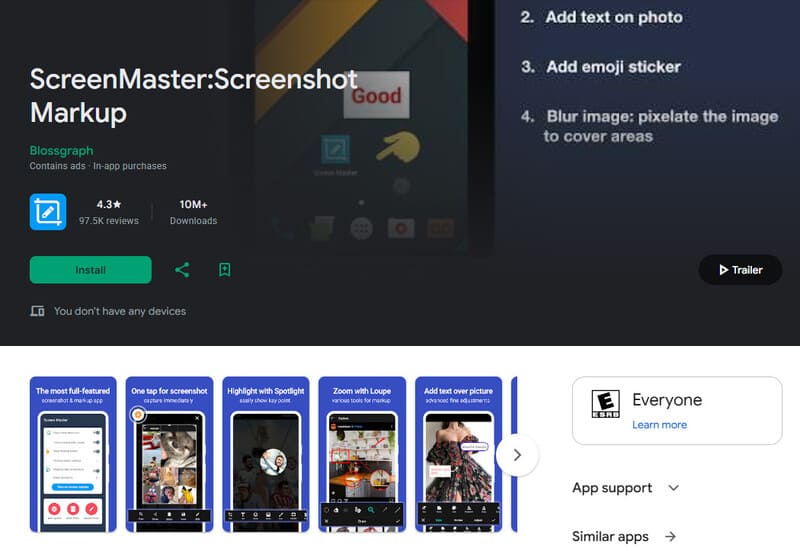
ScreenMaster by Blossgraph is a free and no-root screenshot tool. It not only captures the screen with only simple taps, but also does well in scrolling screenshots and annotation features. It's good at taking instant shots of an entire website, a long article or conversation, or a scrolling app page.
You can edit the screenshot right after taking it. ScreenMaster offers some unique editing features: spotlight, loupe, blur, emoji stickers, etc. Existing images can also be imported and edited on this app.
Part 5. How to Take Screenshots on Android Auto
Android Auto is a driving assistant app that mirrors an Android smartphone or tablet to a car's dashboard. It doesn't support screenshots natively, so you'll need to use the hidden Developer Settings on your device.
Step 1Connect your Android phone or tablet to the car.
Step 2On your phone or tablet, open Settings > Android Auto.
Step 3Scroll to the bottom of the Android Auto settings, and then tap Version and permission info repeatedly until it asks "Allow development settings?". Tap OK to enable Developer Mode.
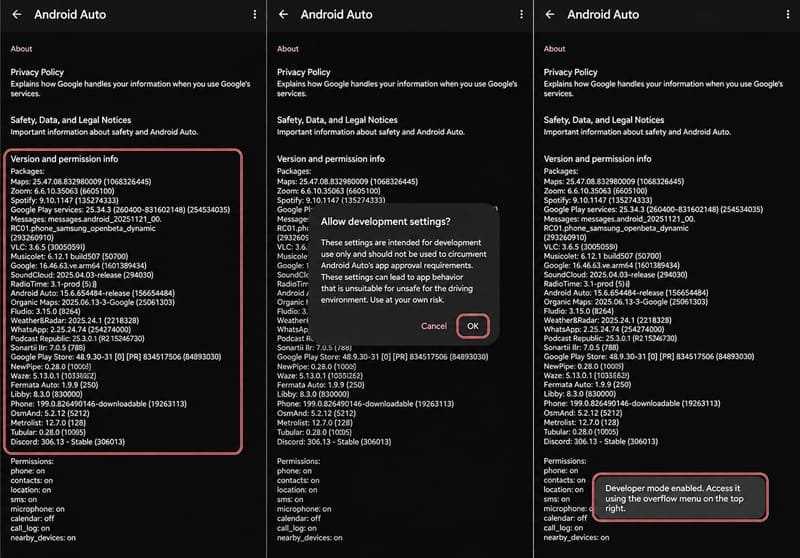
Step 4Tap the 3 dots button in Android Auto settings. Select Developer Settings, then tap Share screenshot now.
Part 6. Where to Find & Manage Your Screenshots
Where Are Screenshots Saved on Android? In most cases, they are automatically saved to the Screenshots folder of your phone.
How to View Screenshots on Android
The easiest way is to view it in Gallery. Open the Gallery app (or Google Photos on a Pixel), tap Albums or Library, then look for the Screenshots album. All the saved screenshots should be in there. You can use Gallery Editor or Google Photo Editor to annotate the screenshot directly in the app.
Another way to access the screenshots on Android is to use the File Manager. Open File Manager and go to Internal Storage > Pictures / DCIM > Screenshots. They are listed in there with file details.
How to Delete Screenshots on Android
In the Gallery/Google Photos app, just select the screenshots and tap Delete, as you would with any other photos. In the File Manager, find the screenshot files, select them, then tap Delete.
Usually on Android 11 and later, this moves the images to Trash / Recycle Bin / Recently Deleted, where they are stored for an extra 30 days before being permanently removed, in case you want to bring them back. But in older versions, this is likely to delete the images once and for all, so be careful when you do it.
Part 7. Troubleshooting Common Screenshot Problems
Black Screenshot on Android
Why it happens
The most likely reason is that the running app uses the Android security feature called FLAG_SECURE to block screen capture. This often happens to health apps, banking apps, and streaming platforms like Disney+ and Netflix, which try to protect their sensitive or copyrighted content. Apart from that, it can also be due to screen overlays or app cache.
How to fix
- Turn off the app that draws over the screen.
- Go to Settings > Apps, select the app, tap Storage, then Clear Cache.
- If screenshots are blocked by a banking or health app, they often provide alternative ways to share content, like an export button or a protected document. Check the app for options like that.
- Mirror the phone screen to a computer and take screenshots on it. Although this isn't 100% effective, it's worth a try.
- The most reliable way is to take a photo of the screen using another phone.
Android Screenshot Notification Not Appearing
Why it happens
The notification feature is likely disabled. This can be frustrating because you can't view the screenshot by simply tapping on the thumbnail now.
How to fix
Turn on Notifications via the following paths:
- On Samsung, go to Settings > Notification > Apps notification > the 3 dots button > Show system apps > Samsung Capture.
- On Pixel, go to Settings > Apps & notifications > See all apps > 3 dots > Show system > System UI > Notifications.
- On Xiaomi/Redmi/OnePlus/Oppo, go to Settings > Apps > Manage apps > the dots button > Show system apps > Screenshot.
Screenshot Keeps Failing or Not Saving
Why it happens
- Hardware issue: You can't take screenshots probably because your Power button or Volume Down button is stuck and not responsive.
- Storage limited: When free space is smaller than 5% of total storage (the exact proportion varies on different models), Android can reject "unnecessary" writes, like a new screenshot image, to maintain a buffer zone for your device system.
How to fix
- Try other screenshot methods without pressing keys.
- Remove rarely-used apps or files from your storage to create more space.
Can't Find Screenshots After Taking Them
Why it happens
Normally, screenshots can be found in the Gallery app. If not, it might be having a glitch. Or if you took the screenshot with a third-party app, it might save to a different folder rather than the default Screenshots.
How to fix
- View the screenshot in File Manager instead of Gallery.
- Check the saving folder of the third-party app, if you're using one.
Bonus: More Advanced Way to Capture Your Android Screen
If methods on mobiles feel limited for you, try mirroring your phone screen to a computer and capture it in more advanced ways. AVAide Screen Recorder can do the job perfectly: it can cast the screen of a connected Android to a computer, and take screenshots on it easily.
样式:
- Mirror your phone screen to the computer without lag.
- Take full-screen or customized partial screenshots with ease.
- Edit screenshots with lines, shapes, blurs, and callouts.
- Manage your screenshots in well-organized folders.

 Secure Download
Step 1Download and install AVAide Screen Recorder for Windows or Mac.
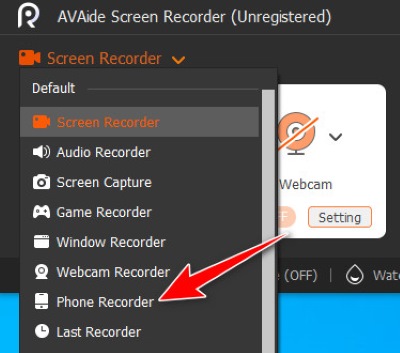
Step 2Run the software. Click the downward arrow next to Screen Recorder. In the drop-down, select Phone Recorder.
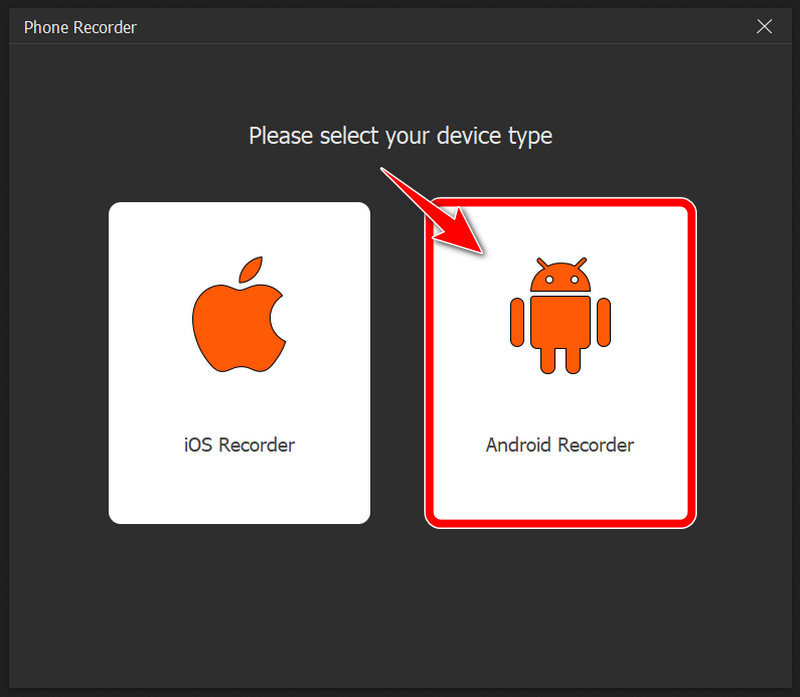
Step 3Select Android Recorder.
Step 4Connect your Android device to the computer via Wi-Fi or a USB cable, following the on-screen instructions.
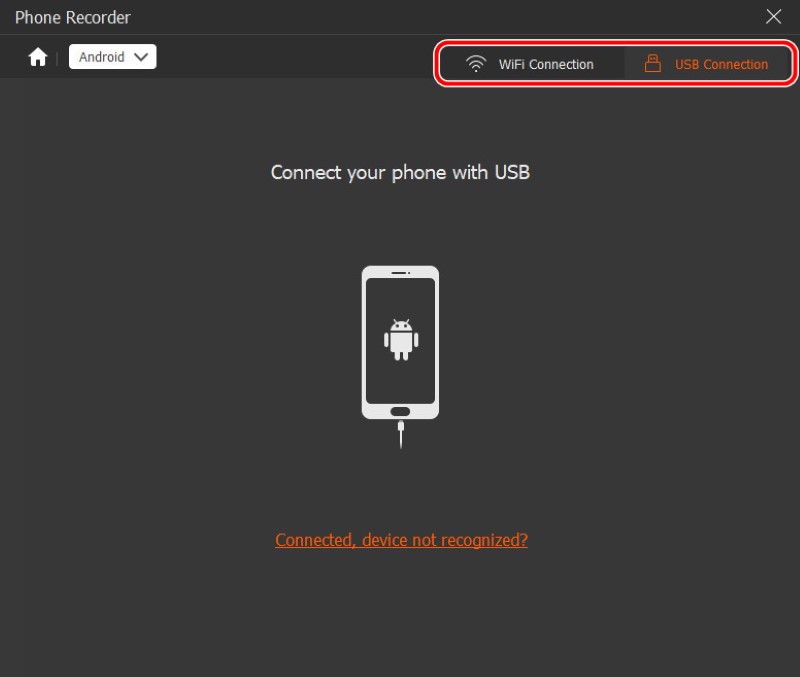
Step 5After your phone is detected, select Screen Mirroring. Then the software prepares to record the screen on Android. In the recording window that appears, you can capture the phone screen by clicking the Snapshot button at the bottom.
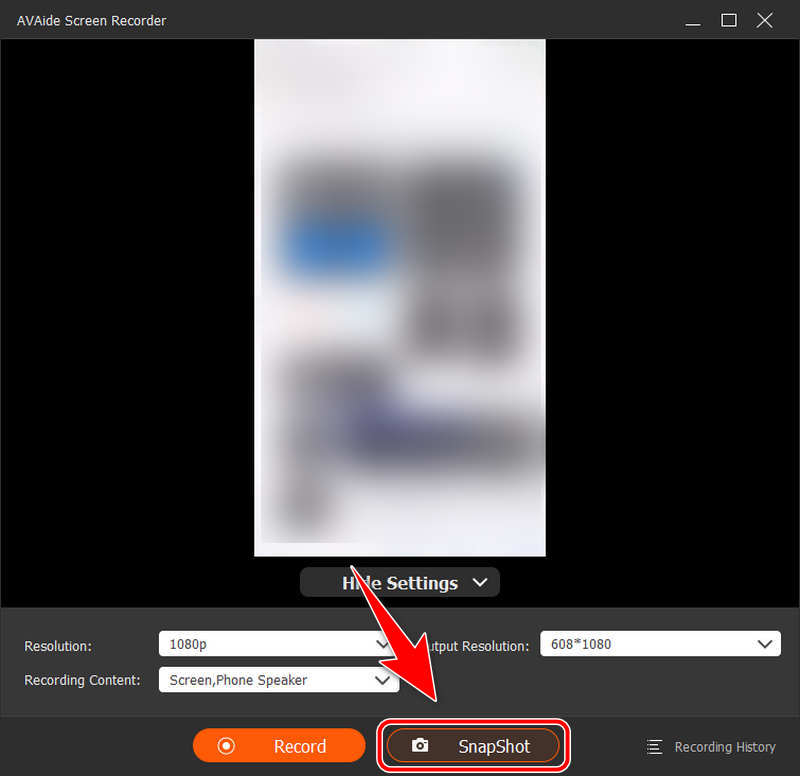
Step 6Crop, edit, copy, and save the screenshot as you wish.
How do you take a screenshot on an Android device? The best way depends on your device brand and model, and your exact needs. The shortcuts and gestures are enough for casual use, while for more advanced control, you can turn to third-party apps, or capture the screen on a computer using AVAide Screen Recorder.
ABOUT THE AUTHOR

Record screen, audio, webcam, gameplay, online meetings, as well as iPhone/Android screen on your computer.