Steam is a well-loved platform for gaming. If you want to share your gameplay with others, you must know how to record Steam gameplay. Here, you will find 3 easy-to-use screen recording tools that help capture Steam gameplay. Each tool includes simple recording steps to save and share your game moments easily. Happy recording, and enjoy sharing your gaming adventures!
Part 1: The Best Way to Record Gameplay on Steam
Best for: All users prefer to record high-quality gameplay with external and internal sound.
Recording your Steam gameplay can be a great way to capture exciting moments, share strategies, or keep a record of your best plays. Whether you are trying to create content for YouTube, share highlights with friends, or save achievements for yourself. If you want to learn how to record gameplay on Steam on Windows and Mac, AVAide Screen Recorder is the answer.
AVAide Screen Converter lets you capture the entire screen or a custom area with sound. With its game recording feature, you can save your gameplay in 1080p, ensuring a smooth, lag-free video that looks professional. It also supports simultaneous webcam and screen recording. You can add a face cam overlay. It is ideal for gaming videos where you want to add commentary. With AVAide Screen Recorder, recording gameplay on Steam is straightforward and customizable. It provides you with everything you need to create impressive videos!
Step 1Download and Install the AVAide Screen Recorder on your Windows or Mac computer. Once installed, proceed to open it.

FREE DOWNLOAD For Windows 7 or later
 Secure Download
FREE DOWNLOAD For Mac OS X 10.13 or later
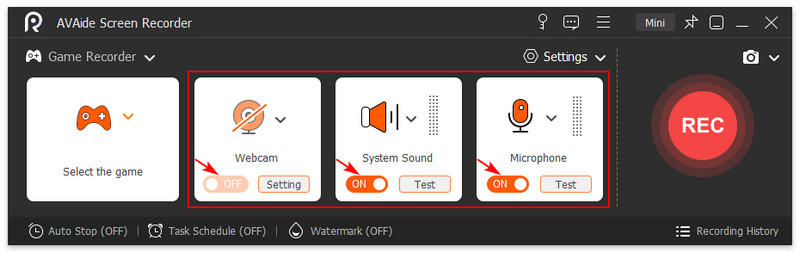
Secure DownloadStep 2Head to the Recording option and select Game Recorder from the drop-down menu. Then, click the Select the Game option and choose the Steam window.

Step 3Now, toggle on the Webcam option if you want to show your face while recording your gameplay. Turn on the System Sound option to record the sound coming from your gameplay. Switch on the Microphone option to record your voice while the recording is ongoing. It is useful if you want to react or say something while playing.
- You can turn the webcam on or off anytime during recording. You can also fine-tune the sound volume as needed. Enabling Microphone Noise Cancellation and Microphone Enhancement in the Microphone settings is a good idea. It helps make your voice clearer and achieve the best voice clarity.
Step 4Once everything is set, click the REC button to record your Steam gameplay. While recording, you can take snapshots and add annotations and text. Once done recording, click the Stop button.

Step 5You can now preview your recorded Steam gameplay. You can remove unnecessary parts using the built-in trimmer. After that, proceed to save it. Please upload it on your social media accounts or gaming and streaming platforms!

Part 2: How to Record Steam Gameplay with OBS Studio
Best for: Users who can manage complex recording processes and want to avoid paying.
OBS Studio is a free screen recording program that works great for recording and streaming. It is open-source so anyone can use it at no cost. This game recorder lets you capture everything happening on your screen. It provides many settings to customize your recording just as you want. It is perfect if you want to record gameplay on Steam.
OBS Studio is also built to work with the latest hardware encoding technology. It means it can use your computer's hardware to lower the power it needs from the processor. Using hardware encoding, OBS Studio keeps your computer running smoothly, even while recording gameplay. However, the user interface is not straightforward. It requires technical knowledge to operate and set up properly.
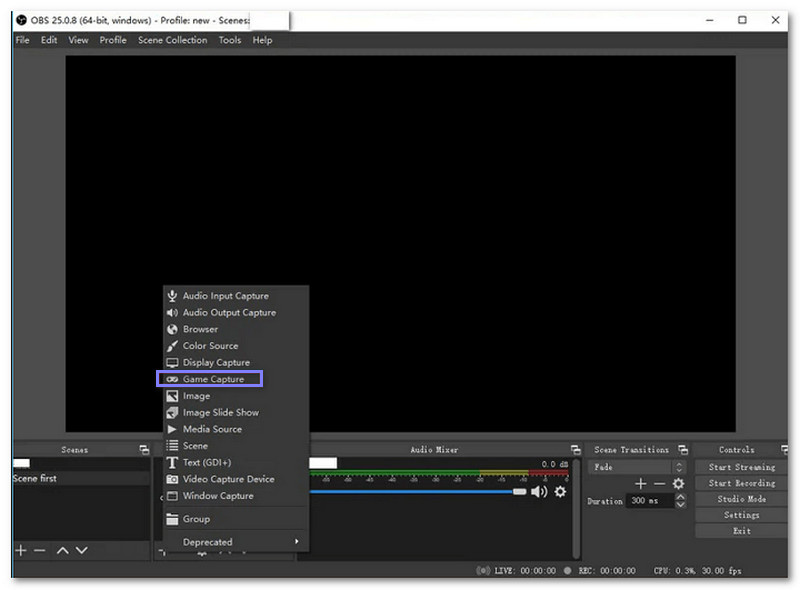
Step 1First and foremost, open OBS Studio. Then, look for the Sources box. Click the (+) button to incorporate a new source.
Choose Game Capture in the list that appears. From there, you will see a drop-down menu where you can select your Steam game.
Step 2OBS Studio offers three capture modes. Here is a quick look at each:
Capture Any Full-Screen Application: Great for recording full-screen games, but remember you need to stay in the game window during recording.
Capture Specific Window: This allows you to pick a specific game window. Ensure to open the game before choosing this mode.
Capture Foreground Window with Hotkey: This option lets you set a key or combination of keys to start and stop the recording. You can customize the keys to make recording easy.
Step 3Pick the game window you want to record and click OK to confirm. Then, navigate to the Settings option. Please set the output file format to MP4 or AVI. Also, tweak other settings. These include video quality, resolution, and bitrate.
Step 4Press the Start Recording button at the lower right when everything's ready. OBS Studio will begin recording your Steam game.
Step 5Once you are finished, hit Stop Recording. Your recorded gameplay will be stored in the location you selected on your computer.
Part 3: How to Record Gameplay in Steam with Game Bar
Best for: Users who want to avoid downloading third-party programs.
The Game Bar is an integrated tool in Windows 10 that is made for gamers. It is perfect for Steam recording gameplay, taking screenshots, and even streaming. This tool is not just for games. It also lets you record anything on your computer screen. So, it is flexible for different needs.
If you have a Windows computer, there is no need to download anything extra. Why? Because Game Bar is included for free. You can open it from the Start menu. Its easy-to-navigate options make recording straightforward. However, it lacked advanced customization options compared to dedicated recording programs.
Step 1Click the Start menu to search for the Windows Game Bar, or quickly open it by pressing Windows + G on your keyboard.
Step 2Ensure your game is open before you start recording. Once the Game Bar is open, you will see different settings you can fine-tune. These include General, Broadcasting, and Audio. These let you control how your recording will look and sound.
Step 3When everything is ready, click Start to begin recording your gameplay. When you are done, click Stop. Your video will be saved automatically on your computer.

- To ensure Game Bar is active, go to Settings, then Gaming, and select Game Bar. Game Bar should be enabled by default. You would not be able to record if it is turned off. Double-checking helps you avoid missing out on capturing your game highlights!
Now, you have explored 3 ways to record gameplay on Steam. Each method offers unique benefits. You can use the Game Bar for quick and easy captures. OBS Studio gives you lots of control over settings for a customized recording. Then, there is AVAide Screen Recorder. It combines ease of use with high-quality results.
AVAide Screen Recorder stands out for its easy handling of long gaming sessions or short highlight clips. It records smoothly without any lag and keeps your video quality high. Enjoy capturing your best gaming moments, and save all your best highlights!
Record screen, audio, webcam, gameplay, online meetings, as well as iPhone/Android screen on your computer.