Представьте, что вы пытаетесь сохранить обучающий материал, игровой момент или онлайн-встречу, но не знаете, как это сделать на своем устройстве. Зная... как записывать экран на iPad Это позволит легко сохранять и делиться этими моментами. В этом руководстве вы узнаете, как включить запись, использовать звук, устранить неполадки и улучшить качество для более плавной и качественной записи экрана каждый раз.
Часть 1. Как включить запись экрана на iPad
Не беспокойтесь, кнопка записи экрана пока не установлена в Центре управления, если только она не есть на вашем iPad. Apple добавила эту функцию в iPadOS изначально, и её необходимо включить, прежде чем ею можно будет пользоваться. После добавления вы сможете записывать экран в любое время одним движением пальца и касанием.
Шаг 1Нажмите Настройки приложение на вашем iPad.
Шаг 2Нажмите на Центр управления в меню, которое вы прокрутите вниз.
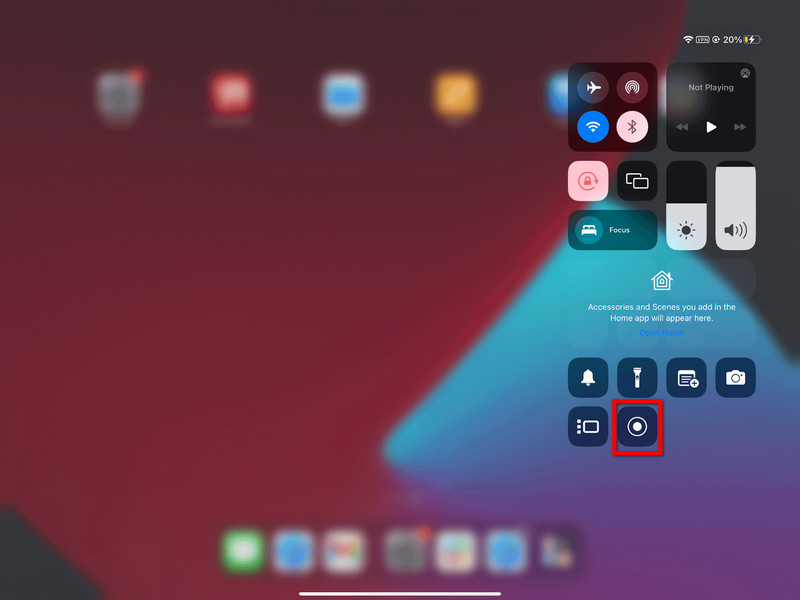
Шаг 3Нажмите + (Добавить) кнопка в Запись экрана раздел списка доступных элементов управления.
Шаг 4Чтобы получить доступ к Центр управленияПроведите пальцем вниз от верхнего правого угла экрана. Теперь вы должны увидеть рекорд.
Часть 2. Как записывать экран на iPad.
После активации запись экрана iPad становится простой и быстрой. Встроенный в iPadOS диктофон — это удобная функция, позволяющая записывать игровой процесс, обучающие видео или даже видеозвонки без установки сторонних приложений.
Шаг 1Нажмите и удерживайте верхний правый угол экрана iPad, затем перетащите его вниз.
Шаг 2Нажмите на Запись экрана Кнопка. После нажатия кнопки начнется 3-секундный обратный отсчет, после которого начнется запись.
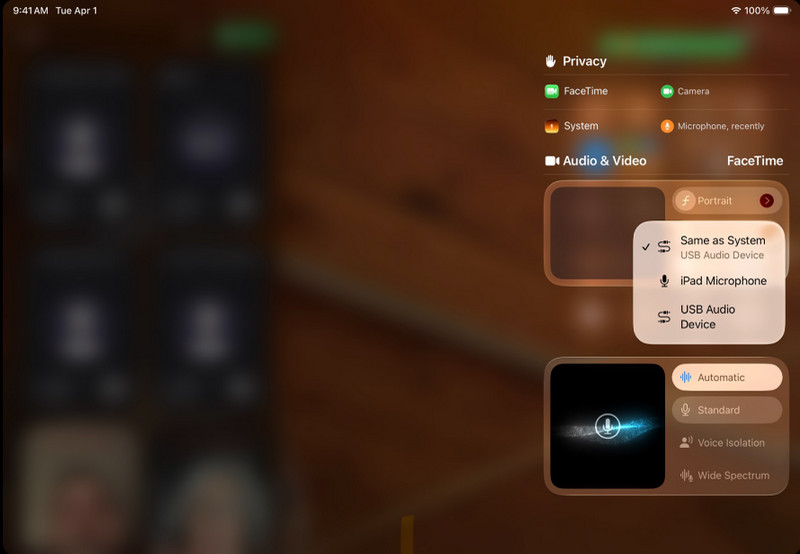
(Необязательный) Удерживайте кнопку Запись экрана нажмите кнопку и коснитесь Микрофон Включить эту функцию, когда вы захотите записать свой голос.
Шаг 3Выберите приложения или действия, которые вы хотите записать.
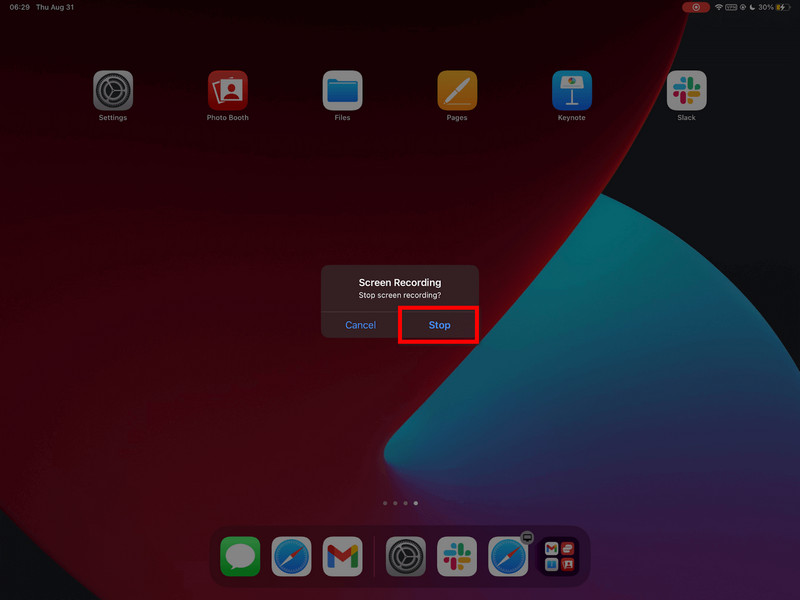
Шаг 4Нажмите на красную строку состояния, а затем нажмите Останавливатьсяили вернуться к Центр управления и коснитесь значка Записывать кнопку еще раз.
Шаг 5Ваше видео автоматически сохранится в Фотографии Приложение, где вы можете редактировать или делиться им.
Часть 3. Как записывать экран на iPad со звуком.
Запись экрана и звука с помощью iPad полезна для обучающих материалов, игр, онлайн-уроков и демонстраций. Запись в iPadOS работает лишь в ограниченном объеме, и перед началом записи важно понимать взаимосвязь между микрофоном и системным звуком.
Важное различие: микрофон против системного звука.
| Тип аудио | Что оно записывает | Доступно на iPadOS | Наилучшие варианты использования |
| Микрофонный звук | Ваш голос и внешние звуки улавливаются микрофоном iPad. | Доступный | Комментарии, обучающие материалы, озвучивание. |
| Системное аудио | Внутренние звуки из приложений, игр, видео и воспроизведения мультимедиа. | Не поддерживается напрямую | Требуется использование внешних инструментов или обходного пути. |
Пошаговая инструкция по записи звука с помощью микрофона.
Шаг 1Проведите пальцем вверх от верхнего правого угла экрана iPad, чтобы открыть Центр управления.
Шаг 2Удерживайте кнопку Запись экрана Нажмите кнопку, чтобы увидеть больше вариантов.
Шаг 3Нажмите на микрофон, чтобы включить его. Он должен загореться красным, указывая на то, что запись голоса включена.
Шаг 4Нажмите Начать записьИ когда обратный отсчет в 3 секунды завершится, начнется запись.
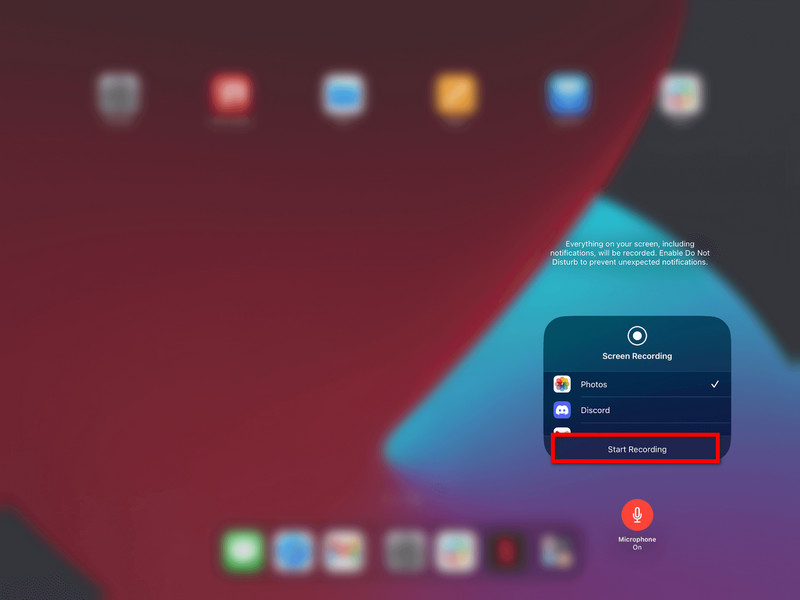
Шаг 5Повторите движения, которые хотите записать. Если микрофон включен, ваш голос будет записан.
ШАГ 6Нажмите на красную строку состояния в верхней части экрана или вернитесь назад. Центр управления и коснитесь значка Записывать кнопку еще раз.
Шаг 7Видео будет автоматически сохранено в Фотографии приложение, где вы можете просмотреть или отредактировать его.
Альтернатива системной аудиозаписи
К сожалению, из-за системных ограничений запись внутреннего звука непосредственно на iPad невозможна, поэтому необходимо решение на основе компьютера. Отличным инструментом является... Программа записи экрана AVAide, что позволяет одновременно отображать экран iPad и записывать звук с экрана и системы.
AVAide Screen Recorder — это высококачественная программа для записи экрана, которая четко фиксирует действия на экране. Она может записывать без задержек и лагов до разрешения 4K/1080p. Также она позволяет одновременно записывать системный звук и звук с микрофона, что идеально подходит для обучающих видеороликов, игр и презентаций.
- Функция высококачественной записи позволяет снимать видео в разрешении 4K или 1080p с четким и высококачественным результатом.
- Двойное аудио
- Поддерживается одновременная запись звука системы и звука микрофона.
- Функция iOS Screen Mirroring отображает и записывает экран вашего iPad на ПК или Mac.
- Функция «Гибкие режимы экрана» поддерживает запись в полноэкранном режиме или в выбранной области.
- Встроенные инструменты редактирования помогут вам быстро обрезать, улучшить и отредактировать записи.

 Безопасная загрузка
Шаг 1Загрузить и установить
Посетите официальный сайт и скачайте AVAide Screen Recorder. Скачайте AVAide Screen Recorder с официального сайта. После установки его можно запускать на компьютере с Windows или Mac.
Шаг 2Выберите вариант iOS
В главном интерфейсе нажмите Телефонный рекордер, затем выберите iOS-рекордер из списка вариантов (iOS и Android).
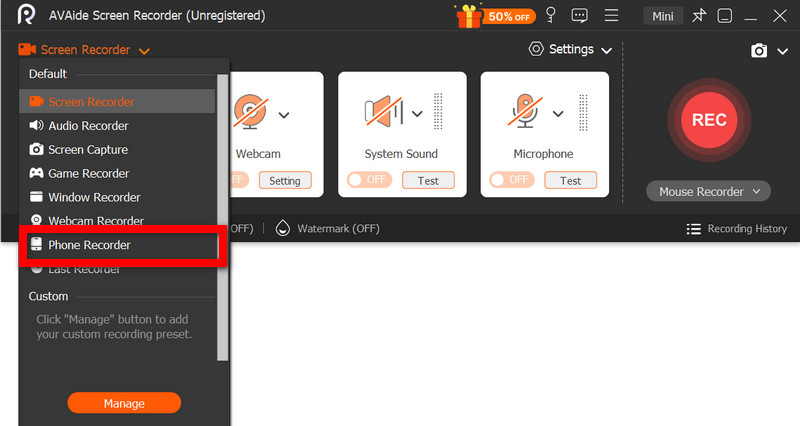
Шаг 3Подключите iPad к компьютеру.
Беспроводное зеркальное отображение экрана вашего iPad на компьютере возможно по той же сети или через USB-кабель, если он есть. В приложении «Зеркало экрана» на вашем iPad выберите устройство AVAide. После подключения вы увидите экран вашего iPad на экране компьютера.
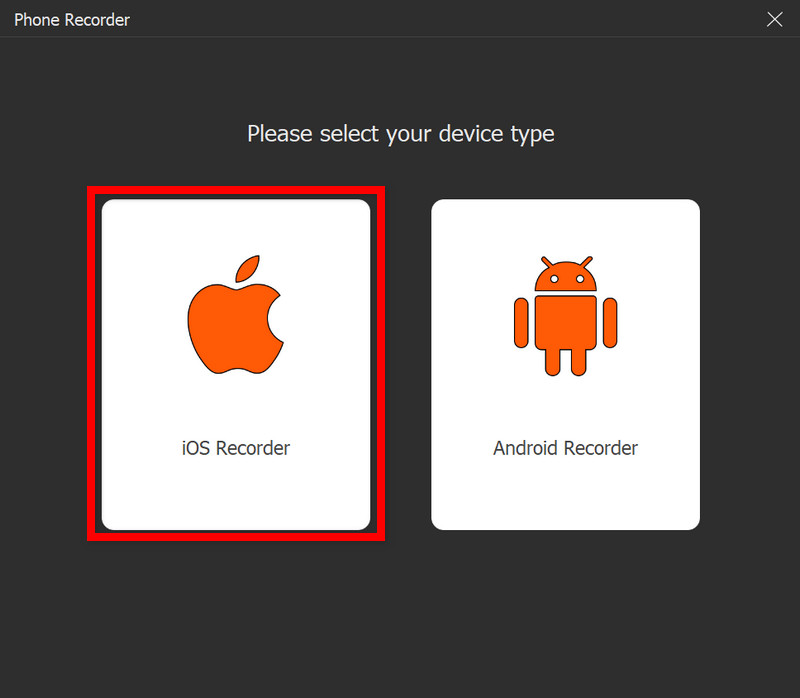
Шаг 4Начать запись
При успешном зеркальном отображении нажмите Записывать Чтобы начать запись экрана вашего iPad, системного звука и сигнала микрофона (если таковой имеется).
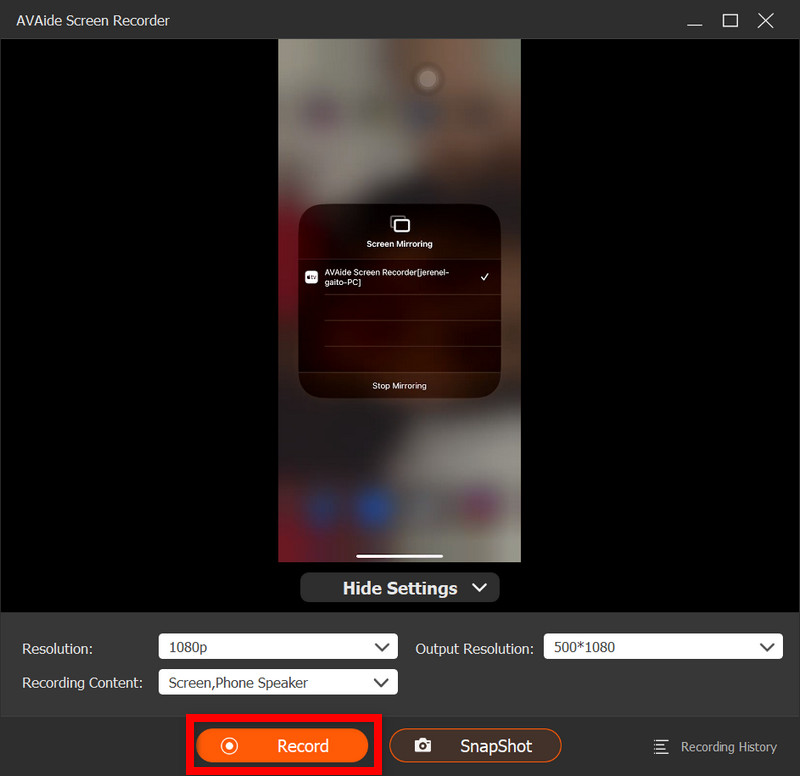
Шаг 5Остановить запись
нажмите Останавливаться Нажмите кнопку, когда закончите. Ваша запись автоматически сохранится на компьютере.
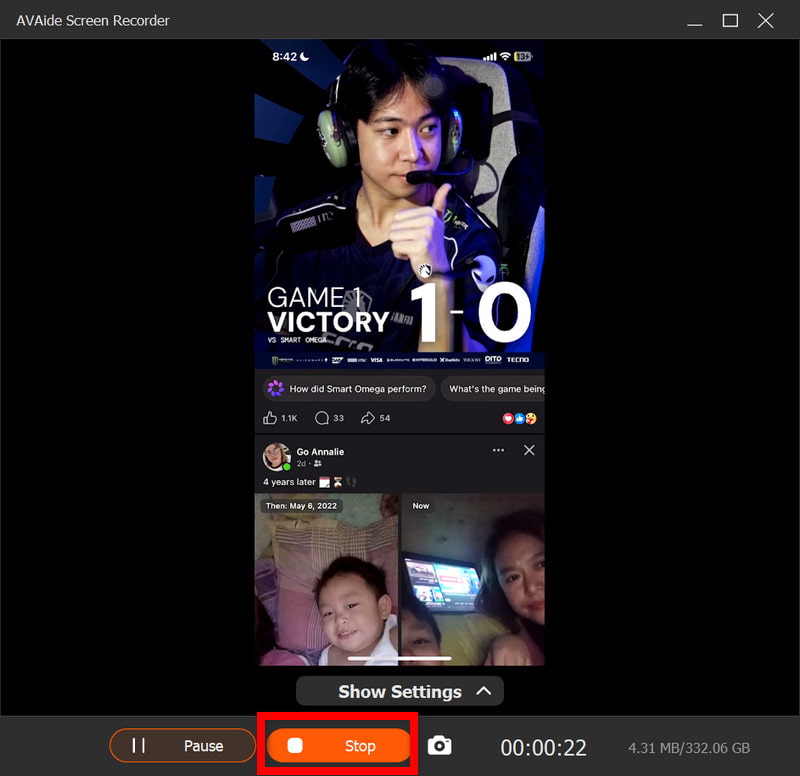
ШАГ 6Отредактируйте видео
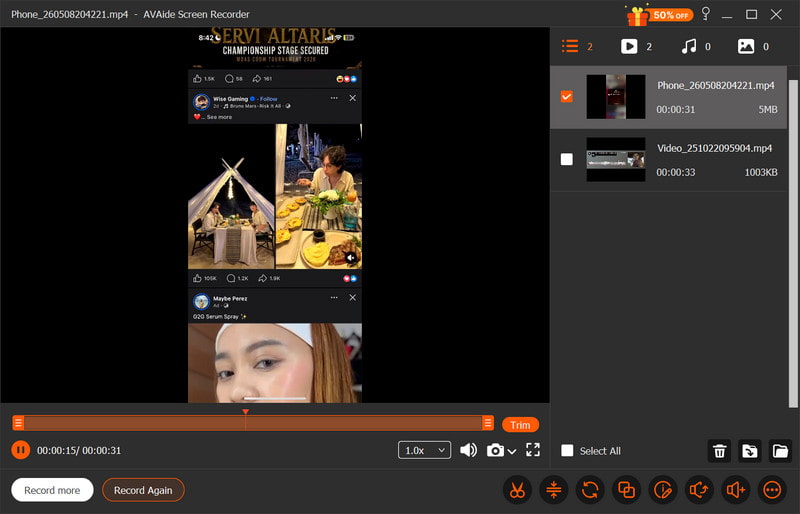
После завершения записи откроется окно предварительного просмотра. Ненужные фрагменты можно вырезать, отрегулировать звук или выполнить простое редактирование перед экспортом окончательного видео.
Часть 4. Почему я не могу записывать экран на своем iPad?
Проблемы с видеозаписью на iPad обычно возникают из-за настроек, ограничений или проблем с производительностью. Ниже перечислены наиболее распространенные проблемы и их причины.
1. Кнопка полностью отсутствует.
Это происходит, если функция записи экрана не установлена в Центре управления. Для её появления необходимо вручную добавить функцию записи экрана в разделе «Настройки» > «Центр управления».
2. Кнопка неактивна или не реагирует.
Как правило, это происходит из-за ограничений на запись экрана, установленных в системных настройках или элементах управления устройства.
- Можно установить ограничения по времени использования экрана.
- Запись может быть запрещена настройками профиля устройства, используемого в школе или на работе.
- В некоторых приложениях может быть невозможно сделать снимок экрана во время их использования.
3. Запись немедленно прекращается после начала.
Проблема обычно связана с системными неполадками или проблемами с хранилищем данных, такими как недостаток свободного места или вмешательство других приложений в процесс записи.
4. Отсутствие звука на записи.
Это происходит, когда аудиоподключение выполнено неправильно или когда пользователь ожидает внутренний звук; на iPadOS невозможно записывать экран во внутреннюю память, поэтому использование встроенной записи невозможно. лучшая программа для записи экрана на Mac может помочь правильно записать звук системы.
5. Запись прерывистая или низкого качества.
Как правило, это вызвано одним из следующих факторов: ограниченным объемом памяти устройства, запущенным слишком большим количеством приложений или устаревшей моделью iPad, не способной записывать видео в таком высоком разрешении.
Часть 5. Полезные советы для более качественной записи экрана.
При записи на iPadOS убедитесь, что ваш iPad правильно настроен для получения плавной, четкой и высококачественной записи. Вот несколько полезных советов по оптимизации качества видео и звука.
1. Освободите место на диске
Перед началом записи убедитесь, что на вашем iPad достаточно свободного места, чтобы избежать зависаний и сбоев, которые могут вызвать проблемы с записью во время съёмки.
2. Закройте неиспользуемые приложения.
Закройте все ненужные фоновые приложения, чтобы повысить производительность системы и предотвратить прерывания или замедления во время записи.
3. Включите режим «Не беспокоить».
Включите режим «Не беспокоить», чтобы предотвратить отображение входящих звонков, сообщений и уведомлений на экране и их отвлечение во время записи.
4. Поддерживайте стабильную настройку экрана.
Не регулируйте яркость, ориентацию или системные настройки во время записи, так как внезапные изменения могут повлиять на стабильность видео и качество записи.
5. Сначала проверьте звук.
Перед началом видеосъемки сделайте короткую тестовую запись, чтобы убедиться, что уровни микрофона установлены правильно, ваш голос звучит четко и записывается должным образом.
6. Используйте чистый главный экран.
Наведите порядок на главном экране или переместите важные приложения в другую папку, чтобы ваша запись выглядела сфокусированной, профессиональной и не загроможденной.
7. Записывайте в тихом месте.
Если вы можете записывать в тихой комнате с минимальным фоновым шумом, ваш микрофон будет лучше улавливать голос и минимизировать нежелательные звуки. запись голоса на Mac или iPad.
запись экрана iPad Это простой, но мощный способ записывать обучающие видеоролики, игровой процесс и важные моменты прямо с вашего устройства. С помощью правильных настроек и советов вы можете улучшить качество видео и звука для достижения лучших результатов. Независимо от того, используете ли вы встроенные инструменты или внешнее программное обеспечение, запись становится проще и надежнее.
ОБ АВТОРЕ

Записывайте действия на экране со звуком, онлайн-встречами, игровыми видео, музыкой, веб-камерой и т. д.