Jak nagrywać ekran na laptopie Lenovo Zależy to od wybranego narzędzia – od wbudowanych funkcji systemu Windows po zaawansowane oprogramowanie. Ten przewodnik przedstawia proste, przejrzyste i skuteczne metody przechwytywania ekranu na urządzeniach Lenovo, zarówno na potrzeby samouczków, spotkań, rozgrywki, jak i codziennego nagrywania.
- Metoda 1. Korzystanie z paska gier Xbox
- Metoda 2. Korzystanie z Lenovo Vantage
- Metoda 3. Korzystanie z Legion Zone/Lenovo Nerve Center
- Metoda 4. Korzystanie z rejestratora ekranu AVAide
- Metoda 5. Korzystanie z szybkich ustawień
- Rozwiązywanie typowych problemów z nagrywaniem ekranu w komputerach Lenovo
Metoda 1. Korzystanie z paska gier Xbox
Wbudowana funkcja nagrywania w Xbox Game Bar to dzieło firmy Microsoft, które płynnie integruje się z systemem Windows i stanowi najwygodniejsze rozwiązanie dla użytkowników Lenovo. Została stworzona z myślą o grach, a jednocześnie służy jako standardowy rejestrator aplikacji, kreator samouczków i rejestrator w przeglądarce. Największą zaletą jest to, że nie wymaga konfiguracji i jest natychmiast gotowy do użycia.
Istnieją jednak pewne wady. Nie zapisuje pulpitu ani Eksploratora plików, a możliwości personalizacji są ograniczone do profesjonalnych narzędzi. Mimo to jest to jedna z najwygodniejszych wbudowanych opcji do luźnych sesji, gdzie jakość i wysiłek nie są aż tak ważne.
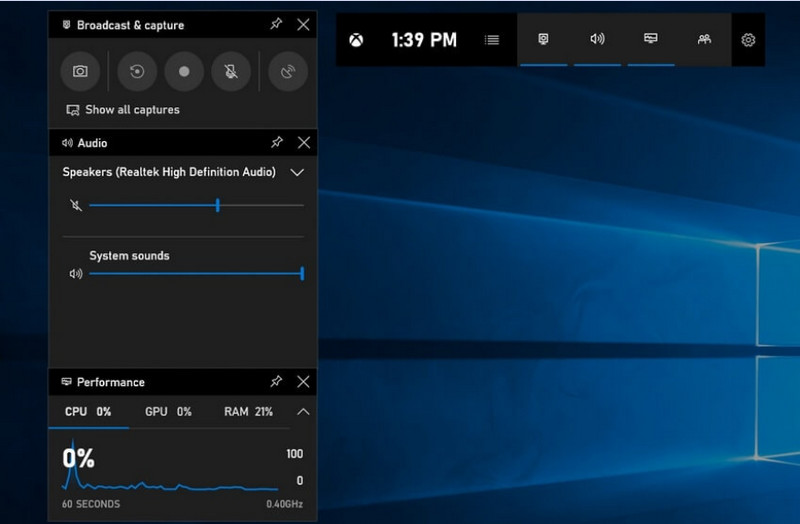
Krok 1Aby otworzyć pasek gier Xbox, naciśnij Windows + G na klawiaturze.
Krok 2Znaleźć Zdobyć panelu lub kliknij na niego z Widżety menu.
Krok 3Kliknij Nagraj (●) przycisk lub naciśnij Windows + Alt + R.
Krok 4Jeśli chcesz nagrać głos, włącz Mikrofon.
Krok 5Naciskać Windows + Alt + R ponownie lub kliknij Zatrzymaj (■) do ukończenia.
Krok 6Znajdziesz swoje nagranie w Filmy > Przechwytuje.
Metoda 2. Korzystanie z Lenovo Vantage
Lenovo Vantage nie jest rejestratorem ekranu, lecz pakietem do zarządzania i optymalizacji systemu. Pełni on raczej pośrednią rolę w nagrywaniu, z niewielką liczbą funkcji wspomagających proces nagrywania w jakiejkolwiek formie, w zależności od modelu urządzenia nagrywającego. Niektóre urządzenia oferują nawet skróty lub narzędzia do obsługi aparatu/wyświetlacza, które mogą ułatwić nagrywanie.
To duże zróżnicowanie pod względem wydajności i dostępności. Podstawowe funkcje nagrywania mogą być obsługiwane na niektórych urządzeniach Lenovo, ale inne mogą ich w ogóle nie obsługiwać. Funkcja jest ograniczona i nieco niespójna w zakresie możliwości nagrywania w trybie pełnoekranowym, ale może być przydatna dla użytkowników, którzy chcą pozostać w ekosystemie Lenovo lub… nagrywać podcast zadowolenie z podstawowych narzędzi.
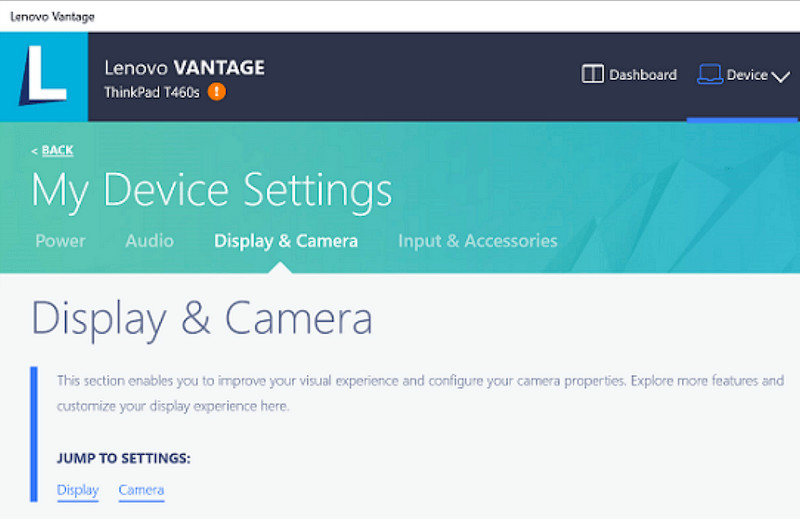
Krok 1Przejdź do Początek menu i kliknij Lenovo Vantage.
Krok 2Uzyskiwać Ustawienia mojego urządzenia > Wyświetlacz i kamera.
Krok 3Sprawdź nagrania i inne dostępne funkcje.
Krok 4Udostępnij wszystkie niezbędne opcje i skróty.
Krok 5Nagraj muzykę korzystając z udostępnionej funkcji (jeśli to możliwe).
Krok 6Znajdź nagrania zapisane w folderze Wideo.
Metoda 3. Korzystanie z Legion Zone/Lenovo Nerve Center
Lenovo Nerve Center (lub Legion Nerve Center – nowsze narzędzia Legion zastąpiły Nerve Sense) jest zoptymalizowane pod kątem urządzeń Lenovo, a w szczególności laptopów Lenovo Legion, przeznaczonych dla graczy. Jest również ściśle zintegrowane z narzędziami do pomiaru wydajności w grach, dzięki czemu użytkownicy mogą wykonywać zrzuty ekranu z gier, monitorując i optymalizując zasoby systemowe.
Jest to jednak dość podstawowy rejestrator. Bardziej chodzi w nim o wygodę niż o personalizację i oferuje jedynie podstawowe opcje nagrywania z ograniczoną kontrolą nad rozdzielczością, przepływnością i ustawieniami zaawansowanymi. Ponadto jest dostępny tylko w niektórych nowszych systemach, a inne go zastąpiły lub usunęły ze swoich systemów, więc nie jest już tak niezawodny jak kiedyś.
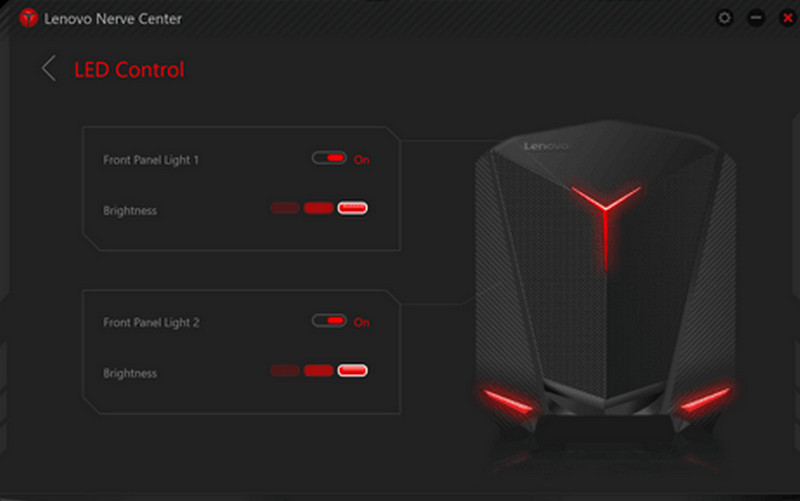
Krok 1Uzyskać dostęp do Lenovo Nerve Center lub Strefa Legionu z urządzenia.
Krok 2Przejdź do narzędzi do nagrywania i/lub gier.
Krok 3Jeżeli masz możliwość wyboru, zmień ustawienia nagrywania, np. rozdzielczość lub jakość dźwięku.
Krok 4Uruchom grę lub aplikację.
Krok 5Nagrywaj przy użyciu domyślnego skrótu lub przycisku.
Krok 6Zatrzymaj nagrywanie i spójrz w swoje Filmy folderu, aby sprawdzić, czy plik został nagrany.
Metoda 4. Korzystanie z rejestratora ekranu AVAide
Rejestrator ekranu AVAide to bardziej zaawansowany i wszechstronny rejestrator ekranu dla Lenovo niż wbudowany rejestrator ekranu. Został stworzony dla użytkowników, którzy oczekują wysokiej jakości wideo, płynniejszej obsługi i większej kontroli nad nagrywaniem. To idealne narzędzie do tworzenia samouczków, nagrywania spotkań czy nagrywania rozgrywki, bez konieczności skomplikowanej konfiguracji, a wszystko to na profesjonalnym poziomie.
Chociaż rejestruje dźwięk systemowy, sygnał z mikrofonu, kamerę internetową i obszary ekranu, obsługuje również nagrywanie w rozdzielczości Full HD, a nawet 4K z minimalnym opóźnieniem w porównaniu z podstawowymi rejestratorami. To sprawia, że jest to kompleksowa aplikacja do przechwytywania ekranu, idealna zarówno do pracy, jak i rozrywki.
- Nagrywaj filmy w rozdzielczości 1080p lub 4K z płynną pracą bez opóźnień.
- Nagrywaj w trybie PEŁNEGO lub NIESTANDARDOWEGO ekranu, zależnie od potrzeb.
- Nagrywaj jednocześnie dźwięk wewnętrzny i głos, uzyskując czysty dźwięk.
- Dodaj funkcję nagrywania Facecam do samouczków, prezentacji lub filmów z rozgrywki.
- Przycinaj, kompresuj i ulepszaj nagrania po ich przechwyceniu.

 Bezpieczne pobieranie
Krok 1Pobierz i zainstaluj oprogramowanie
Odwiedź oficjalną stronę internetową AVAide Screen Recorder. Pobierz instalator systemu Windows, zainstaluj go na laptopie Lenovo i uruchom.
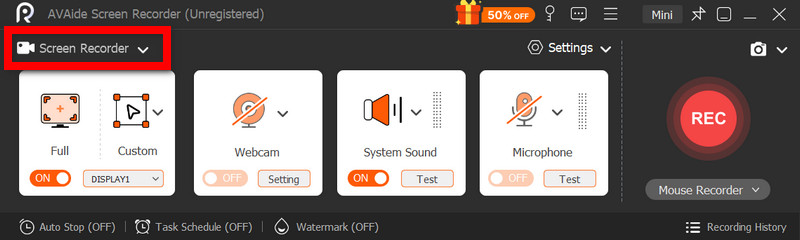
Krok 2Wybierz tryb nagrywania
Otwórz oprogramowanie, a następnie kliknij Nagrywarka ekranu. Nagraj cały ekran za pomocą Pełny lub część ekranu z Zwyczaj.
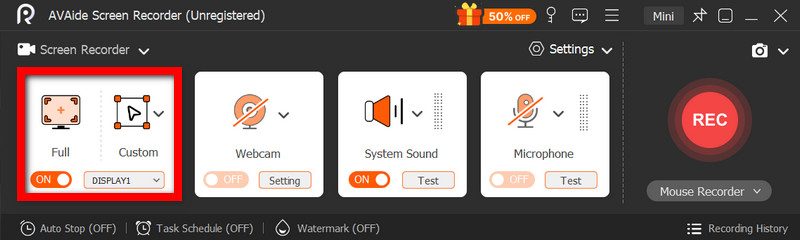
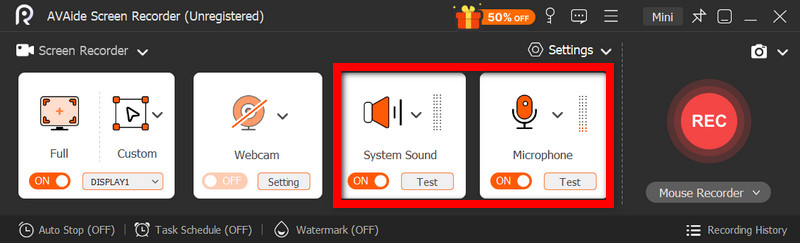
Krok 3Konfiguruj ustawienia audio
Aby nagrać dźwięki wydawane przez komputer, należy aktywować Dźwięk systemowyAby dodać własny głos, aktywuj MikrofonKamerę internetową można również włączyć w razie potrzeby.
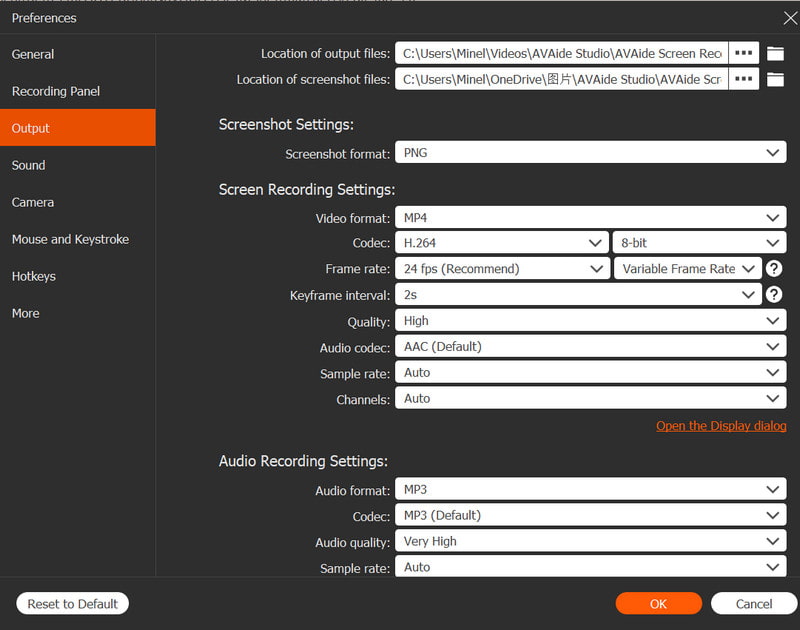
Krok 4Dostosuj ustawienia nagrywania
Użyj Ustawienia przycisk umożliwiający skonfigurowanie jakości wideo, rozdzielczości, liczby klatek na sekundę i formatu wyjściowego w celu uzyskania optymalnej jakości nagrywania.
Krok 5Rozpocznij nagrywanie
wciśnij REC Naciśnij przycisk, aby rozpocząć nagrywanie. Nagrania z Google Meet, samouczki, rozgrywki i inne aktywności na ekranie można płynnie rejestrować.
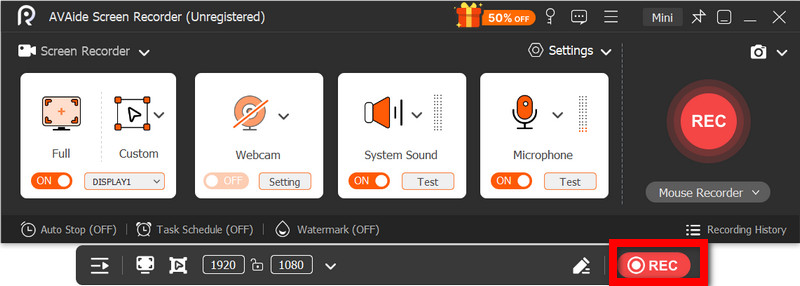
Krok 6Zatrzymaj i zapisz nagranie
Po zakończeniu kliknij Zatrzymać przycisk. Podejrzyj nagranie, w razie potrzeby szybko je edytuj i natychmiast zapisz na komputerze.
Metoda 5. Korzystanie z szybkich ustawień
Tablety Lenovo z systemem Android oferują wbudowaną funkcję nagrywania ekranu w szybkich ustawieniach. Najlepszym sposobem na nagrywanie samouczków, rozgrywki lub aktywności w aplikacjach na tablecie jest brak konieczności pobierania aplikacji innych firm. Łatwa, szybka i zoptymalizowana pod kątem urządzeń mobilnych funkcja idealnie nadaje się do szybkiego nagrywania w podróży.
Brakuje mu zaawansowanych funkcji edycji i dostosowywania, jakie można znaleźć w innych narzędziach do przechwytywania ekranu, ale jest wystarczający do wykonywania prostych zrzutów ekranu z dźwiękiem.
Krok 1Przesuń palcem w górę od dołu ekranu, aby otworzyć Szybkie ustawienia.
Krok 2Spójrz na Nagrywanie ekranu lub Nagrywarka ekranu przycisk. Jeśli go tam nie ma, kliknij Edytować przycisk i dodaj go do swojego panelu.
Krok 3Kliknij Nagrywarka ekranu, a następnie wybierz żądane ustawienia.
Krok 4Uzyskiwać Początek Aby rozpocząć nagrywanie. Przed rozpoczęciem nagrywania nastąpi odliczanie.
Krok 5Dotknij pływającego paska narzędzi lub paska powiadomień, a następnie naciśnij Zatrzymać aby zakończyć nagrywanie.
Rozwiązywanie typowych problemów z nagrywaniem ekranu w komputerach Lenovo
Możesz przeczytać wskazówki dotyczące rozwiązywania typowych problemów podczas nagrywania ekranu na urządzeniu Lenovo.
Chociaż nagrywanie ekranu na urządzeniach Lenovo zazwyczaj nie nastręcza większych problemów, zawsze istnieje możliwość wystąpienia problemów, w zależności od używanego narzędzia lub urządzenia do nagrywania ekranu. Poniżej przedstawiamy najczęstsze problemy i sposoby ich rozwiązania.
- Rejestrator ekranu nie działa: Uruchom ponownie urządzenie i spróbuj jeszcze raz. W przypadku wbudowanych narzędzi, takich jak Xbox Game Bar, upewnij się, że są włączone w Ustawieniach systemu Windows w sekcji Gry.
- Brak dźwięku w nagraniu: Przed rozpoczęciem nagrywania sprawdź, czy dźwięk systemowy lub mikrofon są włączone. Sprawdź również, czy głośność systemu nie jest wyciszona.
- Opóźnienia lub niska jakość obrazu wideo: Zmniejsz jakość obrazu lub zamknij aplikacje działające w tle. Aktualizacja sterowników graficznych również może poprawić wydajność.
- Nie można nagrywać pulpitu ani Eksploratora plików: To jedno z typowych ograniczeń paska gier Xbox. Jeśli chcesz nagrać ekran i uchwycić wszystko, skorzystaj z zaawansowanego programu, takiego jak AVAide Screen Recorder, jednego z… najlepsze rejestratory ekranu dla komputerów Mac i Windows.
- Nagrywanie nie jest zapisywane: Upewnij się, że pamięć nie jest pełna i sprawdź domyślną lokalizację zapisu. W ustawieniach zmień folder wyjściowy i spróbuj.
Przycisk nagrywania ekranu Lenovo Opcje różnią się w zależności od urządzenia i używanego narzędzia. Ogólnie rzecz biorąc, wbudowane funkcje i aplikacje innych firm ułatwiają nagrywanie, oferując elastyczne sposoby efektywnego rejestrowania, zapisywania i zarządzania aktywnością na ekranie urządzeń Lenovo.
O AUTORZE

Przechwytuj działania na ekranie z dźwiękiem, spotkaniami online, filmami z gry, muzyką, kamerą internetową itp.