“The image isn’t supposed to be that blurry. Powerpoint does that automatically when you make it bigger, and it looks awful. Is there a way of making it not do this?”-Reddit
Well, if you want to solve your concern, we are here to help you. In this post, we will give you detailed instructions on how to unblur pictures on PowerPoint. With that, you can still get the best quality for your images. Aside from that, you will also learn various reasons why images become blurry on the software. We encourage you to read everything from this post and learn more about the most effective way to unblur images on PowerPoint.
Part 1. Why Images Go Blurry in PowerPoint
Before fixing the issue, it helps to understand why PowerPoint degrades your visuals:
- Automatic Compression: To keep presentation file sizes low, PowerPoint compresses images automatically during the saving process.
- Low Source Resolution: Stretching a small or low-resolution image across a large slide forcibly introduces pixelation.
- Copy-and-Paste Degradation: Dragging or pasting images directly from the web to PowerPoint often copies lower-quality cache files rather than the original source asset.
- Lossy Formats: Formats like JPEG degrade with every save. Lossless formats (like PNG) hold their crispness much better.
Part 2. How to Unblur Images on PowerPoint
If you want to deblur images on PowerPoint, there are various methods you can use. So, to find the best solution to achieve your objective, see all the tutorials in this section.
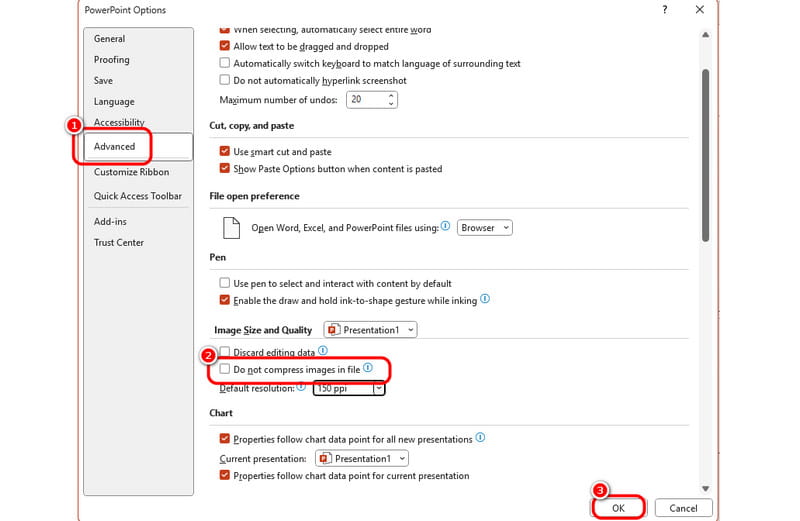
Method 1: Disable the Do not compress option
As we have discussed, the PowerPoint program can automatically compress the image you inserted. So, if you want to prevent this type of action, you should prevent it from compressing photos. To do that, you can follow the simple steps below.
Step 1Open your PowerPoint software and proceed to the File > Options section. After that, the PowerPoint Options window will show up on your screen.
Step 2After that, go to the Advanced > Image Size and Quality options. Then, enable the Do not compress image option.
Step 3Tick the OK button below to save and apply the changes for the final process.
Method 2: Change the Default Resolution
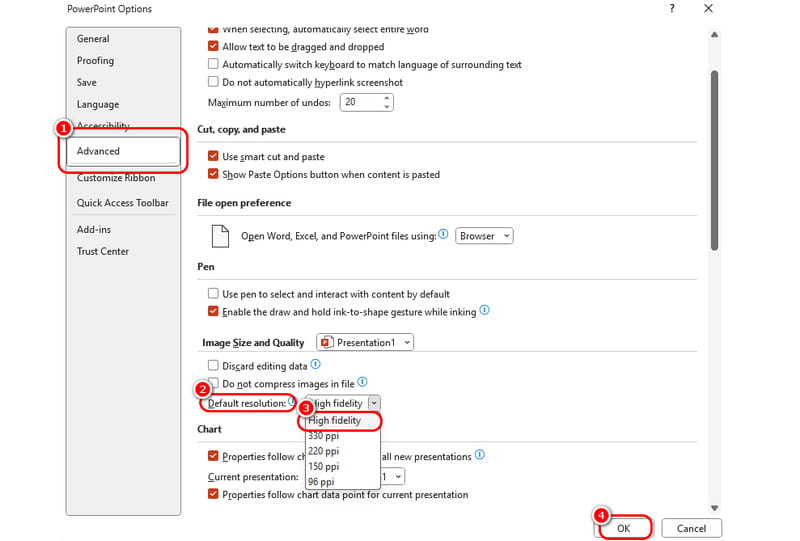
For the second method to unblur an image on PowerPoint, we will change the default resolution. To unblur the photo in PowerPoint, the best thing to do is to set the resolution setting to a High Fidelity option. So, if you want to proceed with the process, see the method below.
Step 1After you launch the PowerPoint software, click the File button in the top left corner and select Options from the left interface.
Step 2When the PowerPoint Options window appears, click the Advanced button and select the Image Size and Quality option.
Step 3Click the Default Resolution button and choose the High-Fidelity option. Once done, click the OK button to apply the changes. If you want to increase the image's resolution, you can use this method.
Method 3: Adjust the Image Sharpness
For our last method, you can use the sharpness feature to improve your blurry image. It has a simple process, making it an ideal way for beginners. Follow the steps below to start fixing blurry images in PowerPoint.
Step 1The first thing to do is to insert the image into PowerPoint. Locate your presentation, go to the Insert > Picture > This Device option to add the image.
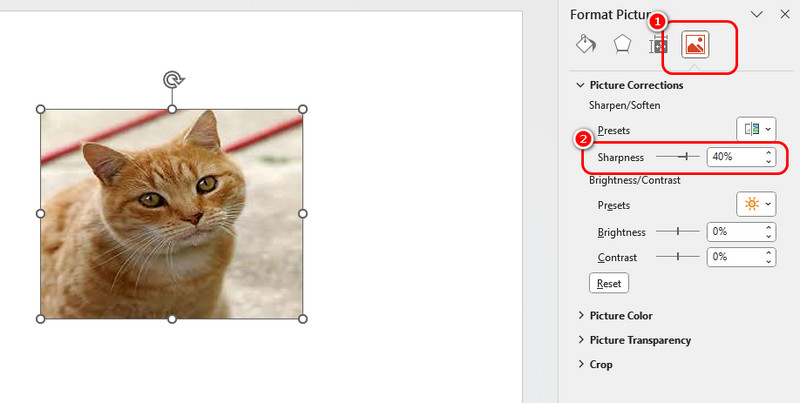
Step 2Right-click the image and hit the Format Picture option. With that, various functions will appear on the right interface.
Step 3Click the Picture button and proceed to the Picture Correction section. Then, select the Sharpness function and use the slider to adjust the sharpness level of the image. Once done, you can save your presentation to the File > Save as options.
Pro-Tips to Maintain Crisp Presentation Visuals
- Use Lossless Formats: Always lean toward PNG or TIFF files when transparency and sharp lines are critical.
- Insert, Don't Paste: Use Insert > Pictures > This Device instead of Ctrl+C / Ctrl+V from a browser to preserve original metadata and quality.
- Match Aspect Ratios: Avoid stretching images manually via the side handles. Hold Shift while dragging corners to scale proportionally.
- Enhance Before Adding: You can use an AI pixel enhancer to enhance the photo before adding it to PowerPoint. It will make the visual better.
Part 3. Online Method to Unblur Images for Free
What if the image itself is too small or blurry? Tweak all the settings you want in PowerPoint, but it won’t recreate missing pixels. Moreover, it is too complicated to adjust each photo one by one on PowerPoint.
That's where AVAide Image Upscaler Online comes in. It's a free, browser-based tool that uses AI to fix blurry photos for PowerPoint instantly.
Key Features of AVAide Image Upscaler:
- 8× Enhancement: It doesn't just stretch your photo; it uses AI Upscaling to upscale it up to 2×, 4×, 6×, or 8× its original size.
- 100% Free & No Watermarks: You get clean, high-resolution downloads without any hidden costs or annoying logos.
- Super Simple: You don't need photo editing skills. The AI handles the heavy lifting in one click.
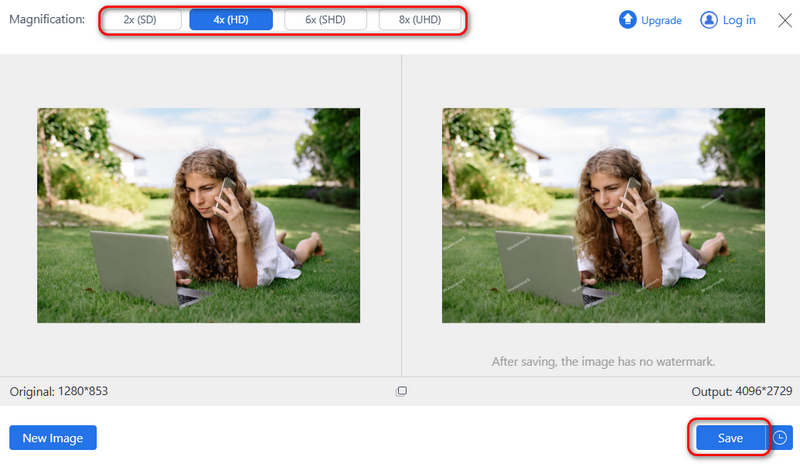
Step 1Access AVAide Image Upscaler Online on your browser. Click the Upload Your Image button to add your photos to this online tool. You can also click the Batch button to add multiple photos.

Step 2Now, you can select a desired magnification, like 2X, 4X, 6X, and even 8x. Then, click the Save button to fix your blurry photo for PowerPoint and save the photo to your local storage.
Part 4. FAQs of Unblurring Image in PowerPoint
How do I uncompress a picture in PowerPoint?
Launch your PowerPoint software, and then click File > Options > Advanced > Image Size and Quality. Then, enable Do not compress images in file.
Can a blurred photo be unblurred?
If a photo is manually blurred, it is very difficult to unblur it. Simply upscaling the resolution or increasing sharpness may not help, and you may need to use AI tools to "create" new pixels for the photo.
How do I soften an image in PowerPoint?
Click on the image to select it. Go to the Picture Format tab at the top of your screen. Click Picture Effects (in the Picture Styles group), hover over Soft Edges, and choose a preset percentage (e.g., 5 Point, 10 Point, etc.) to see it blend instantly.
This post shows you three official ways to fix blurry images in PowerPoint. You can also learn some tips to keep the high quality of your photos. However, if your photo is too small, those features in PowerPoint cannot help you, so you can use AVAide Image Upscaler to directly upscale photos before you add them to your presentation.
ABOUT THE AUTHOR


Our AI technology will automatically enhance the quality of your images, remove noise and fix blurry images online.
PROCESS NOW