Compression is a way to make files smaller, so they take up less space. It is used in videos, music, and images. There are two main types of compression. These are lossy compression and lossless compression.
In this write-up, we will explain both lossy compression and lossless compression. We will compare the options. We will provide examples for each. We will explain when to use each method. By the end, you will know how to choose the right method for your videos and other files.
Part 1: Deep Dive: Lossy vs. Lossless Compression
Different types of files include videos, images, and audio. Each can be compressed in a way that suits your needs.
There are two main kinds of compression: lossy and lossless. Each type works differently and has its own advantages. One method removes data to save space, while the other keeps all the original details intact. Knowing the differences helps you pick the best option for your files. It also ensures you do not lose important quality or information.
Now, let us take a closer look at how lossy vs. lossless compression compares:
| Lossy Compression | Feature | Lossless Compression |
| Some clarity is lost after compression. | Quality | Original clarity is fully preserved. |
| The file size is much smaller. | File Size | File size is smaller but larger than lossy files. |
| Compression is usually faster. | Speed | Compression is slightly slower. |
| Not ideal for repeated editing. | Reusability | Perfect for repeated editing. |
| Best for streaming, online videos, or audio podcasts. | Best For | Best for archiving, professional photos, or source files. |
2026 New Update: AI-Powered Smart Compression
Videos and photos can now be analyzed and compressed more intelligently by AI-powered tools. They retain the essential quality while eliminating what is invisible to humans. It means:
- Smaller files that barely show any loss.
- Superior to lossy compression in terms of quality.
- Perfect for limited storage, online sharing, or streaming.
Part 2: Lossy and Lossless Compression Examples
Here are some typical examples of lossy and lossless compression. It will help you see which files belong to each type and how they are commonly used.
1. Lossy Compression Examples:
- Audio
- Video
- Image
| MP3, AAC |
| H.264, HEVC (standard lossy mode) |
| JPEG, WebP (lossy mode) |
2. Lossless Compression Examples:
- Audio
- Video
- Image
| FLAC, ALAC |
| H.265 lossless, AVI lossless |
| PNG, TIFF, GIF (for some uses) |
Part 3: When to Use Lossy or Lossless Compression
When you save or share files, choosing the right compression type can make a big difference. Lossy and lossless compression have different strengths. Knowing when to use each type is important. It helps your files stay clear and high-quality. It also saves space and effort.
1. Use Lossy Compression When:
- You need to compress videos for email for smaller files.
- You are streaming online videos or music.
- You do not need to edit the file later.
2. Use Lossless Compression When:
- You need perfect quality.
- You plan to edit or re-export the file multiple times.
- You are archiving important content.
Part 4: How to Do Lossy or Lossless Compression
AVAide Video Converter supports both lossy and lossless codecs, so you can choose smaller files or keep perfect quality. It has a smart video compressor that automatically adjusts settings to save space while keeping clarity. It also uses level-3 hardware acceleration, which makes it work fast and stable.
With AVAide Video Converter, you can compress videos safely. It works efficiently and preserves all important details.
- Shows a preview before saving the final file.
- Lets you change output format, resolution, and bitrate easily.
- Supports both lossy and lossless output formats for compression.
- Includes extra tools for video, image, and audio tasks in one place.

 Secure Download
Here is how to do lossless video compression using AVAide Video Converter:
Step 1Get & Install AVAide Video Converter
You can get and install AVAide Video Converter from the official website. Or, simply click the Download buttons above.
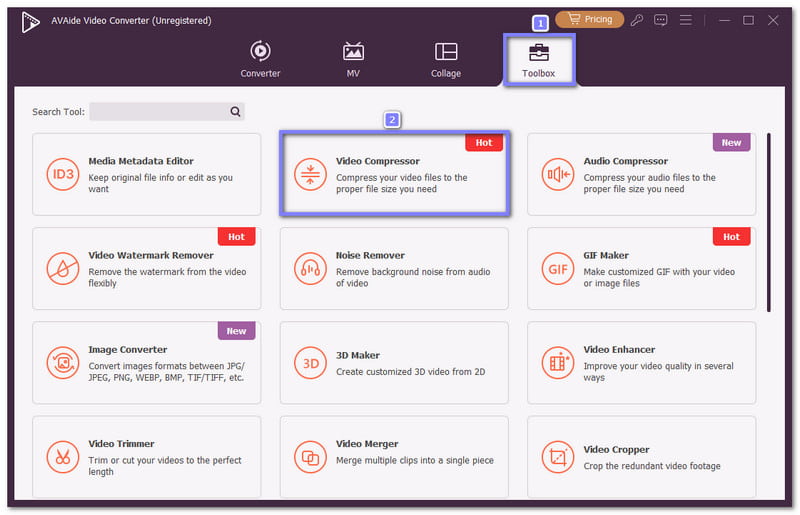
Step 2Open the Video Compressor
Open the program, navigate to the Toolbox tab, and select Video Compressor. This feature is used to compress your video files to the proper file size you need.
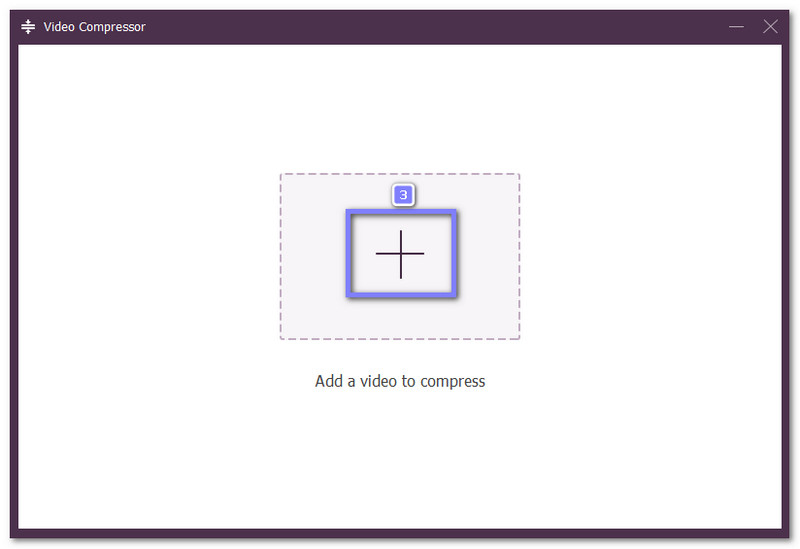
Step 3Import Your Video
Click the Add button. It will open your local folder. There, pick the video file you wish to compress.
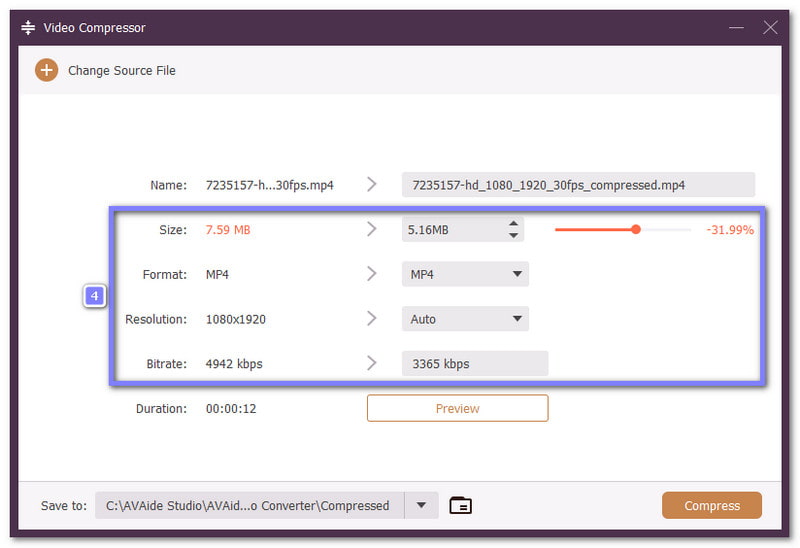
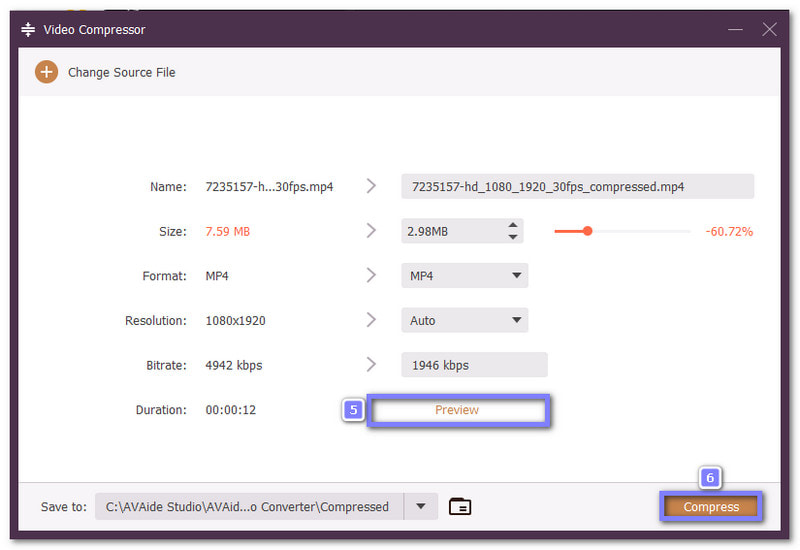
Step 4Adjust Compression Settings
Move the Size slider to the left to reduce the file size. You can also change the video format or resolution. The bitrate will adjust automatically based on the size you set.
Step 5Compress Your Video
Once satisfied with the preview, click the Compress button at the lower right. AVAide Video Converter compresses your video fast and safely. It uses level-3 hardware acceleration to keep the process stable and efficient.
There is no doubt that AVAide Video Converter is one of the top video compressors in the market. It is because it offers smart compression and lets you select the format you want for an ideal output.
Part 5: Pro Tips to Prevent Invisible Quality Loss
Even if a file seems fine, repeatedly editing, converting, or transferring it can gradually lower its quality. These hidden losses can build up over time. By following a few simple tips, you can keep your videos, images, and audio as clear and sharp as the original.
Tip 1: Avoid repeatedly converting lossy files
Every time you save or convert a lossy file, some quality is lost. It can slowly make videos, images, or audio look or sound worse over time. Always try to work with the original file.
Tip 2: Use lossless formats for editing
Edit files in a lossless format like FLAC, PNG, or TIFF. Only convert to a lossy format like MP3, JPEG, or H.264 after you finish all your editing. It keeps your work clear and sharp.
Tip 3: Keep an original copy
Never overwrite your source files. Keep a backup copy safe. This way, you can always return to the original if something goes wrong.
Tip 4: Use high-quality settings
Even lossy formats can look good if you use high-quality settings. Choose higher bitrates or quality levels when saving. It reduces noticeable loss.
Tip 5: Try AI-powered smart compression
Modern AI compression can shrink files without hurting visible quality. It removes data that humans do not notice. It is perfect for saving space while keeping clarity.
Tip 6: Avoid unnecessary resizing
Changing image or video dimensions many times can reduce sharpness. Resize only when needed and try to keep the original size until the final output.
Tip 7: Keep audio sample rates consistent
Changing sample rates or converting audio too much can create hidden artifacts. Keep the original sample rate while editing or exporting.
Tip 8: Use platform-optimized formats for online sharing
Different platforms have their own recommended formats. Using them can reduce quality loss and make sure your content looks good online.
Now you have learned the lossy compression definition, as well as the meaning of lossless compression and when each one works best. We are glad this write-up helped you understand how file size and quality work together.
If you need to do lossy or lossless compression, AVAide Video Converter is a practical tool. It supports both types of compression. The program works on Windows and Mac. It also runs offline. With that, you can compress files anytime without an internet connection.
ABOUT THE AUTHOR

Your complete video toolbox that supports 350+ formats for conversion in lossless quality.