You take a photo, but the background is a mess. Or maybe you need a clean white backdrop for a product shot. This is when you need methods to edit a photo background fast and easily. This guide covers the easiest options, from free online tools to phone apps and advanced desktop solutions. No fancy talk, just what works.
- Part 1. Why You Might Want to Edit Photo Background
- Part 2. How to Edit Image Background Online for Free – Fast and Simple
- Part 3. How to Edit Photo Background on Desktop Using Photoshop – Advanced Control
- Part 4. How to Edit Background of Photo on iPhone/Android – Dedicated App
- Part 5. Pro Tips for Realistic Results When You Edit a Photo Background
Part 1. Why You Might Want to Edit Photo Background
Editing photo backgrounds can help with a lot of things:
- Online sellers need clean product images with a solid background color so the item stands out.
- Social media users swap out backgrounds for something else to create funny memes.
- Sometimes the original background is poorly lit or looks messy.
- You might want to place someone in a scene they've never been.
Whatever your goal, the idea is the same: you remove or hide the background and put something better in its place, while the main subject remains as it was. The tools below make that process easier and more precise, without any fancy studio or green screen.
Part 2. How to Edit Image Background Online for Free – Fast and Simple
If you want something quick and free, online tools are the way to go. One of the best online background editors is AVAide Background Eraser. It runs in your browser, which means you don't need to download anything. You can use it to edit the image's background color, or drop in a new scene. It's best for fast results when you don't want to mess with complicated software.
Step 1Go to the AVAide Background Eraser website in any browser. Upload the photo you want to edit by clicking the central button or drag-and-dropping the file to the workboard.
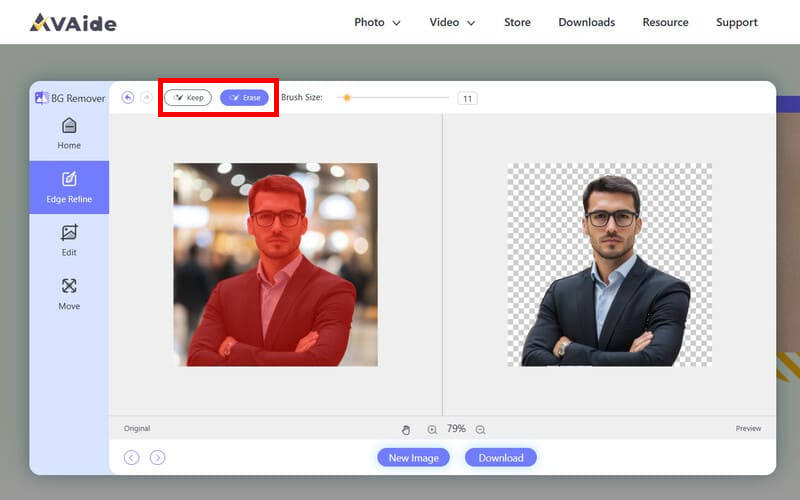
Step 2Wait for it to detect the subject and remove the background automatically. After that, you can fine-tune the edges manually with the Keep or Erase brush in the top-left corner.
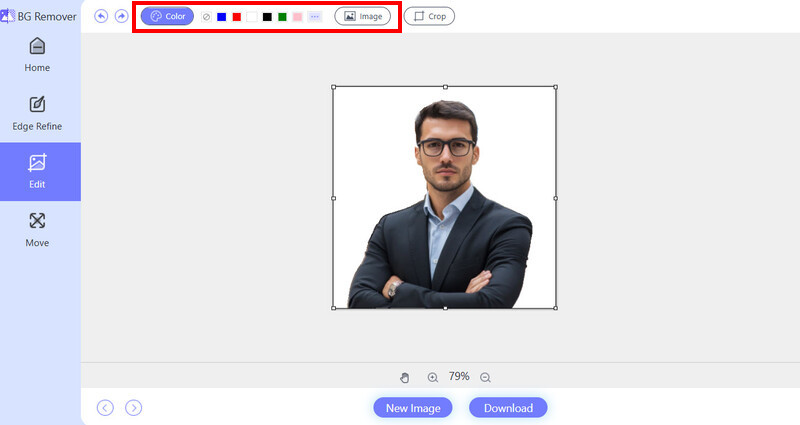
Step 3Go to the Edit panel and choose what to do next: pick a solid color if you want to edit photo background to white or another shade, or edit a background into the picture from local storage. Or you can also simply export the cutout with a transparent background.
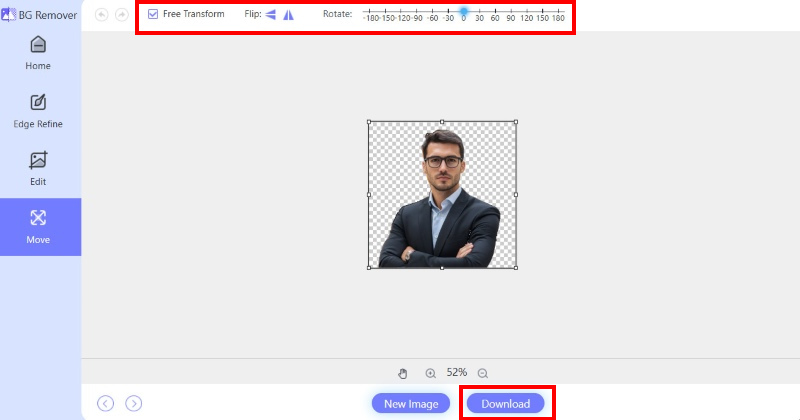
Step 4If you need to rotate or flip the image, go to the Move panel. When you feel happy with the result, click Download.
Part 3. How to Edit Photo Background on Desktop Using Photoshop – Advanced Control
Photoshop gives you the most flexibility. With Photoshop, you can not only erase or replace the background, but also edit it freely without touching the main subject. You can go back and fix mistakes later because everything stays on separate layers. It can be overkill for quick jobs and takes a bit longer to learn, but once you get the hang of it, you can edit image backgrounds in any way you like.
Step 1Open your image in Photoshop. You can go to File > Open in the top menu, or drag-and-drop an image file to the Photoshop workspace.
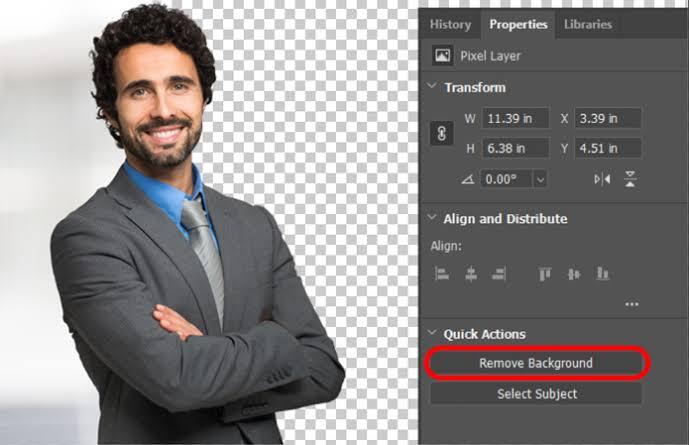
Step 2Click the Window tab in the top menu, and check Properties. The Properties panel will appear on the right. Click Remove Background to turn the background transparent.
Step 3Place your new background image on a layer below the subject. With them on separate layers, what you do with the background will not affect the main subject.
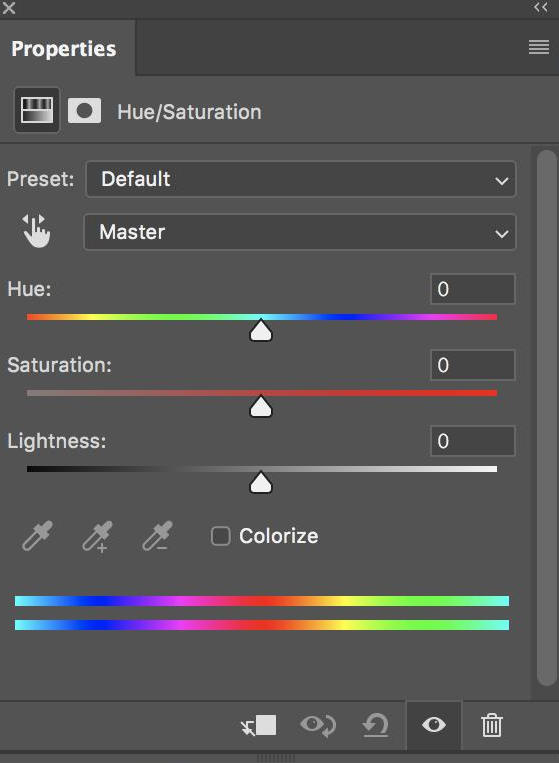
Step 4If the subject still looks somewhat out of place, select the background layer and tweak a few things so it blends better. You can start with these settings in Image > Adjustments:
- Brightness/Contrast: Lighten or darken the background until the lighting feels closer to what's on the subject.
- Hue/Saturation: Dial the colors up or down if the background looks too warm, too cool, or too intense.
- Color Balance: Nudge the shadows, midtones, highlights, etc., to keep the overall color temperature natural.
If one looks sharper than the other, go to Filter > Blur > Gaussian Blur to add a small amount of blur to the subject or the background.
Part 4. How to Edit Background of Photo on iPhone/Android – Dedicated App
An app to edit a photo background would be nice when you are out and about or just prefer working on your phone. Photoroom is one of the best free tools to edit photo backgrounds on phones. It's a special photo editor app that focuses on background editing in particular.
It's really handy for anyone who takes a lot of photos on their phone and needs to swap backgrounds often. Online sellers and social media creators will get a lot out of it. The AI automatically cuts out the main subject for you, saving a lot of manual work.
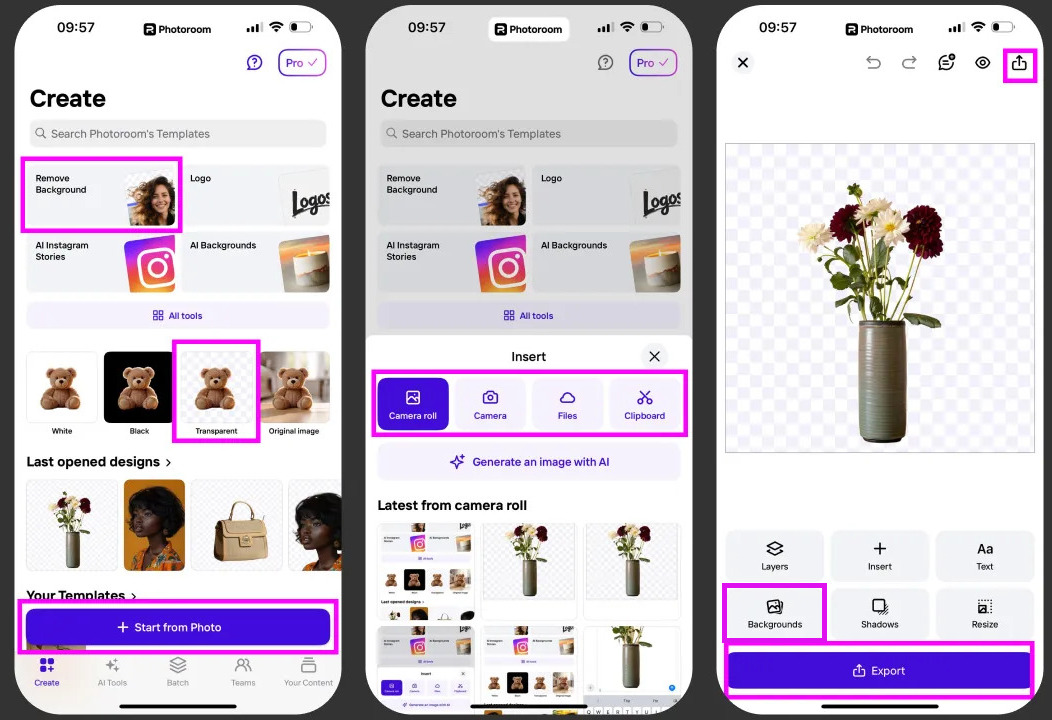
Step 1Download Photoroom from the App Store or Google Play.
Step 2Open the app, select a photo, choose a white/black/transparent background or keep the original photo, and tap Start from Photos. The app auto-removes or preserves the old background accordingly.
Step 3Tap the Background button. Photoroom offers solid colors and background templates, or you can upload your own image.
Part 5. Pro Tips for Realistic Results When You Edit a Photo Background
Getting a clean cutout is only half the job. The real difference between a good edit and a bad one is how well the subject fits the new background.
- Match the lighting. For example, if the main subject has light coming from the left, the new background should have the same lighting direction so it looks natural.
- Shadows matter. A subject with no shadow on the ground or against a wall looks like it is floating. You can add shadows manually in dedicated editors like Photoshop or use generative AI for assistance.
- Check the edges carefully. Hair and soft details are the hardest parts. Zoom in and clean them up.
- Keep the original file. Work with layers or masks so you can go back and fix things later.
- Start with a good source photo. High contrast between the subject and the original background makes every tool work better.
To edit the background of a picture, you do not need expensive software for most everyday edits. Free tools cover a lot of ground. Use AVAide Background Eraser for fast background replacement, Photoshop for detailed or professional edits, and Photoroom when editing photos directly on a phone. Pick the method that fits your needs, and you will get nice results without overcomplicating things.
ABOUT THE AUTHOR


It runs in your browser, which means you don't need to download anything. You can use it to edit the image's background color, or drop in a new scene.
PROCESS NOW