You cannot just use any image as it is, especially if you need it for printing, uploading on socials, or adding to your website. You need to change the size of the image so it fits perfectly and looks clear.
The good news is, it is really easy to do! This guide will help you change the size of an image, whether you want to make it smaller or larger. We will ensure your image looks good and fits any reason you need it for.
Part 1: Why Need to Change the Size of the Image
Images are not always the right size for every situation. Using the wrong size can cause problems. Changing the size of an image helps you use it the right way while keeping it clear. Below are some main reasons you might need to change the size of an image:
- Easier to share online: Large images can slow websites, apps, or emails. Smaller images upload faster and take less space.
- Save storage space: Big images take up a lot of memory. Resizing reduces file size so you can store more files.
- Match specific requirements: Some websites, apps, or documents require certain dimensions or resolutions. Changing the size makes your image fit perfectly.
- Improve visual quality: Adjusting size with the right settings keeps images clear and professional-looking.
- Better for printing: Small images can look blurry or pixelated when printed. Enlarging a picture for printing carefully helps it stay sharp and clear.
Taking the time to resize your image properly can save you a lot of trouble later. If you are ready to do it now, please continue reading the following parts to change the size of the image online and offline.
Part 2: How to Change the Size of an Image Online Without Quality Loss
Resizing an image can be tricky because clarity often drops. Blurry or pixelated images are frustrating, especially when you need them for printing or sharing online. And of course, we do not want you to deal with that.
Here, we will show you how to change the size of an image online without losing clarity. Whether you want to reduce the file size or make your image larger, the online tools provided can help you. See how they work below!
1. AVAide Image Compressor
Usually, when you compress an image, the quality goes down. But not with AVAide Image Compressor. It can change the size of an image by compressing a single image or many images at once by 50-80% in seconds. It uses artificial intelligence (AI) technology to reduce file size smartly without losing details.
Have a lot of images to resize? Do not worry! With AVAide Image Compressor, you can upload up to 40 images at the same time. It is fully online, so it works on any computer or operating system. Can you imagine that with all those perks, it is completely free to use? That is right; you can resize your images to smaller files without paying a thing.
Here is how to change the size of a JPEG image, and other image formats, using AVAide Image Compressor:
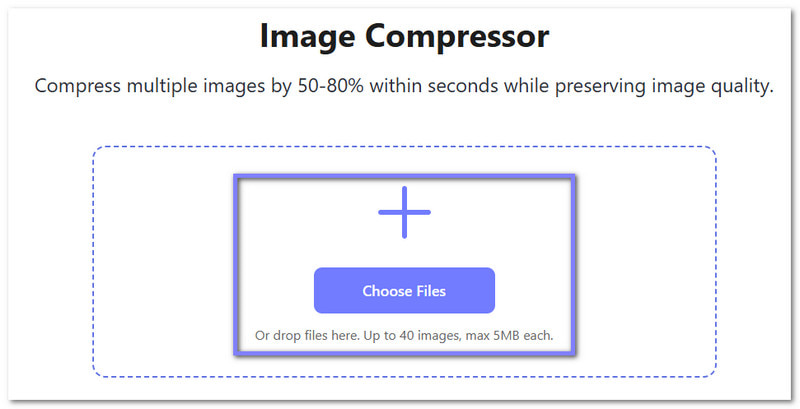
Step 1First off, open your web browser, like Google Chrome or Firefox. Then, go to the AVAide Image Compressor website. Good thing, it works online, so you do not need to download any program.
Step 2Next, press the Choose File button to select the image you want to compress. You can also select and drop your image straight into the website. You can upload up to forty at once, but make sure each image is under five megabytes.
Step 3After uploading, AVAide Image Compressor will automatically start compressing your images. You just need to wait a few seconds. Once you see the green Finished word, it means the compression is complete.
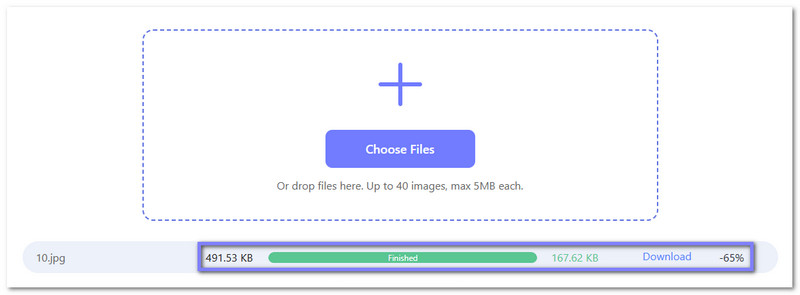
Step 4Before downloading, look at how much space you saved. The website will show the original size and the new size, as well as the percentage reduced. As per the photo, from 491.53 KB it became 167.62 KB, which is about -65%. It helps you see if the compression is good enough for your needs.
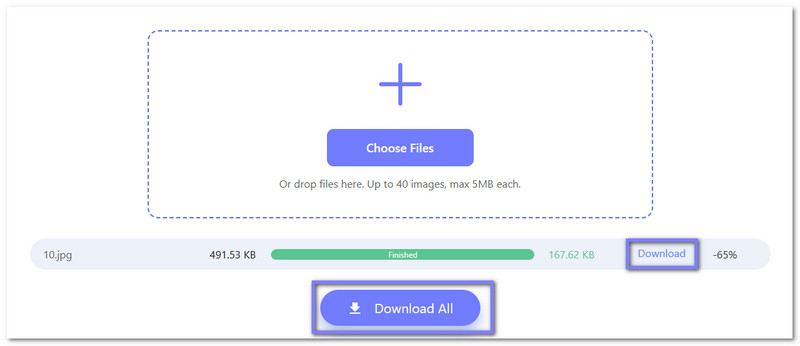
Step 5If you are happy with the results, click the Download button to save a single image or the Download All button to save all images at once. Now your images are smaller, easier to share, and still maintain their clarity.
2. AVAide Image Upscaler
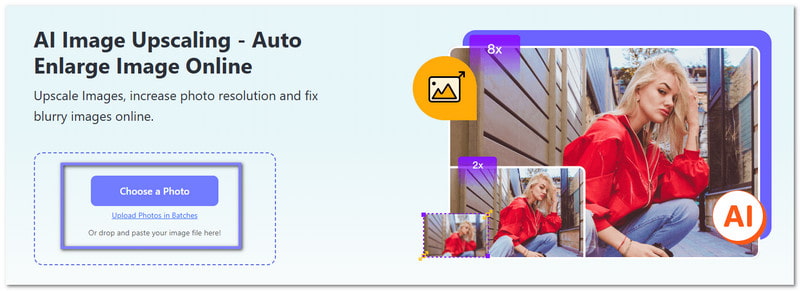
If what you need is to enlarge an image for printing, sharing, or making it clearer, you can count on AVAide Image Upscaler. It helps you increase your small photo size by 2×, 4×, 6×, or even 8× for a crisp and sharp result.
It works for all kinds of images, and no watermarks are added, so that you can use it freely. The artificial intelligence (AI) does all the work for you, which means no experience is needed. It makes it perfect for beginners who want high-quality, enlarged images quickly.
Learn how to easily change the size of an image online using AVAide Image Upscaler below:
Step 1Open a new browser tab and go to the official AVAide Image Upscaler website.
Step 2Upload the image you want to enlarge by clicking the Choose a Photo button in the center, or simply drag and drop your image. If you have many photos to enlarge, click the Upload Photos in Batches. It will make the process faster and easier.
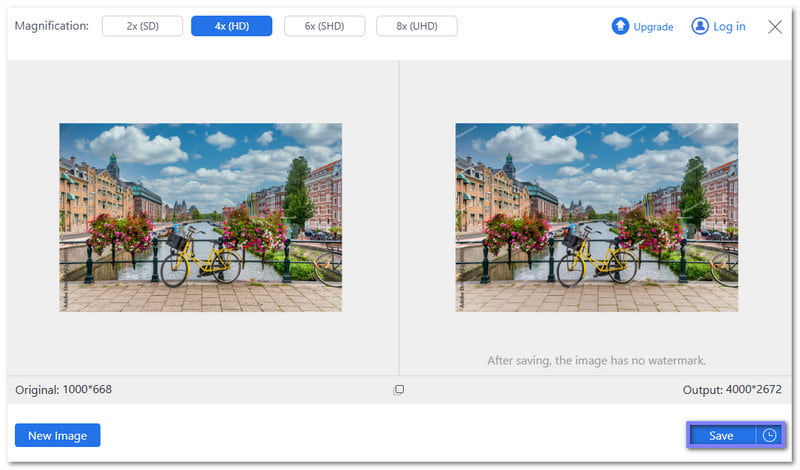
Step 3After uploading, AVAide Image Upscaler will process your image and render a high-quality preview. By default, your image is enlarged 2×. If you want it bigger, you can select 4×, 6×, or 8× from the Magnification option. Keep in mind that free users can enlarge up to 4×, while 6× and 8× require a paid plan.
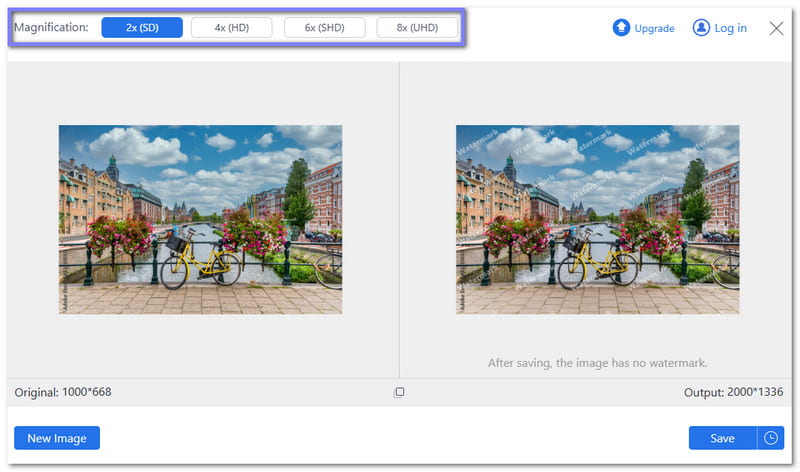
Step 4Once upscaling is complete, you can compare the Original and Output pixel dimensions. As per the photo below, from 1000*688, it becomes 4000*2672 at the 4× level. It helps you see exactly how much larger the image has become.

Step 5If you are satisfied with the size, click Save to download a copy of your resized image. About the watermark, it will be removed after saving. Now you have a larger image ready to use without losing clarity!
Part 3: How to Change the Size of an Image in Pixels in Photoshop
Photoshop can help you change the size of an image in pixels with ease. It is useful when your image is too big or too small for your needs.
In this part, you will learn two simple approaches. One is to enlarge an image. The other is to reduce the picture size. Each method serves a clear purpose and uses the same image size feature.
1. Enlarge Image Size Using Photoshop
Photoshop is great for enlarging images when you need better print results or higher resolution. It works by adding new pixels to increase the size while keeping the image smooth. Small increases are best to avoid losing clarity, and the right settings help the image stay clear and sharp.
Follow the steps below to learn how to change the size and resolution of an image in Photoshop by enlarging it:
Step 1First and foremost, open Photoshop on your computer. Next, click File > Open and choose the image you want to enlarge. Before moving on, check the image for dust or noise. These small flaws can grow bigger after resizing.
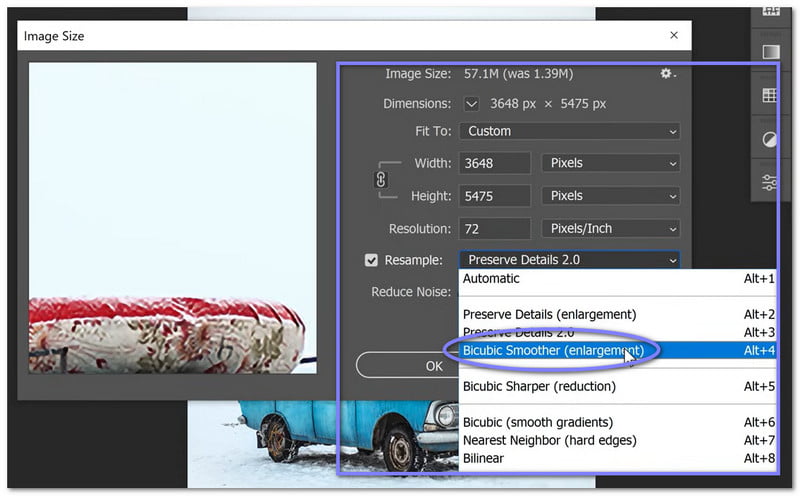
Step 2After the image opens, head to the top menu and click Image > Image Size. It will open a new display where you can control the image size, pixels, and resolution.
Step 3Now, look at the current size of the image. For example, the image may start at 10 × 6.667 inches with a resolution of 300 ppi. To make it larger, change the size to 12 × 8 inches. Keep the resolution the same for print. Photoshop will automatically increase the pixel dimensions.
Step 4Next, make sure Resample is turned on. Then, choose Bicubic Smoother from the list. This option helps Photoshop create new pixels. It works best when enlarging images and keeps them smooth.
Step 5For the last step, click the OK button to apply the new size. The image is now larger. The pixel count and file size will increase. Your image is now ready for printing or framing.
2. Reduce Image Size Using Photoshop
Reducing an image in Photoshop works similarly to enlarging it, but in reverse. You might need to shrink an image if the resolution is too high for the web, the file is too large to send by email, or a smaller size is needed for printing.
Rely on the steps below to learn how to change an image's pixels in Photoshop by reducing it:
Step 1Keep your Photoshop open. Then, go to File > Open and select the image you want to reduce. It is useful when the image is too large for web use or email.
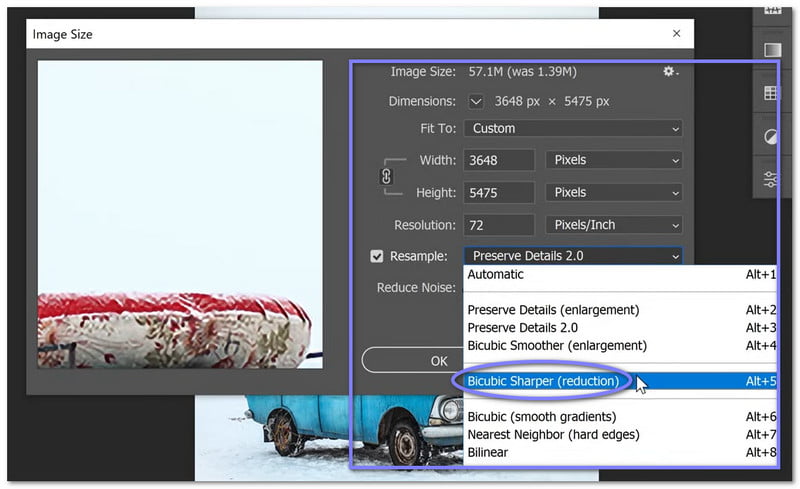
Step 2Once the image is open, go to Image > Image Size. It brings up the same resize display used for enlarging.
Step 3Now, change the resolution from 300 ppi to 72 ppi. After that, enter a smaller pixel size, such as 600 × 400 pixels. This size works well for websites and online use.
Step 4Turn on Resample if it is not already checked. Also, select Bicubic Sharper. This option removes extra pixels and helps keep the image clear when shrinking it.
Step 5Hit the OK button to complete the process. The image is now smaller. The file size is also much smaller. It makes the image easier to upload, share, or send by email.
Part 4: Tips for Changing Size and Resolution of Images
Changing an image's size or resolution may seem simple, but it can affect how it looks and works. If done wrong, images can become blurry, stretched, or lose details. Considering our useful tips can help your images stay clear, sharp, and ready for printing, sharing online, or saving space.
1. Save the original first.
Always keep a copy of the original photo before making any changes. This way, you can go back if needed.
2. Plan the final size and purpose.
Decide if you want to resize the image for website, printing, social media, or email. It helps you choose the right dimensions and resolution.
3. Make gradual adjustments.
Adjust the size of an image gradually when making it larger or smaller. Abrupt, significant changes may cause the image to become fuzzy or lose details.
4. Keep proportions correct.
Maintain the width-to-height ratio. It prevents the image from looking stretched or squashed.
5. Clean the image first.
Remove visible dust, scratches, or spots before resizing. Any flaws can become more noticeable when the image size changes.
6. Check resolution.
Use a higher resolution for printing so the image looks clear. Use a lower resolution for online use to make the photo file smaller and easier to share.
7. Check pixel dimensions.
Look at the width and height in pixels to make sure the image fits the place it will be used, like a website, document, or frame.
8. Preview before saving.
Always look at the image after resizing to see if it looks sharp and balanced. It ensures the final image meets your needs.
You have discovered how to change the size of an image online using AVAide Image Compressor, AVAide Image Upscaler, and Photoshop.
All of these tools can help you resize images. However, Photoshop can be complicated and requires a plan, which is not ideal for first-timers. That is why we recommend using AVAide tools. They make resizing files easy, fast, and free!

Our AI technology will automatically enhance the quality of your images, remove noise and fix blurry images online.
PROCESS NOW