Du vil ha din egen personlige ringetone. Ikke noe du har fått fra noe sted. Noe du har laget til din egen for anrop og varsler.
Vi er her for å hjelpe deg med det. Vi vil vise deg forskjellige måter å gjøre det på spille inn en ringetone på forskjellige systemer. Vi vil også dele enkle tips for bedre resultater. Så gjør stemmen eller lyden din klar for en tilpasset ringetone.
Del 1. Slik spiller du inn en ringetone på iPhone
1. Talememo til ringetone (den enkleste måten)
Talememoer tar opp lyd og gjør den umiddelbart om til en brukbar, tilpasset ringetone med grunnleggende trimmingsverktøy, og denne delen vil lære deg nøyaktig hvordan du lager en taleopptak til en ringetone på en iPhone.
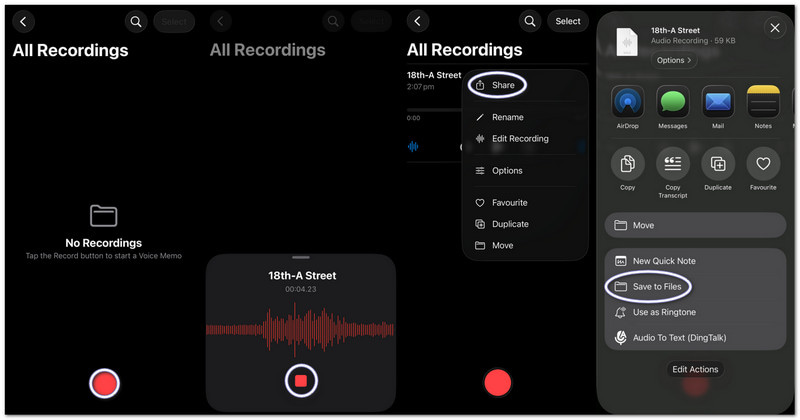
Trinn 1Start talememoer på iPhonen din.
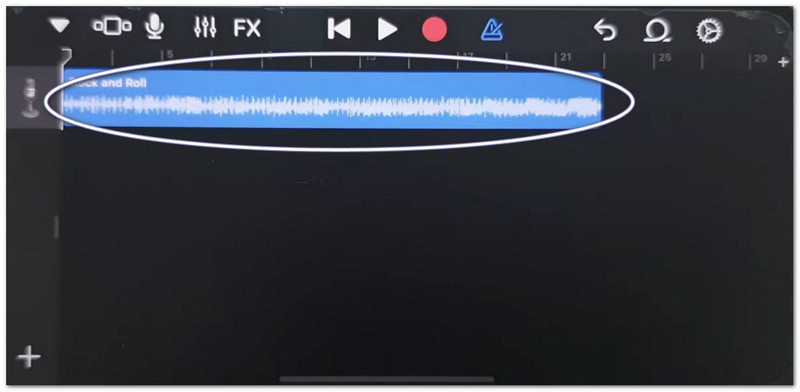
Steg 2Trykk på den røde Ta opp -knappen og les eller spill av lyden.
Trinn 3Trykk på Stoppe når du er ferdig.
Trinn 4Trykk på tre prikker (...) på opptaket ditt.
Trinn 5Velge Lagre i filer for å lagre lyden din og bruke den senere som ringetone.
2. Enhver lydfil (MP3/M4A) til ringetone
Lagrede MP3- eller M4A-lydfiler fra nedlastinger eller musikkapper kan velges og angis som ringetone på en iPhone.
Trinn 1Last ned MP3- eller M4A-filen din og lagre den i Filer app.
Steg 2Løpe Garasjeband og plukke Lydopptaker.
Trinn 3Finn lyden din i Filer, og dra den deretter til tidslinjen.
Trinn 4Gå til Filer, finn lyden din og dra den til tidslinjen.
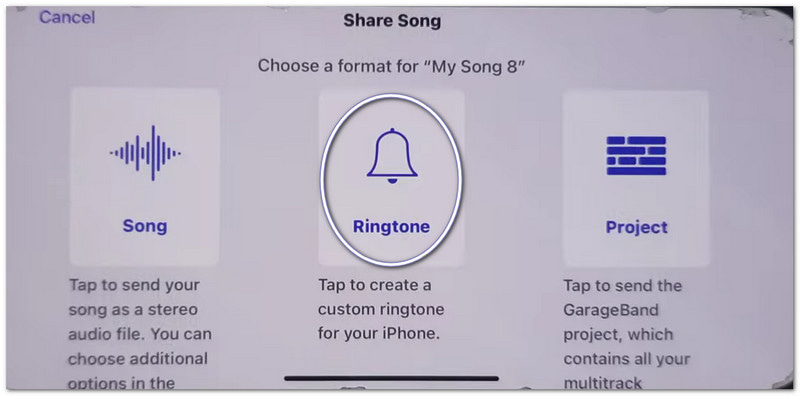
Trinn 5Klipp den ned til under 30 sekunder, og trykk deretter på Dele > Ringetone > Eksport.
3. Bruk av GarageBand (for eldre iOS-versjoner)
GarageBand redigerer lydklipp med presise kontroller, slik at brukerne enkelt kan klippe, arrangere og eksportere tilpassede ringetoner. Dette gjør det enkelt å forstå hvordan man setter et stemmeopptak som ringetone på en iPhone.
Trinn 1Åpen Garasjeband og velg Lydopptaker.
Steg 2Trykk på Sporvisning, og åpne deretter Loop Browser.
Trinn 3Importer den lagrede talememoen eller lydfilen din.
Trinn 4Dra den til tidslinjen og trim den til 30 sekunder eller mindre.
Trinn 5Trykk på Mine sanger, deretter Dele > Ringetone > Eksport.
Feilsøking av «Del notater på iPhone fungerer ikke»
Hvis delingsarket fryser, krasjer eller ikke viser apper når du deler talememoer eller GarageBand-filer, kan du prøve disse løsningene.
Raske løsninger:
- Tving omstart: Trykk Volum opp og Volum nedHold deretter inne av/på-knappen til Apple-symbolet vises.
- Oppdater iOS: Gå til Innstillinger > Generell > Programvare oppdateringInstaller eventuelle oppdateringer. Det fikser systemfeil.
- Veksle AirDrop: Åpne Kontroll senter for å slå av AirDrop. Slå AirDrop av og på igjen. Delingen oppdateres.
Systemrettelser
- Frigjør lagringsplass: Behold minst 2 gigabyte ledig plass. Slett ubrukte filer eller videoer. Lav lagringsplass kan hindre at delingsarket fungerer.
Endelig løsning
- Tilbakestill alle innstillinger: Gå til Innstillinger > Generell > Overføre eller Tilbakestill iPhone > Tilbakestill alle innstillingerDen sletter ikke dataene dine. Den tilbakestiller bare systeminnstillinger og kan fikse problemer med delingsark.
Del 2. Slik spiller du inn en ringetone på Android
1. Bruk av en ringetone-app (mest anbefalt)
Hvis du vil lære hvordan du spiller inn din egen ringetone, kan du bruke Maker: Music Cutter i Google Play Store. Hovedmålet er å hjelpe deg med å trimme sanger, klippe nøyaktige lyddeler og umiddelbart sette dem som tilpassede ringetoner på Android-telefoner.
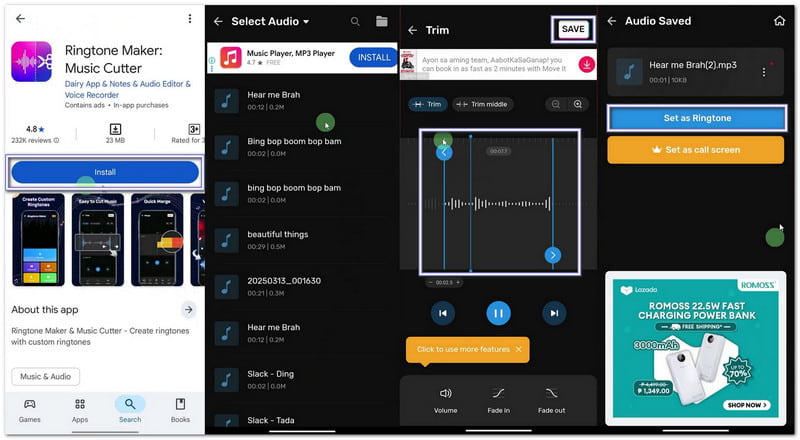
Trinn 1Åpne Google Play-butikken. Søk etter Ringetone Maker: Musikk CutterInstaller den. Trykk deretter på Åpen.
Steg 2Trykk på Kom i gang. Velge Trim lydGi tillatelser slik at appen kan få tilgang til filene dine.
Trinn 3Velg en sang eller lydfil fra telefonen din. Flytt glidebryterne for å velge start- og sluttdel av ringetonen.
Trinn 4 Trykk på Skjære eller LagreVelg klarhet om nødvendig. Trykk Bekrefte. Klikk deretter Angi som ringetoneGi tilgang til systeminnstillinger og velg standard ringetone.
2. Innebygde innstillinger (for nedlastet lyd)
Android-innstillinger tillater direkte valg av lagrede lydfiler og tilordner dem som ringetoner uten behov for ekstra apper eller verktøy.
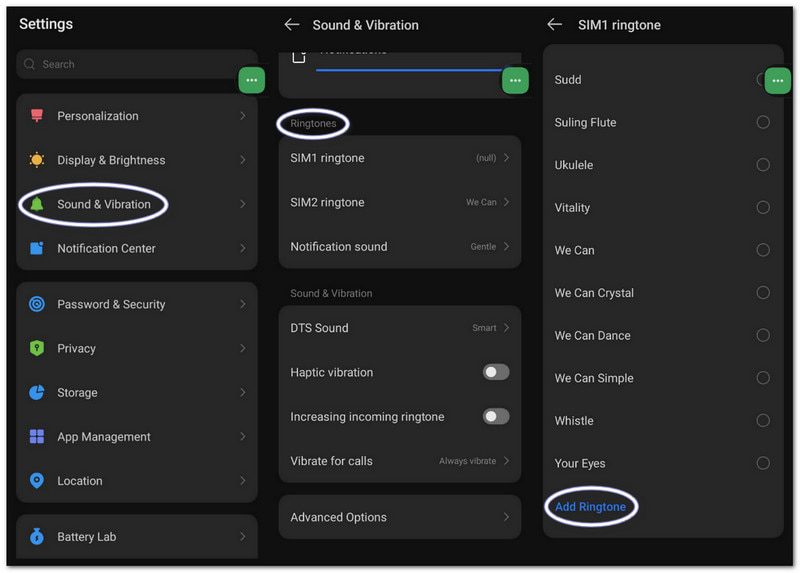
Trinn 1Gå til telefonens innstillinger. Trykk på Lyd og vibrasjon eller Lyd.
Steg 2Trykk på Telefonringetone for å se tilgjengelige alternativer.
Trinn 3Trykk på Plus knappen eller Legg til ringetone knappen øverst.
Trinn 4Bla gjennom lagringsplassen din. Velg lydfilen din. Trykk. FerdigBekreft deretter at du vil angi den som standard ringetone.
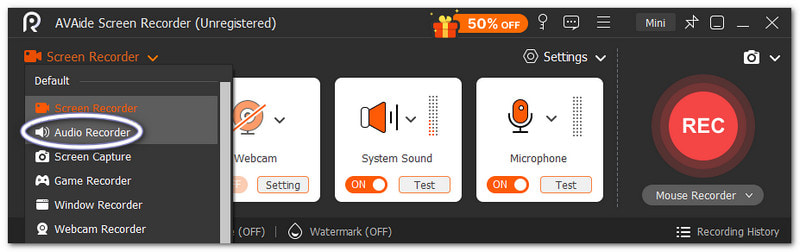
Del 3. Slik gjør du et skjermopptak om til en ringetone
Du kan også gjøre et skjermopptak om til en ringetone på en Windows- eller Mac-datamaskin ved å bruke AVAide skjermopptakerDen har en lydopptaksmodus som fanger opp lyd fra systemet ditt og stemmen din, noe som gjør det enkelt å spille inn en ringetone.
Den tilbyr også lydinnstillinger, der du kan senke eller øke volumet, aktivere støydemping og vise en advarsel når det ikke oppdages lyd. Selvfølgelig kan du eksportere ringetonen din i støttede formater som MP3 og M4A, som fungerer bra for mobile enheter.
Trinn 1Last ned og konfigurer AVAide Screen Recorder på Windows- eller Mac-datamaskinen din.

GRATIS NEDLASTING For Windows 7 eller nyere
 Sikker nedlasting
GRATIS NEDLASTING For Mac OS X 10.13 eller nyere
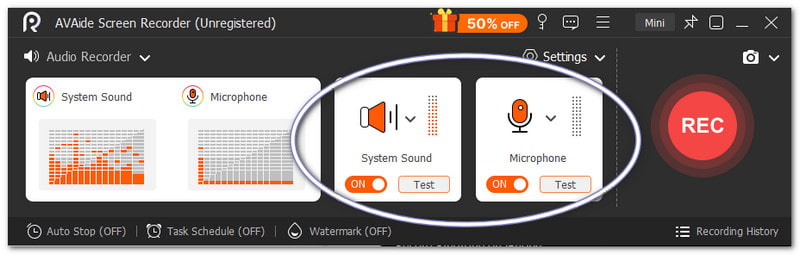
Sikker nedlastingSteg 2Den starter i skjermopptakermodus. Klikk på rullegardinmenyen. Velg Lydopptaker for bedre lydopptak.
Trinn 3Slå på Systemlyd for å ta opp intern lyd. Slå på Mikrofon hvis du vil at stemmen din skal legges til. Du kan også finjustere volumet om nødvendig.
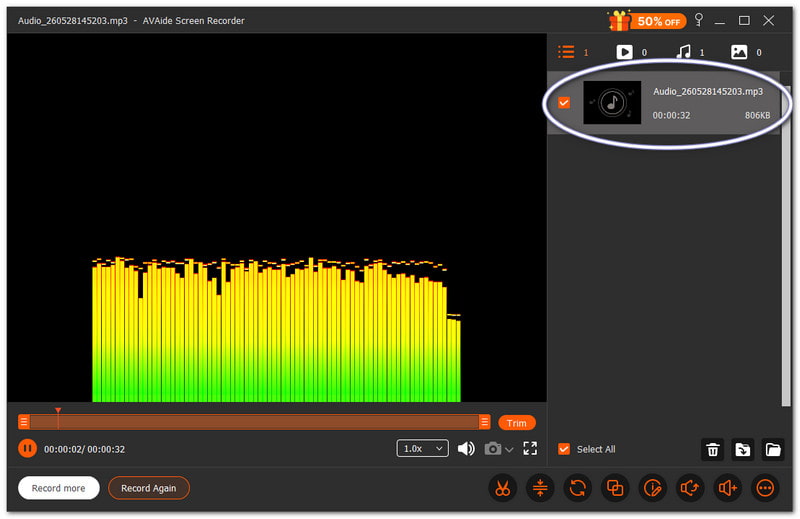
Trinn 4Truffet REC for å starte, og vent på nedtellingen. Når den har startet, spill av lyden du ønsker. Trykk på Stoppe knappen når du er ferdig. Etter det lagres filen automatisk. Men du kan også trimme eller redigere den før du bruker den som ringetone.
Det er ingen tvil om at denne Mac-en og Windows lydopptaker kan hjelpe deg med å lage en ringetone du personlig ønsker og liker til enheten din.
Del 4. Samsung-spesifikke trinn
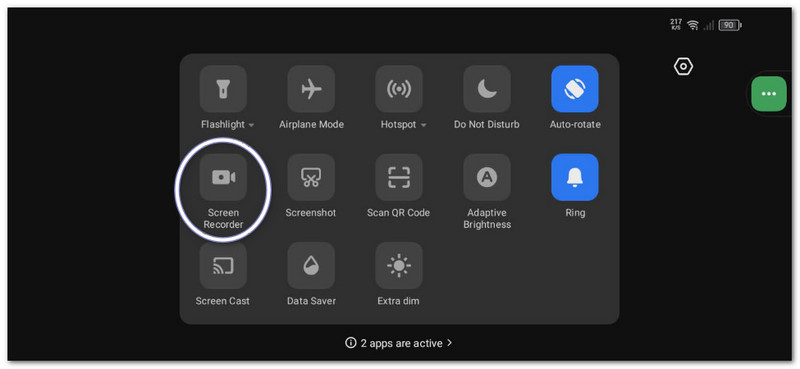
1. Bruk av den innebygde skjermopptakeren
Samsung Screen Recorder tar opp lyd fra videoer og hjelper deg med å gjøre innspilte lyder om til brukbare ringetoner.
Trinn 1I Hurtigpanel, sveip ned. Trykk på Skjermopptaker -knappen. Før du begynner, velg Medielyder.
Steg 2Spill av videoen eller musikken du vil ta opp. La skjermopptakeren ta den opp med lyd.
Trinn 3Stopp opptaket når det er ferdig. Filen lagres i galleriet ditt. Bruk en video-til-MP3-app for å pakke ut lyden.
Trinn 4Flytt MP3-filen til din Intern lagring > Ringetoner-mappen slik at den kan brukes senere.
Denne metoden viser Samsung skjermopptakSå sørg for å konvertere den innspilte videoen kun til lyd, slik at den kan brukes som ringetone.
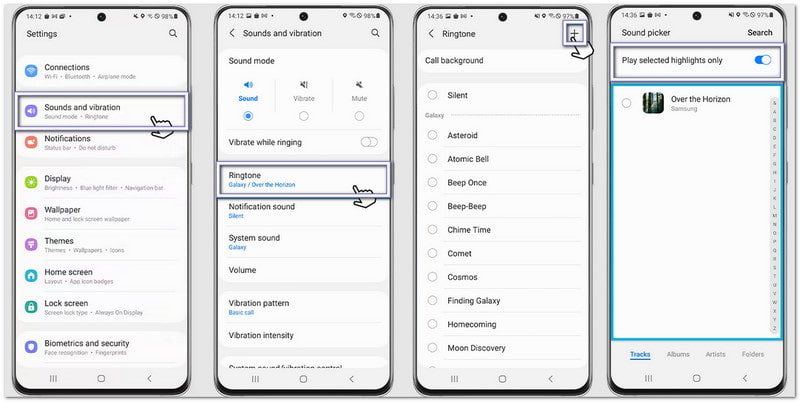
2. Innebygd ringetone-skaper
Med Samsungs ringetoneinnstillinger kan brukere velge sanger, klippe høydepunkter og umiddelbart tilordne dem som standard ringetone for telefonen.
Trinn 1Åpne telefonen din og gå til Innstillinger. Trykk på Lyder og vibrasjoner. Deretter velger du Ringetone.
Steg 2Trykk på Legg til -knappen og velg en lagret sang eller et opptak fra telefonen.
Trinn 3Aktiver Spill kun av valgte høydepunkter hvis tilgjengelig. Samsung vil automatisk trimme den beste delen av lyden.
Trinn 4Bekreft valget ditt, og lyden vil nå bli angitt som standard ringetone.
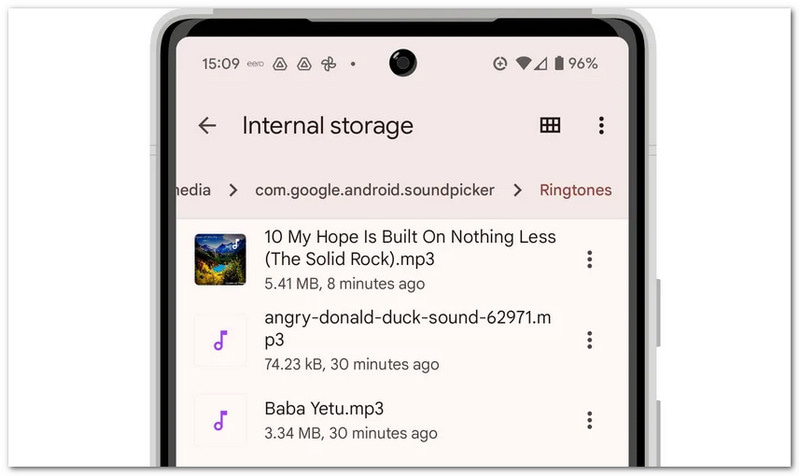
3. Filbehandlingsmetoden
Samsung File Manager organiserer lydfiler og tillater direkte kopiering til Ringetoner-mappen for automatisk ringetonegjenkjenning.
Trinn 1Start Mine filer appen på Samsung-telefonen din.
Steg 2Gå til Nedlastinger eller Lyd mappen. Finn den innspilte eller nedlastede lyden.
Trinn 3Trykk lenge på filen. Trykk KopiereGå deretter til Intern lagring > Ringetoner.
Trinn 4Lim inn filen i Ringetoner-mappen. Gå deretter tilbake til Lydinnstillinger. Filen din vil nå vises i ringetonelisten.
Del 5. Profftips for best resultat
Før du angir ringetone, er det lurt å følge noen enkle tips. Disse vil gjøre at ringetonen din høres klar ut og fungerer bedre på telefonen.
Tips #1: Hold det kort.
Gjør ringetonen din bare 30 til 40 sekunder lang. Det holder den jevn og fullstendig kompatibel med Android-telefoner.
Tips #2: Bruk riktig format.
Bruk MP3- eller M4A-filer når det er mulig. Disse formatene fungerer bra på de fleste Android-enheter uten feil.
Tips #3: Sjekk volumet først.
Spill av ringetonen din før du stiller den inn. Sørg for at den ikke er for høy eller for lav. Det hjelper deg med å unngå overraskelser når noen ringer.
Du har lært hvordan spille inn en ringetone på en iPhone, Android og en datamaskin. Så uansett hvilken enhet du bruker, kan du når som helst lage din egen tilpassede ringetone.
For Windows- og Mac-brukere, AVAide skjermopptaker gjør prosessen enkel. Du kan spille inn din egen stemme eller ta opp lyd fra systemet ditt. Du kan også trimme filen etter opptaket. Det hjelper deg med å beholde bare den beste delen til ringetonen din.
OM FORFATTEREN

Fang skjermaktiviteter med lyd, nettmøter, spillvideoer, musikk, webkamera osv.