Cara merekam layar di laptop Lenovo Hal ini bergantung pada alat yang Anda pilih, mulai dari fitur bawaan Windows hingga perangkat lunak canggih. Panduan ini menunjukkan metode yang sederhana, jelas, dan efisien untuk merekam layar Anda pada perangkat Lenovo, baik untuk tutorial, rapat, permainan, atau perekaman sehari-hari.
Metode 1. Menggunakan Xbox Game Bar
Fitur perekaman bawaan Xbox Game Bar adalah milik Microsoft, terintegrasi dengan Windows, dan merupakan solusi perekaman paling nyaman bagi pengguna Lenovo. Fitur ini dirancang untuk bermain game sekaligus berfungsi sebagai perekam aplikasi standar, pembuat tutorial, dan perekam browser. Keunggulan utamanya adalah tidak memerlukan pengaturan; siap digunakan langsung.
Namun, ada beberapa kekurangan yang jelas. Tidak merekam desktop atau File Explorer, dan kustomisasi terbatas pada alat profesional. Meskipun demikian, ini tetap menjadi salah satu opsi bawaan yang paling nyaman untuk sesi santai di mana kualitas dan upaya tidak terlalu penting.
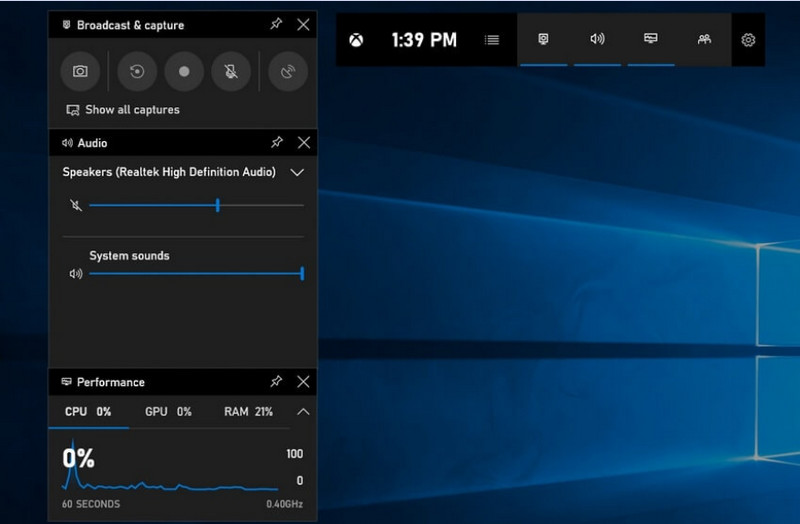
Langkah 1Untuk membuka Xbox Game Bar, tekan Windows + G pada keyboard Anda.
Langkah 2Temukan Menangkap panel atau klik di atasnya dari Widget Tidak bisa.
Langkah 3Klik Rekam (●) tombol atau tekan Jendela + Alt + R.
Langkah 4Jika Anda ingin merekam suara, aktifkan Mikropon.
Langkah 5Tekan Jendela + Alt + R lagi atau klik Berhenti (■) untuk diselesaikan.
Langkah 6Anda akan menemukan rekaman Anda di Video > Tangkapan.
Metode 2. Menggunakan Lenovo Vantage
Lenovo Vantage bukanlah perekam layar; ini adalah rangkaian perangkat lunak manajemen dan optimasi sistem. Perannya lebih bersifat tidak langsung dalam perekaman, dengan sangat sedikit fitur yang membantu proses perekaman dalam beberapa bentuk, tergantung pada model perangkat perekam, atau bahkan dengan beberapa perangkat yang menawarkan pintasan atau alat kamera/layar yang dapat membantu proses perekaman.
Ini merupakan variasi yang luas dalam hal kinerja dan ketersediaan. Fungsi perekaman dasar mungkin didukung pada beberapa perangkat Lenovo, tetapi perangkat lain mungkin tidak memilikinya sama sekali. Kemampuannya terbatas dan agak tidak konsisten dalam hal perekam layar penuh, tetapi mungkin bermanfaat bagi pengguna yang ingin tetap berada dalam ekosistem Lenovo atau rekam podcast konten dengan peralatan dasar.
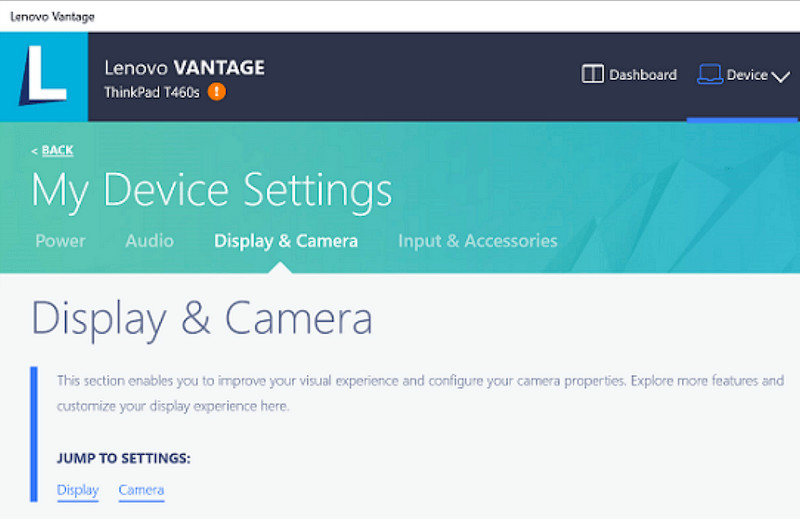
Langkah 1Pergi ke Awal menu dan klik Lenovo Vantage.
Langkah 2Mengetuk Pengaturan Perangkat Saya > Layar & Kamera.
Langkah 3Periksa rekaman atau fungsi lain yang tersedia.
Langkah 4Sediakan opsi atau jalan pintas yang diperlukan.
Langkah 5Rekam musik menggunakan fungsi yang tersedia (jika memungkinkan).
Langkah 6Temukan rekaman yang telah Anda simpan di folder Video Anda.
Metode 3. Menggunakan Legion Zone / Lenovo Nerve Center
Lenovo Nerve Center (atau Legion Nerve Center - alat yang lebih baru dari Legion telah menggantikan Nerve Sense) dioptimalkan untuk perangkat Lenovo, khususnya laptop Lenovo Legion, yang ditujukan untuk para gamer. Aplikasi ini juga terintegrasi erat dengan alat performa game, sehingga pengguna dapat mengambil tangkapan layar game mereka sambil memantau dan mengoptimalkan sumber daya sistem.
Namun, perekam ini tergolong sangat sederhana. Fungsinya lebih mengutamakan kemudahan penggunaan daripada kustomisasi, dan hanya menawarkan opsi perekaman dasar dengan kontrol terbatas atas resolusi, bitrate, dan pengaturan lanjutan. Selain itu, perekam ini hanya tersedia di beberapa sistem yang lebih baru, dan sistem lain telah menggantinya atau menghapusnya, sehingga tidak lagi seandal dulu.
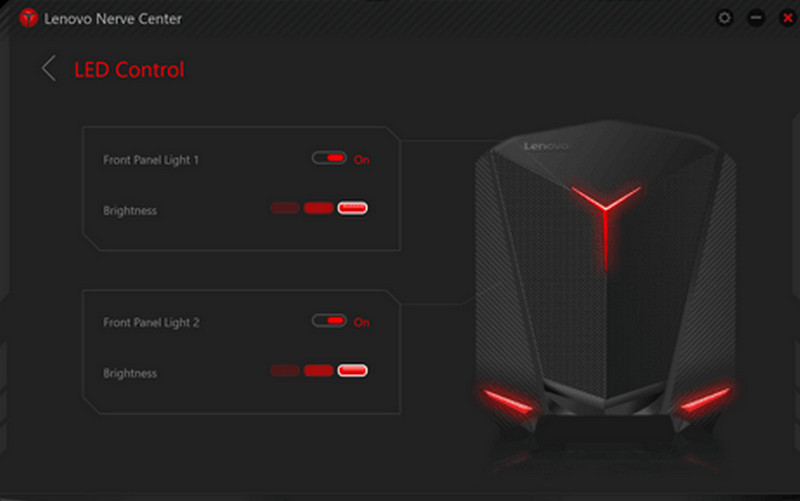
Langkah 1Akses Pusat Saraf Lenovo atau Zona Legiun dari perangkat tersebut.
Langkah 2Buka pengaturan perekaman dan/atau permainan.
Langkah 3Jika ada pilihan, ubah pengaturan perekaman, seperti resolusi atau kualitas audio.
Langkah 4Jalankan game atau aplikasi tersebut.
Langkah 5Rekam dengan pintasan atau tombol default.
Langkah 6Hentikan perekaman dan lihat ke dalam Video folder untuk melihat apakah file tersebut telah direkam.
Metode 4. Menggunakan Perekam Layar AVAide
Perekam Layar AVAide adalah perekam layar yang lebih canggih dan serbaguna untuk Lenovo dibandingkan perekam layar bawaan. Aplikasi ini dirancang untuk mereka yang menginginkan kualitas video, pengoperasian yang lebih lancar, dan kontrol perekaman yang lebih baik. Ini adalah alat yang sempurna untuk membuat tutorial, merekam rapat, atau merekam permainan, tanpa pengaturan yang rumit, semuanya pada tingkat profesional.
Selain dapat merekam suara sistem, input mikrofon, webcam, dan area layar, aplikasi ini juga mendukung perekaman Full HD dan bahkan 4K dengan jeda minimal dibandingkan perekam dasar. Hal ini menjadikannya aplikasi perekaman layar serbaguna untuk pekerjaan dan hiburan.
- Rekam video dalam resolusi 1080p atau 4K dengan performa yang lancar dan tanpa jeda.
- Rekam dalam mode layar PENUH atau KUSTOM sesuai kebutuhan Anda.
- Rekam suara internal dan suara vokal secara bersamaan dengan output yang jernih.
- Tambahkan perekaman Facecam untuk tutorial, presentasi, atau video permainan.
- Pangkas, kompres, dan tingkatkan kualitas rekaman setelah perekaman.

 Unduh Aman
Langkah 1Unduh dan Instal Perangkat Lunak
Kunjungi situs web resmi AVAide Screen Recorder. Unduh Windows Installer, instal di laptop Lenovo Anda, dan jalankan.
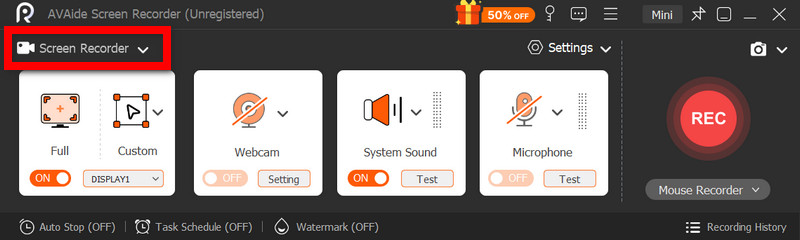
Langkah 2Pilih Mode Perekaman
Buka perangkat lunak, lalu klik Perekam LayarRekam seluruh layar dengan Penuh atau sebagian layar dengan Kebiasaan.
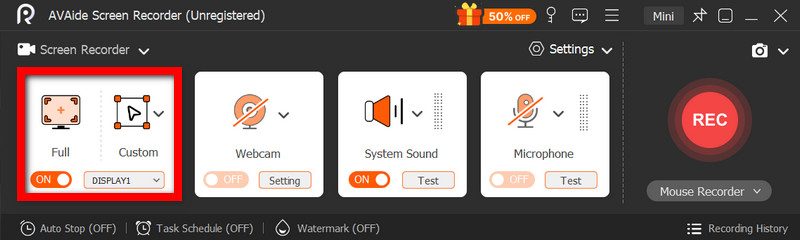
Langkah 3Konfigurasi Pengaturan Audio
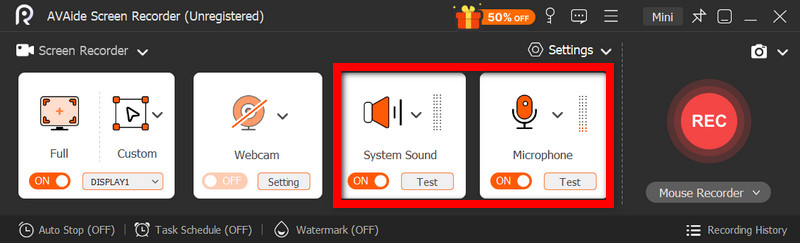
Untuk merekam suara apa pun yang dihasilkan oleh komputer, aktifkan Suara SistemUntuk menyertakan suara Anda sendiri, aktifkan MikroponWebcam juga dapat diaktifkan sesuai kebutuhan.
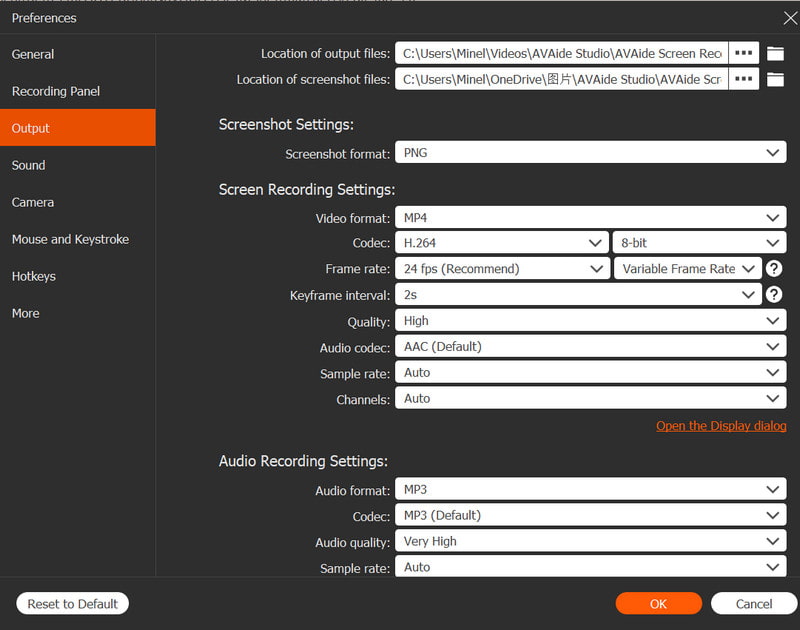
Langkah 4Sesuaikan Pengaturan Perekaman
Menggunakan Pengaturan tombol untuk mengkonfigurasi kualitas video, resolusi, kecepatan bingkai, dan format output untuk mencapai kinerja perekaman yang optimal.
Langkah 5Mulai merekam
tekan REKAM Tekan tombol untuk memulai perekaman. Rekaman Google Meet, tutorial, permainan, atau aktivitas di layar lainnya dapat direkam dengan lancar.
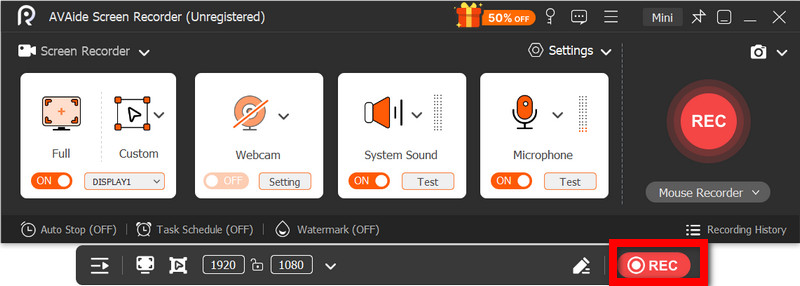
Langkah 6Hentikan dan Simpan Rekaman
Setelah selesai, klik Berhenti tombol. Pratinjau rekaman Anda, edit dengan cepat jika perlu, dan simpan ke komputer Anda secara instan.
Metode 5. Menggunakan Pengaturan Cepat
Pada tablet Android Lenovo, terdapat opsi perekaman layar bawaan di pengaturan cepat. Cara terbaik untuk merekam tutorial, permainan, atau aktivitas aplikasi di tablet Anda adalah tanpa mengunduh aplikasi pihak ketiga. Mudah, cepat, dan dioptimalkan untuk penggunaan seluler, fitur ini ideal untuk perekaman cepat saat bepergian.
Meskipun tidak memiliki fitur pengeditan dan penyesuaian tingkat lanjut seperti yang terdapat pada alat tangkapan layar lainnya, aplikasi ini cukup memadai untuk tangkapan layar sederhana dengan suara.
Langkah 1Geser ke atas dari bagian bawah layar untuk membukanya. Pengaturan Cepat.
Langkah 2carilah Rekaman Layar atau Perekam Layar tombol. Jika tidak ada, klik tombol tersebut. Sunting tombol dan tambahkan ke panel Anda.
Langkah 3Klik Perekam Layar, lalu pilih pengaturan yang Anda inginkan.
Langkah 4Mengetuk Awal untuk memulai perekaman. Akan ada hitungan mundur sebelum perekaman dimulai.
Langkah 5Ketuk bilah alat mengambang atau bilah notifikasi, lalu tekan Berhenti untuk mengakhiri rekaman.
Panduan Pemecahan Masalah Umum Perekaman Layar pada Lenovo
Anda dapat membaca kiat-kiat untuk mengatasi masalah umum saat merekam layar pada perangkat Lenovo.
Meskipun umumnya tidak ada komplikasi besar dengan perekaman layar pada perangkat Lenovo, selalu ada kemungkinan masalah tergantung pada alat atau perangkat perekaman layar yang digunakan. Berikut adalah masalah yang paling umum dan cara memperbaikinya.
- Perekam Layar Tidak Berfungsi: Restart perangkat Anda dan coba lagi. Untuk fitur bawaan seperti Xbox Game Bar, pastikan fitur tersebut diaktifkan di Pengaturan Windows di bawah Gaming.
- Tidak ada audio dalam rekaman: Periksa apakah Suara Sistem atau Mikrofon diaktifkan sebelum merekam. Selain itu, pastikan volume sistem Anda tidak dimatikan.
- Video tersendat atau berkualitas rendah: Kurangi kualitas video atau tutup aplikasi yang berjalan di latar belakang. Memperbarui driver grafis Anda juga dapat meningkatkan kinerja.
- Tidak dapat merekam Desktop atau File Explorer: Ini adalah salah satu keterbatasan umum Xbox Game Bar. Jika Anda ingin merekam layar dan menangkap semuanya, gunakan program canggih seperti AVAide Screen Recorder, salah satu yang terbaik. perekam layar terbaik untuk Mac dan Windows.
- Rekaman Tidak Tersimpan: Pastikan penyimpanan Anda tidak penuh, dan verifikasi lokasi penyimpanan default. Di pengaturan, ubah folder output, dan coba lagi.
Tombol perekaman layar Lenovo Opsi bervariasi tergantung pada perangkat Anda dan alat yang Anda gunakan. Secara keseluruhan, fitur bawaan dan aplikasi pihak ketiga membuat perekaman menjadi mudah, memberi Anda cara fleksibel untuk merekam, menyimpan, dan mengelola aktivitas layar secara efisien pada perangkat Lenovo.
TENTANG PENULIS

Tangkap aktivitas layar dengan audio, rapat online, video gameplay, musik, webcam, dll.