Mencoba mencari tahu cara merekam audio di Mac Hal ini sering terjadi ketika Anda perlu merekam kuliah di kelas, menyimpan panggilan video, merekam podcast, atau membuat konten suara dengan cepat. Untungnya, macOS menyertakan alat perekaman bawaan, dan beberapa opsi pihak ketiga dapat membantu Anda merekam mikrofon dan audio internal berkualitas tinggi dengan mudah.
Metode 1: Menggunakan QuickTime Player
Hampir semua orang tampaknya memiliki QuickTime di macOS mereka. QuickTime menyediakan antarmuka yang intuitif, perekaman mikrofon yang andal, dan ekspor cepat yang tidak memerlukan aplikasi lain. Teknik ini berguna untuk sulih suara, kuliah, rapat daring, dan bahkan rekaman podcast dasar.
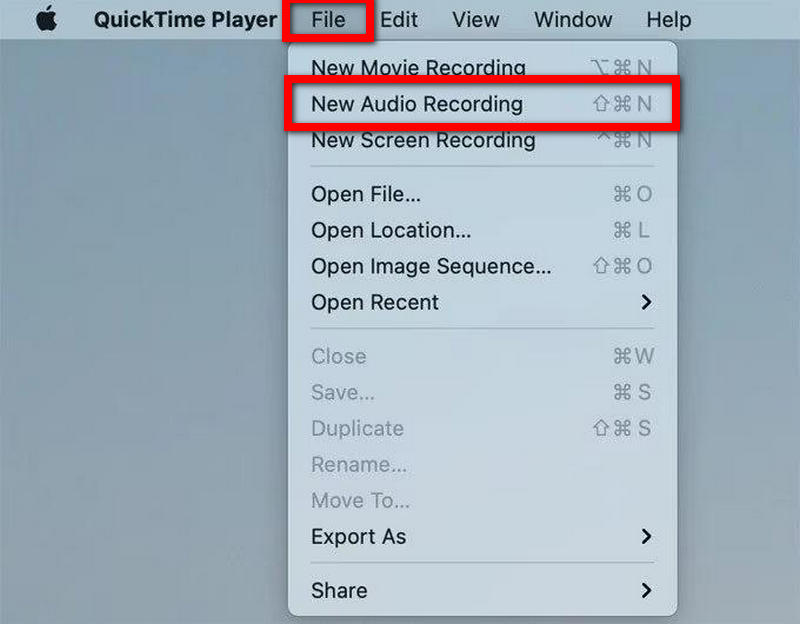
Langkah 1Luncurkan QuickTime Player baik dari folder Aplikasi atau melalui pencarian Spotlight.
Langkah 2Pergi ke Mengajukan menu dari bilah menu atas.
Langkah 3Klik Rekaman Audio Baru.
Langkah 4Tekan tanda panah kecil di sebelah Catatan tombol untuk menentukan mikrofon yang ingin Anda gunakan.
Langkah 5Jika perlu, sesuaikan volume input.
Langkah 6Untuk mulai merekam, tekan Catatan tombol.
Langkah 7 Bicaralah ke mikrofon.
Langkah 8tekan Berhenti tombol untuk mengakhiri perekaman.
Langkah 9Untuk menyimpan rekaman ke Mac Anda, buka Mengajukan dan pilih Menyimpan.
Metode 2: Menggunakan Memo Suara
Voice Memos dibuat untuk perekaman suara cepat. Aplikasi ini cocok untuk membuat pengingat pribadi, bertukar pikiran, kuliah singkat, dan rekaman audio pendek. Rekaman memo suara secara otomatis disinkronkan melalui iCloud, sehingga rekaman tersedia di semua perangkat Apple.
Langkah 1Luncurkan aplikasi Voice Memos di Mac Anda.
Langkah 2tekan Catatan tombol.
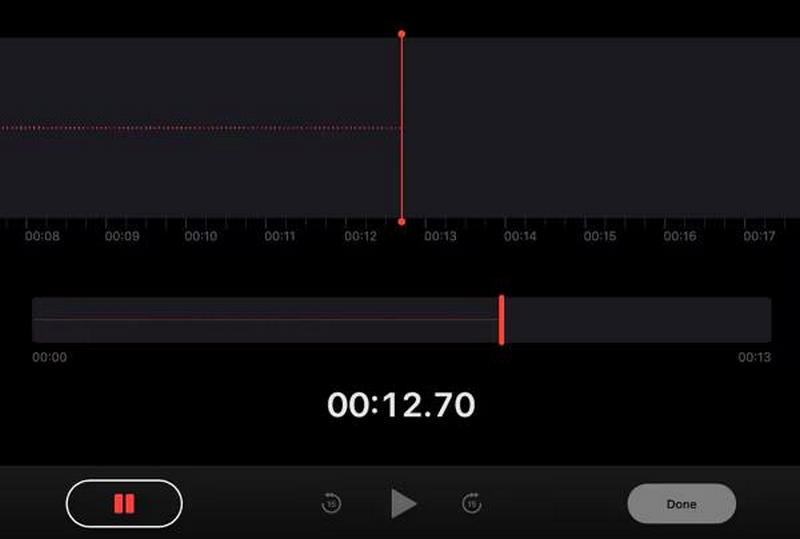
Langkah 3Bicaralah melalui mikrofon.
Langkah 4Jika Anda perlu menghentikan perekaman sejenak, pilih Berhenti sebentar.
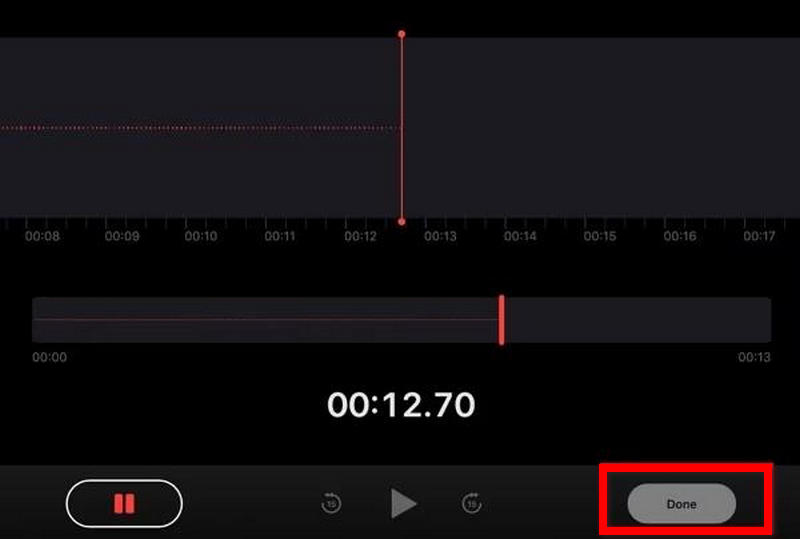
Langkah 5Tekan Selesai untuk menyelesaikan perekaman.
Langkah 6Untuk mempermudah pencarian rekaman, pilih Ganti nama pilihan.
Langkah 7Untuk berbagi, menduplikasi, atau mengekspor rekaman, klik kanan file tersebut.
Mengapa macOS tidak mendukung perekaman audio internal secara bawaan?
Secara default, macOS memungkinkan penggunaan mikrofon. Namun, tidak ada cara untuk merekam audio sistem internal dengan fungsi bawaan tersebut. Ini termasuk pemutaran media di aplikasi, musik, dan suara browser. Privasi, perlindungan hak cipta, dan keamanan sistem adalah alasan macOS memiliki batasan ini.
Tidak seperti audio mikrofon, audio internal dapat berisi media yang dilindungi atau komunikasi pribadi dari aplikasi. Karena itu, Apple membatasi akses ke saluran audio internal kecuali pengguna menginstal perangkat lunak tambahan.
Karena masalah-masalah ini, perangkat lunak seperti QuickTime tidak dapat merekam audio internal, tetapi audio eksternal melalui mikrofon dapat direkam.
Contoh dari permasalahan ini:
- Rekam permainan video beserta audionya.
- Rekam kelas online.
- Rekam audio dan video secara online.
- Rekam audio dari video online di web.
- Rekam video instruksional dengan audio internal komputer.
Metode 3: Menggunakan BlackHole + QuickTime Player
BlackHole adalah driver audio virtual gratis yang memungkinkan audio sistem dialihkan secara internal ke perangkat lunak perekaman. Jika driver ini digunakan bersama dengan QuickTime, maka pengguna Mac dapat merekam audio internal dan audio mikrofon eksternal. Driver ini memungkinkan pengguna untuk merekam rapat online, tutorial, video game, webinar, podcast, dan audio browser, semuanya dengan kualitas audio yang tinggi dan jernih.
Langkah 1Unduh dan instal BlackHole di Mac Anda dari situs web resminya, lalu buka Pengaturan Audio MIDI.
Langkah 2Buat Perangkat Multi-Output dan aktifkan speaker atau headphone Mac Anda serta BlackHole.
Langkah 3 Atur Perangkat Multi-Output sebagai output audio default Anda di pengaturan suara.
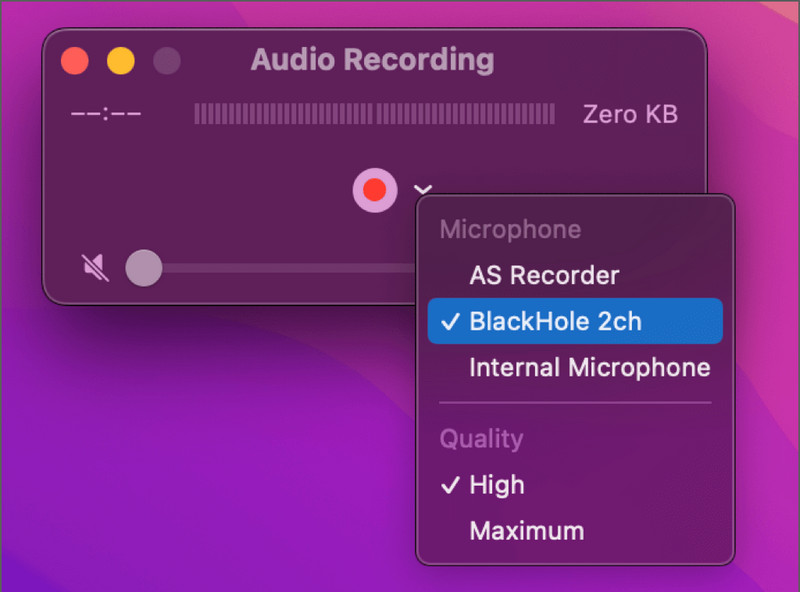
Langkah 4Buka QuickTime Player, pilih Mengajukan > Rekaman Audio Baru, lalu pilih Lubang Hitam sebagai mikrofon atau sumber audio.
Langkah 5Klik Catatan Tekan tombol, putar audio yang ingin Anda rekam, lalu hentikan dan simpan rekaman setelah selesai.
Metode 4: Menggunakan Perangkat Lunak Pihak Ketiga Khusus
1. Perekam Layar AVAide
Perekam Layar AVAide AVAide sangat cocok untuk pengguna Mac yang menginginkan alat sederhana namun ampuh untuk merekam suara dan audio. Selain perekaman layar, AVAide dapat menangkap audio dari mikrofon, speaker sistem, dan webcam Anda, serta layar ponsel Anda. Salah satu fitur terbaik AVAide adalah dirancang untuk pemula dan pengguna tingkat lanjut, menjadikannya pilihan tepat bagi siapa pun yang perlu merekam suara di Mac.
- Merekam audio mikrofon dan sistem secara bersamaan.
- Mendukung perekaman audio berkualitas tinggi dengan jeda minimal.
- Memungkinkan perekaman layar penuh, jendela, atau area khusus.
- Termasuk perekaman webcam untuk tutorial dan podcast.
- Mendukung berbagai format ekspor seperti MP3, AAC, FLAC, M4A, dan lainnya.

 Unduh Aman
Langkah 1Unduh dan Instal Perangkat Lunak
Kunjungi situs web AVAide untuk mengunduh perangkat lunak. Ikuti petunjuk instalasi di layar untuk menginstal perangkat lunak dengan sukses.
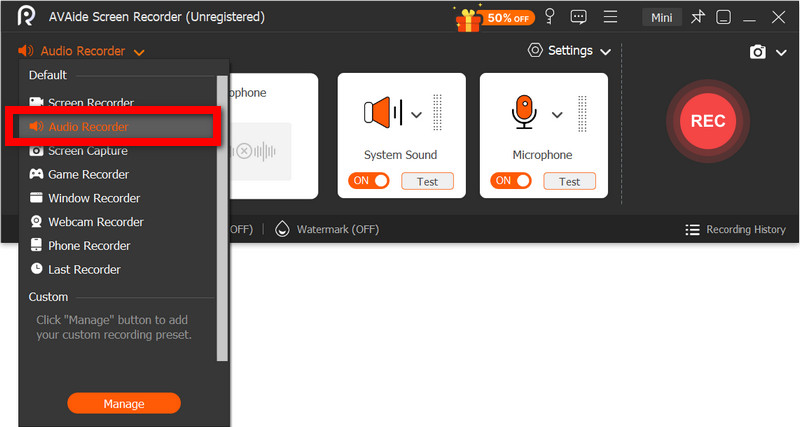
Langkah 2Pilih Perekam Audio
Buka perangkat lunak dan dari halaman utama, pilih Perekam suara untuk merekam suara saja.
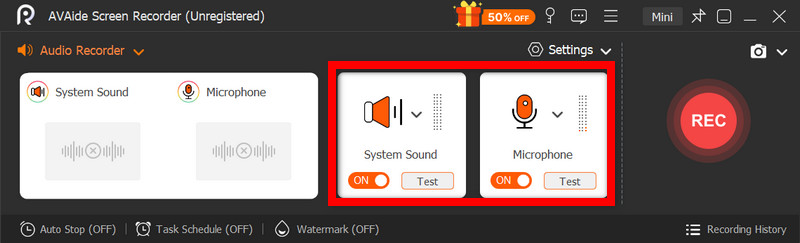
Langkah 3Aktifkan Mikrofon dan Suara Sistem
Aktifkan Mikropon Opsi untuk merekam suara dengan jelas. Aktifkan Suara Sistem untuk merekam audio internal dari Mac Anda.
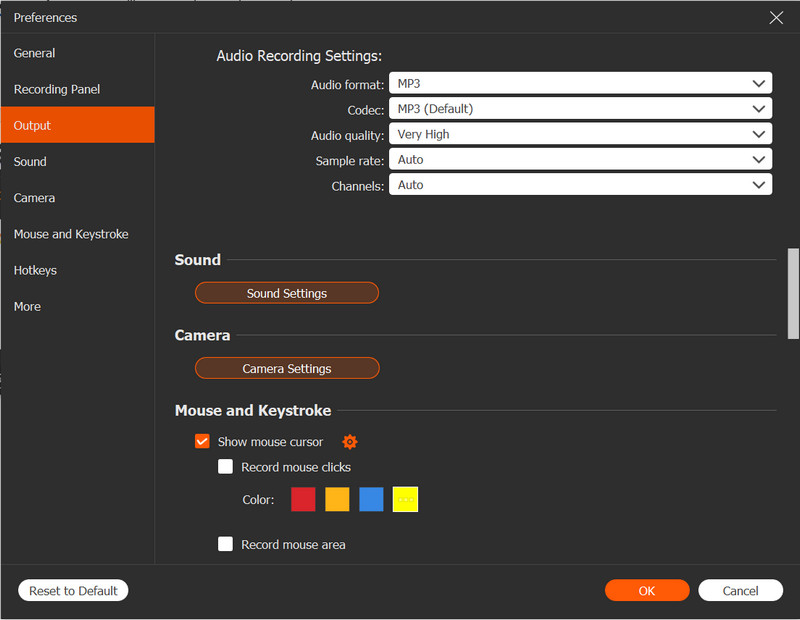
Langkah 4Sesuaikan Pengaturan Perekaman
Dari Pengaturan Pada menu, pilih format audio dan kualitas output yang Anda inginkan. Tentukan lokasi penyimpanan dan sesuaikan level volume untuk mikrofon dan audio sistem.
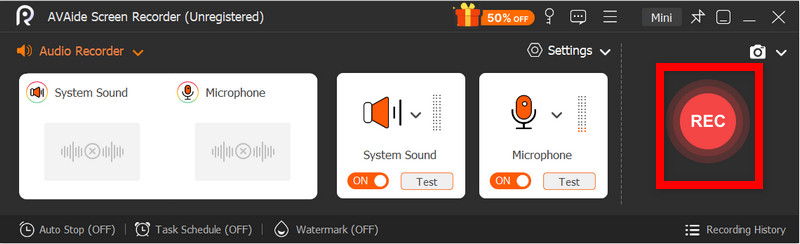
Langkah 5Mulai merekam
Pilih REKAM Opsi untuk memulai perekaman suara Anda. Selama sesi perekaman, Anda dapat menjeda, melanjutkan, atau menambahkan catatan.
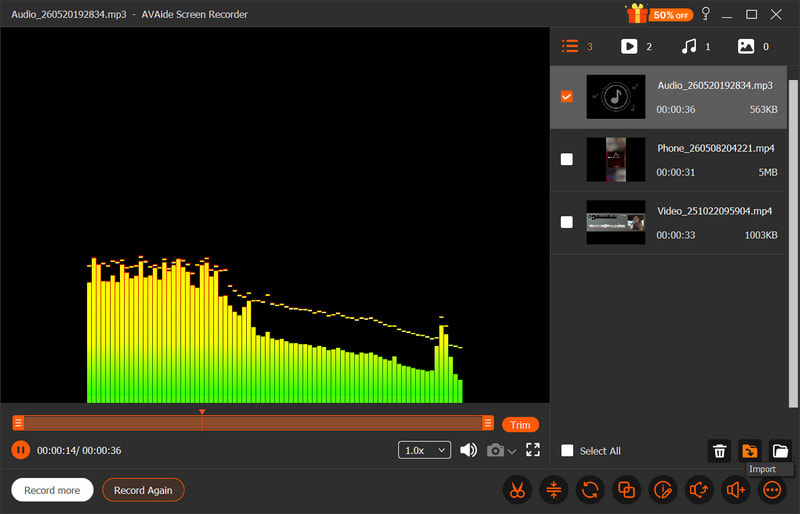
Langkah 6Simpan dan Pratinjau
Pilih Berhenti Opsi untuk mengakhiri perekaman audio. Anda kemudian dapat memangkas audio dan menyimpan audio yang direkam di Mac Anda.
2. Menggunakan Audacity
Audacity adalah perekam dan editor audio Mac yang mudah digunakan, andal, dan gratis. Aplikasi ini sering dipilih dibandingkan opsi lain untuk podcast dan proyek musik karena alur kerjanya yang sederhana dan fitur-fitur profesional seperti pengurangan noise, pemangkasan, dan peningkatan kualitas audio. Meskipun memiliki semua fitur tersebut, Audacity memiliki antarmuka pengguna yang sederhana, menjadikannya pilihan tepat untuk pemula.
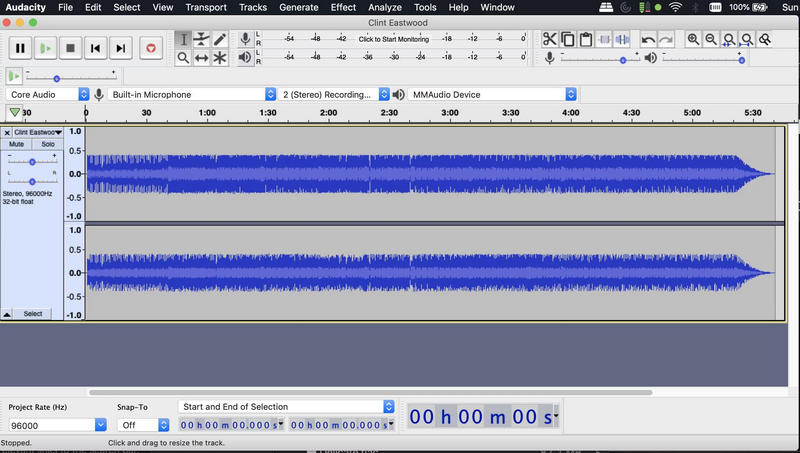
Langkah 1Unduh Audacity dan instal di Mac Anda. Buka aplikasi setelah instalasi selesai.
Langkah 2Pilih input audio Anda. Atur input ke perangkat audio Anda dan sesuaikan level perekaman.
Langkah 3Saat siap merekam, tekan tombol Catatan Tekan tombol dan mulailah berbicara ke mikrofon Anda.
Langkah 4Setelah selesai merekam, tekan tombol Berhenti tombol.
Langkah 5Setelah puas dengan hasil rekaman, pilih proyek yang ingin Anda ekspor dengan membuka Mengajukan > Ekspor. Pilih MP3, WAVatau opsi ekspor audio lainnya.
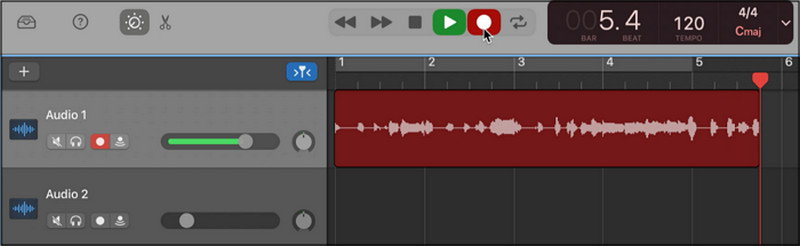
3. Menggunakan GarageBand
Alternatif yang bagus untuk Audacity adalah GarageBand, yang merupakan aplikasi milik Apple yang sudah terpasang di semua Mac. GarageBand memiliki semua fitur yang sama dengan Audacity dan lebih banyak lagi, seperti alat musik dan efek audio. GarageBand bahkan lebih baik untuk produksi musik dan banyak digunakan untuk rekam podcast sesi rekaman, sulih suara, dan proyek audio berkualitas tinggi dengan kontrol suara profesional.
Langkah 1Buka GarageBand dan pilih Proyek Baru, lalu pilih opsi tersebut. Suara.
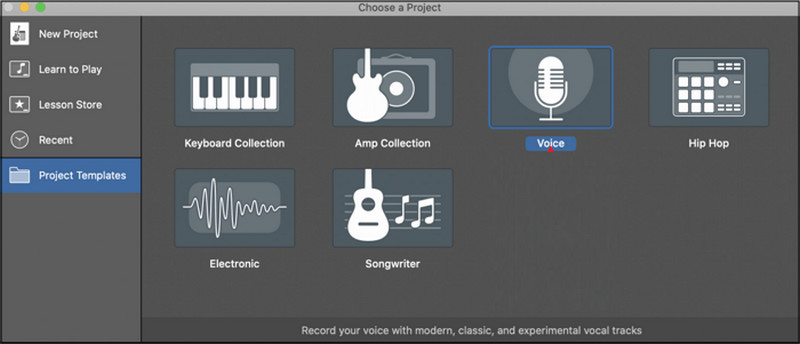
Langkah 2Pilih input yang ingin Anda gunakan untuk merekam. Jika Anda mau, aktifkan pemantauan audio agar dapat mendengar suara Anda saat merekam.
Langkah 3Memukul Catatan dan mulailah sesi Anda.
Langkah 4Setelah selesai merekam, tekan tombol Berhenti Gunakan fitur pengeditan dan penyesuaian suara di GarageBand untuk menyempurnakan rekaman Anda.
Langkah 5Ekspor proyek audio yang sudah selesai ke Mac Anda dengan kualitas dan format yang Anda inginkan.
Tips Bonus
1. Cara Merekam Audio dari YouTube di Mac
Untuk merekam audio YouTube, kursus online, webinar, serta pemutaran podcast dan musik di Mac Anda, Anda dapat menggunakan OBS Studio, perangkat lunak perekaman gratis untuk video layar dan perekaman siaran langsung. Karena OBS Studio menawarkan perekaman suara sistem berkualitas tinggi, ini adalah pilihan yang bagus untuk dimiliki.
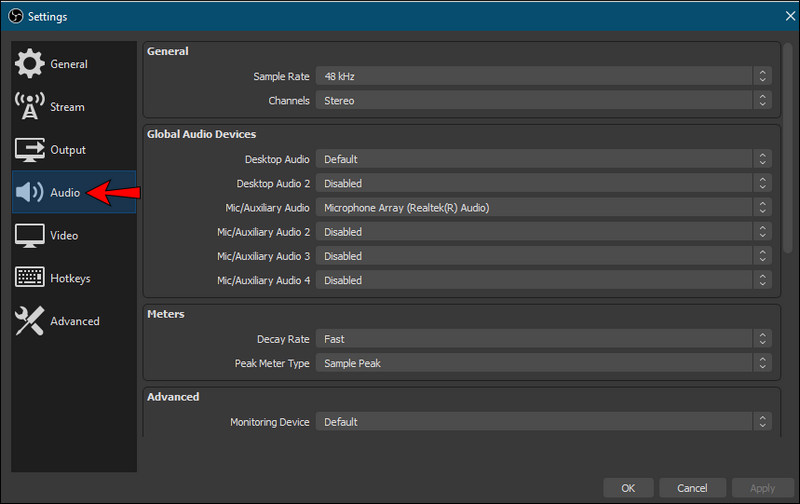
Langkah 1Unduh dan instal OBS Studio di Mac Anda, lalu buka perangkat lunak tersebut setelah terinstal.
Langkah 2Buat sumber baru di audio Pilih opsi dan pilih perangkat audio sistem Anda atau driver audio virtual.
Langkah 3Buka YouTube di browser dan muat video/audio yang ingin Anda rekam.
Langkah 4tekan Mulai merekam Tekan tombol tersebut, lalu putar video/audio YouTube seperti biasa.
Langkah 5Tunggu hingga audio yang ingin Anda rekam selesai, lalu tekan tombol Berhenti Tekan tombol dan cari file audio yang sekarang tersimpan di Mac Anda.
2. Cara Merekam Audio di Mac dengan Mikrofon Eksternal
Audio dari mikrofon eksternal, dalam kebanyakan kasus, memiliki kualitas audio yang lebih tinggi dibandingkan dengan mikrofon internal pada Mac. Mikrofon USB memiliki koneksi langsung ke Mac. Namun, mikrofon XLR mungkin memerlukan antarmuka audio untuk kualitas suara yang lebih baik dan noise yang lebih rendah. Dengan menggunakan perekam layar terbaik untuk Mac juga dapat membantu menghasilkan rekaman yang lebih jernih saat menggabungkan tugas audio dan video.
Langkah 1Hubungkan mikrofon pilihan Anda ke Mac Anda, lalu buka Pengaturan sistem, pergi ke Suara, dan atur mikrofon yang baru saja Anda hubungkan sebagai perangkat input.
Langkah 2Sesuaikan level input mikrofon dan uji suara untuk memastikan suara Anda terdeteksi dengan jelas.
Langkah 3Buka perangkat lunak perekaman pilihan Anda, seperti AVAide Screen Recorder.
Langkah 4Pilih mikrofon eksternal di dalam pengaturan perangkat lunak dan mulailah merekam suara atau sesi audio Anda.
Langkah 5Hentikan perekaman, tinjau kualitas suara, lalu simpan atau ekspor file audio akhir ke Mac Anda.
Rekam suara Mac Anda dapat dengan mudah menggunakan alat bawaan seperti QuickTime dan Voice Memos atau perangkat lunak canggih untuk perekaman berkualitas profesional. Baik Anda membutuhkan audio internal, narasi podcast, atau rekaman kuliah online, metode ini menyediakan cara yang andal untuk menangkap suara jernih secara efisien di Mac Anda.
TENTANG PENULIS

Tangkap aktivitas layar dengan audio, rapat online, video gameplay, musik, webcam, dll.