Imaginez que vous essayez d'enregistrer un tutoriel, un moment de jeu ou une réunion en ligne, mais que vous ne savez pas comment le faire sur votre appareil. Comment enregistrer l'écran sur iPad Ce guide vous explique comment activer l'enregistrement, utiliser le son, résoudre les problèmes et améliorer la qualité pour des enregistrements d'écran plus fluides et de meilleure qualité à chaque fois.
- Partie 1. Comment activer l'enregistrement d'écran sur iPad
- Partie 2. Comment enregistrer l'écran sur iPad
- Partie 3. Comment enregistrer l'écran avec le son sur iPad
- Partie 4. Pourquoi ne puis-je pas enregistrer l'écran sur mon iPad ?
- Partie 5. Conseils de pro pour de meilleurs enregistrements d'écran
Partie 1. Comment activer l'enregistrement d'écran sur iPad
Ne vous inquiétez pas, le bouton d'enregistrement d'écran n'est pas encore installé dans votre Centre de contrôle, sauf si vous ne l'avez pas déjà installé sur votre iPad. Apple a intégré cette fonctionnalité nativement à iPadOS ; il faut l'activer pour pouvoir l'utiliser. Une fois activée, vous pourrez enregistrer votre écran à tout moment d'un simple glissement de doigt et d'un toucher.
Étape 1Appuyez sur le Réglages application sur votre iPad.
Étape 2Cliquer sur Centre de contrôle dans le menu en faisant défiler vers le bas.
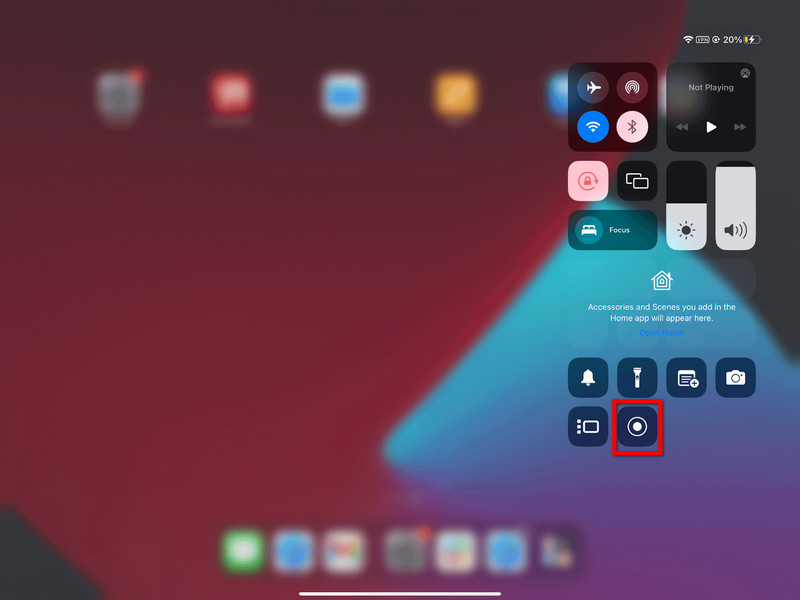
Étape 3Appuyez sur le + (Ajouter) bouton dans le Enregistrement d'écran section de la liste des commandes disponibles.
Étape 4Pour accéder au Centre de contrôleFaites glisser votre doigt du coin supérieur droit de votre écran vers le bas. Vous devriez maintenant voir l'enregistrement.
Partie 2. Comment enregistrer l'écran sur iPad
Une fois activée, l'enregistrement de l'écran de votre iPad est simple et rapide. L'enregistreur intégré d'iPadOS est une fonctionnalité intuitive qui vous permet d'enregistrer vos sessions de jeu, des tutoriels ou même vos appels vidéo sans installer d'application tierce.
Étape 1Appuyez longuement en haut à droite de l'écran de votre iPad, puis faites glisser vers le bas.
Étape 2Tapez sur le Enregistrement d'écran Appuyez sur le bouton. Un compte à rebours de 3 secondes s'affichera avant le début de l'enregistrement.
(Facultatif) Maintenez le Enregistrement d'écran bouton et appuyez sur le Microphone pour l'activer lorsque vous souhaitez enregistrer votre voix.
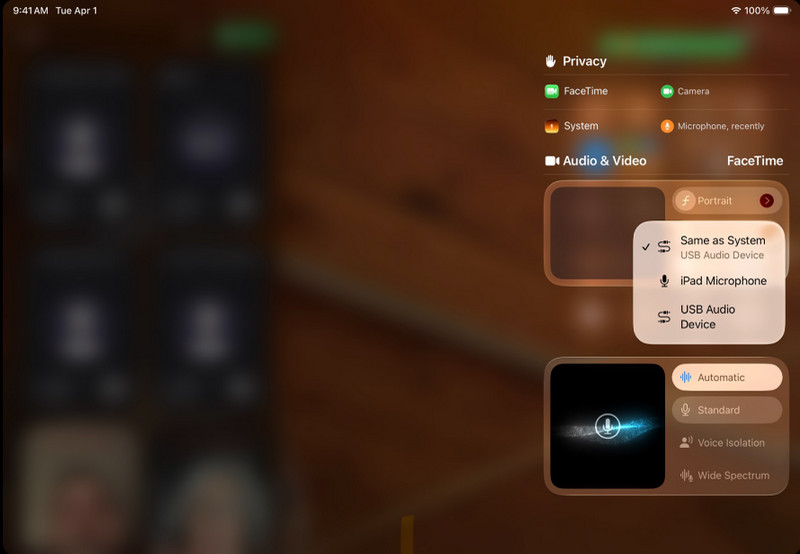
Étape 3Sélectionnez les applications ou les activités que vous souhaitez enregistrer.
Étape 4Appuyez sur la barre d'état rouge, puis appuyez sur Arrêter, ou retournez à la Centre de contrôle et appuyez sur le Disque bouton à nouveau.
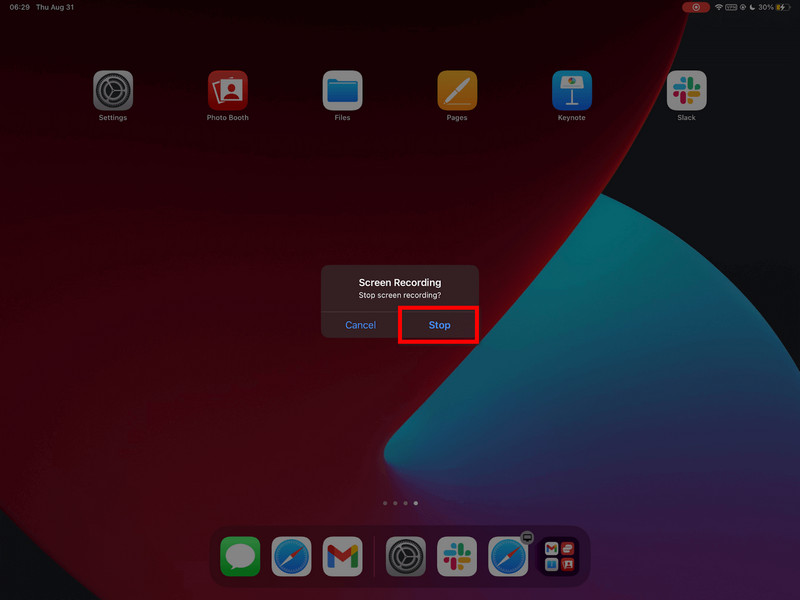
Étape 5Votre vidéo sera automatiquement enregistrée dans le Photos application, où vous pouvez la modifier ou la partager.
Partie 3. Comment enregistrer l'écran avec le son sur iPad
Capturer l'écran et le son avec l'iPad est utile pour les tutoriels, les jeux, les cours en ligne et les démonstrations. L'enregistrement sur iPadOS présente toutefois des limitations ; il est donc important de comprendre le fonctionnement du microphone et du système audio avant d'enregistrer.
Distinction importante : Microphone vs. Audio du système
| Type audio | Ce qu'il enregistre | Disponibilité sur iPadOS | Meilleurs cas d'utilisation |
| Audio du microphone | Votre voix et les sons extérieurs sont captés par le microphone de l'iPad. | Disponible | Commentaires, tutoriels, narration. |
| Système audio | Sons internes provenant des applications, des jeux, des vidéos et de la lecture multimédia. | Non directement pris en charge | Nécessite des outils externes ou une solution de contournement. |
Étapes pour enregistrer du son avec un microphone
Étape 1Faites glisser votre doigt vers le haut depuis le coin supérieur droit de l'écran de votre iPad pour ouvrir l'application. Centre de contrôle.
Étape 2Maintenez le Enregistrement d'écran Cliquez sur ce bouton pour afficher plus d'options.
Étape 3Appuyez sur le microphone pour l'allumer. Il devrait devenir rouge pour indiquer que l'enregistrement vocal est en cours.
Étape 4Cliquez sur Commencer l'enregistrementet lorsque le compte à rebours de 3 secondes est terminé, l'enregistrement commence.
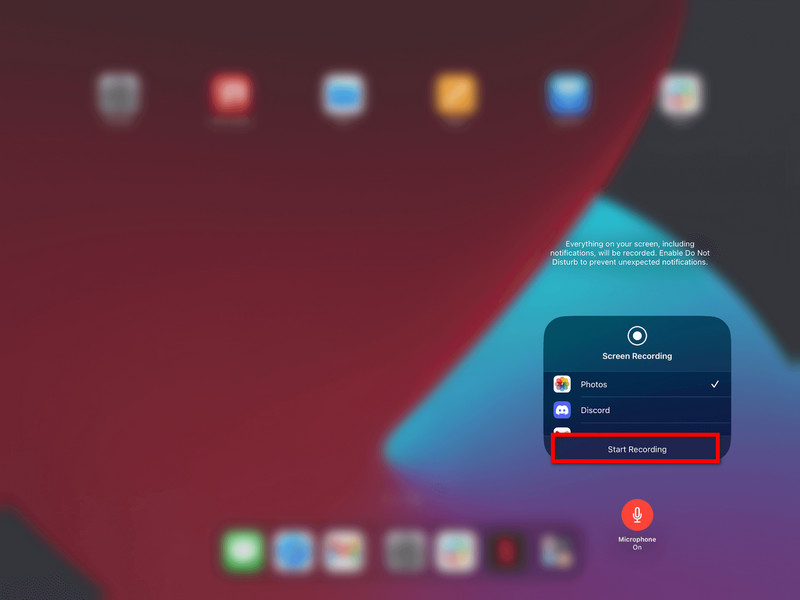
Étape 5Répétez les mouvements que vous souhaitez enregistrer. Si le microphone est activé, votre voix sera enregistrée.
Étape 6Appuyez sur la barre d'état rouge en haut de l'écran ou retournez à Centre de contrôle et appuyez sur le Disque bouton à nouveau.
Étape 7La vidéo sera automatiquement enregistrée dans le Photos application, où vous pouvez la consulter ou la modifier.
Alternative pour l'enregistrement audio du système
Malheureusement, en raison des limitations du système, il est impossible d'enregistrer l'audio interne directement sur l'iPad ; une solution informatique est donc nécessaire. Un excellent outil est… AVAide Enregistreur d'écran, qui vous permet de dupliquer l'écran d'un iPad et d'enregistrer simultanément l'écran et le son du système.
AVAide Screen Recorder est un logiciel d'enregistrement d'écran de haute qualité qui capture l'activité de l'écran avec une grande netteté. Il peut enregistrer sans latence ni décalage jusqu'en 4K/1080p. Il permet également l'enregistrement simultané du son système et du microphone, idéal pour les tutoriels, les sessions de jeu et les présentations.
- L'enregistrement haute qualité vous permet de capturer des vidéos en 4K ou 1080p avec des résultats clairs et de haute qualité.
- Double audio
- Prise en charge de l'enregistrement simultané du son du système et de l'audio du microphone.
- La fonction de recopie d'écran iOS permet d'afficher et d'enregistrer l'écran de votre iPad sur un PC ou un Mac.
- Les modes d'affichage flexibles prennent en charge l'enregistrement en plein écran ou dans une zone personnalisée.
- Les outils de montage intégrés vous permettent de découper, d'améliorer et de modifier rapidement vos enregistrements.

 Téléchargement sécurisé
Étape 1Télécharger et installer
Rendez-vous sur le site officiel et téléchargez AVAide Screen Recorder. Une fois installé, il fonctionnera sur votre ordinateur Windows ou Mac.
Étape 2Sélectionnez l'option iOS
Dans l'interface principale, cliquez Enregistreur téléphonique, puis sélectionnez Enregistreur iOS de la liste des options (iOS et Android).
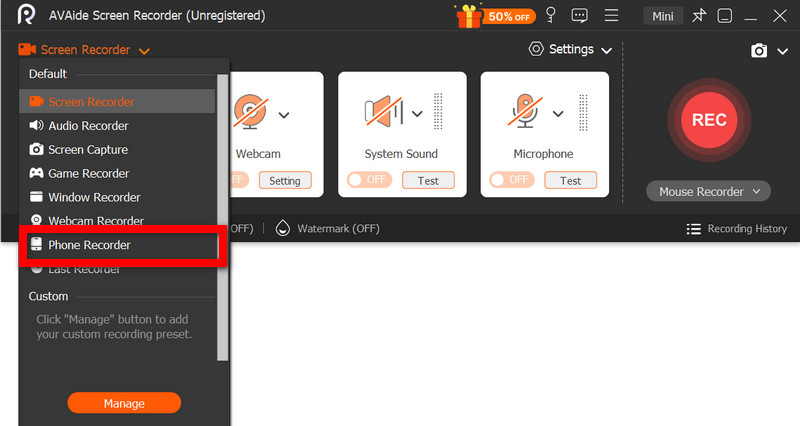
Étape 3Connectez l'iPad au PC
Il est possible de dupliquer sans fil l'écran de votre iPad sur votre ordinateur via le même réseau ou à l'aide d'un câble USB si vous en possédez un. Dans l'application Recopie d'écran de votre iPad, sélectionnez l'appareil AVAide. L'écran de votre iPad s'affichera alors sur votre ordinateur une fois la connexion établie.
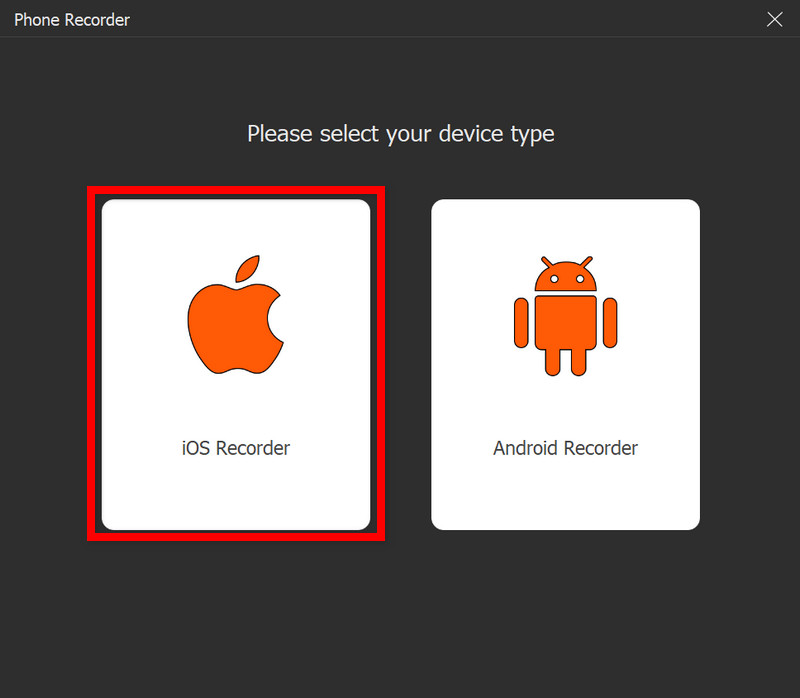
Étape 4Commencer l'enregistrement
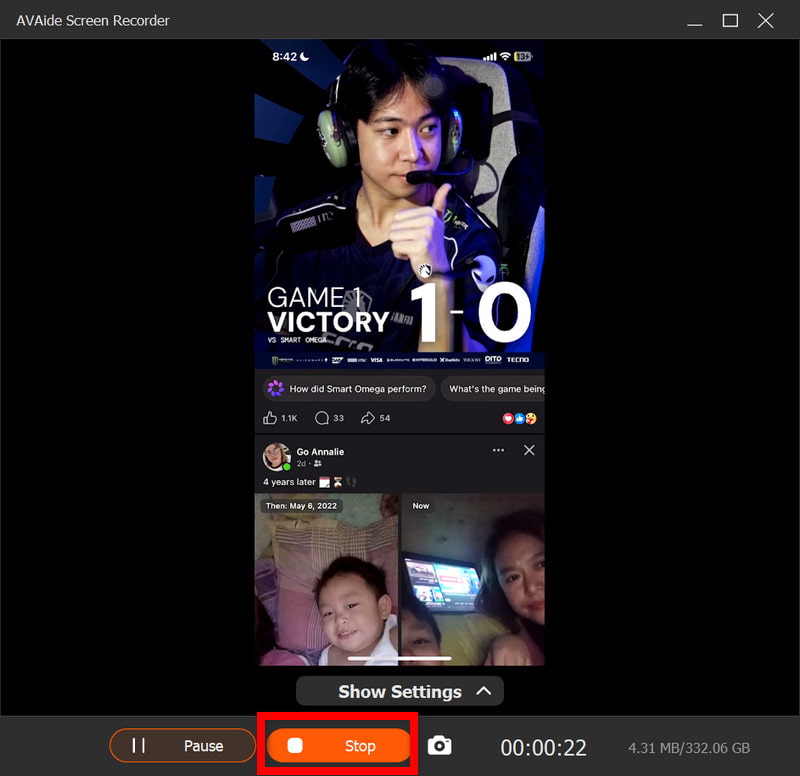
En cas de mise en miroir réussie, appuyez Disque pour commencer l'enregistrement de l'écran de votre iPad, du son système et de l'entrée du microphone (le cas échéant).
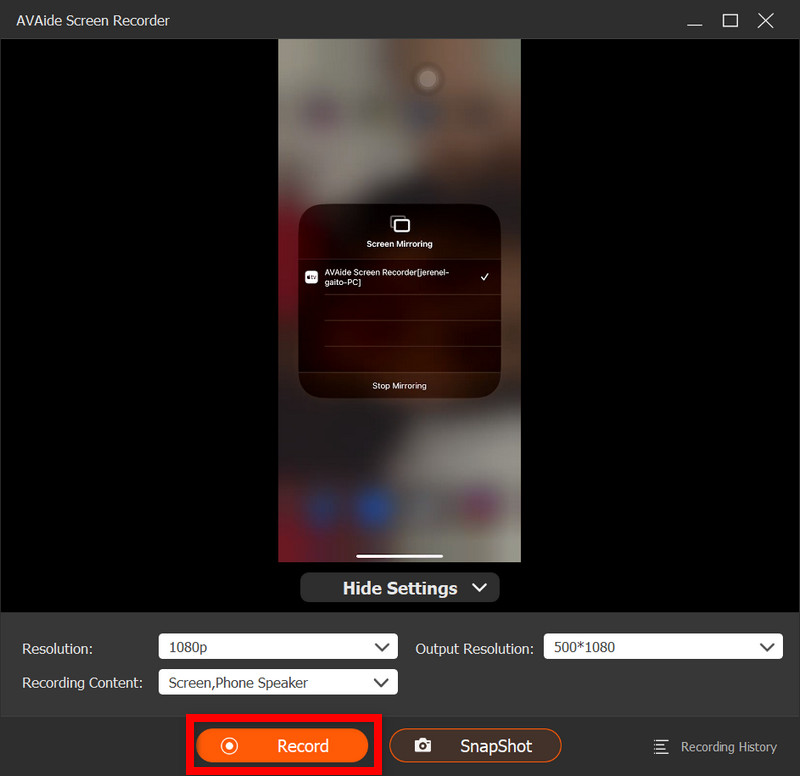
Étape 5Arrête d'enregistrer
appuie sur le Arrêter Cliquez sur le bouton une fois terminé. Votre enregistrement sera automatiquement sauvegardé sur votre ordinateur.
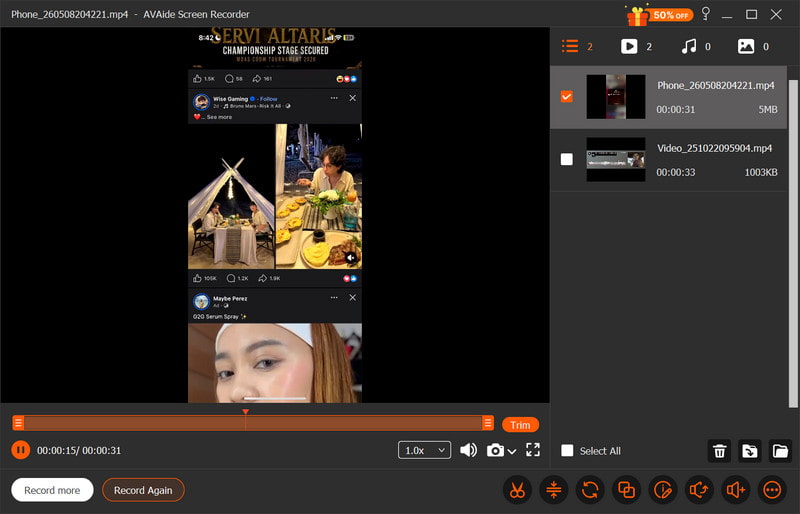
Étape 6Modifier la vidéo
Une fois l'enregistrement terminé, une fenêtre de prévisualisation s'ouvre. Vous pouvez alors supprimer les passages indésirables, ajuster le son ou effectuer des modifications simples avant d'exporter la vidéo finale.
Partie 4. Pourquoi ne puis-je pas enregistrer l'écran sur mon iPad ?
Un problème d'enregistrement vidéo sur iPad est généralement dû à des réglages, des restrictions ou des problèmes de performance. Les problèmes et causes les plus courants sont présentés ci-dessous.
1. Le bouton est complètement absent.
Ce problème survient si l'enregistrement d'écran n'est pas installé dans le Centre de contrôle. Vous devez l'ajouter manuellement dans Réglages > Centre de contrôle pour qu'il y apparaisse.
2. Le bouton est grisé ou ne répond pas.
Cela est généralement dû à une restriction de l'enregistrement d'écran dans les paramètres système ou les commandes de l'appareil.
- Il est possible de définir des limites de temps d'écran.
- L'enregistrement peut être interdit par les paramètres de profil de l'appareil scolaire ou professionnel.
- Certaines applications peuvent ne pas vous permettre de prendre une capture d'écran pendant leur utilisation.
3. L'enregistrement s'arrête immédiatement après son démarrage.
Le problème est généralement lié à des problèmes de système ou de stockage, tels qu'un espace disponible insuffisant ou d'autres applications interférant avec le processus d'enregistrement.
4. Aucun son sur l'enregistrement
Cela se produit lorsque la connexion audio est incorrecte ou lorsque l'utilisateur s'attend à un son interne ; l'enregistrement d'écran interne n'est pas possible sur iPadOS. meilleur enregistreur d'écran pour Mac peut aider à capturer correctement le son du système.
5. L'enregistrement est saccadé ou de mauvaise qualité.
Cela est généralement dû à l'un des facteurs suivants : capacité de stockage limitée de l'appareil, trop d'applications en cours d'exécution ou un modèle d'iPad plus ancien incapable d'enregistrer à une résolution aussi élevée.
Partie 5. Conseils de pro pour de meilleurs enregistrements d'écran
Lors de l'enregistrement sur iPadOS, assurez-vous que votre iPad est correctement configuré pour un enregistrement fluide, net et de haute qualité. Voici quelques conseils utiles pour optimiser la qualité vidéo et audio.
1. Libérez de l'espace de rangement
Avant de commencer l'enregistrement, assurez-vous qu'il y a suffisamment d'espace libre sur votre iPad afin d'éviter tout décalage ou dysfonctionnement, ce qui pourrait entraîner des problèmes d'enregistrement pendant le tournage.
2. Fermez les applications inutilisées
Fermez toutes les applications inutiles en arrière-plan afin d'améliorer les performances du système et d'éviter les interruptions ou les ralentissements pendant l'enregistrement.
3. Activez le mode Ne pas déranger
Activez le mode « Ne pas déranger » pour empêcher tous les appels, messages et notifications entrants de s'afficher à l'écran et de vous distraire pendant l'enregistrement.
4. Maintenez une configuration d'écran stable
Ne modifiez pas la luminosité, l'orientation ou les paramètres système pendant l'enregistrement, car des changements soudains peuvent affecter la cohérence vidéo et la qualité de l'enregistrement.
5. Tester l'audio en premier
Avant de commencer à filmer votre vidéo, effectuez un court enregistrement test pour vérifier que les niveaux du microphone sont correctement réglés et que votre voix est claire et correctement enregistrée.
6. Utilisez un écran d'accueil propre
Nettoyez votre écran d'accueil ou déplacez les applications sensibles vers un autre dossier afin que votre enregistrement paraisse clair, professionnel et épuré.
7. Enregistrez dans un environnement calme
Si vous pouvez enregistrer dans une pièce calme avec peu de bruit de fond, votre microphone captera mieux votre voix et minimisera les bruits indésirables. enregistrement vocal sur un Mac ou iPad.
enregistrement d'écran iPad C'est une méthode simple et efficace pour enregistrer des tutoriels, des séquences de jeu et des moments importants directement depuis votre appareil. Grâce à quelques réglages et astuces, vous pouvez améliorer la qualité vidéo et audio pour des résultats optimaux. Que vous utilisiez les outils intégrés ou un logiciel externe, l'enregistrement devient plus facile et plus fiable.
À PROPOS DE L'AUTEUR

Capturez les activités de l'écran avec de l'audio, des réunions en ligne, des vidéos de jeu, de la musique, une webcam, etc.
Enregistrement d'écran
- Enregistrement d'écran sous Windows
- Enregistrer un live sur Instagram
- Extraire des vidéos de Tubi
- Convertir des vidéos YouTube en MP3
- Téléchargez des vidéos depuis Fansly
- Téléchargement de vidéos JW Player
- Télécharger les vidéos Bilibili
- Télécharger des vidéos Patreon
- Télécharger les vidéos SpankBang
- Télécharger des vidéos Discord
- Télécharger la vidéo DoodSream