Have you ever wondered why there's a red line in your red line in your Final Cut Pro projects? We'll explain why it happens and show you easy ways to make it go away if you don't want it.
Part 1. Why Is Dragline Red in Final Cut Pro
In Final Cut Pro, sometimes you see a red line on your clips in the browser, and you might wonder why it's there. This red line is just a signal that you've marked a clip as “rejected,” which means you don't want to use it in your project.
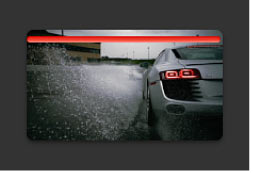
To mark a clip as rejected, select it and press the Delete key or use the 'R' key shortcut. The red line appears on the clip to show it's rejected.
Lines in other colors also have their meanings and functions. These lines are there to quickly show you if they've been marked as a favorite, rejected, have keywords applied, or are currently being used in your current project. It's a helpful way to keep your clips organized.
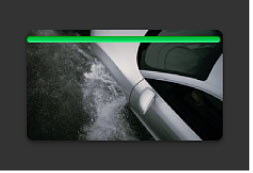
◆ Green Line: If you see a green line on a clip, it means you've liked that clip and marked it as a favorite.
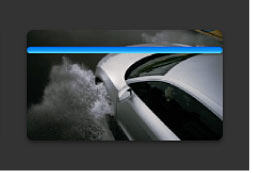
◆ Blue Line: A blue line on a clip means you've added specific words to describe it, like adding tags or labels to help you find it later.
◆ Purple Line: When you see a purple line, it means the software itself has looked at the clip and guessed what it might be about, and it added some keywords automatically to describe it.
◆ Orange Line: If there's an orange line at the bottom of a clip, it's a sign that this clip is currently being used in the project you're working on in the timeline. It's like a flag telling you, “Hey, this clip is part of your project right now.”

Part 2. How to Solve Final Cut Pro Red Line
There are two scenarios where you might want to get rid of those red lines in Final Cut Pro. The first is when you want to use a “rejected” clip again. The second is when you simply find those lines annoying or don't need them.
In the first case, you can unmark the “rejected” clip. It's important to know that Final Cut Pro doesn't actually delete clips when you mark them as “rejected”; it just hides them by default. So, you can always see these clips again from “All clips” in the browser if you change your mind. To unmark a clip, just select it and press 'U' on your keyboard (or choose “Mark”, and then click “Unrate”).
Now, if you want to get rid of those clips permanently because you no longer need them, you can delete the source media files of the rejected clips.
In the second scenario, where you find all those lines bothersome, you can turn them off. To do this, go to the “View” menu, select “Browser,” and then choose “Marked Ranges.” This will make all those lines disappear, giving you a cleaner workspace.
Part 3. Bonus Tip: Convert Incompatible Videos for Final Cut Pro
Final Cut Pro is great for video editing for Mac users, but it may not handle all formats like MPG. If you run into compatibility issues, consider using AVAide Video Converter. It easily converts various formats into ones that work smoothly with Final Cut Pro. So you can use it to convert MPG to MOV or MP4. This tool simplifies working with different videos.
It boasts various capabilities, excelling not just in conversion but also in video editing, and DVD ripping, and offering a range of advanced tools.
- It boasts various capabilities, excelling not just in conversion but also in video editing, and DVD ripping, and offering a range of advanced tools.
- Easily convert video and audio to over 300 formats with lightning speed.
- Rip DVDs to various formats with superior quality and customization options.
- Create beautiful movies easily, even if you’re a beginner.
- Effortlessly create stunning video collages with music.
- Robust video editing features, including rotating, cropping, adding effects and filter, video enhancer, and more.
- Offer various advanced tools, like watermark remover, noise remover, 3D maker, GIF maker, color correction, etc.
With AVAide Video Converter, any conversion is made easy with only a few steps.
Step 1Download and install AVAide Video Converter. And then launch it.

FREE DOWNLOAD For Windows 7 or later
 Secure Download
FREE DOWNLOAD For Mac OS X 10.13 or later
Secure DownloadStep 2Add files to convert. You can either click “+” to add files or drag them directly to the center of the interface.

Step 3Select a format that is compatible with Final Cut Pro, such as MOV or MP4. Choose your preferred video saving location, and then click “Convert All”.

Part 4. FAQs of Final Cut Pro
Can I use Final Cut Pro on Windows?
No. Final Cut Pro is exclusive to macOS and is not available for Windows. However, you can explore alternative video editing software options that are compatible with Windows, such as AVAide Video Converter.
How much does Final Cut Pro cost?
$299.99 for a one-time purchase.
Does Final Cut Pro have tracking?
Yes. Final Cut Pro can track the movement of objects in videos.
How do I find my timeline in Final Cut Pro?
Once you are in your project, you should see a panel at the bottom of the screen. This panel is the timeline. It usually contains a series of video and audio tracks where you can arrange and edit your clips.
Does Final Cut Pro come with transitions?
Yes. Final Cut Pro has various transitions.
To sum it all up, learning to deal with lines in different colors in Final Cut Pro is crucial for a better video editing experience. We've explored why these colored lines appear, provided solutions for managing them effectively, and offered a useful tip for dealing with incompatible videos. By mastering these aspects, you can enhance your Final Cut Pro skills and enjoy smoother video editing.
ABOUT THE AUTHOR

Your complete video toolbox that supports 350+ formats for conversion in lossless quality.