Stellen Sie sich vor, Sie möchten ein Tutorial, einen Spielmoment oder ein Online-Meeting speichern, wissen aber nicht genau, wie Sie es auf Ihrem Gerät aufnehmen können. So funktioniert die Bildschirmaufnahme auf dem iPad Mit dieser Anleitung können Sie diese Momente ganz einfach speichern und teilen. Sie erfahren, wie Sie die Aufnahme aktivieren, Ton verwenden, Probleme beheben und die Qualität verbessern – für flüssigere und bessere Bildschirmaufnahmen.
- Teil 1. So aktivieren Sie die Bildschirmaufnahme auf dem iPad
- Teil 2. So erstellen Sie eine Bildschirmaufnahme auf dem iPad
- Teil 3. So erstellen Sie Bildschirmaufnahmen mit Ton auf dem iPad
- Teil 4. Warum kann ich auf meinem iPad keine Bildschirmaufnahme machen?
- Teil 5. Profi-Tipps für bessere Bildschirmaufnahmen
Teil 1. So aktivieren Sie die Bildschirmaufnahme auf dem iPad
Keine Sorge, die Bildschirmaufnahmefunktion ist im Kontrollzentrum noch nicht verfügbar, es sei denn, Sie haben es auf Ihrem iPad nicht. Apple hat diese Funktion in iPadOS integriert, und sie muss vor der Nutzung aktiviert werden. Sobald sie hinzugefügt ist, können Sie Ihren Bildschirm jederzeit mit einer einfachen Wisch- und Tippgeste aufnehmen.
Schritt 1Tippen Sie auf die Einstellungen App auf Ihrem iPad.
Schritt 2Klicke auf Kontrollzentrum im Menü, während Sie nach unten scrollen.
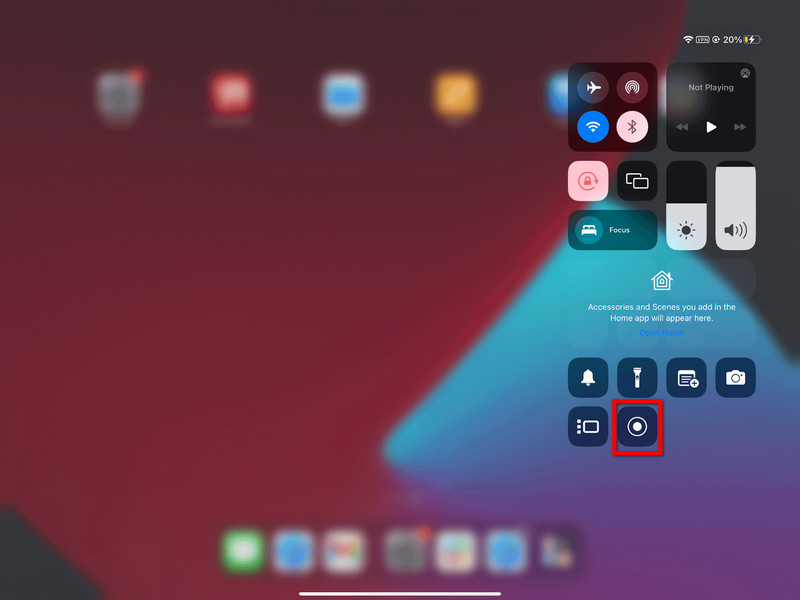
Schritt 3Tippen Sie auf die + (Hinzufügen) Schaltfläche in der Bildschirmaufnahme Abschnitt der Liste der verfügbaren Steuerelemente.
Schritt 4Für den Zugriff auf die KontrollzentrumWischen Sie von der oberen rechten Ecke Ihres Bildschirms nach unten. Nun sollte der Datensatz angezeigt werden.
Teil 2. So erstellen Sie eine Bildschirmaufnahme auf dem iPad
Sobald Sie die Funktion aktiviert haben, ist das Aufnehmen Ihres iPad-Bildschirms einfach und schnell. Der in iPadOS integrierte Recorder ist eine nahtlos integrierte Funktion, mit der Sie Gameplay, Tutorials oder sogar Videoanrufe aufzeichnen können, ohne Apps von Drittanbietern installieren zu müssen.
Schritt 1Tippen und halten Sie die obere rechte Ecke Ihres iPad-Bildschirms und ziehen Sie sie dann nach unten.
Schritt 2Tippen Sie auf die Bildschirmaufnahme Knopf. Vor dem Aufnahmestart folgt ein 3-Sekunden-Countdown.
(Optional) Halten Sie die Taste gedrückt Bildschirmaufnahme Taste und tippen Sie auf die Mikrofon Aktivieren Sie diese Funktion, wenn Sie Ihre Stimme aufnehmen möchten.
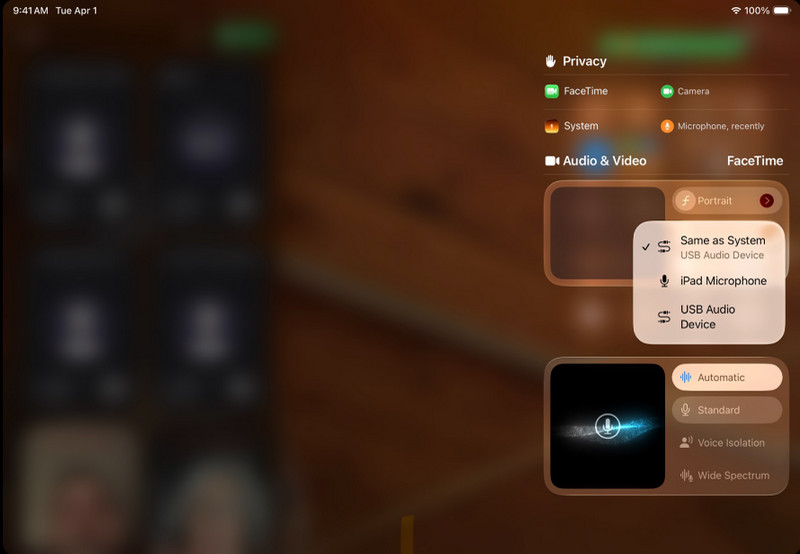
Schritt 3Wählen Sie die Apps oder Aktivitäten aus, die Sie aufzeichnen möchten.
Schritt 4Tippe auf die rote Statusleiste und dann auf Stoppenoder geh zurück zu Kontrollzentrum und tippen Sie auf Schallplatte Taste erneut.
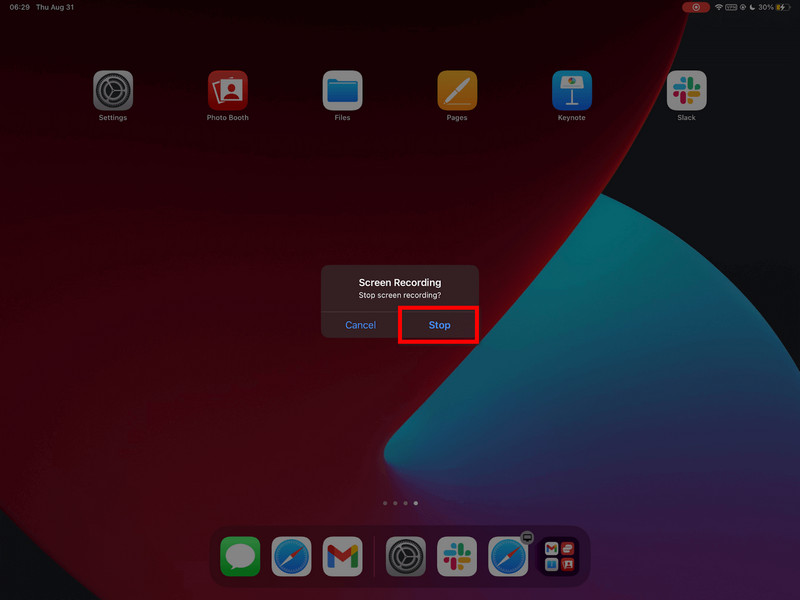
Schritt 5Ihr Video wird automatisch gespeichert im Fotos App, in der Sie es bearbeiten oder teilen können.
Teil 3. So erstellen Sie Bildschirmaufnahmen mit Ton auf dem iPad
Die Bildschirm- und Tonaufnahme mit dem iPad ist hilfreich für Tutorials, Spiele, Online-Kurse und Demonstrationen. Die Aufnahmefunktion unter iPadOS ist jedoch eingeschränkt, und es ist wichtig, vor der Aufnahme das Zusammenspiel von Mikrofon und Systemaudio zu verstehen.
Wichtiger Unterschied: Mikrofon- vs. Systemaudio
| Audiotyp | Was es aufzeichnet | Verfügbarkeit auf iPadOS | Beste Anwendungsfälle |
| Mikrofon-Audio | Ihre Stimme und Umgebungsgeräusche werden vom Mikrofon des iPads erfasst. | Verfügbar | Kommentare, Anleitungen, Erzählungen. |
| System Audio | Interne Geräusche von Apps, Spielen, Videos und Medienwiedergabe. | Nicht direkt unterstützt | Erfordert externe Tools oder eine alternative Lösung. |
Schritte zum Aufnehmen von Audio mit einem Mikrofon
Schritt 1Wischen Sie vom oberen rechten Bildschirmrand Ihres iPads nach oben, um die App zu öffnen. Kontrollzentrum.
Schritt 2Halten Sie die Taste gedrückt Bildschirmaufnahme Klicken Sie auf diese Schaltfläche, um weitere Optionen anzuzeigen.
Schritt 3Drücken Sie das Mikrofon, um es einzuschalten. Es sollte rot leuchten, um anzuzeigen, dass die Sprachaufnahme aktiviert ist.
Schritt 4Klicken Starte die AufnahmeUnd wenn der 3-Sekunden-Countdown abgelaufen ist, beginnt die Aufnahme.
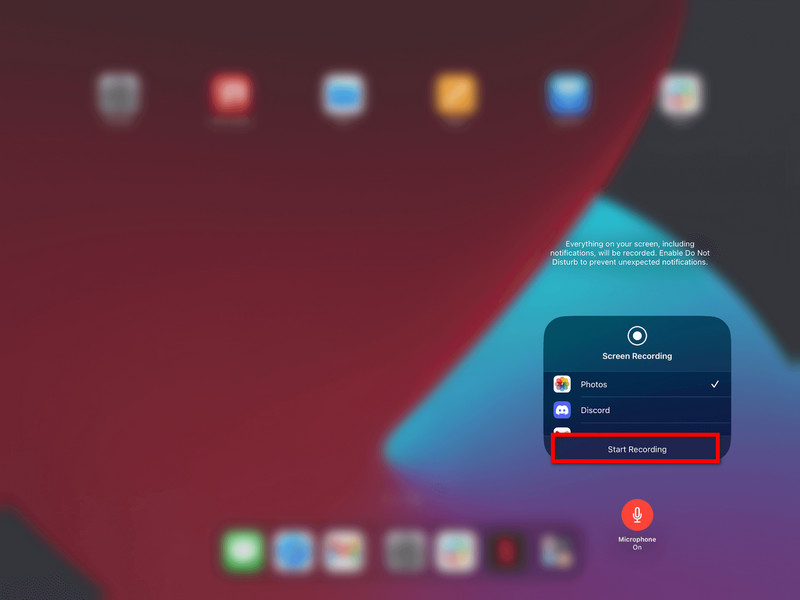
Schritt 5Wiederholen Sie die Bewegungen, die Sie aufzeichnen möchten. Wenn das Mikrofon eingeschaltet ist, wird Ihre Stimme aufgezeichnet.
Schritt 6Tippen Sie auf die rote Statusleiste oben auf dem Bildschirm oder kehren Sie zurück zu Kontrollzentrum und tippen Sie auf Schallplatte Taste erneut.
Schritt 7Das Video wird automatisch gespeichert in Fotos App, in der Sie es ansehen oder bearbeiten können.
Alternative zur System-Audioaufnahme
Leider ist es aufgrund von Systembeschränkungen nicht möglich, internen Ton direkt auf dem iPad aufzunehmen, daher ist eine computerbasierte Lösung erforderlich. Ein hervorragendes Werkzeug dafür ist der/die/das … AVAide Screen Recorder, mit dem Sie ein iPad spiegeln und gleichzeitig den Bildschirm und den Systemton aufnehmen können.
AVAide Screen Recorder ist eine hochwertige Bildschirmaufnahmesoftware, die Bildschirmaktivitäten gestochen scharf aufzeichnet. Sie zeichnet ruckelfrei in bis zu 4K/1080p auf. Zudem ermöglicht sie die gleichzeitige Aufnahme von System- und Mikrofon-Audio – ideal für Tutorials, Gameplay und Präsentationen.
- Die Funktion „Hochwertige Aufnahme“ ermöglicht es Ihnen, Videos in 4K oder 1080p mit klaren, hochwertigen Ergebnissen aufzunehmen.
- Dual Audio
- Unterstützung für die gleichzeitige Aufnahme von Systemton und Mikrofon-Audio.
- Mit iOS Screen Mirroring wird der Bildschirm Ihres iPads auf einem PC oder Mac angezeigt und aufgezeichnet.
- Flexible Bildschirmmodi unterstützen Vollbild- oder benutzerdefinierte Bereichsaufnahmen.
- Integrierte Bearbeitungswerkzeuge helfen Ihnen, Aufnahmen schnell zu kürzen, zu verbessern und zu bearbeiten.

 Sicherer Download
Schritt 1Herunterladen und installieren
Besuchen Sie die offizielle Website und laden Sie den AVAide Screen Recorder herunter. Nach der Installation können Sie ihn auf Ihrem Windows- oder Mac-Computer ausführen.
Schritt 2iOS-Option auswählen
Klicken Sie in der Hauptoberfläche Telefon Recorder, dann auswählen iOS-Recorder aus der Liste der Optionen (iOS und Android).
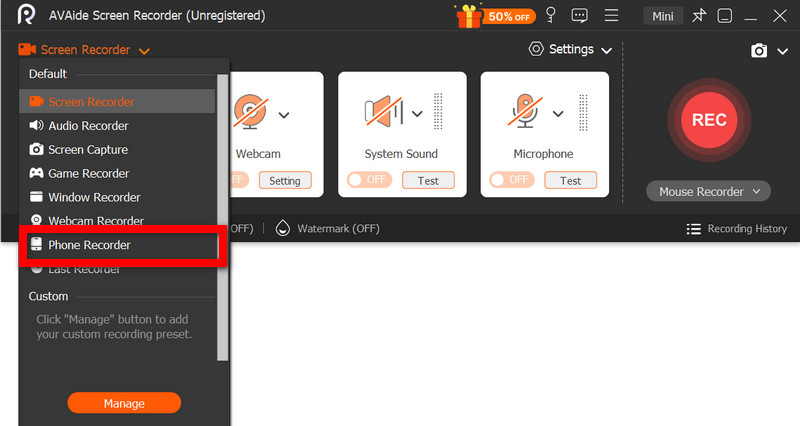
Schritt 3Schließen Sie das iPad an den PC an.
Sie können Ihr iPad drahtlos über dasselbe Netzwerk oder, falls vorhanden, per USB-Kabel auf Ihren Computer spiegeln. Wählen Sie dazu in der App „Bildschirmspiegelung“ auf Ihrem iPad das AVAide-Gerät aus. Sobald die Verbindung hergestellt ist, wird der Bildschirm Ihres iPads auf Ihrem Computer angezeigt.
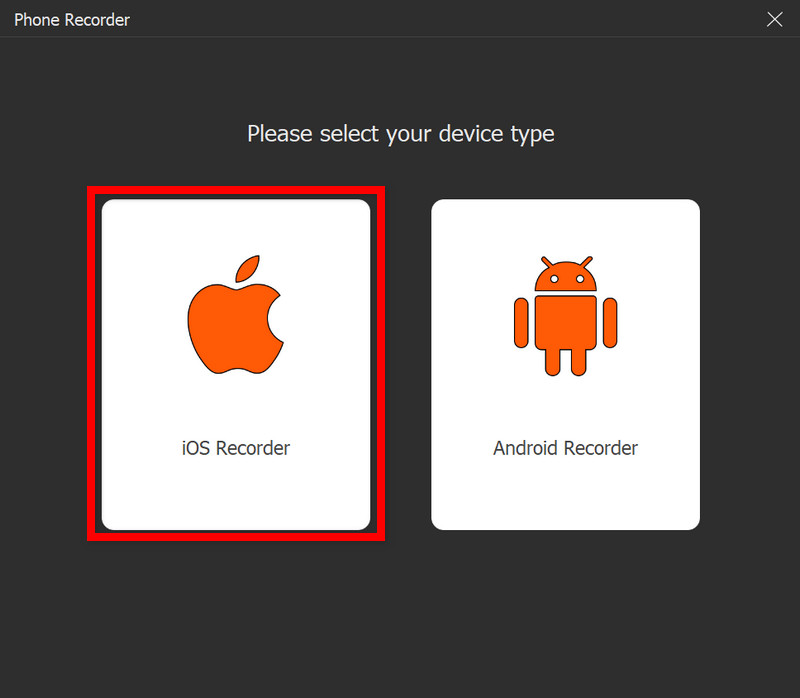
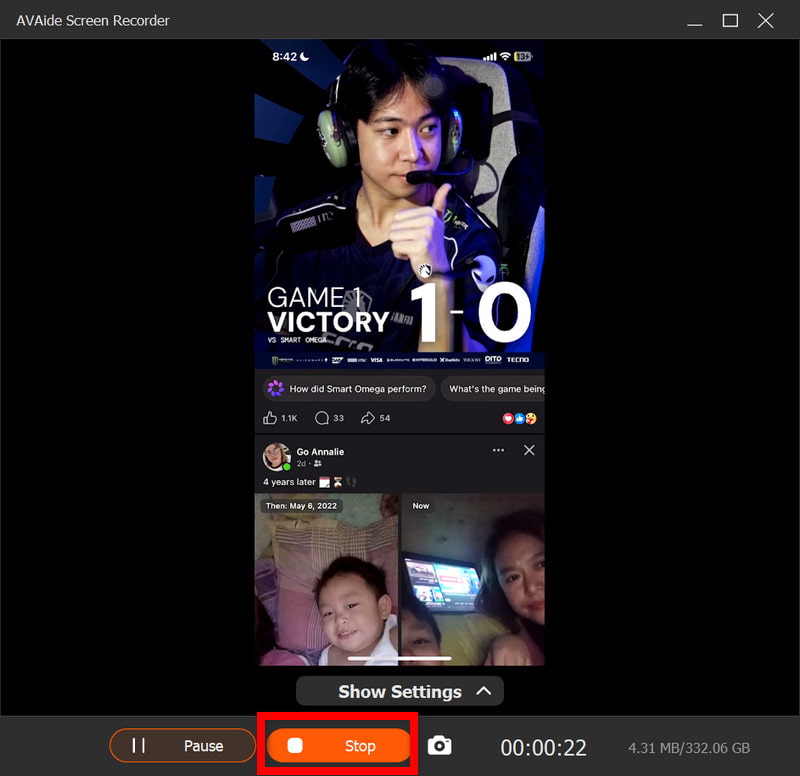
Schritt 4Starte die Aufnahme
Bei erfolgreicher Spiegelung, Presse Schallplatte Um die Aufnahme Ihres iPad-Bildschirms, des Systemtons und des Mikrofoneingangs (falls vorhanden) zu starten.
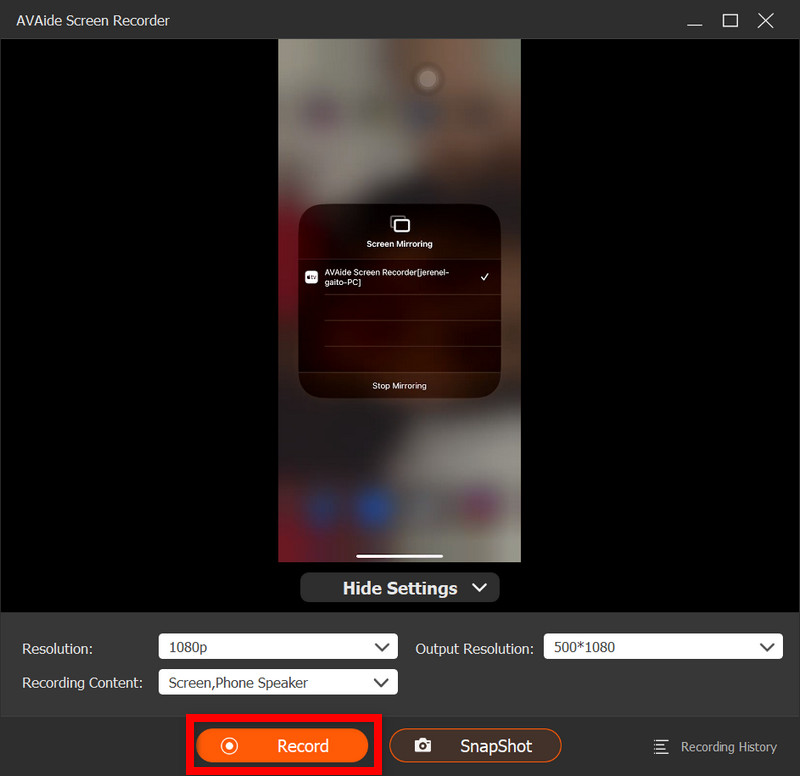
Schritt 5Höre auf, aufzunehmen
Drücken Sie die Stoppen Drücken Sie die Taste, wenn Sie fertig sind. Ihre Aufnahme wird automatisch auf Ihrem Computer gespeichert.
Schritt 6Video bearbeiten
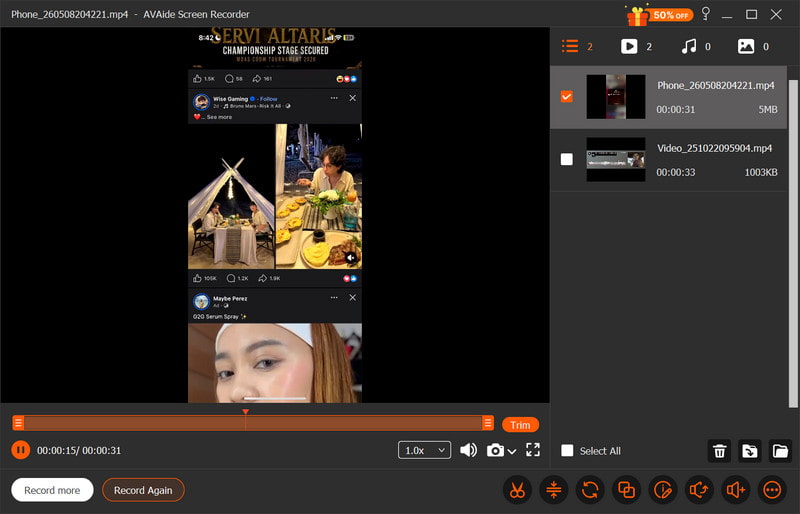
Nach der Aufnahme öffnet sich ein Vorschaufenster. Unerwünschte Passagen können herausgeschnitten, der Ton angepasst oder einfache Bearbeitungen vorgenommen werden, bevor das endgültige Video exportiert wird.
Teil 4. Warum kann ich auf meinem iPad keine Bildschirmaufnahme machen?
Videoaufnahmeprobleme auf dem iPad treten typischerweise aufgrund von Einstellungen, Einschränkungen oder Leistungsproblemen auf. Die häufigsten Probleme und Ursachen werden im Folgenden aufgeführt.
1. Der Knopf fehlt vollständig.
Dies tritt auf, wenn die Bildschirmaufnahme nicht im Kontrollzentrum installiert ist. Sie müssen die Bildschirmaufnahme manuell unter Einstellungen > Kontrollzentrum hinzufügen, damit sie dort angezeigt wird.
2. Die Schaltfläche ist ausgegraut oder reagiert nicht.
Typischerweise liegt dies an einer Einschränkung der Bildschirmaufzeichnung durch Systemeinstellungen oder Gerätesteuerung.
- Bildschirmzeitlimits können eingestellt werden.
- Aufnahmen können durch die Geräteprofileinstellungen der Schule oder des Arbeitsplatzes untersagt sein.
- Bei manchen Apps ist es möglicherweise nicht möglich, während der Nutzung einen Screenshot zu erstellen.
3. Die Aufnahme stoppt sofort nach dem Start.
Das Problem hängt üblicherweise mit System- oder Speicherproblemen zusammen, wie z. B. unzureichendem Speicherplatz oder anderen Anwendungen, die den Aufnahmevorgang stören.
4. Kein Ton auf der Aufnahme
Dies tritt auf, wenn die Audioverbindung nicht korrekt hergestellt wird oder der Benutzer interne Audioausgabe erwartet; unter iPadOS ist es nicht möglich, den Bildschirm intern aufzuzeichnen, daher wird die Verwendung von … bester Bildschirmrekorder für Mac kann dabei helfen, den Systemklang richtig aufzunehmen.
5. Die Aufnahme ist abgehackt oder von geringer Qualität.
Dies wird typischerweise durch einen der folgenden Faktoren verursacht: begrenzter Gerätespeicher, zu viele gleichzeitig laufende Anwendungen oder ein älteres iPad-Modell, das nicht in der Lage ist, in einer so hohen Auflösung aufzunehmen.
Teil 5. Profi-Tipps für bessere Bildschirmaufnahmen
Achten Sie bei Aufnahmen mit iPadOS auf die korrekte Einrichtung Ihres iPads für eine reibungslose, klare und qualitativ hochwertige Aufnahme. Hier finden Sie einige hilfreiche Tipps zur Optimierung der Video- und Audioqualität.
1. Speicherplatz freigeben
Bevor Sie mit der Aufnahme beginnen, stellen Sie sicher, dass auf Ihrem iPad genügend freier Speicherplatz vorhanden ist, damit es nicht zu Verzögerungen oder Störungen kommt, die während der Aufnahme Probleme verursachen können.
2. Nicht verwendete Apps schließen
Schließen Sie alle unnötigen Hintergrundanwendungen, um die Systemleistung zu verbessern und Unterbrechungen oder Verlangsamungen während der Aufnahme zu vermeiden.
3. Schalten Sie den „Nicht stören“-Modus ein.
Aktivieren Sie den Nicht-Stören-Modus, um zu verhindern, dass eingehende Anrufe, Nachrichten und Benachrichtigungen auf dem Bildschirm erscheinen und Sie während der Aufnahme ablenken.
4. Sorgen Sie für eine stabile Bildschirmkonfiguration.
Verändern Sie während der Aufnahme weder Helligkeit, Ausrichtung noch Systemeinstellungen, da plötzliche Änderungen die Videokonsistenz und Aufnahmequalität beeinträchtigen können.
5. Zuerst den Ton testen
Bevor Sie mit den Videoaufnahmen beginnen, machen Sie eine kurze Testaufnahme, um zu überprüfen, ob die Mikrofonpegel richtig eingestellt sind und ob Ihre Stimme klar klingt und ordnungsgemäß aufgenommen wird.
6. Verwenden Sie einen aufgeräumten Startbildschirm
Räumen Sie Ihren Startbildschirm auf oder verschieben Sie sensible Apps oder Anwendungen in einen anderen Ordner, damit Ihre Aufnahme fokussiert, professionell und übersichtlich wirkt.
7. In einer ruhigen Umgebung aufnehmen
Wenn Sie in einem ruhigen Raum mit geringen Hintergrundgeräuschen aufnehmen können, liefert Ihr Mikrofon eine bessere Sprachqualität und minimiert unerwünschte Geräusche. Sprachaufnahme auf einem Mac oder iPad.
iPad-Bildschirmaufnahme ist eine einfache, aber leistungsstarke Möglichkeit, Tutorials, Gameplay und wichtige Momente direkt mit deinem Gerät aufzunehmen. Mit den richtigen Einstellungen und Tipps kannst du sowohl die Video- als auch die Audioqualität verbessern und so bessere Ergebnisse erzielen. Ob mit integrierten Tools oder externer Software – Aufnahmen werden einfacher und zuverlässiger.
ÜBER DEN AUTOR

Erfassen Sie Bildschirmaktivitäten mit Audio, Online-Meetings, Gameplay-Videos, Musik, Webcam usw.
Bildschirmaufnahme
- Bildschirmaufnahme unter Windows
- Instagram Live aufnehmen
- Rippen Sie Videos von Tubi
- Konvertieren Sie YouTube-Videos in MP3
- Laden Sie Videos von Fansly herunter
- Herunterladen von JW Player-Videos
- Laden Sie Bilibili-Videos herunter
- Patreon-Videos herunterladen
- SpankBang-Videos herunterladen
- Discord-Videos herunterladen
- DoodSream-Video herunterladen