Wie man auf einem Lenovo-Laptop eine Bildschirmaufnahme durchführt Das hängt vom gewählten Tool ab – von integrierten Windows-Funktionen bis hin zu fortschrittlicher Software. Dieser Leitfaden zeigt einfache, übersichtliche und effiziente Methoden zur Bildschirmaufnahme auf Lenovo-Geräten, egal ob für Tutorials, Meetings, Spiele oder alltägliche Aufnahmen.
- Methode 1. Verwendung der Xbox Game Bar
- Methode 2. Verwendung von Lenovo Vantage
- Methode 3. Verwendung von Legion Zone / Lenovo Nerve Center
- Methode 4. Verwendung des AVAide-Bildschirmrekorders
- Methode 5. Verwendung der Schnelleinstellungen
- Behebung häufiger Probleme bei der Bildschirmaufnahme auf Lenovo-Geräten
Methode 1. Verwendung der Xbox Game Bar
Die integrierte Aufnahmefunktion der Xbox Game Bar stammt von Microsoft, ist nahtlos in Windows integriert und die komfortabelste Aufnahmelösung für Lenovo-Nutzer. Sie wurde für Spiele entwickelt und dient gleichzeitig als Standard-Anwendungsrekorder, Tutorial-Ersteller und Browser-Recorder. Der größte Vorteil: Sie ist sofort einsatzbereit und erfordert keine Einrichtung.
Es gibt aber auch deutliche Nachteile. Der Desktop und der Datei-Explorer werden nicht aufgezeichnet, und die Anpassungsmöglichkeiten sind auf professionelle Tools beschränkt. Dennoch ist es eine der praktischsten integrierten Optionen für gelegentliche Sessions, bei denen Qualität und Aufwand nicht so wichtig sind.
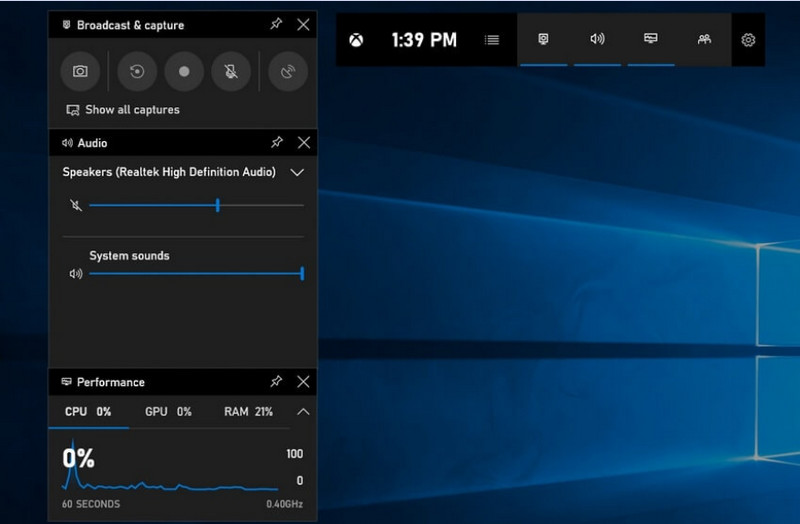
Schritt 1Um die Xbox Game Bar zu öffnen, drücken Sie Windows + G auf deiner Tastatur.
Schritt 2Finden Sie die Erfassung oder klicken Sie darauf im Bedienfeld. Widgets Speisekarte.
Schritt 3Drücke den Aufnahme (●) Taste oder drücken Windows + Alt + R.
Schritt 4Wenn Sie Sprachaufnahmen machen möchten, aktivieren Sie die entsprechende Funktion. Mikrofon.
Schritt 5Drücken Sie Windows + Alt + R erneut klicken oder klicken Stopp (■) um zu vervollständigen.
Schritt 6Sie finden Ihre Aufnahme in Videos > Erfasst.
Methode 2. Verwendung von Lenovo Vantage
Lenovo Vantage ist kein Bildschirmrekorder, sondern eine Suite zur Systemverwaltung und -optimierung. Die Aufnahmefunktion ist eher indirekt, da nur wenige Funktionen den Aufnahmeprozess direkt unterstützen. Dies hängt vom verwendeten Aufnahmegerät ab, wobei manche Geräte sogar Tastenkombinationen oder Kamera-/Display-Tools zur Unterstützung des Aufnahmeprozesses bieten.
Die Leistung und Verfügbarkeit variieren stark. Grundlegende Aufnahmefunktionen werden von einigen Lenovo-Geräten unterstützt, von anderen jedoch gar nicht. Die Möglichkeiten von Vollbildrekordern sind begrenzt und teilweise uneinheitlich, könnten aber für Nutzer, die im Lenovo-Ökosystem bleiben möchten, dennoch nützlich sein. Podcast aufnehmen Inhalte mit grundlegenden Werkzeugen erstellen.
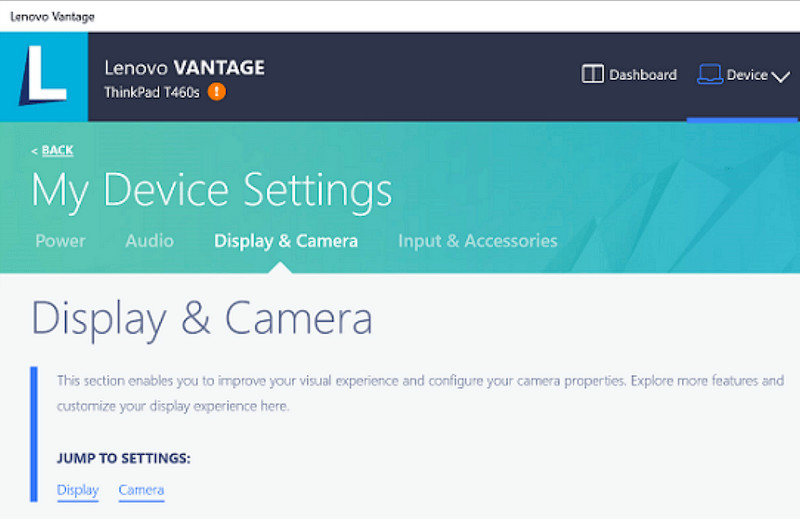
Schritt 1Gehe zum Anfang Menü und klicken Sie auf Lenovo Vantage.
Schritt 2Zapfhahn Meine Geräteeinstellungen > Display & Kamera.
Schritt 3Prüfen Sie, ob Aufzeichnungen oder andere verfügbare Funktionen vorhanden sind.
Schritt 4Stellen Sie alle notwendigen Optionen oder Abkürzungen zur Verfügung.
Schritt 5Nehmen Sie die Musik mithilfe der dafür vorgesehenen Funktion auf (sofern möglich).
Schritt 6Suchen Sie in Ihrem Videos-Ordner nach Aufnahmen, die Sie gespeichert haben.
Methode 3. Verwendung von Legion Zone / Lenovo Nerve Center
Lenovo Nerve Center (oder Legion Nerve Center – neuere Tools von Legion haben Nerve Sense ersetzt) ist für Lenovo-Geräte, insbesondere Lenovo Legion-Laptops, optimiert und richtet sich an Gamer. Es ist eng mit Tools zur Gaming-Performance-Optimierung integriert, sodass Benutzer Screenshots ihrer Spiele erstellen und gleichzeitig die Systemressourcen überwachen und optimieren können.
Es handelt sich jedoch um ein recht einfaches Aufnahmegerät. Der Fokus liegt eher auf Benutzerfreundlichkeit als auf individuellen Anpassungsmöglichkeiten. Es bietet lediglich grundlegende Aufnahmeoptionen mit begrenzter Kontrolle über Auflösung, Bitrate und erweiterte Einstellungen. Zudem ist es nur noch auf einigen neueren Systemen verfügbar, und andere Systeme haben es ersetzt oder entfernt, sodass es nicht mehr so zuverlässig ist wie früher.
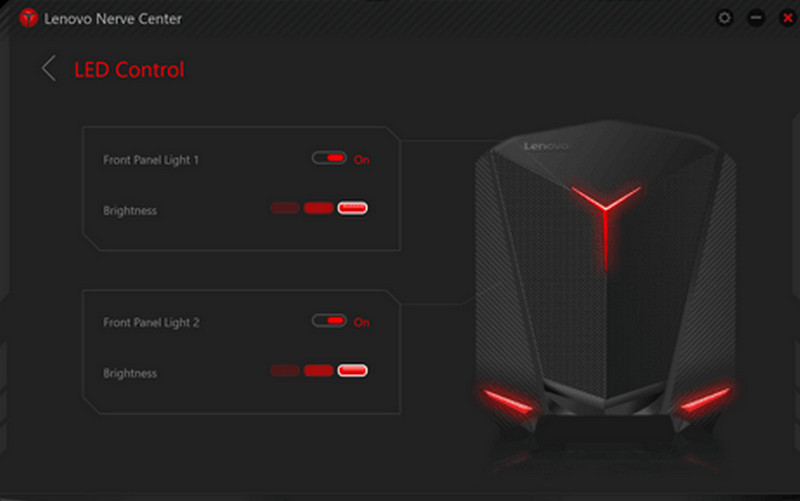
Schritt 1Greife auf ... zu Lenovo Nervenzentrum oder Legion Zone vom Gerät.
Schritt 2Navigieren Sie zu den Aufnahme- und/oder Spieletools.
Schritt 3Wenn möglich, ändern Sie die Aufnahmeeinstellungen, z. B. die Auflösung oder die Audioqualität.
Schritt 4Starte das Spiel oder die Anwendung.
Schritt 5Mit der Standard-Tastenkombination aufnehmen.
Schritt 6Stopp die Aufnahme und schau in dein Videos Ordner, um zu prüfen, ob die Datei aufgezeichnet wurde.
Methode 4. Verwendung des AVAide-Bildschirmrekorders
AVAide Screen Recorder ist ein fortschrittlicherer und vielseitigerer Bildschirmrekorder für Lenovo als der integrierte Bildschirmrekorder. Er wurde für Anwender entwickelt, die Wert auf hohe Videoqualität, flüssigere Bedienung und mehr Kontrolle über die Aufnahme legen. Er ist das perfekte Werkzeug für die Erstellung von Tutorials, die Aufzeichnung von Meetings oder das Aufzeichnen von Gameplay – ganz ohne komplizierte Einrichtung und in professioneller Qualität.
Es kann Systemton, Mikrofoneingang, Webcam und Bildschirmbereiche aufzeichnen und unterstützt zudem Full-HD- und sogar 4K-Aufnahmen mit minimaler Verzögerung im Vergleich zu einfachen Aufnahmegeräten. Damit ist es eine All-in-One-Bildschirmaufnahme-Anwendung für Arbeit und Freizeit.
- Nehmen Sie Videos in 1080p oder 4K mit flüssiger, ruckelfreier Wiedergabe auf.
- Je nach Bedarf können Sie im Vollbild- oder im benutzerdefinierten Bildschirmmodus aufnehmen.
- Nehmen Sie gleichzeitig interne Geräusche und Sprache mit klarer Ausgabe auf.
- Fügen Sie Facecam-Aufnahmen für Tutorials, Präsentationen oder Gameplay-Videos hinzu.
- Aufnahmen nach der Aufnahme kürzen, komprimieren und verbessern.

 Sicherer Download
Schritt 1Laden Sie die Software herunter und installieren Sie sie
Besuchen Sie die offizielle Website von AVAide Screen Recorder. Laden Sie den Windows Installer herunter, installieren Sie ihn auf Ihrem Lenovo-Laptop und führen Sie ihn aus.
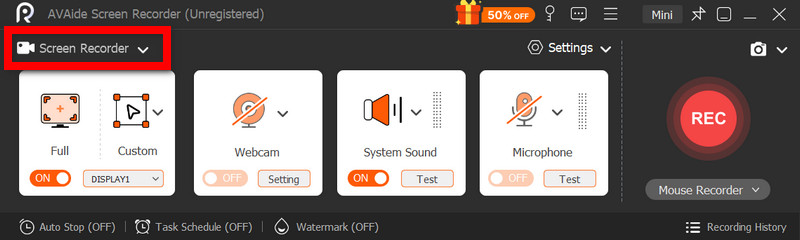
Schritt 2Aufnahmemodus auswählen
Öffnen Sie die Software und klicken Sie dann auf Bildschirm recorderDen gesamten Bildschirm aufnehmen mit Voll oder ein Teil des Bildschirms mit Brauch.
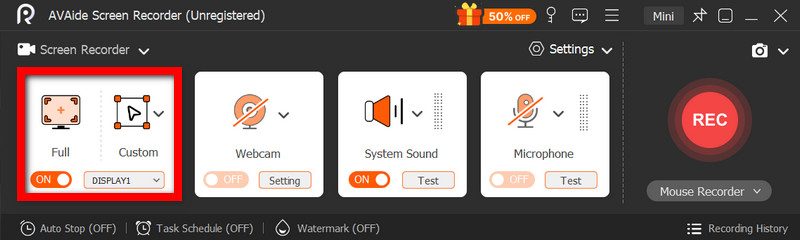
Schritt 3Audioeinstellungen konfigurieren
Um alle vom Computer erzeugten Töne aufzuzeichnen, aktivieren Sie SystemtonUm Ihre eigene Stimme einzubringen, aktivieren Sie die MikrofonDie Webcam kann bei Bedarf ebenfalls eingeschaltet werden.
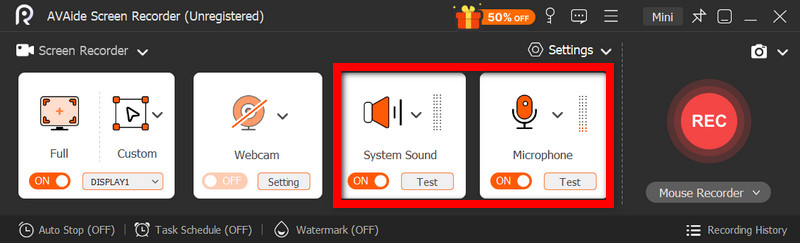
Schritt 4Aufnahmeeinstellungen anpassen
Benutzen Sie die Einstellungen Schaltfläche zur Konfiguration von Videoqualität, Auflösung, Bildrate und Ausgabeformat für optimale Aufnahmeergebnisse.
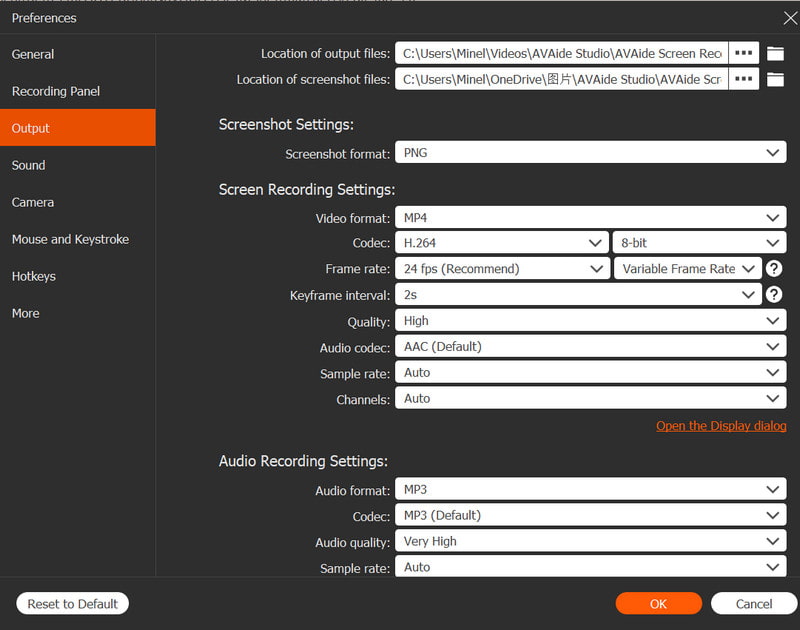
Schritt 5Starte die Aufnahme
Drücken Sie die AUFN Mit dieser Schaltfläche können Sie die Aufnahme starten. Google Meet-Aufnahmen, Tutorials, Gameplay oder jegliche Bildschirmaktivitäten lassen sich reibungslos aufzeichnen.
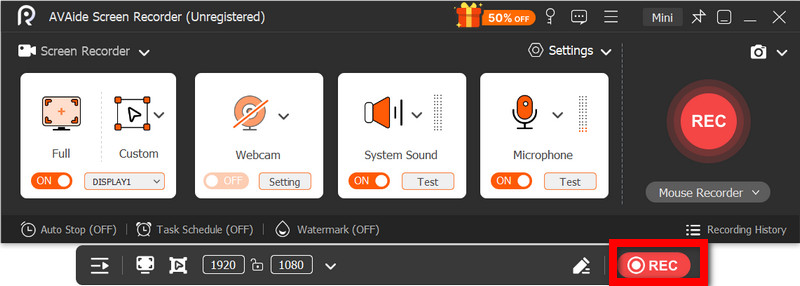
Schritt 6Stoppen und Speichern der Aufnahme
Wenn Sie fertig sind, klicken Sie auf die Schaltfläche Stoppen Mit dieser Schaltfläche können Sie Ihre Aufnahme in der Vorschau anhören, sie bei Bedarf schnell bearbeiten und sofort auf Ihrem Computer speichern.
Methode 5. Verwendung der Schnelleinstellungen
Lenovo Android-Tablets bieten eine integrierte Bildschirmaufnahmefunktion in den Schnelleinstellungen. Tutorials, Gameplay oder App-Aktivitäten lassen sich am besten ohne zusätzliche Apps auf dem Tablet aufzeichnen. Einfach, schnell und für die mobile Nutzung optimiert – ideal für kurze Aufnahmen unterwegs.
Es fehlen zwar die erweiterten Bearbeitungs- und Anpassungsfunktionen anderer Bildschirmaufnahmeprogramme, aber für einfache Bildschirmaufnahmen mit Ton ist es ausreichend.
Schritt 1Wischen Sie vom unteren Bildschirmrand nach oben, um das Menü zu öffnen. Schnelleinstellungen.
Schritt 2Suche nach Bildschirmaufzeichnung oder Bildschirm recorder Schaltfläche. Falls sie nicht angezeigt wird, klicken Sie auf die Schaltfläche. Bearbeiten Klicken Sie auf die Schaltfläche und fügen Sie sie Ihrem Bedienfeld hinzu.
Schritt 3Klicken Bildschirm recorderWählen Sie anschließend die gewünschten Einstellungen aus.
Schritt 4Zapfhahn Anfang Die Aufnahme startet. Vor Beginn der Aufnahme wird ein Countdown abgespielt.
Schritt 5Tippen Sie auf die schwebende Symbolleiste oder Benachrichtigungsleiste und drücken Sie dann Stoppen um die Aufnahme zu beenden.
Behebung häufiger Probleme bei der Bildschirmaufnahme auf Lenovo-Geräten
Hier finden Sie Tipps zur Behebung häufiger Probleme bei der Bildschirmaufnahme mit einem Lenovo-Gerät.
Obwohl Bildschirmaufnahmen auf Lenovo-Geräten in der Regel problemlos funktionieren, können je nach verwendetem Aufnahmeprogramm oder -gerät Probleme auftreten. Im Folgenden finden Sie die häufigsten Probleme und deren Behebung.
- Bildschirmaufnahme funktioniert nicht: Starten Sie Ihr Gerät neu und versuchen Sie es erneut. Stellen Sie bei integrierten Tools wie der Xbox Game Bar sicher, dass diese in den Windows-Einstellungen unter „Spiele“ aktiviert sind.
- Kein Ton in der Aufnahme: Prüfen Sie vor der Aufnahme, ob der Systemton oder das Mikrofon eingeschaltet ist. Stellen Sie außerdem sicher, dass die Systemlautstärke nicht stummgeschaltet ist.
- Ruckelndes oder qualitativ minderwertiges Video: Reduzieren Sie die Videoqualität oder schließen Sie im Hintergrund laufende Anwendungen. Auch ein Update Ihrer Grafiktreiber kann die Leistung verbessern.
- Desktop oder Datei-Explorer können nicht aufgezeichnet werden: Dies ist eine der häufigsten Einschränkungen der Xbox Game Bar. Wenn Sie Ihren Bildschirm aufzeichnen und alles erfassen möchten, verwenden Sie ein fortgeschrittenes Programm wie AVAide Screen Recorder. Die besten Bildschirmrekorder für Mac und Windows.
- Aufnahme wird nicht gespeichert: Stellen Sie sicher, dass Ihr Speicherplatz nicht voll ist, und überprüfen Sie den Standardspeicherort. Ändern Sie in den Einstellungen den Ausgabeordner und versuchen Sie es erneut.
Lenovo-Bildschirmaufnahmetaste Die Optionen variieren je nach Gerät und verwendetem Tool. Insgesamt ermöglichen integrierte Funktionen und Apps von Drittanbietern eine einfache Aufzeichnung und bieten flexible Möglichkeiten, Bildschirmaktivitäten auf Lenovo-Geräten effizient zu erfassen, zu speichern und zu verwalten.
ÜBER DEN AUTOR

Erfassen Sie Bildschirmaktivitäten mit Audio, Online-Meetings, Gameplay-Videos, Musik, Webcam usw.
Bildschirmaufnahme
- Bildschirmaufnahme unter Windows
- Instagram Live aufnehmen
- Rippen Sie Videos von Tubi
- Konvertieren Sie YouTube-Videos in MP3
- Laden Sie Videos von Fansly herunter
- Herunterladen von JW Player-Videos
- Laden Sie Bilibili-Videos herunter
- Patreon-Videos herunterladen
- SpankBang-Videos herunterladen
- Discord-Videos herunterladen
- DoodSream-Video herunterladen