Forestil dig, at du prøver at gemme en tutorial, et gameplay-øjeblik eller et onlinemøde, men du er usikker på, hvordan du optager det på din enhed. hvordan man optager skærmen på en iPad kan gøre det nemt at gemme og dele disse øjeblikke. Denne guide gennemgår aktivering af optagelse, brug af lyd, løsning af problemer og forbedring af kvaliteten for at opnå mere jævne og bedre skærmoptagelser hver gang.
Del 1. Sådan aktiverer du skærmoptagelse på iPad
Bare rolig, skærmoptagelsesknappen er ikke installeret i dit Kontrolcenter endnu, medmindre du ikke har den på din iPad. Apple har inkluderet denne funktionalitet indbygget i iPadOS, og den skal aktiveres, før den kan bruges. Når den er tilføjet, kan du optage din skærm når som helst med blot et swipe og et tryk.
Trin 1Tryk på Indstillinger app på din iPad.
Trin 2Klik på Kontrolcenter i menuen, når du ruller ned.
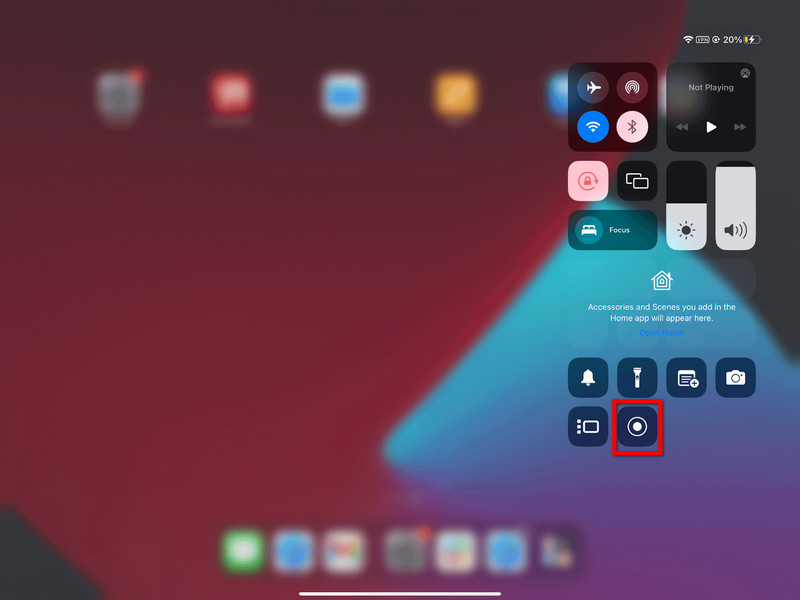
Trin 3Tryk på + (Tilføj) knappen i Skærmoptagelse sektionen på listen over tilgængelige kontrolelementer.
Trin 4For at få adgang til Kontrolcenter, stryg nedad fra øverste højre hjørne af din skærm. Nu burde du kunne se posten.
Del 2. Sådan optager du skærmbilleder på iPad
Når du har aktiveret den, er det nemt og hurtigt at optage din iPad-skærm. Den indbyggede optager i iPadOS er en problemfri funktion, der giver dig mulighed for at optage gameplay, tutorials eller endda videoopkald uden at installere tredjepartsapps.
Trin 1Tryk og hold nede øverst til højre på din iPad-skærm, og træk den derefter ned.
Trin 2Tryk på Skærmoptagelse knappen. Der vil være en nedtælling på 3 sekunder, før optagelsen starter.
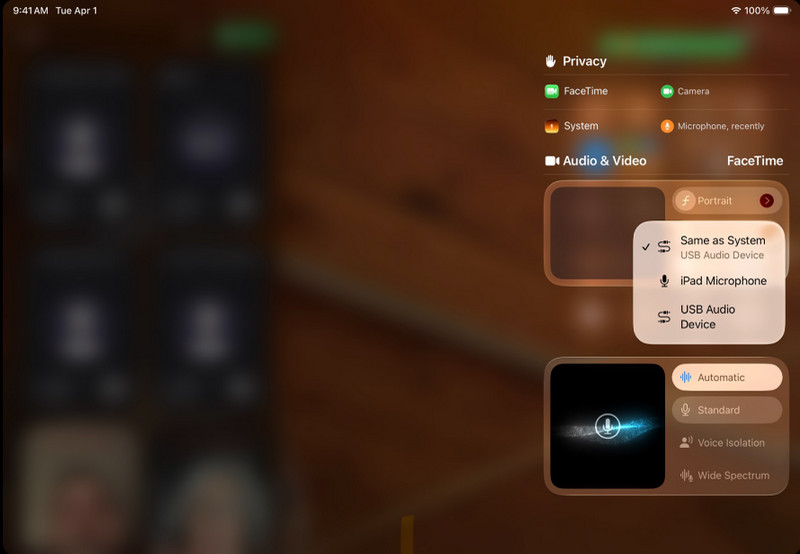
(Valgfri) Hold nede Skærmoptagelse knappen og tryk på Mikrofon for at aktivere det, når du vil optage din stemme.
Trin 3Vælg de apps eller aktiviteter, du vil optage.
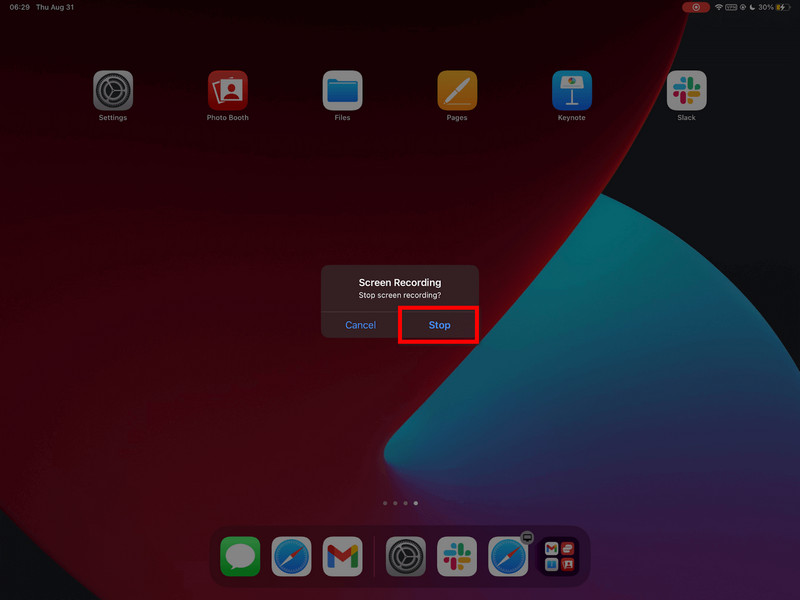
Trin 4Tryk på den røde statuslinje, og tryk derefter på Hold op, eller gå tilbage til Kontrolcenter og tryk på Optage knappen igen.
Trin 5Din video gemmes automatisk i Fotos app, hvor du kan redigere eller dele den.
Del 3. Sådan optager du skærm på iPad med lyd
Det er nyttigt at optage skærm og lyd med iPad'en til vejledninger, spil, onlinekurser og demonstrationer. Optagelse på iPadOS fungerer kun i begrænset omfang, og det er vigtigt at forstå forholdet mellem mikrofonen og systemlyden, før du optager.
Vigtig forskel: Mikrofon vs. Systemlyd
| Lydtype | Hvad den optager | Tilgængelighed på iPadOS | Bedste brugsscenarier |
| Mikrofonlyd | Din stemme og eksterne lyde opfanges af iPad'ens mikrofon. | Ledig | Kommentarer, vejledninger, fortælling. |
| Systemlyd | Interne lyde fra apps, spil, videoer og medieafspilning. | Ikke direkte understøttet | Kræver eksterne værktøjer eller en løsning. |
Trin til at optage lyd med en mikrofon
Trin 1Stryg opad fra øverste højre hjørne af din iPad-skærm for at åbne Kontrolcenter.
Trin 2Hold nede Skærmoptagelse knappen for at se flere muligheder.
Trin 3Tryk på mikrofonen for at tænde den. Den skal lyse rød for at indikere, at stemmeoptagelsen er aktiveret.
Trin 4Klik Start optagelse, og når nedtællingen på 3 sekunder er færdig, starter optagelsen.
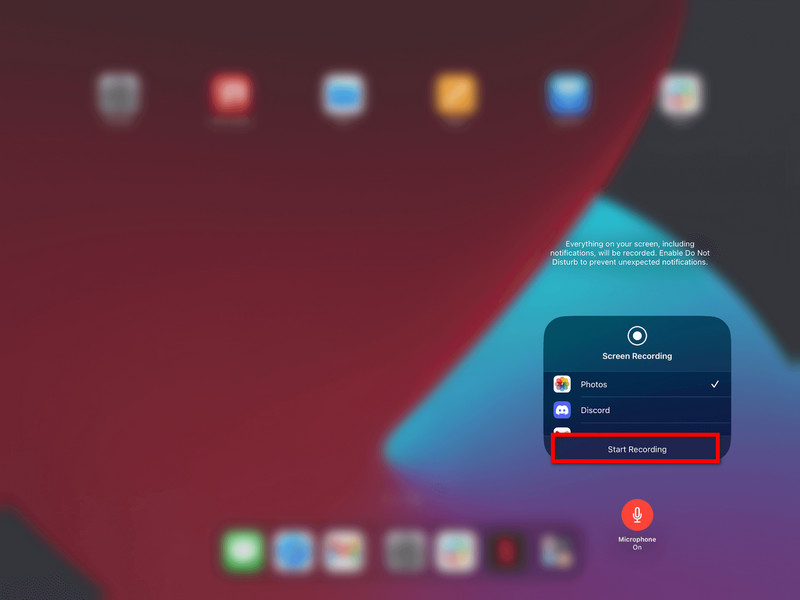
Trin 5Gentag de bevægelser, du ønsker at optage. Hvis mikrofonen er tændt, vil din stemme blive optaget.
Trin 6Tryk på den røde statuslinje øverst på skærmen, eller vend tilbage til Kontrolcenter og tryk på Optage knappen igen.
Trin 7Videoen gemmes automatisk i Fotos app, hvor du kan se eller redigere den.
Alternativ til systemlydoptagelse
Desværre kan du på grund af systembegrænsninger ikke optage intern lyd direkte på iPad'en, så en computerbaseret løsning er nødvendig. Et fremragende værktøj er AVAide skærmoptager, som lader dig spejle en iPad og optage skærmen og systemlyden samtidigt.
AVAide Screen Recorder er et skærmoptagelsessoftware af høj kvalitet, der optager skærmaktivitet med klarhed. Det kan optage uden forsinkelse eller forsinkelse op til 4K/1080p. Det muliggør også samtidig optagelse af system- og mikrofonlyd, perfekt til tutorials, gameplay og præsentationer.
- Med optagelse i høj kvalitet kan du optage videoer i 4K eller 1080p med klare resultater i høj kvalitet.
- Dobbelt lyd
- Understøtter optagelse af systemlyd og mikrofonlyd samtidigt.
- iOS Screen Mirroring viser og optager din iPad-skærm på en pc eller Mac.
- Fleksible skærmtilstande understøtter optagelse i fuld skærm eller brugerdefineret område.
- Indbyggede redigeringsværktøjer hjælper dig med hurtigt at beskære, forbedre og redigere optagelser.

 Sikker download
Trin 1Download og installer
Besøg den officielle hjemmeside og download AVAide Screen Recorder. Download AVAide Screen Recorder fra den officielle hjemmeside. Når den er installeret, kan den køres fra din Windows- eller Mac-computer.
Trin 2Vælg iOS-indstilling
I hovedgrænsefladen skal du klikke på Telefonoptager, og vælg derefter iOS-optager fra listen over muligheder (iOS og Android).
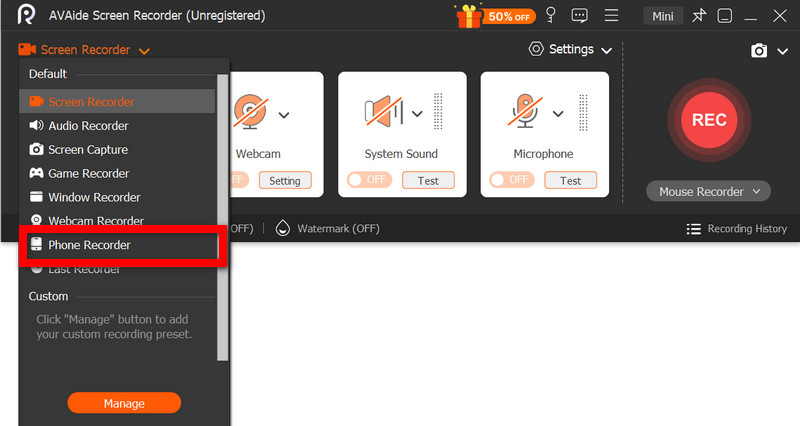
Trin 3Tilslut iPad'en til pc'en
Det er muligt at spejle din iPad trådløst til din computer via det samme netværk eller via et USB-kabel, hvis et er tilgængeligt. I Screen Mirroring-appen på din iPad skal du vælge AVAide-enheden. Du vil se din iPad-skærm vist på din computer, når du har oprettet forbindelse.
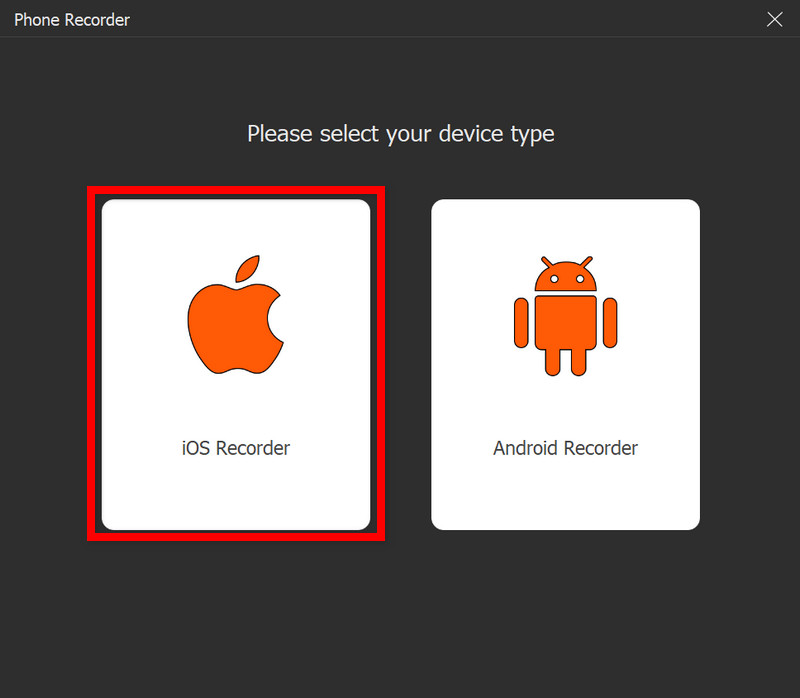
Trin 4Start optagelse
Når spejlingen er gennemført, skal du trykke på Optage for at starte optagelse af din iPad-skærm, systemlyd og mikrofoninput (hvis relevant).
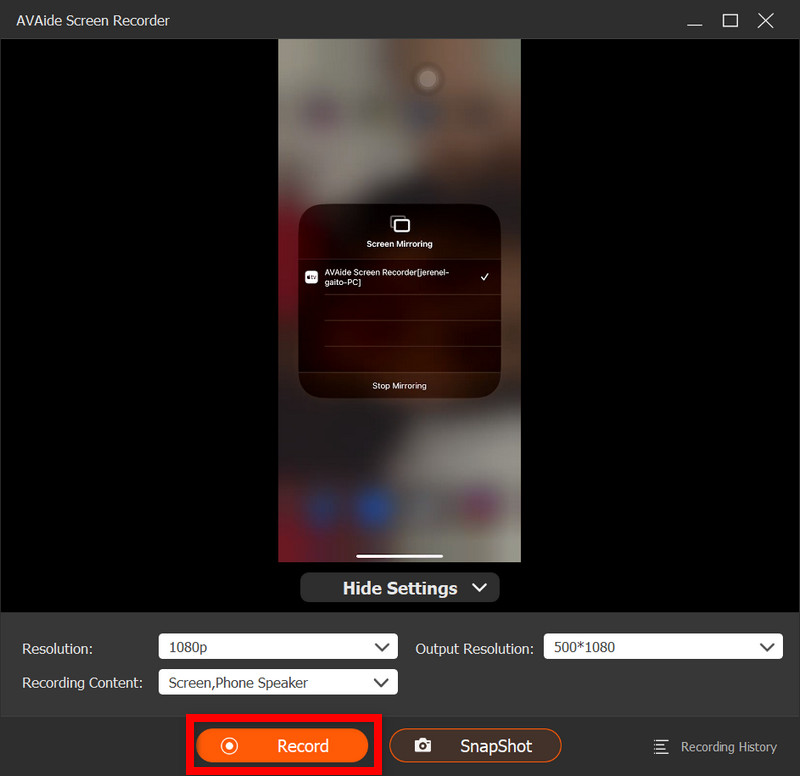
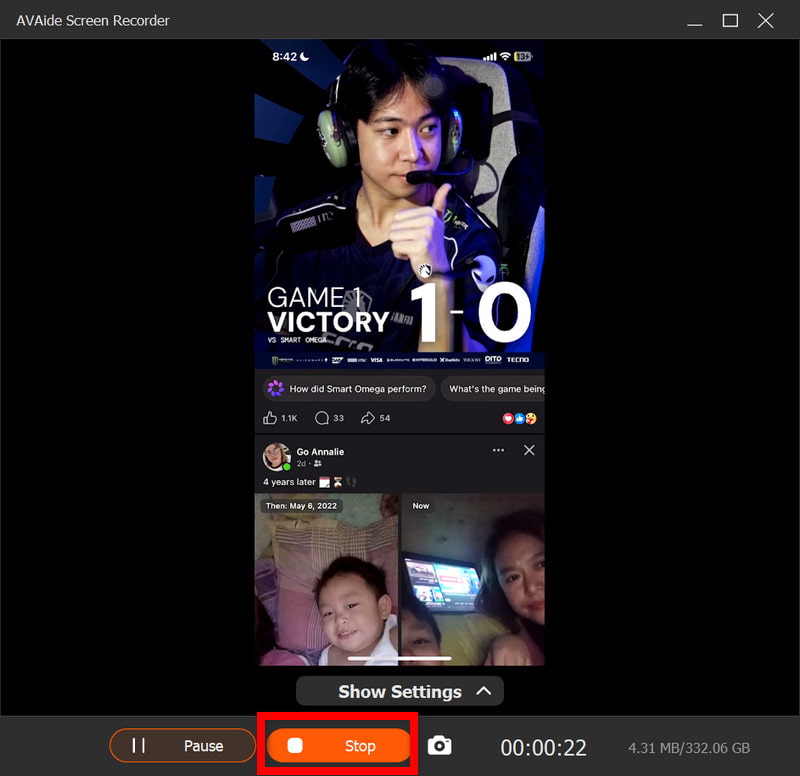
Trin 5Stop optagelse
Tryk på Hold op knappen når du er færdig. Din optagelse gemmes automatisk på din computer.
Trin 6Rediger videoen
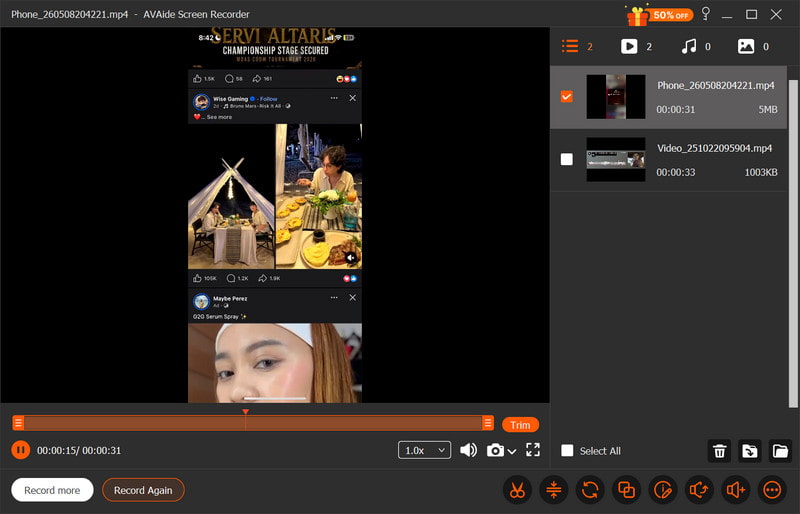
Når du har optaget, åbnes et forhåndsvisningsvindue. Uønskede dele kan klippes væk, lyden justeres eller simpel redigering udføres, før den endelige video eksporteres.
Del 4. Hvorfor kan jeg ikke optage skærmbilleder på min iPad?
Et problem med videooptagelse på iPad'en opstår typisk på grund af indstillinger, begrænsninger eller problemer med ydeevnen. De mest almindelige problemer og årsager er vist nedenfor.
1. Knappen mangler helt
Dette sker, hvis Skærmoptagelse ikke er installeret i Kontrolcenter. Du skal manuelt tilføje Skærmoptagelse i Indstillinger > Kontrolcenter for at det vises der.
2. Knappen er nedtonet eller reagerer ikke
Dette skyldes typisk en begrænsning af skærmoptagelse fra systemindstillinger eller enhedskontroller.
- Skærmtidsgrænser kan indstilles.
- Optagelse kan være forbudt af skolens eller arbejdsenhedens profilindstillinger.
- Nogle apps tillader muligvis ikke, at du tager et skærmbillede, mens du bruger dem.
3. Optagelsen stopper umiddelbart efter start
Problemet er ofte relateret til system- eller lagerproblemer, såsom utilstrækkelig tilgængelig plads eller andre programmer, der forstyrrer optagelsesprocessen.
4. Ingen lyd på optagelsen
Dette sker, når lyden ikke er korrekt tilsluttet, eller når brugeren forventer intern lyd; det er ikke muligt at optage skærmen internt på iPadOS, så ved at bruge bedste skærmoptager til Mac kan hjælpe med at opfange systemlyd korrekt.
5. Optagelsen er hakkende eller lav kvalitet
Dette skyldes typisk en af disse faktorer: begrænset enhedslagring, kørsel af for mange applikationer eller en ældre iPad-model, der ikke kan optage i så høj opløsning.
Del 5. Professionelle tips til bedre skærmoptagelser
Når du optager på iPadOS, skal du sørge for, at din iPad er konfigureret korrekt for at opnå en jævn, klar og højkvalitets optagelse. Her er nogle nyttige tips til optimering af video- og lydkvalitet.
1. Frigør lagerplads
Før du begynder at optage, skal du sørge for, at der er rigeligt med ledig plads på din iPad, så den ikke lagger eller får fejl, hvilket kan forårsage optagelsesproblemer, mens du filmer.
2. Luk ubrugte apps
Luk alle unødvendige baggrundsapps for at forbedre systemets ydeevne og forhindre afbrydelser eller forsinkelser under optagelse.
3. Slå Forstyr ikke til
Aktivér Forstyr ikke for at forhindre, at alle indgående opkald, beskeder og notifikationer vises på skærmen og distraherer dig under optagelse.
4. Hold en stabil skærmopsætning
Juster ikke lysstyrke, retning eller systemindstillinger under optagelse, da pludselige ændringer kan påvirke videoensartethed og optagelseskvalitet.
5. Test lyden først
Før du begynder at optage din video, skal du lave en kort testoptagelse for at kontrollere, at mikrofonniveauerne er indstillet korrekt, og at din stemme lyder klar og bliver optaget korrekt.
6. Brug en ren startskærm
Ryd op på din startskærm, eller flyt følsomme apps eller applikationer til en anden mappe, så din optagelse fremstår fokuseret, professionel og ryddelig.
7. Optag i et roligt miljø
Hvis du kan optage i et stille rum med lidt baggrundsstøj, vil din mikrofon bedre opfange stemmelyd og minimere uønskede lyde, når du optagelse af stemme på en Mac eller iPad.
iPad-skærmoptagelse er en simpel, men effektiv måde at optage tutorials, gameplay og vigtige øjeblikke direkte fra din enhed. Med de rigtige indstillinger og tips kan du forbedre både video- og lydkvaliteten for bedre resultater. Uanset om du bruger indbyggede værktøjer eller ekstern software, bliver optagelse nemmere og mere pålidelig.
OM FORFATTEREN

Optag skærmaktiviteter med lyd, onlinemøder, gameplay-videoer, musik, webcam osv.
Skærmoptagelse