Sådan optager du en skærm på en Lenovo bærbar computer afhænger af det værktøj, du vælger, fra indbyggede Windows-funktioner til avanceret software. Denne guide viser enkle, klare og effektive metoder til at optage din skærm på Lenovo-enheder, uanset om det er til tutorials, møder, gameplay eller hverdagsoptagelse.
Metode 1. Brug af Xbox Game Bar
Den indbyggede optagefunktion i Xbox Game Bar er Microsofts, integreres problemfrit med Windows og er den mest bekvemme optageløsning for Lenovo-brugere. Den blev skabt til at spille spil, samtidig med at den fungerer som en standard programoptager, tutorialoptager og browseroptager. Den største fordel er, at den ikke kræver nogen opsætning; den er klar til brug med det samme.
Men der er klare ulemper. Den optager ikke skrivebordet eller Stifinderen, og tilpasning er begrænset til professionelle værktøjer. Det er dog stadig en af de mest bekvemme indbyggede muligheder til afslappede sessioner, hvor kvalitet og indsats ikke er lige så vigtige.
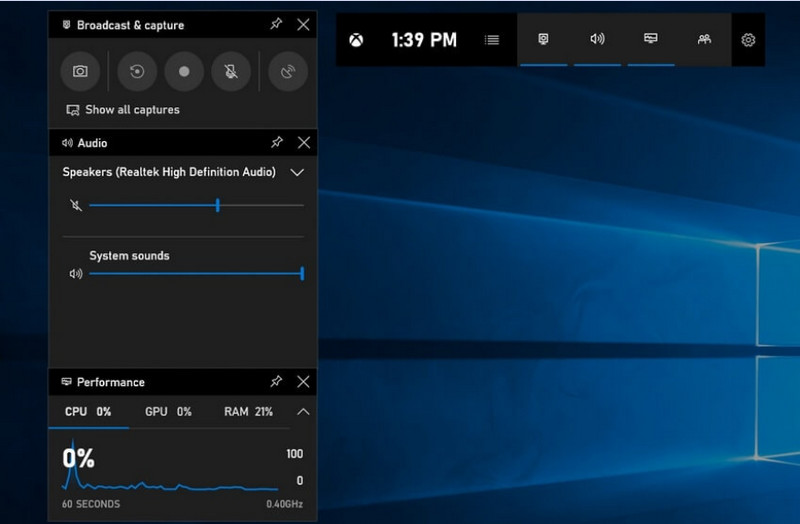
Trin 1For at åbne Xbox Game Bar skal du trykke på Windows + G på dit tastatur.
Trin 2Find Fange panelet eller klik på det fra Widgets menu.
Trin 3Klik på Optag (●) knap eller tryk på Windows + Alt + R.
Trin 4Hvis du vil optage stemme, skal du aktivere Mikrofon.
Trin 5Trykke Windows + Alt + R igen eller klik Stop (■) at fuldføre.
Trin 6Du finder din optagelse i Videoer > Fanger.
Metode 2. Brug af Lenovo Vantage
Lenovo Vantage er ikke en skærmoptager; det er en systemadministrations- og optimeringspakke. Den spiller mere en indirekte rolle i optagelsen med meget få funktioner, der hjælper optagelsesprocessen på en eller anden måde, afhængigt af optageenhedens model, eller endda med nogle enheder, der tilbyder genveje eller kamera-/skærmværktøjer, der kan hjælpe med optagelsesprocessen.
Dette er en stor variation i ydeevne og tilgængelighed. Grundlæggende optagefunktioner understøttes muligvis på nogle Lenovo-enheder, men andre har disse muligvis slet ikke. Det er begrænset og noget inkonsekvent i, hvad det kan gøre for fuldskærmsoptagere, men det kan være værdifuldt for brugere, der ønsker at forblive inden for Lenovo-økosystemet, eller optag podcast indhold med grundlæggende værktøjer.
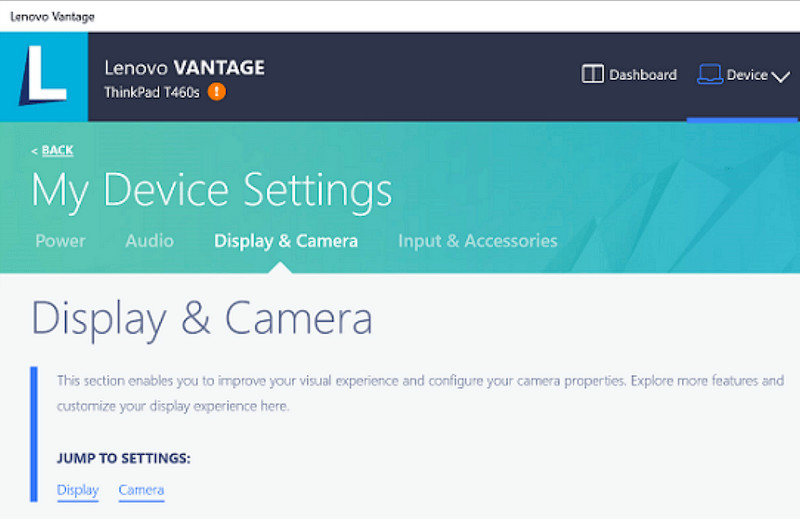
Trin 1Gå til Start menuen og klik på Lenovo Vantage.
Trin 2Tryk på Mine enhedsindstillinger > Skærm og kamera.
Trin 3Tjek for optagelser eller andre tilgængelige funktioner.
Trin 4Gør alle nødvendige muligheder eller genveje tilgængelige.
Trin 5Optag musikken ved hjælp af den medfølgende funktion (hvis muligt).
Trin 6Find optagelser, du har gemt, i din mappe Videoer.
Metode 3. Brug af Legion Zone / Lenovo Nerve Center
Lenovo Nerve Center (eller Legion Nerve Center - nyere værktøjer fra Legion har erstattet Nerve Sense) er optimeret til Lenovo-enheder, specifikt Lenovo Legion-bærbare computere, der er rettet mod gamere. Det er også tæt integreret med spilpræstationsværktøjer, så brugerne kan tage skærmbilleder af deres spil, mens de overvåger og optimerer systemressourcer.
Det er dog en ret simpel optager. Den handler mere om bekvemmelighed end tilpasning og tilbyder kun grundlæggende optagemuligheder med begrænset kontrol over opløsning, bitrate og avancerede indstillinger. Den er også kun tilgængelig på nogle nyere systemer, og andre har erstattet eller fjernet den fra deres systemer, så den er ikke så pålidelig, som den engang var.
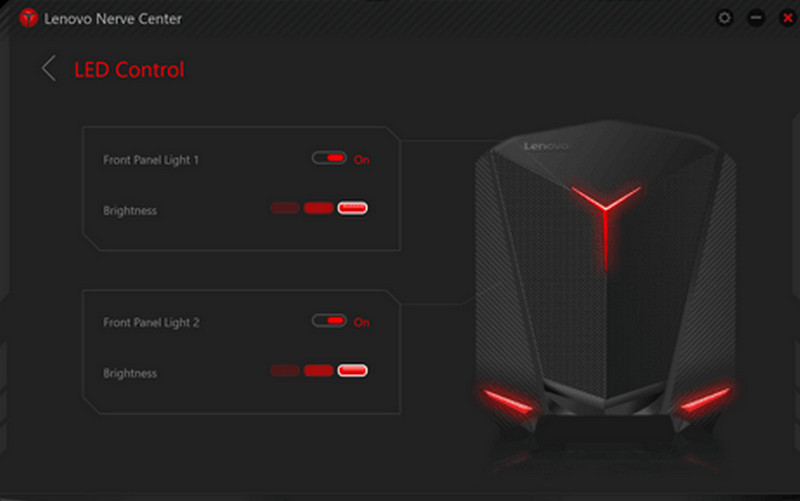
Trin 1Få adgang til Lenovo Nervecenter eller Legionzone fra enheden.
Trin 2Naviger til optagelses- og/eller spilværktøjerne.
Trin 3Hvis der er et valg, kan du ændre optagelsesindstillingerne, f.eks. opløsning eller lydkvalitet.
Trin 4Start spillet eller applikationen.
Trin 5Optag med standardgenvejen eller -knappen.
Trin 6Stop optagelsen og kig i din Videoer mappen for at se, om filen er blevet optaget.
Metode 4. Brug af AVAide Screen Recorder
AVAide skærmoptager er en mere sofistikeret og alsidig skærmoptager til Lenovo end den indbyggede skærmoptager. Den er bygget til dem, der ønsker videokvalitet, mere jævn betjening og større optagelseskontrol. Det er det perfekte værktøj til at oprette tutorials, optage møder eller optage gameplay, uden kompliceret opsætning, alt sammen på et professionelt niveau.
Selvom den kan optage systemlyd, mikrofoninput, webcam og skærmområder, understøtter den også fuld HD- og endda 4K-optagelse med minimal forsinkelse sammenlignet med almindelige optagere. Dette gør den til en alt-i-en skærmoptagelsesapplikation til arbejde og fritid.
- Optag videoer i 1080p eller 4K med jævn og forsinkelsesfri ydeevne.
- Optag i FULD eller BRUGERDEFINERET skærmtilstand afhængigt af dine behov.
- Optag både intern lyd og stemme samtidigt med klart output.
- Tilføj Facecam-optagelse til tutorials, præsentationer eller gameplay-videoer.
- Beskær, komprimer og forbedr optagelser efter optagelse.

 Sikker download
Trin 1Download og installer softwaren
Besøg den officielle hjemmeside for AVAide Screen Recorder. Download Windows Installer, installer det på din Lenovo bærbare computer, og kør det.
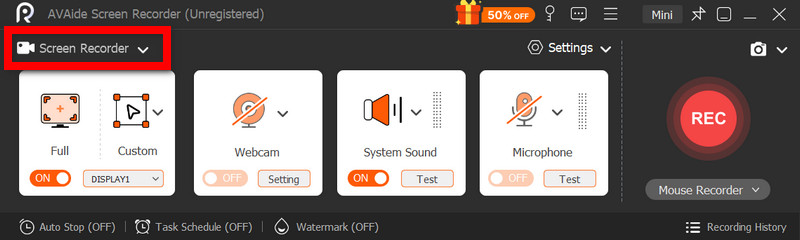
Trin 2Vælg optagetilstand
Åbn softwaren, og klik derefter på SkærmoptagerOptag hele skærmen med Fuld eller en del af skærmen med Brugerdefinerede.
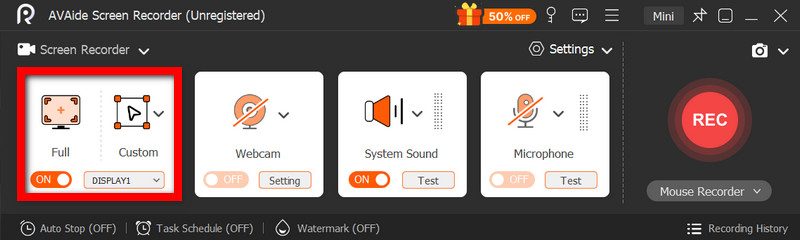
Trin 3Konfigurer lydindstillinger
For at optage lyde fra computeren skal du aktivere System lydFor at inkludere din egen stemme skal du aktivere MikrofonWebkameraet kan også tændes efter behov.
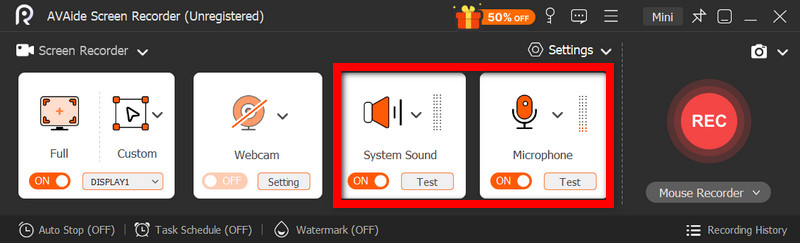
Trin 4Juster optagelsesindstillinger
Brug Indstillinger knappen til at konfigurere videokvalitet, opløsning, billedhastighed og outputformat for at opnå optimal optagelsesydelse.
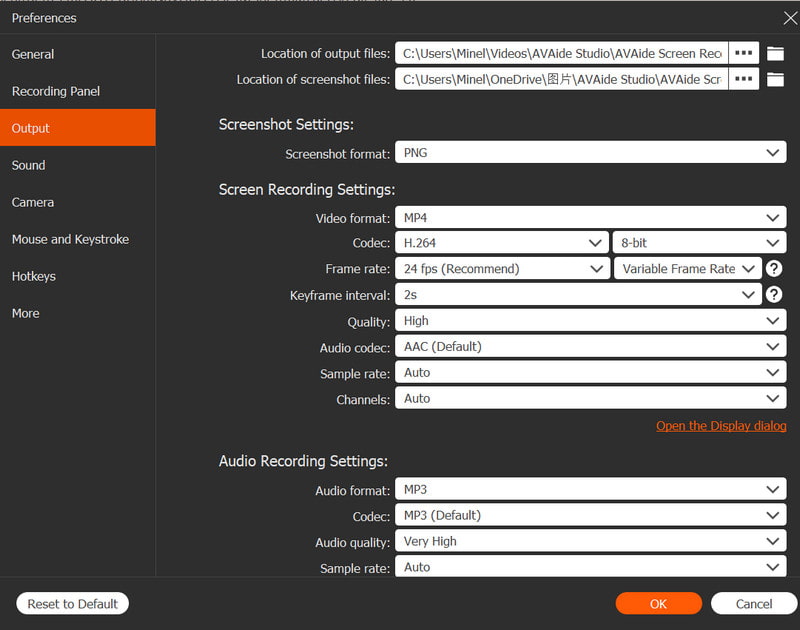
Trin 5Start optagelse
Tryk på REC knappen for at starte optagelsen. Google Meet-optagelser, tutorials, gameplay eller enhver aktivitet på skærmen kan optages problemfrit.
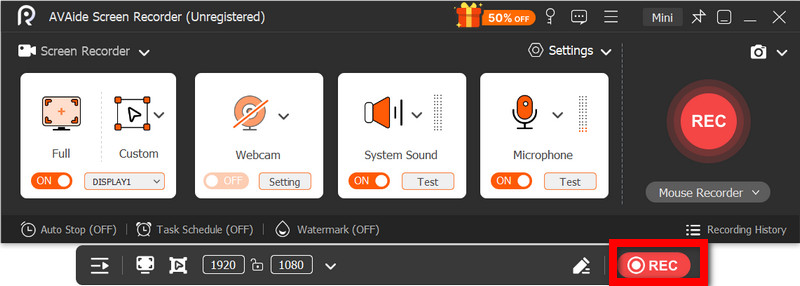
Trin 6Stop og gem optagelsen
Når du er færdig, skal du klikke på Hold op knappen. Forhåndsvis din optagelse, rediger den hurtigt om nødvendigt, og gem den på din computer med det samme.
Metode 5. Brug af hurtigindstillinger
På Lenovo Android-tablets er der en indbygget skærmoptagelsesmulighed i hurtigindstillingerne. Den bedste måde at optage tutorials, gameplay eller appaktivitet på din tablet er uden at downloade tredjepartsapps. Den er nem, hurtig og optimeret til mobilbrug, og ideel til hurtige optagelser på farten.
Det mangler de avancerede redigerings- og tilpasningsfunktioner, der findes i andre skærmoptagelsesværktøjer, men det er tilstrækkeligt til simple skærmoptagelser med lyd.
Trin 1Stryg opad fra bunden af skærmen for at åbne Hurtige indstillinger.
Trin 2Se efter Skærmoptagelse eller Skærmoptager knappen. Hvis den ikke er der, skal du klikke på Redigere knappen og tilføj den til dit panel.
Trin 3Klik Skærmoptager, og vælg derefter de ønskede indstillinger.
Trin 4Tryk på Start for at starte optagelsen. Der vil være en nedtælling, før optagelsen begynder.
Trin 5Tryk på den flydende værktøjslinje eller notifikationslinjen, og tryk derefter på Hold op for at afslutte optagelsen.
Fejlfinding af almindelige problemer med skærmoptagelse på Lenovo
Du kan læse tips til løsning af almindelige problemer, når du optager skærmen på en Lenovo-enhed.
Selvom der generelt ikke er større komplikationer med skærmoptagelse på Lenovo-enheder, er der altid en mulighed for problemer afhængigt af det anvendte skærmoptagelsesværktøj eller den anvendte enhed. Nedenfor er de mest almindelige problemer og hvordan du løser dem.
- Skærmoptager virker ikke: Genstart din enhed, og prøv igen. For indbyggede værktøjer som Xbox Game Bar skal du sørge for, at det er aktiveret i Windows-indstillinger under Spil.
- Ingen lyd i optagelsen: Kontrollér, om Systemlyd eller Mikrofon er tændt, før du optager. Kontroller også, at din systemlydstyrke ikke er slået fra.
- Laggy eller video i lav kvalitet: Reducer videokvaliteten eller luk programmer i baggrunden. Opgradering af dine grafikdrivere kan også forbedre ydeevnen.
- Kan ikke optage på skrivebordet eller i Stifinderen: Dette er en af de almindelige begrænsninger ved Xbox Game Bar. Hvis du vil optage din skærm og optage alt, skal du bruge et avanceret program som f.eks. AVAide Screen Recorder, en af de bedste skærmoptagere til Mac og Windows.
- Optagelse gemmes ikke: Sørg for, at din lagerplads ikke er fuld, og bekræft standardplaceringen for lagring. Skift outputmappen i indstillingerne, og prøv det.
Lenovo-skærmoptagelsesknap Indstillingerne varierer afhængigt af din enhed og det værktøj, du bruger. Samlet set gør indbyggede funktioner og tredjepartsapps optagelse enkel, hvilket giver dig fleksible måder at optage, gemme og administrere skærmaktivitet effektivt på Lenovo-enheder.
OM FORFATTEREN

Optag skærmaktiviteter med lyd, onlinemøder, gameplay-videoer, musik, webcam osv.
Skærmoptagelse