Prøver at finde ud af det hvordan man optager lyd på en Mac sker ofte, når du har brug for at optage en forelæsning, gemme et videoopkald, optage en podcast eller hurtigt oprette stemmeindhold. Heldigvis indeholder macOS indbyggede optageværktøjer, og adskillige tredjepartsmuligheder kan hjælpe dig med nemt at optage mikrofonlyd og intern lyd i høj kvalitet.
Metode 1: Brug af QuickTime Player
Alle ser ud til at have QuickTime på deres macOS. QuickTime tilbyder en intuitiv brugerflade, pålidelig mikrofonoptagelse og hurtig eksport, der ikke kræver nogen anden applikation. Denne teknik er nyttig til voiceovers, forelæsninger, onlinemøder og endda basale podcastoptagelser.
Trin 1Start QuickTime Player enten fra mappen Programmer eller via Spotlight-søgning.
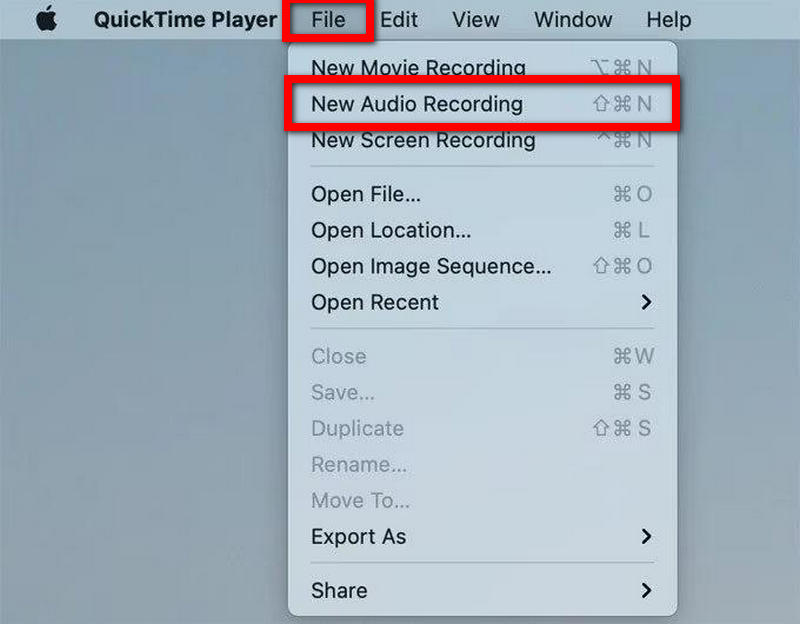
Trin 2Gå til Fil menuen fra den øverste menulinje.
Trin 3Klik Ny lydoptagelse.
Trin 4Tryk på den lille pil ved siden af Optage knappen for at angive den mikrofon, du vil bruge.
Trin 5Juster om nødvendigt inputlydstyrken.
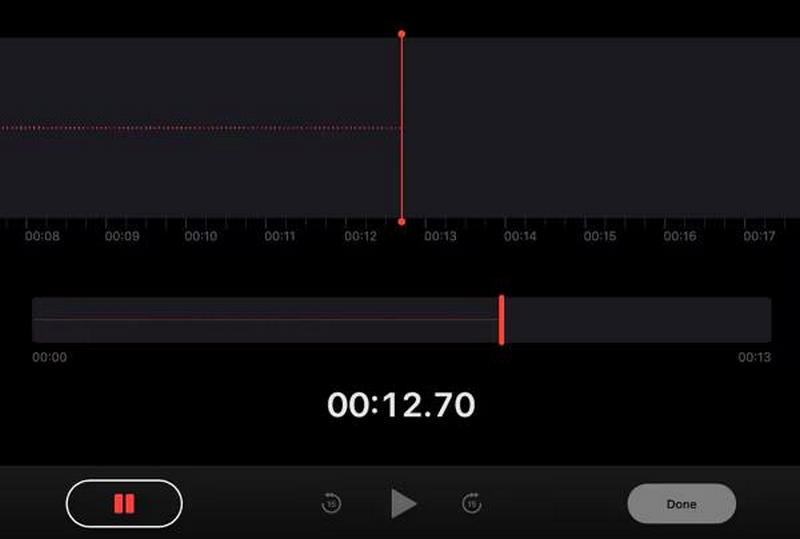
Trin 6Tryk på for at starte optagelsen Optage knap.
Trin 7 Tal ind i mikrofonen.
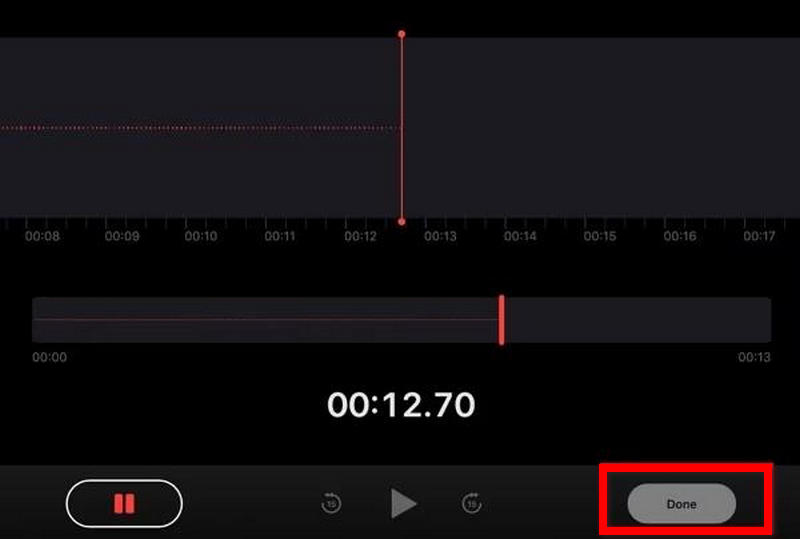
Trin 8Tryk på Hold op knappen for at afslutte optagelsen.
Trin 9For at gemme optagelsen på din Mac skal du gå til Fil og vælg Gemme.
Metode 2: Brug af stemmememoer
Voice Memos er lavet til hurtig stemmeoptagelse. Denne applikation er god til at lave personlige påmindelser, brainstorme idéer, korte foredrag og korte lydoptagelser. Optagede stemmememoer synkroniseres automatisk via iCloud, så optagelserne er tilgængelige på alle Apple-enheder.
Trin 1Start stemmememoer på din Mac.
Trin 2Tryk på Optage knap.
Trin 3Tal gennem mikrofonen.
Trin 4Hvis du har brug for at stoppe optagelsen et øjeblik, skal du vælge Pause.
Trin 5Trykke Færdig for at afslutte optagelsen.
Trin 6For at gøre det nemmere at finde optagelsen skal du vælge Omdøb mulighed.
Trin 7For at dele, duplikere eller eksportere optagelsen skal du højreklikke på filen.
Hvorfor macOS ikke understøtter intern lydoptagelse
macOS tillader brug af mikrofonen direkte fra starten. Der er dog ingen måde at optage intern systemlyd med den indbyggede funktionalitet. Dette inkluderer medieafspilning i apps, musik og browserlyde. Privatliv, ophavsretsbeskyttelse og systemsikkerhed er grundene til, at macOS har disse begrænsninger.
I modsætning til mikrofonlyd kan intern lyd indeholde beskyttede medier eller privat kommunikation fra apps. På grund af dette begrænser Apple adgangen til interne lydkanaler, medmindre brugerne installerer yderligere software.
På grund af disse problemer kan værktøjer som QuickTime ikke optage intern lyd, men ekstern lyd via en mikrofon kan.
Eksempler på disse problemer:
- Optag videospil med lyd.
- Optag en onlineklasse.
- Optag lyd og video online.
- Optag lyd fra en onlinevideo på nettet.
- Optag instruktionsvideoer med intern computerlyd.
Metode 3: Brug af BlackHole + QuickTime Player
BlackHole er en gratis virtuel lyddriver, der gør det muligt at dirigere systemlyd internt til optagelsessoftware. Hvis denne driver bruges sammen med QuickTime, kan Mac-brugere optage intern lyd og ekstern mikrofonlyd. Dette drev giver brugerne mulighed for at optage onlinemøder, tutorials, videospil, webinarer, podcasts og browserlyd, alt sammen med klar lyd i høj kvalitet.
Trin 1Download og installer BlackHole på din Mac fra den officielle hjemmeside, og åbn derefter Audio MIDI Setup.
Trin 2Opret en multi-output-enhed, og aktiver både dine Mac-højttalere eller hovedtelefoner og BlackHole.
Trin 3 Indstil multioutputenheden som din standardlydudgang i lydindstillingerne.
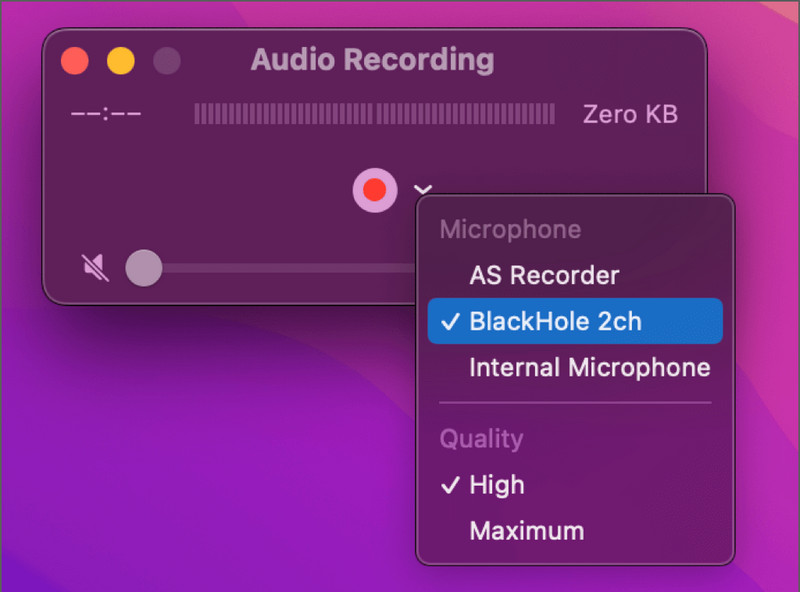
Trin 4Åbn QuickTime Player, vælg Fil > Ny lydoptagelse, og vælg derefter Sort hul som mikrofon eller lydkilde.
Trin 5Klik på Optage -knappen, afspil den lyd, du vil optage, og stop derefter optagelsen, og gem den, når den er færdig.
Metode 4: Brug af dedikeret tredjepartssoftware
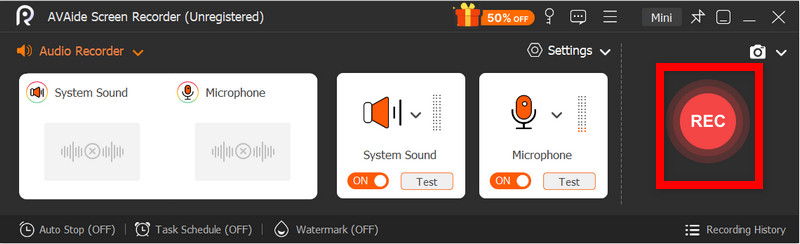
1. AVAide skærmoptager
AVAide skærmoptager er perfekt til Mac-brugere, der ønsker et simpelt, men kraftfuldt værktøj til at optage stemme og lyd. Udover skærmoptagelse kan AVAide optage lyd fra din mikrofon, systemhøjttalere og webcam, samt din telefonskærm. En af de bedste funktioner ved AVAide er, at det er designet til både begyndere og avancerede brugere, hvilket gør det til en god mulighed for alle, der har brug for at optage stemme på en Mac.
- Optager både mikrofon- og systemlyd samtidigt.
- Understøtter lydoptagelse i høj kvalitet med minimal forsinkelse.
- Tillader optagelse i fuld skærm, vindue eller brugerdefineret område.
- Inkluderer webcam-optagelse til tutorials og podcasts.
- Understøtter flere eksportformater såsom MP3, AAC, FLAC, M4A og mere.

 Sikker download
Trin 1Download og installer softwaren
Gå til AVAide-webstedet for at downloade softwaren. Følg installationsvejledningen på skærmen for at installere softwaren korrekt.
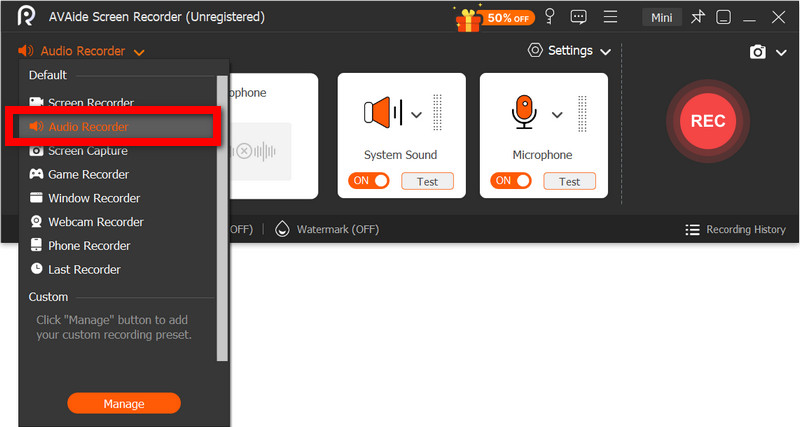
Trin 2Vælg Lydoptager
Åbn softwaren, og vælg fra hovedsiden Lydoptager kun for at optage stemme.
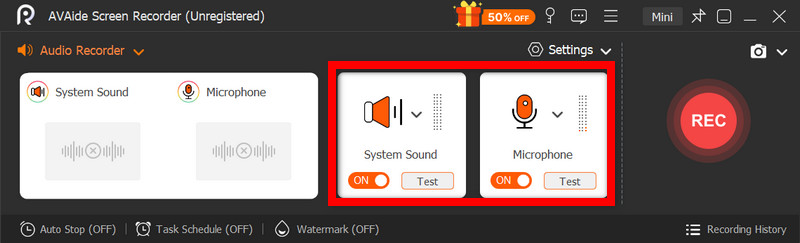
Trin 3Aktivér mikrofon og systemlyd
Aktiver Mikrofon mulighed for at optage stemme tydeligt. Aktiver System lyd for at optage den interne lyd fra din Mac.
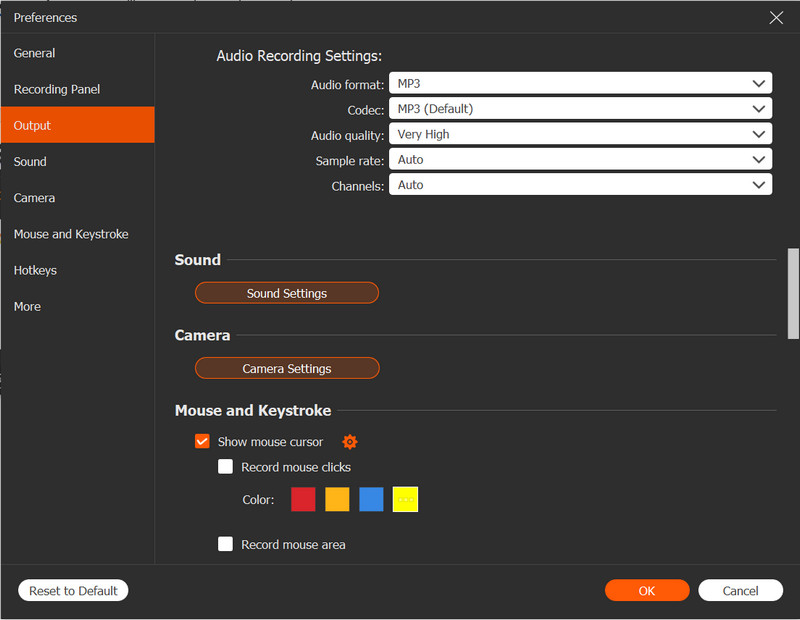
Trin 4Juster optagelsesindstillinger
Fra Indstillinger I menuen skal du vælge dit foretrukne lydformat og outputkvalitet. Bestem lagringsstedet og juster lydstyrken for mikrofonen og systemlyden.
Trin 5Start optagelse
Vælg REC mulighed for at starte optagelsen af din stemme. Under optagelsen kan du sætte på pause, genoptage eller tilføje noter.
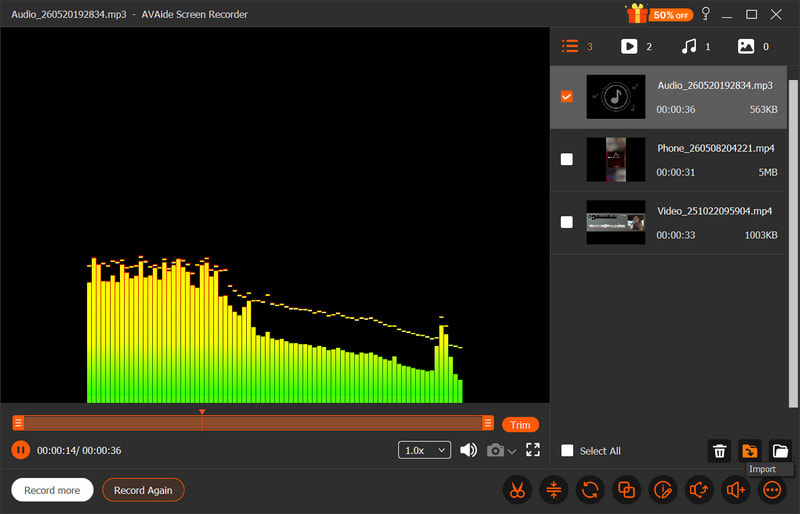
Trin 6Gem og få vist et eksempel
Vælg Hold op mulighed for at afslutte lydoptagelsen. Du kan derefter trimme lyden og gemme den optagede lyd på din Mac.
2. Brug af Audacity
Audacity er en brugervenlig, kraftfuld og gratis lydoptager og -editor til Mac. Den foretrækkes ofte frem for andre muligheder til podcasts og musikprojekter på grund af dens enkle arbejdsgange og professionelle funktioner som støjreduktion, beskæring og lydforbedring. Selv med alle disse funktioner har Audacity en simpel brugergrænseflade, hvilket gør den til et godt valg for begyndere.
Trin 1Download Audacity og installer det på din Mac. Åbn appen, når du er færdig med installationen.
Trin 2Vælg din lydindgang. Indstil indgangen til din lydenhed, og juster optagelsesniveauet.
Trin 3Når du er klar til at optage, skal du trykke på Optage -knappen og begynd at tale ind i din mikrofon.
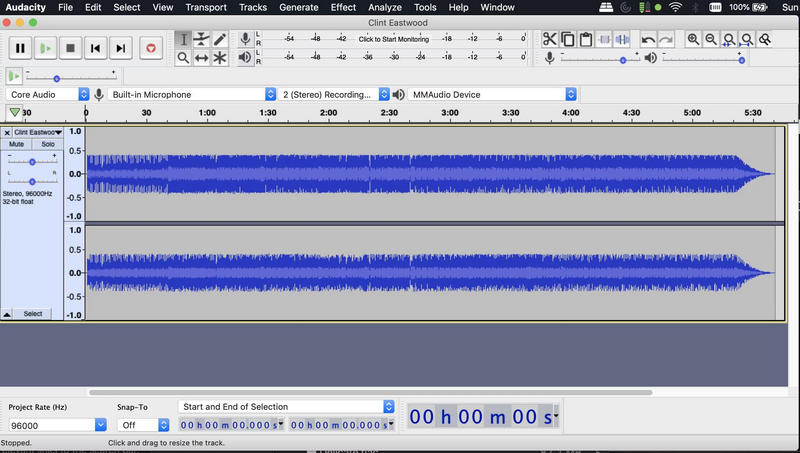
Trin 4Når du er færdig med at optage, skal du trykke på Hold op knap.
Trin 5Når du er tilfreds med optagelsen, skal du vælge det projekt, du vil eksportere, ved at gå til Fil > Eksport. Vælg MP3, WAVeller en anden lydeksportmulighed.
3. Brug af GarageBand
Et godt alternativ til Audacity er GarageBand, som er en Apple-proprietær app, der er forudinstalleret på alle Mac-computere. GarageBand har alle de samme funktioner som Audacity og mere til, såsom musikværktøjer og lydeffekter. GarageBand er endnu bedre til musikproduktioner og bruges i vid udstrækning til optag podcast sessioner, voiceovers og lydprojekter af høj kvalitet med professionel lydkontrol.
Trin 1Start GarageBand, og vælg Nyt projekt, og vælg indstillingen Stemme.
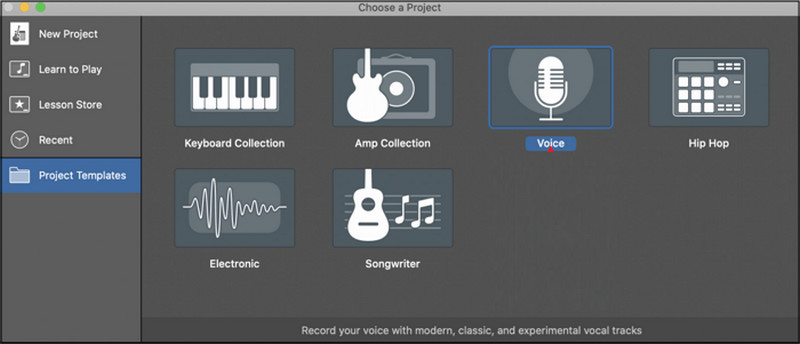
Trin 2Vælg den indgang, du vil optage med. Hvis du ønsker det, kan du aktivere Lydovervågning for at høre din stemme under optagelse.
Trin 3Hit Optage og start din session.
Trin 4Når du er færdig med din optagelse, skal du trykke på Hold op knappen. Brug redigerings- og lydjusteringsfunktionerne i GarageBand til at forbedre din optagelse.
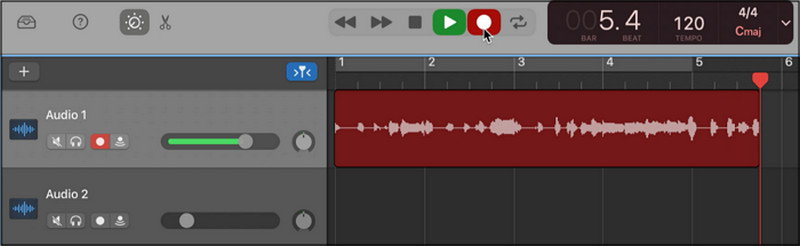
Trin 5Eksporter det færdige lydprojekt i den ønskede kvalitet og det ønskede format til din Mac.
Bonustips
1. Sådan optager du lyd fra YouTube på Mac
For at optage YouTube-lyd, onlinekurser, webinarer og afspilning af podcasts og musik på din Mac kan du bruge OBS Studio, et gratis optagelsessoftwareprogram til skærmvideo og livestream-optagelse. Da OBS Studio tilbyder optagelser af systemlyde i høj kvalitet, er det en god mulighed.
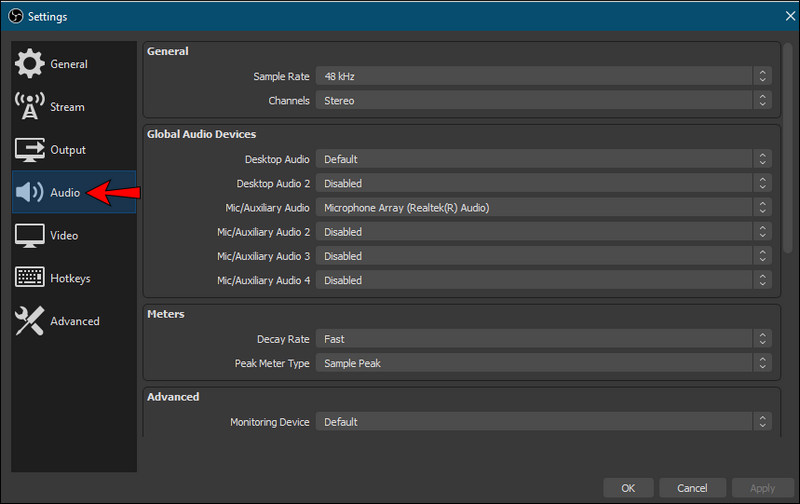
Trin 1Download og installer OBS Studio på din Mac, og åbn softwaren, når den er installeret.
Trin 2Opret en ny kilde i Lyd og vælg din systemlydenhed eller virtuelle lyddriver.
Trin 3Åbn YouTube i browseren, og indlæs den video/lyd, du vil optage.
Trin 4Tryk på Start optagelse knappen, og afspil derefter YouTube-videoen/lyden normalt.
Trin 5Vent, indtil den lyd, du vil optage, er færdig, og tryk derefter på Hold op knappen og find lydfilen, som nu er gemt på din Mac.
2. Sådan optager du lyd på Mac med en ekstern mikrofon
Lyd fra eksterne mikrofoner har i de fleste tilfælde en højere lydkvalitet sammenlignet med den interne mikrofon på en Mac. USB-mikrofoner har en direkte forbindelse til en Mac. XLR-mikrofoner kan dog kræve et lydkort for bedre lydkvalitet og lavere støj. Brug af bedste skærmoptager til Mac kan også hjælpe med at optage klarere optagelser, når man kombinerer lyd- og videoopgaver.
Trin 1Tilslut din valgte mikrofon til din Mac, åbn Systemindstillinger, gå til Lyd, og indstil den mikrofon, du lige har tilsluttet, som inputenhed.
Trin 2Juster mikrofonens indgangsniveau, og test lyden for at sikre, at din stemme registreres tydeligt.
Trin 3Åbn din foretrukne optagelsessoftware, f.eks. AVAide Screen Recorder.
Trin 4Vælg den eksterne mikrofon i softwareindstillingerne, og begynd at optage din stemme- eller lydsession.
Trin 5Stop optagelsen, gennemgå lydkvaliteten, og gem eller eksporter den endelige lydfil til din Mac.
Optag Mac-stemme nemt ved hjælp af indbyggede værktøjer som QuickTime og Voice Memos eller avanceret software til optagelser i professionel kvalitet. Uanset om du har brug for intern lyd, podcast-fortælling eller online forelæsningsoptagelser, giver disse metoder pålidelige måder at optage klar lyd effektivt på din Mac.
OM FORFATTEREN

Optag skærmaktiviteter med lyd, onlinemøder, gameplay-videoer, musik, webcam osv.