Imagine that you record a great track in a GarageBand and wish to attach it to an email or upload it to a site. Then what? You’ll need to learn the GarageBand to MP3 export process to ensure that no one misses out on your music, regardless of the device they use. You will be fully informed how to accomplish it in these steps.
Part 1. How to Export GarageBand to MP3 on Mac
GarageBand provides excellent features for making music and crafting new launches, but exporting projects to MP3 needs to be improved. Although above version 10.0.2 and onwards, this MP3 exporting issue was resolved, its users on Mac devices can now easily export their projects to the MP3 sound standard using the best music editor available. Below, I will walk you through all the steps needed to export your GarageBand project to MP3 format properly.
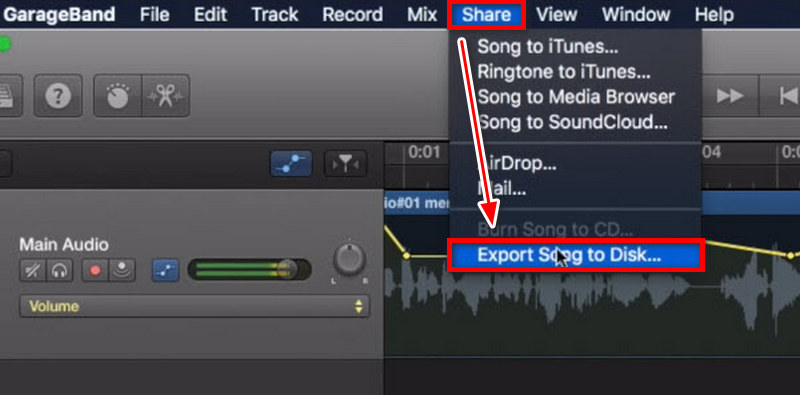
Step 1Run your GarageBand and open a project you’re done with. Select the Share button in the navigation bar from the above window, which is between Settings and Window.
Step 2You should now obtain an Export Song to Disk option, and clicking on it will save your song directly onto the computer in the default state, so it would need to be renamed after the file-saving process opens up clean.
Step 3Furthermore, please select MP3 as your desired export quality so that it can be altered. A few options include renaming the song file and choosing the appropriate folder for storing that file; the mp3 file extension will be incorporated automatically by GarageBand.
Step 4On the screen, there will also be a Quality drop-down bar - choose the desired sound quality and press the Export button, which sits beneath it. The completed Song Exporter will import your completed song file in MP3 format so it is ready to be heard or distributed.

Part 2. Can You Save GarageBand to MP3 on iPhone and iPad
While using GarageBand export features available on iOS, you will note that it is only possible to export projects in M4A format, which can be a major hindrance, especially if you require an MP3 format. Thankfully, there are some quite effective workarounds. Here, we will discuss ways of saving GarageBand files as MP3 on iPhone or iPad devices, emphasizing the pros and cons of the methods while providing the necessary steps to complete the procedures.
Method 1: Via GarageBand, Files App and Document Application
This starts with exporting the file as an M4A through GarageBand, followed by using the Document application to obtain a conversion via a web-based converter.
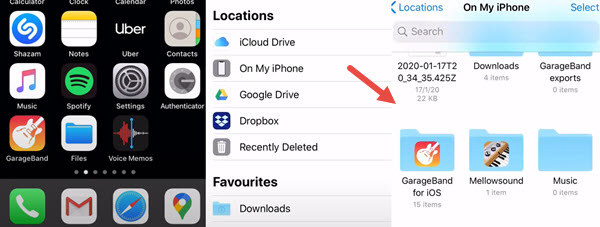
Step 1Access the Files App on your iPhone device and open a new dedicated folder, some hard drive named GarageBand files. Direct the newly created folder into the On My iPhone directory.
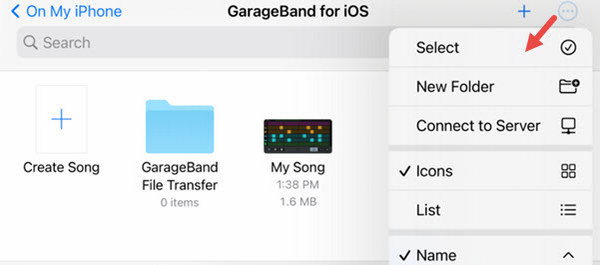
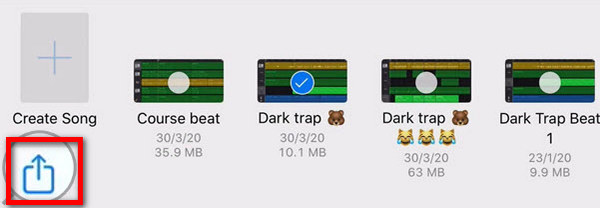
Step 2In GarageBand, select the Export option tab on the top right corner of the screen, first tapping the Select button and selecting the song you would like to export. Sharing the song requires you to tap Share > Song. Hitting Share first will display the song imports followed by a high-quality iTunes plus rendering export feature.
Step 3Click Open In…, followed by Document by Readdle, which would need downloading if it hasn’t been installed. This procedure opens the file from the Documents service supplier.
Step 4We can now turn to the Documents App, particularly its built-in browser, and search for an online converter, say Convertio. Allow the M4A file to be uploaded, select the MP3 conversion, and download the desired file.
- Pros
- This method requires no additional purchases as it employs free apps and online converters.
- The whole procedure is done on the IOS device, eliminating the necessity of a device.
- Cons
- The use of online converters may result in the compression of the file and may, in turn, affect the sound quality.
Method 2: Access GarageBand Files from a Computer
If the project consists of more than one file, transferring it to a computer and batch, convert to MP3 is easier and faster.
Step 1Connect DearMob iPhone Manager and launch the application to perform the necessary action.
Step 2Follow Files > GarageBand and create a new folder containing the new exports on the desktop.

Step 3Use your iPhone GarageBand to find your songs, and by clicking on the three dots next to the song you want to share, select Share > Files and pick the folder created on DearMob.
Step 4On the computer, go back to DearMob’s folder and hit refresh to check if the new items are available. Release them back to the PC and make them in MP3 format.
- Pros
- This enables you to export more than one file at a go, which is very convenient, especially when many projects are being worked on.
- Desktop computers, in most cases, produce better-quality MP3s than online converters.
- Cons
- DearMob iPhone Manager is a paid program, thus adding another expenditure for this method.
Bonus Tips:
1. Lowercase File Extension: Alter MP3 to MP3 if there is difficulty in importing it in GarageBand.
2. Adjust Sample Rate and Bit Depth: To ensure compatibility, consider adjusting the sample rate to 44.1 kHz and the bit depth to 16 bits.
3. Convert to AIFF: If the issues persist, one may consider converting from AIFF to M4A, which is more useful for editing than the other formats.
Part 3. The Best Way to Save GarageBand as MP3 on Windows
Saving GarageBand as an MP3 is a great option as it is very small in size and easy to use when one is transferring a file like an audio file that one has worked on an excellent audio project in the application known as GarageBand. AVAide Video Converter is the right tool that can make GarageBand file conversion very simple and with no quality degradation.
- Over 300 formats are supported for import and export in audio files.
- Audio can be preserved in up to 8K quality.
- Using this tool is effortless because of its user-friendly interface.
- Edit, cut, and adjust the boost level on the audio files.
- Change information contained in media files to make them easier to manage.

 Secure Download
Step 1Go to the official website of AVAide Video Converter and grab the installation file. After that, follow the provided instructions to install the application.
Step 2After that, open it on your Windows computer and load your GarageBand exported file by either clicking the Add Files button or dragging the file into the application.

Step 3Go to the Profile window, click on it, and choose the MP3 option for the formats under the Audio section.

Step 4Finally, click on the Convert All button to begin the conversion process. An AVAide Video Converter will convert the file and save it as an MP3 file in the specified output folder.

Step 5After the process is complete, go to the output folder selected before the process to obtain the MP3 file, which is now ready for distribution!
On top of making it easier to share music, converting GarageBand to MP3 retains the original audio quality. Use these techniques to share your creations on different sites easily. Relish your music!
Your complete video toolbox that supports 350+ formats for conversion in lossless quality.
Related Articles


Copyright © 2026 AVAide. All rights reserved.