Imagine you are trying to save a tutorial, gameplay moment, or online meeting, but you are unsure how to capture it on your device. Knowing how to screen record on iPad can make it easy to save and share these moments. This guide walks you through enabling recording, using sound, resolving issues, and improving quality for smoother, better screen recordings every time.

Part 1. How to Enable Screen Recording on iPad

Do not worry, the screen recording button is not installed in your Control Center yet, unless you do not have it on your iPad. Apple has included this functionality natively in iPadOS, and it has to be turned on before it can be used. Once added, you can record your screen anytime with just a swipe and a tap.

步驟1點擊 設置 app on your iPad.

第2步點選 控制中心 in the menu as you scroll down.

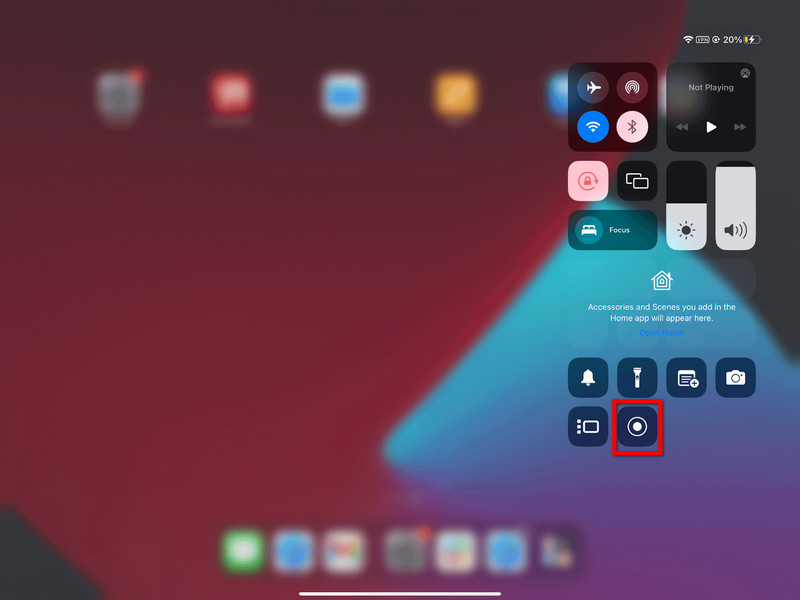
Control Center Record Button

第 3 步點擊 + (Add) 中的按鈕 屏幕錄製 section of the available controls list.

步驟4訪問 控制中心, swipe down from the top-right corner of your screen. Now you should see the record.

Part 2. How to Screen Record on iPad

Once you activate it, recording your iPad screen is easy and fast. The iPadOS built-in recorder is a seamless feature that lets you capture gameplay, tutorials, or even video calls without installing third-party apps.

步驟1Tap and hold the top right of your iPad screen, then drag it down.

第2步點擊 屏幕錄製 button. There will be a 3-second countdown before recording starts.

(Optional) 按住 屏幕錄製 按鈕並點擊 麥克風 to enable it when you wish to record your voice.

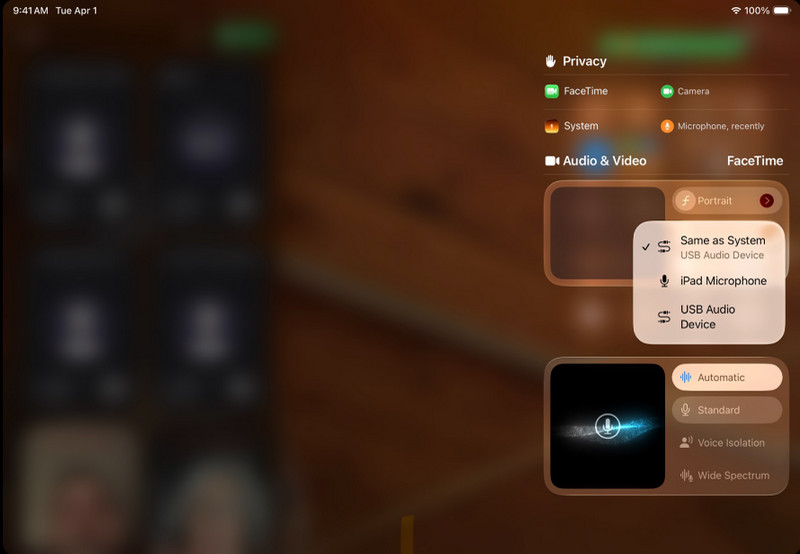
Microphone on iPad

第 3 步Select the apps or activities you want to record.

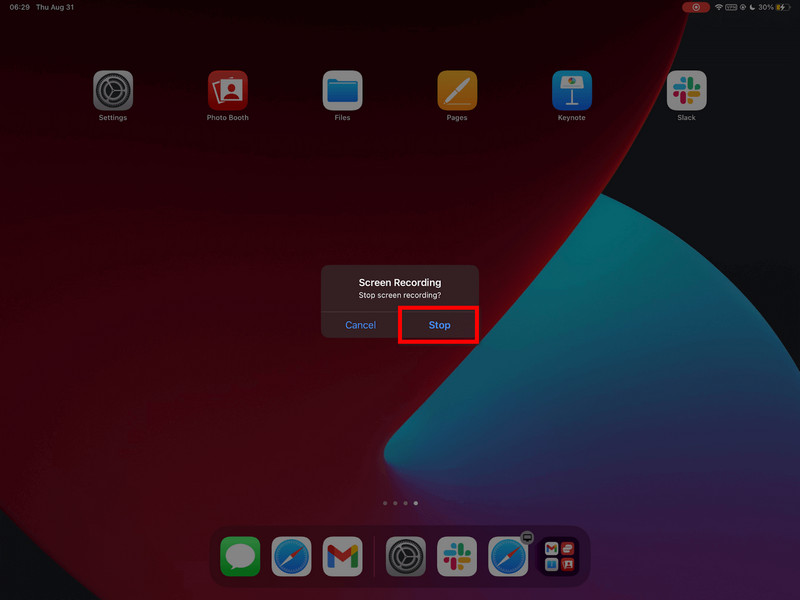
步驟4Tap the red status bar and then tap 停止, or go back to the 控制中心 並點擊 記錄 按鈕。

Stop Button on iPad

第 5 步Your video will automatically save in the 相片 app, where you can edit or share it.

Part 3. How to Screen Record on iPad with Sound

Capturing the screen and audio with the iPad is helpful for tutorials, games, online classes, and demonstrations. Recording on iPadOS works only to a limited extent, and it is important to understand the relationship between the microphone and system audio before recording.

Important Distinction: Microphone vs. System Audio

Audio Type What It Records Availability on iPadOS 最佳應用案例
Microphone Audio Your voice and external sounds are captured by the iPad’s microphone. 可用的 Commentary, tutorials, narration.
System Audio Internal sounds from apps, games, videos, and media playback. Not directly supported Requires external tools or a workaround.

Steps to Record Audio with a Microphone

步驟1Swipe upwards from the top right of your iPad screen to open the 控制中心.

第2步按住 屏幕錄製 button to see more options.

第 3 步Press the microphone to turn on. It should become red to indicate that the voice recording is on.

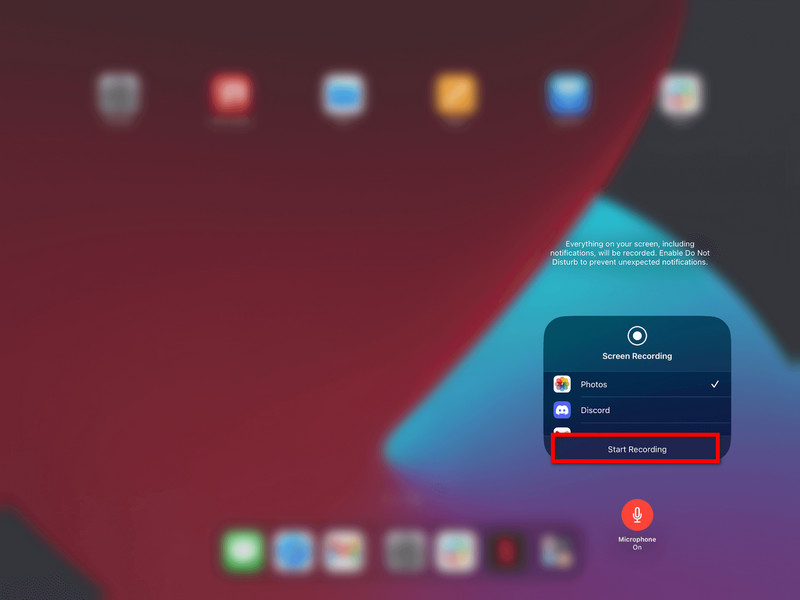
步驟4點擊 開始錄製, and when the 3-second countdown completes, the recording starts.

開始錄製

第 5 步Repeat the movements that you wish to record. If the microphone is on, then your voice will be recorded.

第 6 步Tap the red status bar at the top of the screen or return to 控制中心 並點擊 記錄 按鈕。

第 7 步The video will be automatically saved in the 相片 app, where you can view or edit it.

Alternative for System Audio Recording

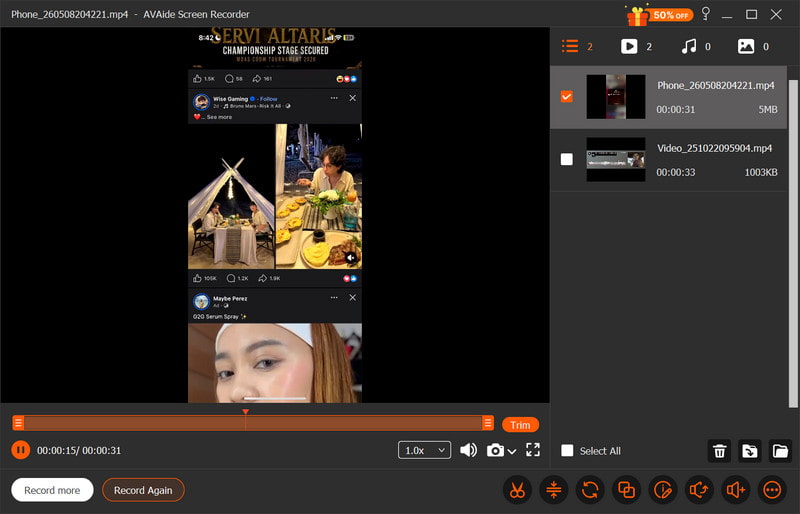
Unfortunately, due to system limitations, you cannot record internal audio directly on the iPad, so a computer-based solution is needed. An excellent tool is the AVAide 屏幕錄像, which lets you mirror an iPad and record the screen and system audio simultaneously.

AVAide Screen Recorder is a high-quality screen recording software that captures screen activity with clarity. It can record without lag or delay up to 4 K/1080p. It also allows simultaneous recording of system and microphone audio, perfect for tutorials, gameplay, and presentations.

AVAide 屏幕錄像
  • High-Quality Recording lets you capture videos in 4K or 1080p with clear, high-quality results.
  • Dual Audio
  • Support recording system sound and the microphone audio simultaneously.
  • iOS Screen Mirroring displays and records your iPad screen on a PC or Mac.
  • Flexible Screen Modes support full-screen or custom-area recording.
  • Built-in Editing Tools help you trim, enhance, and edit recordings quickly.

步驟1下載並安裝

Visit the official website and download the AVAide Screen Recorder. Download AVAide Screen Recorder from the official website. Once installed, it can be run from your Windows or Mac computer.

第2步Select iOS Option

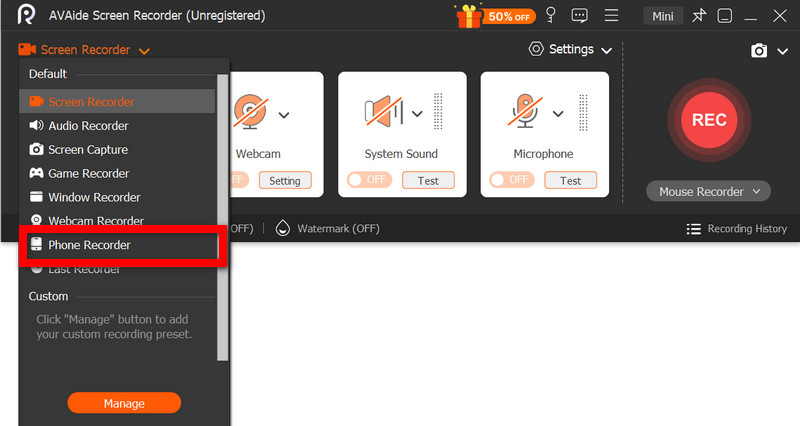
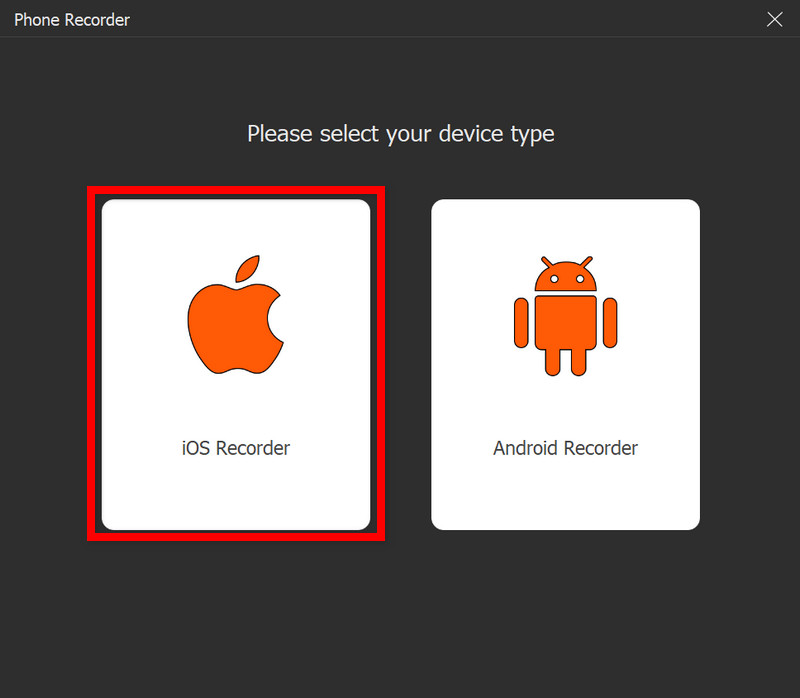
In the main interface, click 電話錄音機,然後選擇 iOS 錄音機 from the list of options (iOS and Android).

AVAide 電話錄音機

第 3 步Attach the iPad to the PC

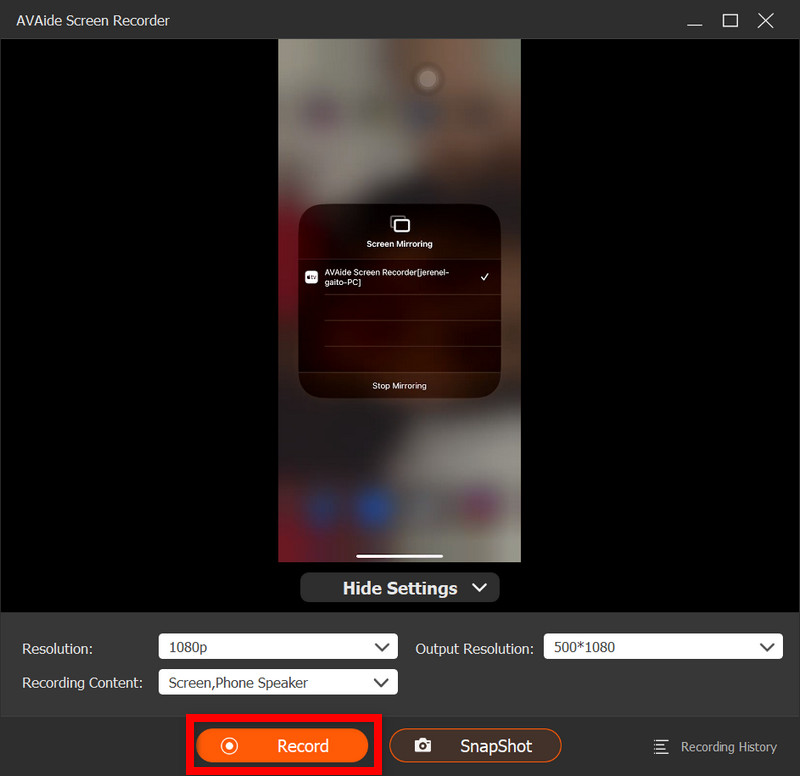
Wirelessly mirroring your iPad to your computer is possible over the same network, or via a USB cable if one is available. In the Screen Mirroring app on your iPad, choose the AVAide device. You will see your iPad screen displayed on your computer once you are connected.

iOS 錄音機

步驟4開始錄製

With successful mirroring, press 記錄 to start recording your iPad screen, system audio, and microphone input (if any).

Record iPad Avaide

第 5 步停止錄製

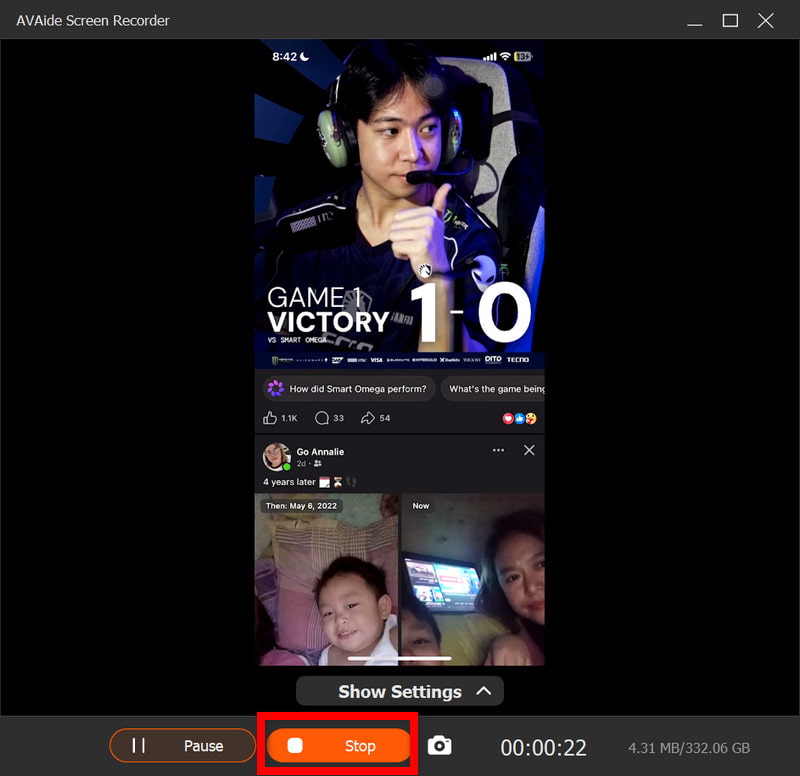
停止 button when done. Your recording will automatically save on your computer.

停止按鈕

第 6 步Edit the Video

Once you have recorded, a preview window will open. Unwanted parts can be cut away, sound adjusted, or simple editing done before exporting the final video.

Edit Import

Part 4. Why Can't I Screen Record on my iPad?

A video recording problem on the iPad typically occurs due to settings, restrictions, or performance issues. The most common issues and causes are displayed below.

1. The Button Is Missing Entirely

This occurs if Screen Recording is not installed in the Control Center. You must manually add Screen Recording in Settings > Control Center for it to appear there.

2. The Button Is Grayed Out or Unresponsive

Typically, this is due to a restriction on screen recording from system settings or device controls.

  • Screen Time limits can be set on.
  • Recording may be prohibited by school or work device profile settings.
  • Some apps may not allow you to take a screenshot while using them.

3. Recording Stops Immediately After Starting

The problem is commonly related to system or storage issues, such as insufficient available space or other applications interfering with the recording process.

4. No Sound on the Recording

This occurs when audio is not properly connected or when the user expects internal audio; it is not possible to record the screen internally on iPadOS, so using the best screen recorder for Mac can help capture system sound properly.

5. Recording Is Choppy or Low Quality

This is typically caused by one of these factors: limited device storage, running too many applications, or an older iPad model unable to record at such a high resolution.

Part 5. Pro Tips for Better Screen Recordings

When recording on iPadOS, make sure your iPad is set up properly for a smooth, clear, high-quality recording. Here are some helpful tips for optimizing video and audio quality.

1. 釋放儲存空間

Before you start recording, ensure there is plenty of free space on your iPad so it does not lag or glitch, which can cause recording problems while you are filming.

2. Close Unused Apps

Close all unnecessary background apps to improve system performance and prevent interruptions or slowdowns during recording.

3. Turn On Do Not Disturb

Activate Do Not Disturb to prevent all incoming calls, messages, and notifications from appearing on the screen and distracting you while recording.

4. Keep a Stable Screen Setup

Do not adjust brightness, orientation, or system settings during recording, as sudden changes may affect video consistency and recording quality.

5. Test Audio First

Before you begin shooting your video, do a short test recording to check that the microphone levels are set correctly and that your voice sounds clear and is being recorded properly.

6. Use a Clean Home Screen

Clean up your home screen or relocate sensitive apps or applications to a different folder so that your recording appears focused, professional, and uncluttered.

7. Record in a Quiet Environment

If you can record in a quiet room with little background noise, your microphone will pick up better voice audio and minimize unwanted sounds when recording voice on a Mac or iPad.

結論

iPad screen recording is a simple yet powerful way to capture tutorials, gameplay, and important moments directly from your device. With the right settings and tips, you can improve both video and audio quality for better results. Whether using built-in tools or external software, recording becomes easier and more reliable.

經過 艾莎·約翰遜 on 5 月 27, 2026

關於作者

艾莎·約翰遜
艾莎·約翰遜

艾莎·約翰遜是一位多媒體製作技術員,專長於螢幕錄製和音訊擷取工作流程。她曾幫助教育工作者、培訓師和播客團隊建立穩定的錄製環境,並解決常見的硬體和配置問題。她的實作經驗能夠幫助創作者提升錄製清晰度,製作出更可靠的內容。

相關文章