Đang cố gắng tìm hiểu Cách ghi âm trên máy Mac Điều này thường xảy ra khi bạn cần ghi lại bài giảng trên lớp, lưu cuộc gọi video, thu âm podcast hoặc tạo nội dung âm thanh nhanh chóng. May mắn thay, macOS có các công cụ ghi âm tích hợp sẵn và một số tùy chọn của bên thứ ba có thể giúp bạn ghi âm micrô và âm thanh nội bộ chất lượng cao một cách dễ dàng.
Phương pháp 1: Sử dụng QuickTime Player
Hầu hết mọi người đều có QuickTime trên macOS. QuickTime cung cấp giao diện trực quan, khả năng ghi âm micro đáng tin cậy và xuất file nhanh chóng mà không cần ứng dụng nào khác. Công nghệ này hữu ích cho việc lồng tiếng, thuyết trình, họp trực tuyến và thậm chí cả ghi âm podcast cơ bản.
Bước 1Khởi chạy QuickTime Player từ thư mục Ứng dụng hoặc thông qua tìm kiếm Spotlight.
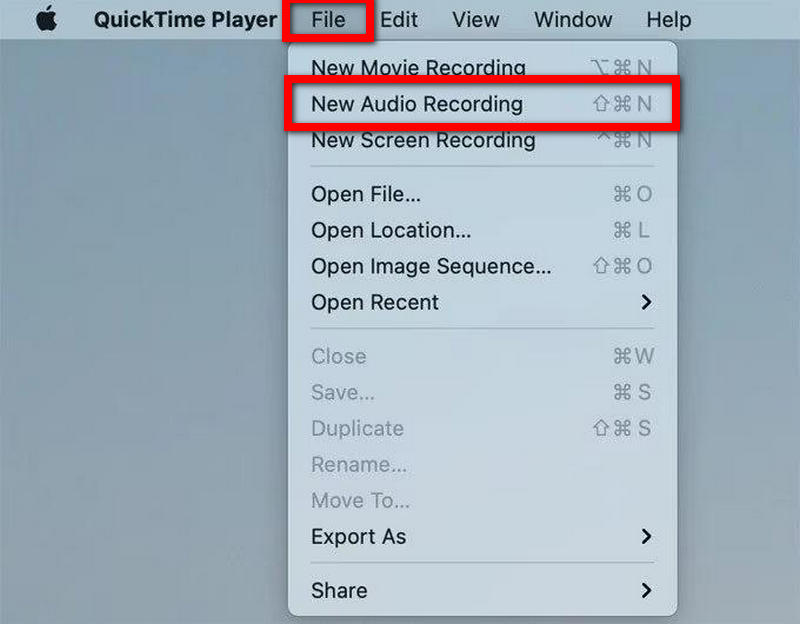
Bước 2Đi đến Tập tin Menu từ thanh menu trên cùng.
Bước 3Nhấp chuột Ghi âm mới.
Bước 4Nhấn vào mũi tên nhỏ bên cạnh Ghi Nút này dùng để chỉ định micro bạn muốn sử dụng.
Bước 5Nếu cần, hãy điều chỉnh âm lượng đầu vào.
Bước 6Để bắt đầu ghi âm, nhấn nút Ghi cái nút.
Bước 7 Hãy nói vào micro.
Bước 8Nhấn vào Ngừng lại nút để kết thúc quá trình ghi âm.
Bước 9Để lưu bản ghi âm vào máy Mac của bạn, hãy vào... Tập tin và chọn Cứu.
Phương pháp 2: Sử dụng ghi âm giọng nói
Ứng dụng Ghi Âm Giọng Nói được thiết kế để ghi âm giọng nói nhanh chóng. Ứng dụng này rất hữu ích để tạo lời nhắc cá nhân, lên ý tưởng, bài giảng ngắn và các bản ghi âm ngắn. Các bản ghi âm giọng nói được tự động đồng bộ hóa qua iCloud, vì vậy các bản ghi âm có sẵn trên tất cả các thiết bị của Apple.
Bước 1Khởi chạy ứng dụng Ghi âm giọng nói trên máy Mac của bạn.
Bước 2Nhấn vào Ghi cái nút.
Bước 3Hãy nói qua micro.
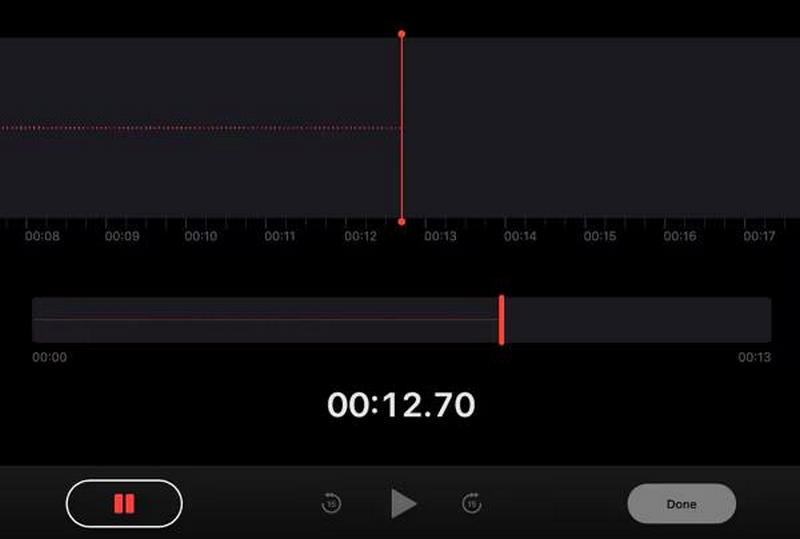
Bước 4Nếu bạn cần tạm dừng ghi âm, hãy chọn Tạm ngừng.
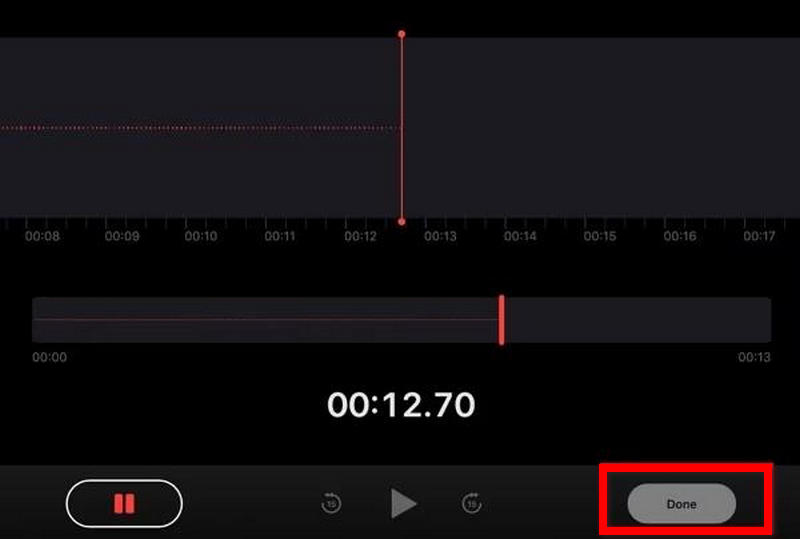
Bước 5Nhấn Làm xong để hoàn tất việc ghi âm.
Bước 6Để dễ dàng tìm thấy bản ghi âm hơn, hãy chọn Đổi tên lựa chọn.
Bước 7Để chia sẻ, sao chép hoặc xuất bản ghi âm, hãy nhấp chuột phải vào tệp.
Vì sao macOS không hỗ trợ ghi âm nội bộ một cách mặc định?
Theo mặc định, macOS cho phép sử dụng micro. Tuy nhiên, không có cách nào để ghi âm thanh hệ thống nội bộ bằng chức năng tích hợp sẵn. Điều này bao gồm âm thanh phát trong ứng dụng, nhạc và âm thanh trình duyệt. Quyền riêng tư, bảo vệ bản quyền và bảo mật hệ thống là lý do macOS có những hạn chế này.
Khác với âm thanh từ micro, âm thanh nội bộ có thể chứa các nội dung đa phương tiện được bảo vệ hoặc các cuộc liên lạc riêng tư từ các ứng dụng. Vì lý do này, Apple hạn chế quyền truy cập vào các kênh âm thanh nội bộ trừ khi người dùng cài đặt phần mềm bổ sung.
Do những vấn đề này, các công cụ như QuickTime không thể ghi âm thanh nội bộ, nhưng có thể ghi âm thanh bên ngoài thông qua micro.
Ví dụ về những vấn đề này:
- Ghi lại quá trình chơi game kèm âm thanh.
- Ghi hình một buổi học trực tuyến.
- Ghi âm và quay video trực tuyến.
- Ghi âm từ video trực tuyến trên web.
- Ghi lại các video hướng dẫn bằng âm thanh tích hợp của máy tính.
Phương pháp 3: Sử dụng BlackHole + QuickTime Player
BlackHole là một trình điều khiển âm thanh ảo miễn phí cho phép định tuyến âm thanh hệ thống nội bộ đến phần mềm ghi âm. Nếu sử dụng trình điều khiển này cùng với QuickTime, người dùng Mac có thể ghi âm cả âm thanh nội bộ và âm thanh từ micro ngoài. Trình điều khiển này cho phép người dùng ghi lại các cuộc họp trực tuyến, hướng dẫn, trò chơi điện tử, hội thảo trực tuyến, podcast và âm thanh trình duyệt, tất cả đều với chất lượng âm thanh cao và rõ nét.
Bước 1Tải xuống và cài đặt BlackHole trên máy Mac của bạn từ trang web chính thức, sau đó mở Audio MIDI Setup.
Bước 2Tạo thiết bị đa đầu ra và kích hoạt cả loa hoặc tai nghe Mac của bạn và BlackHole.
Bước 3 Hãy đặt Thiết bị đa đầu ra làm thiết bị đầu ra âm thanh mặc định trong cài đặt âm thanh.
Bước 4Mở QuickTime Player, chọn Tập tin > Ghi âm mới, sau đó chọn Lỗ đen như micro hoặc nguồn âm thanh.
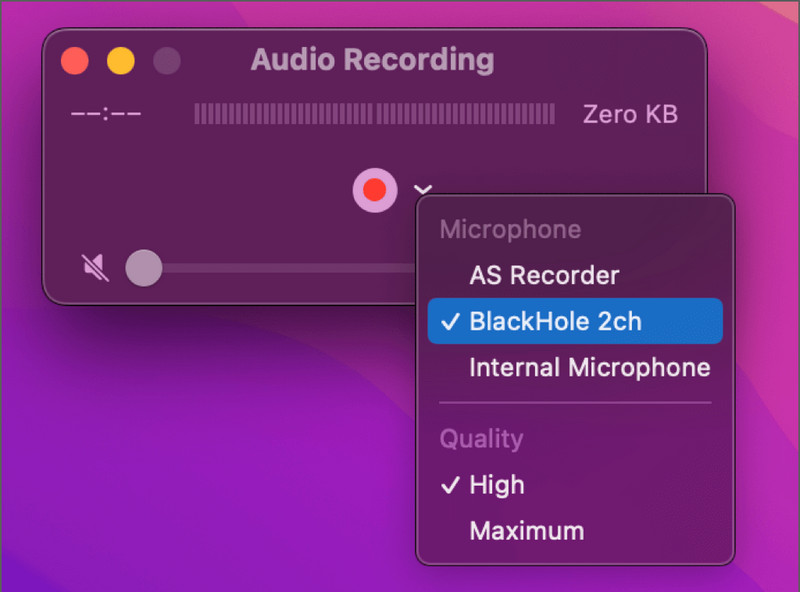
Bước 5Nhấn vào Ghi Nhấn nút đó, phát đoạn âm thanh bạn muốn thu âm, sau đó dừng lại và lưu bản ghi sau khi hoàn tất.
Phương pháp 4: Sử dụng phần mềm chuyên dụng của bên thứ ba
1. AVAide Screen Recorder
AVAide Screen Recorder AVAide là ứng dụng hoàn hảo cho người dùng Mac muốn một công cụ đơn giản nhưng mạnh mẽ để ghi âm giọng nói và âm thanh. Ngoài chức năng ghi màn hình, AVAide còn có thể thu âm từ micrô, loa hệ thống, webcam, cũng như màn hình điện thoại của bạn. Một trong những tính năng tốt nhất của AVAide là nó được thiết kế cho cả người mới bắt đầu và người dùng nâng cao, khiến nó trở thành lựa chọn tuyệt vời cho bất kỳ ai cần ghi âm giọng nói trên máy Mac.
- Ghi lại đồng thời cả âm thanh từ micro và âm thanh hệ thống.
- Hỗ trợ ghi âm chất lượng cao với độ trễ tối thiểu.
- Cho phép ghi hình toàn màn hình, cửa sổ hoặc khu vực tùy chỉnh.
- Bao gồm tính năng ghi hình webcam cho các bài hướng dẫn và podcast.
- Hỗ trợ nhiều định dạng xuất khác nhau như MP3, AAC, FLAC, M4A, và nhiều định dạng khác.

 An toàn tải
Bước 1Tải xuống và cài đặt phần mềm
Truy cập trang web AVAide để tải phần mềm xuống. Làm theo hướng dẫn cài đặt trên màn hình để cài đặt phần mềm thành công.
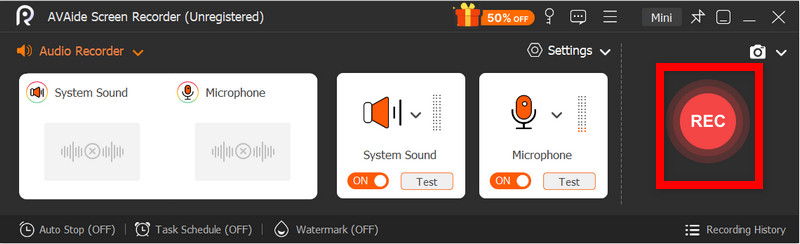
Bước 2Chọn máy ghi âm
Mở phần mềm và từ trang chính, chọn... Máy thu âm Chỉ ghi âm giọng nói.
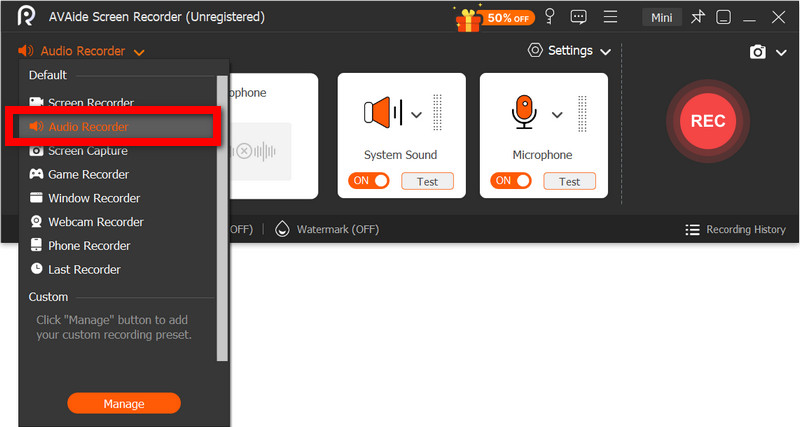
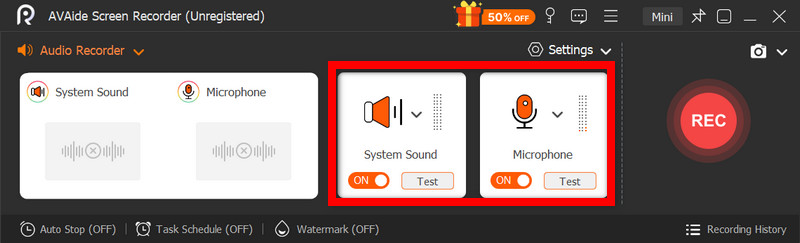
Bước 3Kích hoạt micro và âm thanh hệ thống
Kích hoạt Cái mic cờ rô Tùy chọn ghi âm giọng nói rõ ràng. Kích hoạt Hệ thống âm thanh Để thu âm thanh nội bộ từ máy Mac của bạn.
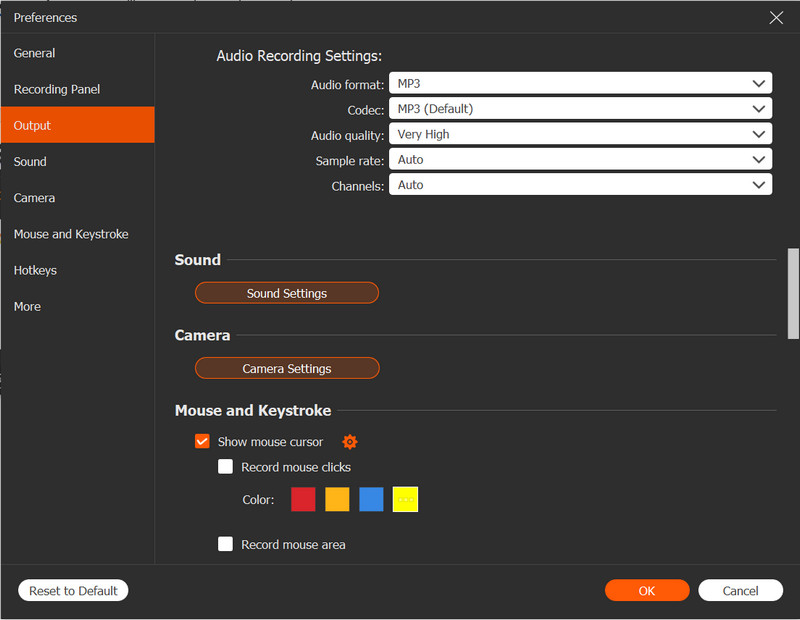
Bước 4Điều chỉnh cài đặt ghi âm
Từ Cài đặt Trong menu, chọn định dạng âm thanh và chất lượng đầu ra ưa thích. Xác định vị trí lưu và điều chỉnh mức âm lượng cho micrô và âm thanh hệ thống.
Bước 5Bắt đầu ghi âm
Chọn GHI Tùy chọn này cho phép bạn bắt đầu ghi âm giọng nói. Trong quá trình ghi âm, bạn có thể tạm dừng, tiếp tục hoặc thêm ghi chú.
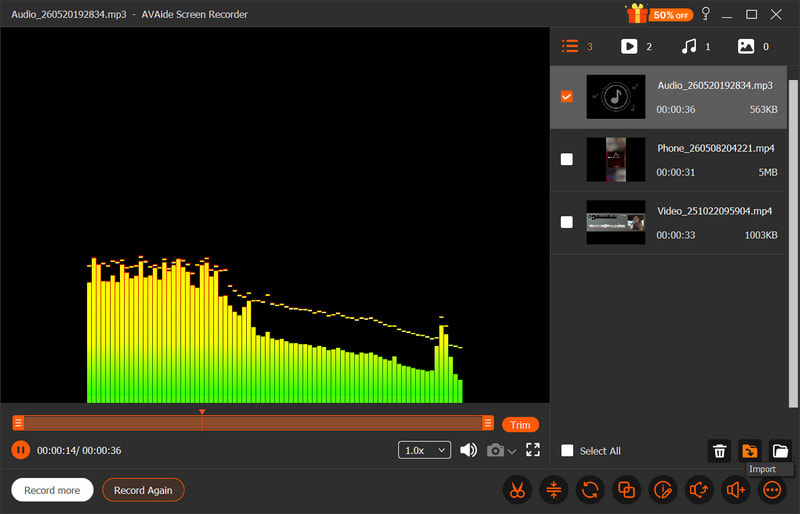
Bước 6Lưu và xem trước
Chọn Ngừng lại Tùy chọn này cho phép bạn kết thúc quá trình ghi âm. Sau đó, bạn có thể cắt bớt đoạn âm thanh và lưu bản ghi âm vào máy Mac của mình.
2. Sử dụng Audacity
Audacity là phần mềm ghi âm và chỉnh sửa âm thanh miễn phí, mạnh mẽ và dễ sử dụng dành cho máy Mac. Nó thường được ưa chuộng hơn các lựa chọn khác cho podcast và các dự án âm nhạc nhờ quy trình làm việc đơn giản và các tính năng chuyên nghiệp như giảm nhiễu, cắt ghép và nâng cao chất lượng âm thanh. Ngay cả với tất cả các tính năng này, Audacity vẫn có giao diện người dùng đơn giản, khiến nó trở thành lựa chọn tuyệt vời cho người mới bắt đầu.
Bước 1Tải xuống Audacity và cài đặt nó trên máy Mac của bạn. Mở ứng dụng sau khi quá trình cài đặt hoàn tất.
Bước 2Chọn nguồn âm thanh đầu vào. Thiết lập nguồn đầu vào thành thiết bị âm thanh của bạn và điều chỉnh mức thu âm.
Bước 3Khi sẵn sàng ghi âm, hãy nhấn nút Ghi Nhấn nút và bắt đầu nói vào micrô của bạn.
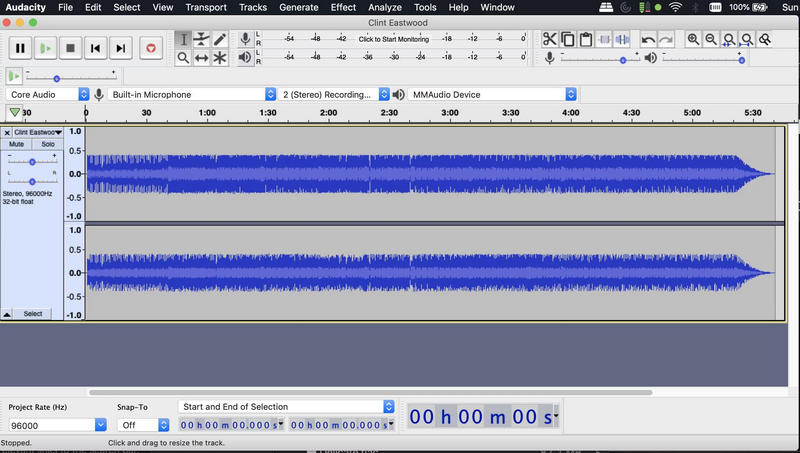
Bước 4Khi quá trình ghi âm hoàn tất, hãy nhấn nút Ngừng lại cái nút.
Bước 5Khi đã hài lòng với bản ghi âm, hãy chọn dự án bạn muốn xuất bằng cách vào phần sau: Tập tin > Xuất khẩu. Lựa chọn MP3, WAVhoặc một tùy chọn xuất âm thanh khác.
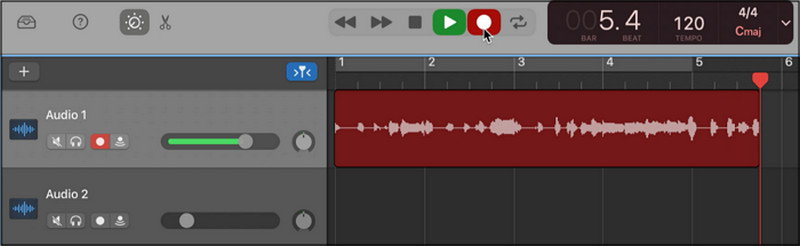
3. Sử dụng GarageBand
Một lựa chọn thay thế tuyệt vời cho Audacity là GarageBand, một ứng dụng độc quyền của Apple được cài đặt sẵn trên tất cả các máy Mac. GarageBand có tất cả các tính năng tương tự như Audacity và hơn thế nữa, chẳng hạn như các công cụ âm nhạc và hiệu ứng âm thanh. GarageBand thậm chí còn tốt hơn cho việc sản xuất âm nhạc và được sử dụng rộng rãi để... ghi âm podcast Thu âm, lồng tiếng và các dự án âm thanh chất lượng cao với hệ thống điều khiển âm thanh chuyên nghiệp.
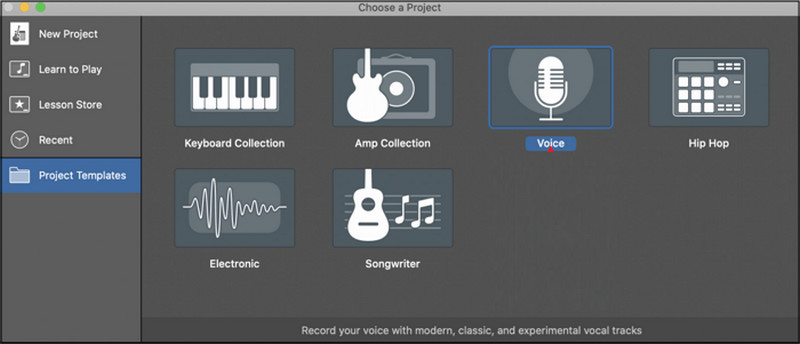
Bước 1Khởi động GarageBand và chọn Dự án mới, sau đó chọn tùy chọn Tiếng nói.
Bước 2Chọn thiết bị đầu vào bạn muốn sử dụng để ghi âm. Nếu muốn, hãy bật tính năng giám sát âm thanh để nghe giọng nói của mình trong khi ghi âm.
Bước 3Đánh Ghi và bắt đầu buổi học của bạn.
Bước 4Khi bạn hoàn tất quá trình ghi âm, hãy nhấn nút Ngừng lại nút. Sử dụng các tính năng chỉnh sửa và điều chỉnh âm thanh trong GarageBand để hoàn thiện bản thu âm của bạn.
Bước 5Xuất dự án âm thanh đã hoàn thành với chất lượng và định dạng mong muốn sang máy Mac của bạn.
Mẹo bổ sung
1. Cách ghi âm từ YouTube trên máy Mac
Để ghi lại âm thanh YouTube, các khóa học trực tuyến, hội thảo trực tuyến, cũng như phát lại podcast và nhạc trên máy Mac, bạn có thể sử dụng OBS Studio, một phần mềm ghi hình miễn phí dành cho quay video màn hình và phát trực tiếp. Vì OBS Studio cung cấp khả năng ghi âm chất lượng cao, nên đây là một lựa chọn tuyệt vời.
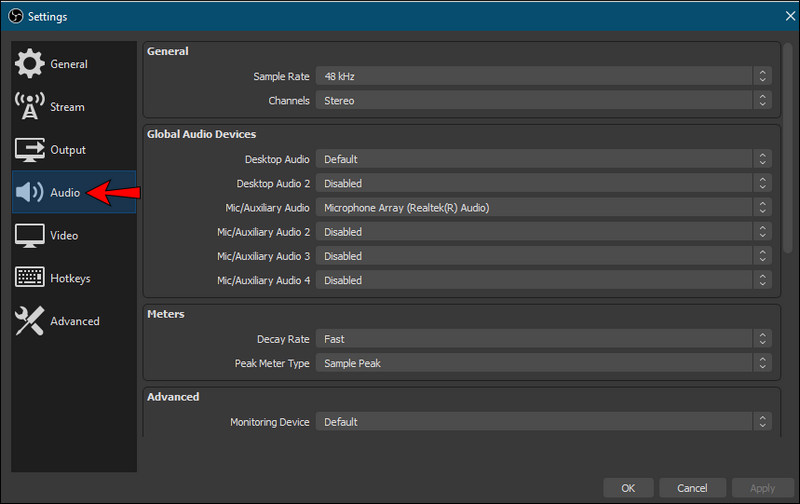
Bước 1Tải xuống và cài đặt OBS Studio trên máy Mac của bạn, sau đó mở phần mềm khi đã cài đặt xong.
Bước 2Tạo nguồn mới trong Âm thanh Tùy chọn này cho phép bạn chọn thiết bị âm thanh hệ thống hoặc trình điều khiển âm thanh ảo.
Bước 3Mở YouTube trên trình duyệt và tải video/âm thanh bạn muốn ghi âm.
Bước 4Đánh vào Bắt đầu ghi âm Nhấn nút đó, sau đó phát video/âm thanh YouTube như bình thường.
Bước 5Chờ cho đến khi đoạn âm thanh bạn muốn ghi âm hoàn tất, sau đó nhấn nút. Ngừng lại Nhấn vào nút và tìm tệp âm thanh, tệp này hiện đã được lưu trên máy Mac của bạn.
2. Cách ghi âm trên máy Mac bằng micro ngoài
Trong hầu hết các trường hợp, âm thanh từ micro ngoài có chất lượng cao hơn so với micro tích hợp trên máy Mac. Micro USB có kết nối trực tiếp với máy Mac. Tuy nhiên, micro XLR có thể cần giao diện âm thanh để có chất lượng âm thanh tốt hơn và giảm nhiễu. Sử dụng... phần mềm ghi màn hình tốt nhất cho Mac Điều này cũng có thể giúp thu được bản ghi âm rõ nét hơn khi kết hợp các tác vụ âm thanh và video.
Bước 1Kết nối micro bạn đã chọn với máy Mac, mở Cài đặt hệ thống, đi đến Âm thanhvà thiết lập micro bạn vừa kết nối làm thiết bị đầu vào.
Bước 2Điều chỉnh mức tín hiệu đầu vào của micro và kiểm tra âm thanh để đảm bảo giọng nói của bạn được thu rõ ràng.
Bước 3Mở phần mềm ghi màn hình mà bạn ưa thích, chẳng hạn như AVAide Screen Recorder.
Bước 4Chọn micro ngoài trong phần cài đặt phần mềm và bắt đầu ghi âm giọng nói hoặc phiên âm thanh của bạn.
Bước 5Dừng ghi âm, kiểm tra chất lượng âm thanh, rồi lưu hoặc xuất file âm thanh cuối cùng sang máy Mac của bạn.
Ghi âm giọng nói Mac Dễ dàng sử dụng các công cụ tích hợp sẵn như QuickTime và Ghi âm giọng nói hoặc phần mềm tiên tiến để ghi âm chất lượng chuyên nghiệp. Cho dù bạn cần ghi âm nội bộ, tường thuật podcast hay ghi âm bài giảng trực tuyến, những phương pháp này đều cung cấp các cách đáng tin cậy để thu âm rõ ràng một cách hiệu quả trên máy Mac của bạn.
GIỚI THIỆU VỀ TÁC GIẢ

Ghi lại các hoạt động trên màn hình bằng âm thanh, cuộc họp trực tuyến, video trò chơi, nhạc, webcam, v.v.