ผู้ใช้ Android ที่ต้องการเรียนรู้ วิธีบันทึกเสียงบนแอนดรอยด์ คุณมาถูกที่แล้ว เพราะบทความนี้จะครอบคลุมทุกวิธีง่ายๆ ที่คุณต้องการ
เราจะมาเรียนรู้วิธีการบันทึกเสียงจากภายนอก เช่น เสียงพูดและเสียงสภาพแวดล้อม รวมถึงวิธีการบันทึกเสียงภายในจากระบบโทรศัพท์ของคุณ นอกจากนี้เรายังจะให้คำแนะนำการแก้ไขปัญหาเบื้องต้นเพื่อช่วยคุณแก้ปัญหาการบันทึกที่พบบ่อยอีกด้วย
ส่วนที่ 1 การบันทึกเสียงภายนอก (เสียงพูดและเสียงสภาพแวดล้อม)
1. การใช้แอปบันทึกเสียงในตัว
วิธีนี้เป็นวิธีง่ายๆ ในการเรียนรู้การบันทึกเสียงบนโทรศัพท์ Android โดยใช้คุณสมบัติพื้นฐานที่มีอยู่แล้วในโทรศัพท์ Android ส่วนใหญ่ในการบันทึกเสียงพูดและเสียงต่างๆ
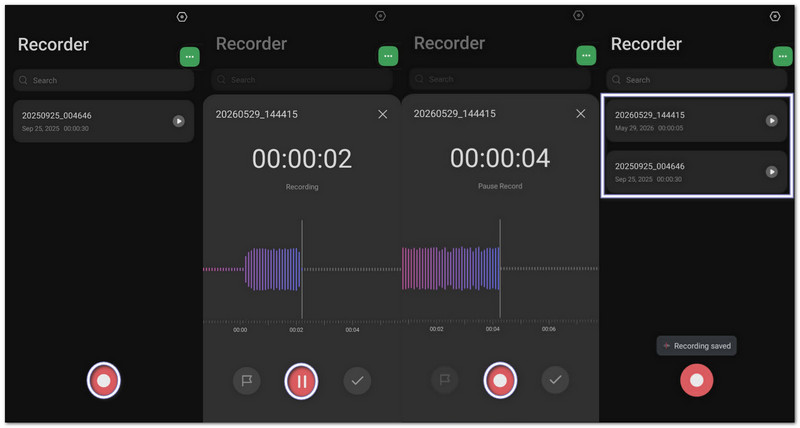
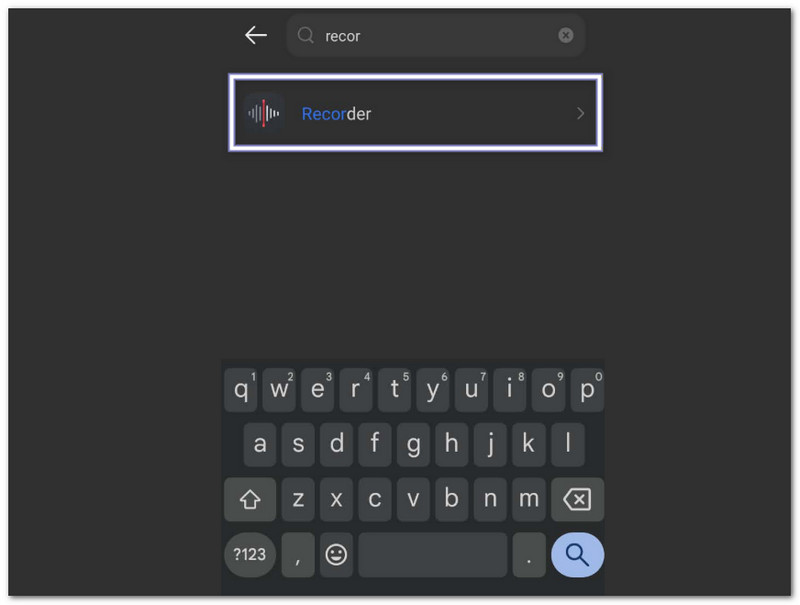
ขั้นตอนที่ 1เปิดลิ้นชักแอปของคุณแล้วมองหา... เครื่องบันทึกเสียง.
ขั้นตอนที่ 2แตะสีแดง บันทึก กดปุ่มเพื่อเริ่มบันทึกเสียงของคุณหรือเสียงรอบข้าง
ขั้นตอนที่ 3แตะ หยุด หากคุณต้องการพักสักครู่ แตะ ประวัติย่อ เพื่อจะดำเนินการต่อ.
ขั้นตอนที่ 4แตะ บันทึก เมื่อคุณบันทึกเสร็จแล้ว ไฟล์เสียงของคุณจะถูกจัดเก็บไว้ในแอป Files หรือ My Files โดยส่วนใหญ่จะบันทึกเป็นไฟล์ MP3 หรือ M4A
2. บันทึกเสียงภายนอกโดยไม่ต้องใช้แอปพลิเคชันใดๆ
วิธีการนี้ช่วยให้สามารถบันทึกเสียงบน Android ได้ทันทีโดยใช้คุณสมบัติในตัวของโทรศัพท์โดยไม่ต้องเปิดแอปบันทึกเสียงที่ติดตั้งไว้
ก. วิดเจ็ตบันทึกเสียงของ Google
ขั้นตอนที่ 1กดค้างไว้ที่พื้นที่ว่างบนหน้าจอหลักของคุณ
ขั้นตอนที่ 2แตะ วิดเจ็ต และหา เครื่องบันทึกเสียงของ Google วิดเจ็ต
ขั้นตอนที่ 3ลากไปที่หน้าจอหลักของคุณ
ขั้นตอนที่ 4แตะที่วิดเจ็ตเมื่อใดก็ได้เพื่อเริ่มบันทึกด้วยการแตะเพียงครั้งเดียว
ข. Google Assistant
ขั้นตอนที่ 1พูด "เฮ้ กูเกิลหรือถือไว้ พลัง ปุ่ม.
ขั้นตอนที่ 2พูด "บันทึกเสียงของฉัน" หรือ "เริ่มการบันทึกเสียง"
ขั้นตอนที่ 3Google Assistant จะเปิดโปรแกรมบันทึกเสียงและเริ่มบันทึกเสียง

C. ไอคอนการตั้งค่าด่วน
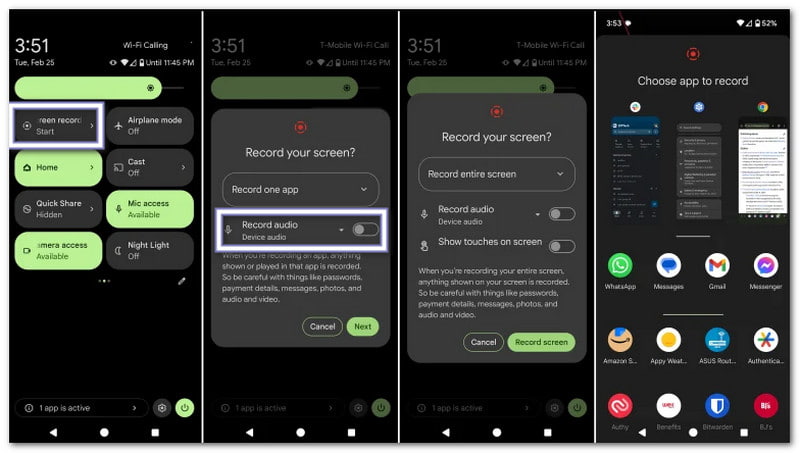
ขั้นตอนที่ 1ปัดลงจากด้านบนของหน้าจอ
ขั้นตอนที่ 2ค้นหา บันทึกเสียง หรือ บันทึกหน้าจอ ในเมนูการตั้งค่าด่วน
ขั้นตอนที่ 3แตะเพื่อเริ่มบันทึกทันที
ขั้นตอนที่ 4เมื่อบันทึกเสร็จแล้ว ให้หยุดบันทึกและบันทึกไฟล์
3. การบันทึกด้วยแอปพลิเคชันของบุคคลที่สาม (เพื่อคุณภาพและคุณสมบัติที่ดีกว่า)
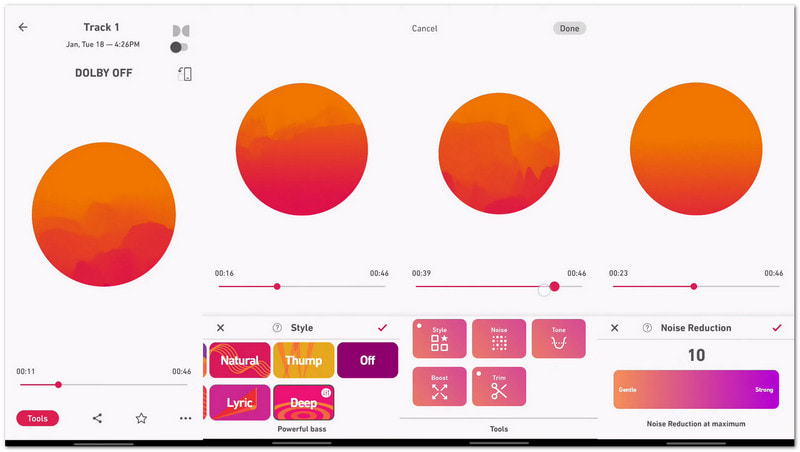
การบันทึกเสียงด้วยแอปพลิเคชันจากภายนอก เช่น Dolby On จะให้คุณภาพเสียงที่คมชัดกว่าและควบคุมได้มากขึ้นสำหรับความต้องการด้านเสียงทุกประเภท มันจะเปลี่ยนโทรศัพท์ของคุณให้เป็นสตูดิโอบันทึกเสียงแบบง่ายๆ สำหรับเสียงพูด เสียงเพลง และวิดีโอ
แอปนี้ช่วยปรับปรุงคุณภาพเสียงด้วยการลดเสียงรบกวน ปรับ EQ และเพิ่มเอฟเฟ็กต์แบบสตูดิโอ เพื่อให้ได้เสียงที่สะอาดและเป็นมืออาชีพมากขึ้น มีประโยชน์มากหากคุณต้องการเรียนรู้วิธีบันทึกเสียงบน Samsung และแบรนด์ Android อื่นๆ
ขั้นตอนที่ 1ติดตั้ง ดอลบี้ ออน จาก Google Play Store
ขั้นตอนที่ 2เปิดแอปแล้วกดปุ่ม บันทึก ปุ่ม.
ขั้นตอนที่ 3บันทึกเสียงพูด เสียงเพลง หรือเสียงพื้นหลังของคุณ แอปจะลดเสียงรบกวนและปรับปรุงคุณภาพเสียงโดยอัตโนมัติ
ขั้นตอนที่ 4บันทึกหรือแชร์ไฟล์บันทึกเสียงหลังจากแก้ไขด้วยเครื่องมือเสียงในตัว
ส่วนที่ 2 การบันทึกเสียงภายใน (จากระบบเสียงของโทรศัพท์ของคุณ)
1. การใช้โปรแกรมบันทึกหน้าจอในตัว
นี่คือฟีเจอร์อย่างเป็นทางการของ Android สำหรับการเรียนรู้ วิธีบันทึกเสียงภายในเครื่องบน Androidและยังบันทึกเสียงระบบพร้อมกับกิจกรรมบนหน้าจอได้อย่างเสถียรอีกด้วย
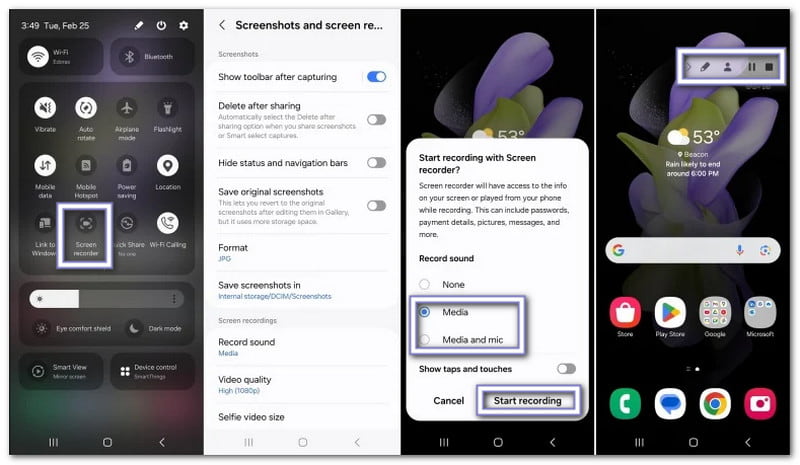
ขั้นตอนที่ 1ปัดลงจากด้านบนของหน้าจอสองครั้งเพื่อเปิด การตั้งค่าด่วน.
ขั้นตอนที่ 2หา บันทึกหน้าจอหากไม่มี ให้กดปุ่ม ดินสอ หรือ แก้ไข ปุ่มนั้นแล้วเพิ่มเข้าไปก่อน
ขั้นตอนที่ 3แตะ บันทึกหน้าจอ แล้วเลือก เสียงอุปกรณ์ หรือ สื่อ และ ไมโครโฟน เป็นแหล่งกำเนิดเสียง
ขั้นตอนที่ 4เริ่มบันทึกและเปิดแอป เกม หรือวิดีโอที่คุณต้องการบันทึก หยุดการบันทึกเมื่อเสร็จสิ้น
2. บันทึกเสียงภายในเครื่องอย่างเดียว (ไม่มีวิดีโอ) โดยใช้แอปพลิเคชันจากภายนอก
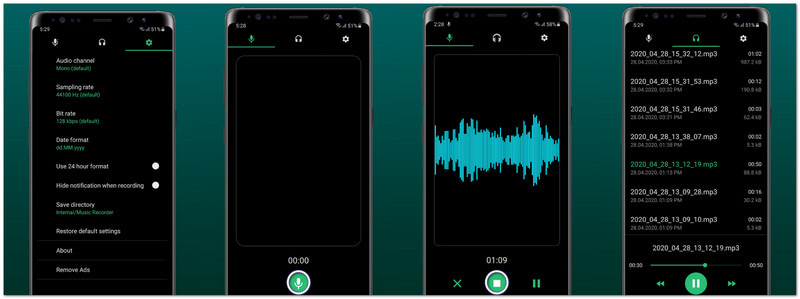
หากคุณกำลังมองหาวิธีบันทึกเฉพาะเสียงบน Android แอป Music Recorder - Song Recorder ที่พัฒนาโดย Jaya Zone Tech คือทางออกที่ง่ายดาย
นี้ แอปบันทึกเสียง บันทึกเสียงคุณภาพสูงจากแอป เกม และเครื่องเล่นเพลง คุณยังสามารถตั้งค่าบิตเรต อัตราการสุ่มตัวอย่าง และเลือกโมโนหรือสเตอริโอเพื่อคุณภาพเสียงที่ดีขึ้น รองรับการหยุดชั่วคราว เล่นต่อ แก้ไข แชร์ และแม้แต่โหมดบันทึกแบบซ่อนเพื่อการใช้งานที่ยืดหยุ่น
ขั้นตอนที่ 1ติดตั้ง เครื่องบันทึกเสียงดนตรี - เครื่องบันทึกเพลง จาก Google Play Store แล้วเปิดแอปขึ้นมา
ขั้นตอนที่ 2อนุญาตสิทธิ์ที่จำเป็นสำหรับ ไมโครโฟน และ การเข้าถึงพื้นที่จัดเก็บข้อมูล.
ขั้นตอนที่ 3เปิด การตั้งค่า และเปลี่ยนแปลง แหล่งบันทึก จาก ไมค์ ถึง เสียงภายในคุณยังสามารถเลือกได้อีกด้วย MP3 หรือ WAV รูปแบบ.
ขั้นตอนที่ 4แตะ บันทึก และเล่นไฟล์เสียง เกม หรือวิดีโอที่คุณต้องการบันทึก แอปจะบันทึกเฉพาะเสียงภายในเครื่องเท่านั้น
ส่วนที่ 3 ในกรณีที่คุณจำเป็นต้องใช้ไมโครโฟนภายนอกกับ Android
ไมโครโฟนในโทรศัพท์ของคุณใช้งานได้ดีสำหรับการบันทึกเสียงแบบง่ายๆ แต่ถ้าคุณต้องการเสียงที่ชัดเจนขึ้น ลดเสียงรบกวน หรือบันทึกเสียงพูดได้ดังขึ้น ไมโครโฟนภายนอกจะช่วยได้มาก
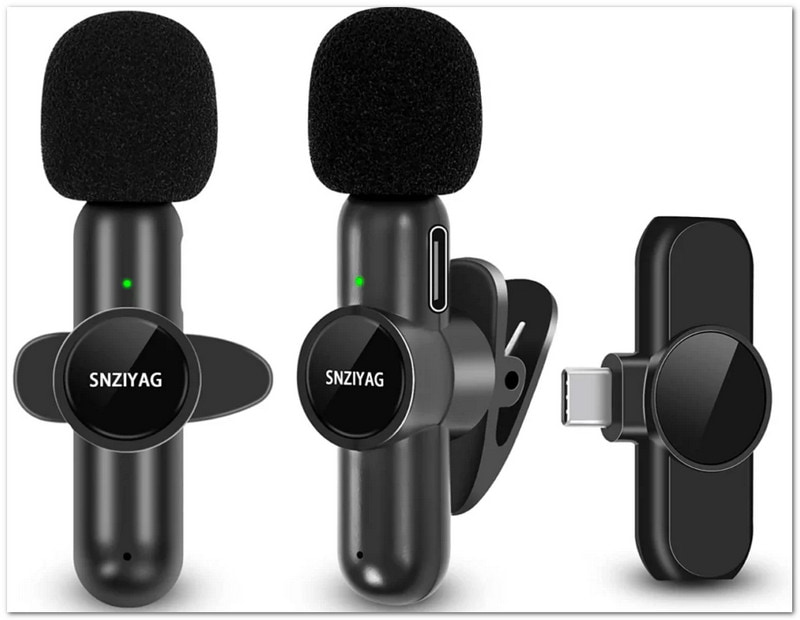
ตัวเลือก A: ไมโครโฟน USB-C
ไมโครโฟน USB-C ใช้งานง่ายและรวดเร็ว เพียงแค่เสียบเข้ากับพอร์ต USB-C ของโทรศัพท์แล้วเริ่มบันทึกได้เลย โทรศัพท์ Android ส่วนใหญ่จะตรวจจับได้โดยอัตโนมัติ โดยทั่วไปแล้ว ไมโครโฟน USB-C ให้เสียงที่คมชัดและสะอาดกว่าไมโครโฟนในตัวของโทรศัพท์ เหมาะสำหรับผู้สร้างคอนเทนต์ นักเรียน และการบันทึกวิดีโอด้วยมือถือ
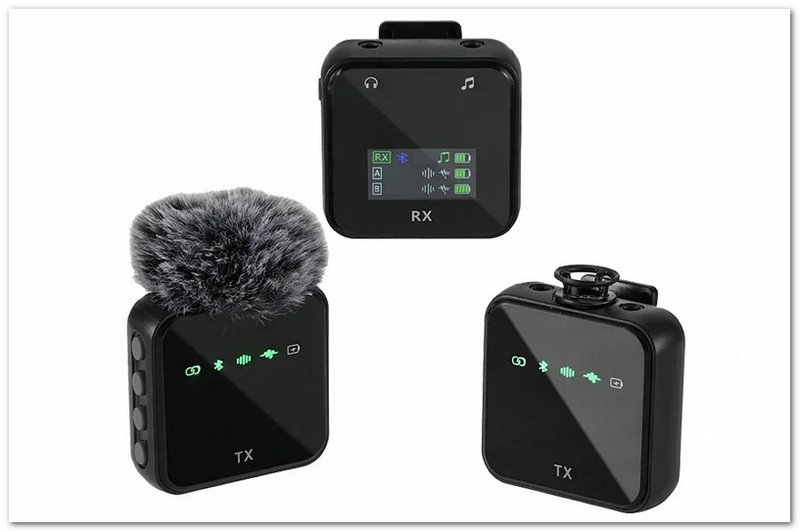
ตัวเลือก B: ไมโครโฟนบลูทูธไร้สาย
ไมโครโฟนบลูทูธช่วยให้คุณบันทึกเสียงได้โดยไม่ต้องใช้สาย คุณเชื่อมต่อผ่านการตั้งค่าบลูทูธของโทรศัพท์และเริ่มบันทึกได้ตามปกติ มีประโยชน์หากคุณต้องเคลื่อนที่ไปมาขณะถ่ายทำหรือพูดคุย หลายคนใช้ไมโครโฟนบลูทูธสำหรับการทำวล็อก การนำเสนอ วิดีโอภายนอกอาคาร และการสัมภาษณ์ เพราะพกพาสะดวกและง่ายต่อการพกพา
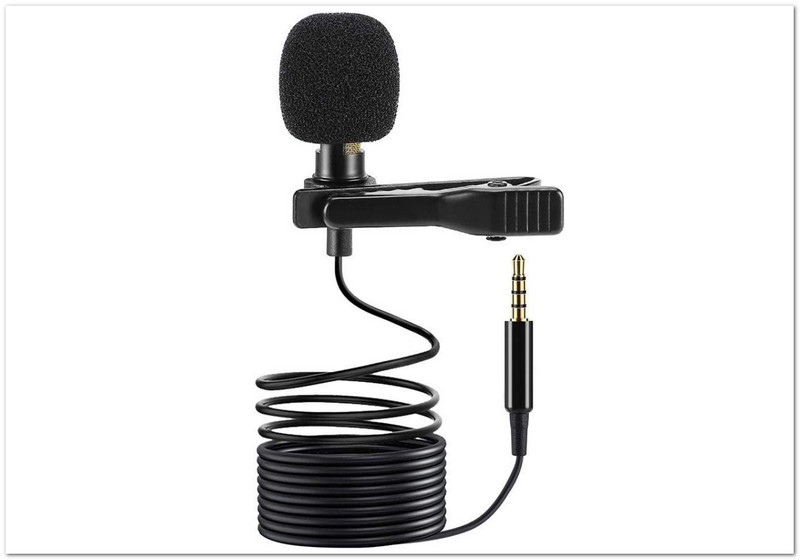
ตัวเลือก C: ไมโครโฟน 3.5 มม.
ไมโครโฟนขนาด 3.5 มม. เชื่อมต่อผ่านช่องเสียบหูฟังของโทรศัพท์ Android หากอุปกรณ์ของคุณไม่มีช่องเสียบหูฟัง คุณสามารถใช้อะแดปเตอร์ USB-C เป็น 3.5 มม. ได้ ไมโครโฟนเหล่านี้มีราคาไม่แพงและใช้งานง่าย เหมาะสำหรับการบันทึกเสียง โครงงานโรงเรียน การโทร และการบันทึกเสียงแบบง่ายๆ นอกจากนี้ยังเป็นตัวเลือกที่ดีสำหรับผู้เริ่มต้นที่ต้องการคุณภาพเสียงที่ดีขึ้นโดยไม่ต้องเสียเงินมากเกินไป
ส่วนที่ 4 การแก้ไขปัญหาทั่วไป
คุณเรียนรู้วิธีการบันทึกเสียงบน Android เสร็จแล้ว แต่ถ้าหากคุณเจอปัญหาที่ไม่คาดคิดล่ะ คุณรู้ไหมว่าจะต้องทำอย่างไร?
อาจรู้สึกว่ายาก โดยเฉพาะอย่างยิ่งถ้าคุณเป็นมือใหม่ แต่ไม่ต้องกังวล เราจะไม่ปล่อยให้คุณติดอยู่กลางทาง เราจะให้วิธีแก้ปัญหาที่ง่ายๆ ที่คุณสามารถนำไปใช้ได้ หากคุณเจอปัญหาแบบที่ระบุไว้ด้านล่าง
1. ตัวเลือกเสียงภายในถูกปิดใช้งาน (สีเทา)
ระบบ Android จะบล็อกเสียงภายในในบางแอป นอกจากนี้ยังอาจถูกจำกัดด้วยกฎหมายลิขสิทธิ์ ให้ใช้ฟังก์ชันเสียงภายในเครื่องแทน บันทึกหน้าจอ จาก การตั้งค่าด่วนวิธีนี้เหมาะสำหรับเสียงระบบมากกว่า ถ้าเป็นไปได้ ให้ตั้งค่าเสียงเป็น เสียงอุปกรณ์ หรือ สื่อ และ ไมค์.
2. ไม่พบไมโครโฟนภายนอก
ปัญหานี้เกิดขึ้นเมื่อโทรศัพท์ตรวจไม่พบไมโครโฟน เปิดใช้งานใหม่ ออตโต้ ใน การตั้งค่า สำหรับ ไมโครโฟน USB-C. ตรวจสอบ สายเคเบิล และ อะแดปเตอร์ เพื่อการสนับสนุนและ ชิป DACเสียบไมโครโฟนก่อนเปิดแอป ลองดู เปิดกล้อง หากมีความจำเป็น.
3. เครื่องบันทึกเสียงไม่แสดงขึ้นมา
แอปอาจถูกซ่อนหรือปิดใช้งานอยู่ เปิด ลิ้นชักแอป และค้นหา เครื่องบันทึก. ไปที่ การตั้งค่า > แอพ และเปิดใช้งานหากปิดใช้งานอยู่
4. การบันทึกพื้นหลังหยุดลง
ระบบ Android อาจปิดแอปเพื่อประหยัดแบตเตอรี่ ตั้งค่า การเพิ่มประสิทธิภาพแบตเตอรี่ ถึง ไม่จำกัดล็อกแอปไว้ แอปที่ใช้งานล่าสุด เพื่อให้ร้านยังคงเปิดอยู่
5. การบันทึกไม่สำเร็จ
มักเป็นปัญหาเรื่องพื้นที่จัดเก็บข้อมูลหรือสิทธิ์การเข้าถึง อนุญาต พื้นที่จัดเก็บ หรือ สิทธิ์การเข้าถึงไฟล์ตรวจสอบว่าพื้นที่จัดเก็บข้อมูลเต็มหรือไม่ ล้างข้อมูล แคช แล้วลองใหม่อีกครั้ง
โบนัส: โปรแกรมบันทึกหน้าจอที่ดีที่สุดสำหรับ Android ที่ให้คุณภาพเสียงที่ดีกว่า
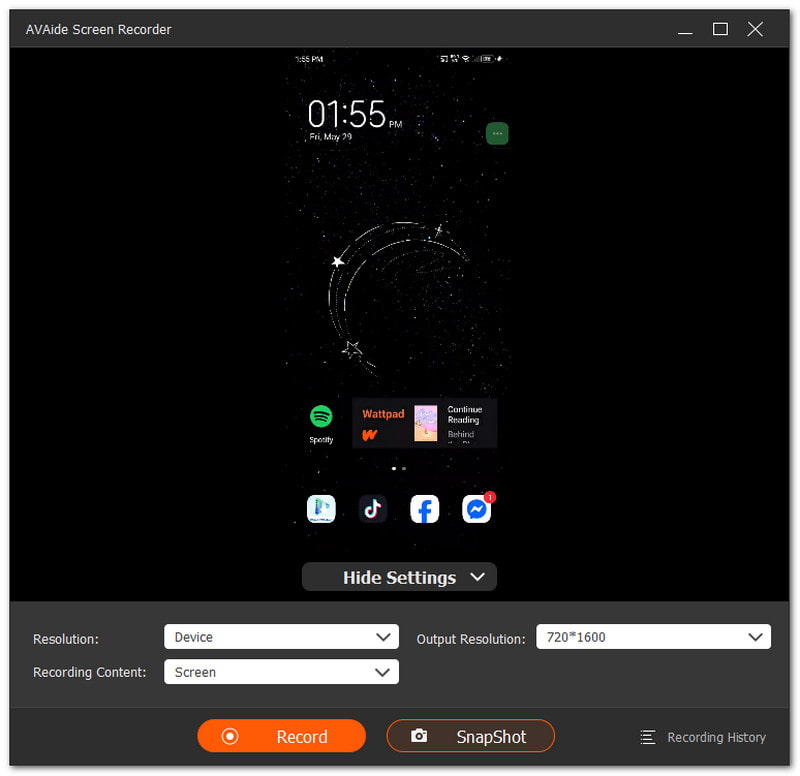
โปรแกรมบันทึกหน้าจอ AVAide แอปนี้มีฟีเจอร์บันทึกเสียงโทรศัพท์ที่ใช้งานได้กับอุปกรณ์ Android รองรับความละเอียดสูงสุด 4K เพื่อวิดีโอที่คมชัด นอกจากนี้ยังสามารถบันทึกเสียงจากไมโครโฟนของโทรศัพท์ เสียงจากลำโพงคอมพิวเตอร์ หรือทั้งสองอย่างพร้อมกันได้ และยังสามารถถ่ายภาพนิ่งขณะบันทึกได้ทันที เหมาะอย่างยิ่งสำหรับเกมบนมือถือ วิดีโอแนะนำการใช้งานแอป และการสนทนาทางวิดีโอ
- บันทึกเสียงบน iPhoneรวมถึง Android, Windows และ Mac ด้วย
- บันทึกภาพหน้าจอโทรศัพท์ด้วยความละเอียดสูง
- อนุญาตให้ทำการแก้ไขต่างๆ เช่น ตัดแต่ง รวม แปลง และเพิ่มระดับเสียง
- รองรับไฟล์รูปแบบต่างๆ เช่น MP4, WMV, AVI, GIF และ MP3

 ดาวน์โหลดอย่างปลอดภัย
ตอนนี้คุณรู้แล้ว วิธีบันทึกเสียงบนแอนดรอยด์ และสิ่งที่ควรทำเมื่อพบปัญหา หากเกิดปัญหาขึ้น ให้ตรวจสอบการตั้งค่า สิทธิ์การเข้าถึง และเครื่องมือบันทึกของคุณ
เพื่อให้ได้ผลลัพธ์ที่ดีขึ้น คุณสามารถใช้เครื่องมือที่มีประสิทธิภาพอย่างเช่น ได้เช่นกัน โปรแกรมบันทึกหน้าจอ AVAideโปรแกรมนี้ให้การบันทึกที่ราบรื่นและคุณภาพเสียงคมชัดสูงสำหรับผู้ใช้ Android รวมถึงผู้ใช้ Windows และ Mac ด้วย
เกี่ยวกับผู้เขียน

จับภาพกิจกรรมบนหน้าจอด้วยเสียง การประชุมออนไลน์ วิดีโอการเล่นเกม เพลง เว็บแคม ฯลฯ